
Multi-Source Documentation MCP Server
- voiceflow-doc-mcp
- data
- voiceflow_docs
example-extension-form-input.md•6.05 kB
---
category: general
scraped_at: '2025-11-12T14:08:55.076985'
title: 'Example extension: form input'
url: /docs/example-extension-form-input
---
# Example extension: form input
> 📘
>
> ### Learn about extensions first!
>
> If you haven't already, we recommend reading the [custom forms and extensions](/docs/custom-web-chat-widgets) page before following this guide. That page will give you a bunch of extra context about what is going on here!
The first extension that many users build is a form extension. We'll walk you through a full example that creates a form with name, email, and phone fields.
[](https://yz5du1veb1.ufs.sh/f/9fKud4NeF5NSY3bOkwRLqS74rbVsgFnoXQRxeBvDfjhUtWTm)
## Step 1: Create the extension
Here's the code for our extension. Add this script above the web chat widget script and before the </body> tag on your website.
JavaScript
```
<script>
const FormExtension = {
name: 'Forms',
type: 'response',
match: ({ trace }) =>
trace.type === 'Custom_Form' || trace.payload?.name === 'Custom_Form',
render: ({ trace, element }) => {
const formContainer = document.createElement('form');
formContainer.innerHTML = `
<style>
label {
font-size: 0.8em;
color: #888;
}
input[type="text"], input[type="email"], input[type="tel"] {
width: 100%;
border: none;
border-bottom: 0.5px solid rgba(0, 0, 0, 0.1);
background: transparent;
margin: 5px 0;
outline: none;
padding: 8px 0; /* Added some padding for better UX */
}
.phone {
width: 150px;
}
.invalid {
border-color: red;
}
.submit {
background: linear-gradient(to right, #2e6ee1, #2e7ff1);
border: none;
color: white;
padding: 10px;
border-radius: 5px;
width: 100%;
cursor: pointer;
}
</style>
<label for="name">Name</label>
<input type="text" class="name" name="name" required><br><br>
<label for="email">Email</label>
<input type="email" class="email" name="email" required pattern="[a-z0-9._%+-]+@[a-z0-9.-]+\\.[a-z]{2,}$" title="Invalid email address"><br><br>
<label for="phone">Phone Number</label>
<input type="tel" class="phone" name="phone" required pattern="\\d+" title="Invalid phone number, please enter only numbers"><br><br>
<input type="submit" class="submit" value="Submit">
`;
formContainer.addEventListener('input', function () {
// Remove 'invalid' class when input becomes valid
const name = formContainer.querySelector('.name');
const email = formContainer.querySelector('.email');
const phone = formContainer.querySelector('.phone');
if (name.checkValidity()) name.classList.remove('invalid');
if (email.checkValidity()) email.classList.remove('invalid');
if (phone.checkValidity()) phone.classList.remove('invalid');
});
formContainer.addEventListener('submit', function (event) {
event.preventDefault();
const name = formContainer.querySelector('.name');
const email = formContainer.querySelector('.email');
const phone = formContainer.querySelector('.phone');
if (
!name.checkValidity() ||
!email.checkValidity() ||
!phone.checkValidity()
) {
name.classList.add('invalid');
email.classList.add('invalid');
phone.classList.add('invalid');
return;
}
formContainer.querySelector('.submit').remove();
window.voiceflow.chat.interact({
type: 'complete',
payload: { name: name.value, email: email.value, phone: phone.value },
});
});
element.appendChild(formContainer);
},
};
</script>
```
## Step 2: Register the extension
Update your `chat.load()` code to register the extension:
```
window.voiceflow.chat.load({
verify: { projectID: '<ID>' },
url: 'https://general-runtime.voiceflow.com',
versionID: 'production',
assistant: {
extensions: [FormExtension]
}
});
```
## Step 3: Trigger the extension
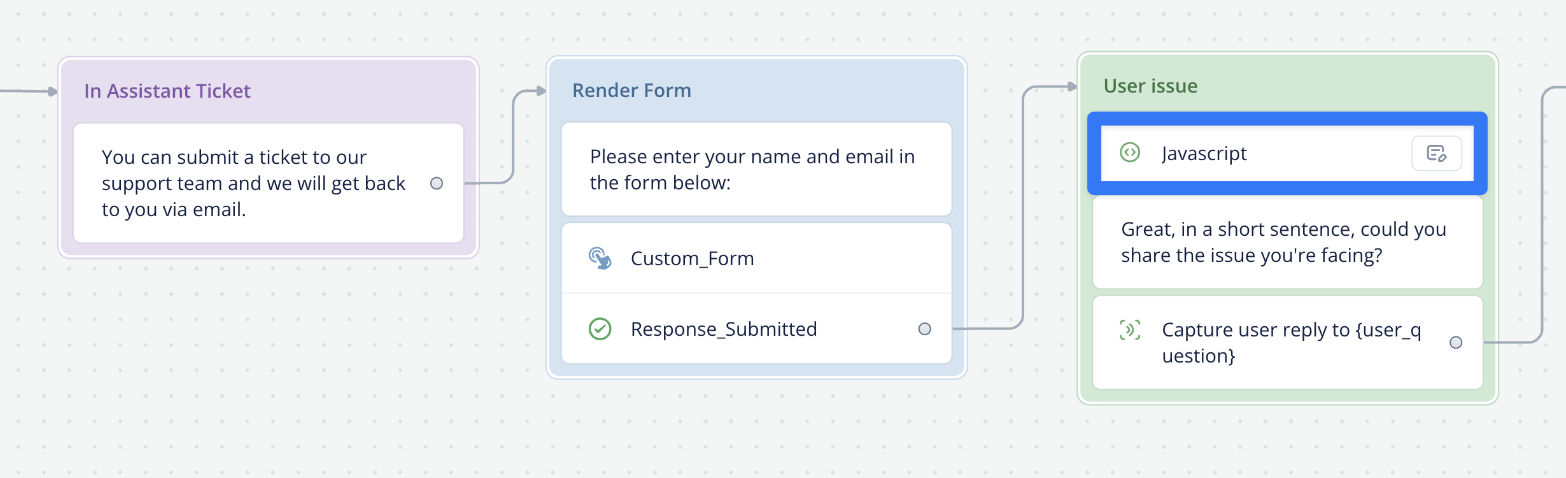
Add a [Custom action step](/docs/custom-actions) in your Voiceflow workflow with the name `Custom_Form`. Then, add a path called `Response_Submitted` and enable the "stop on action" setting so the agent waits for input before continuing.
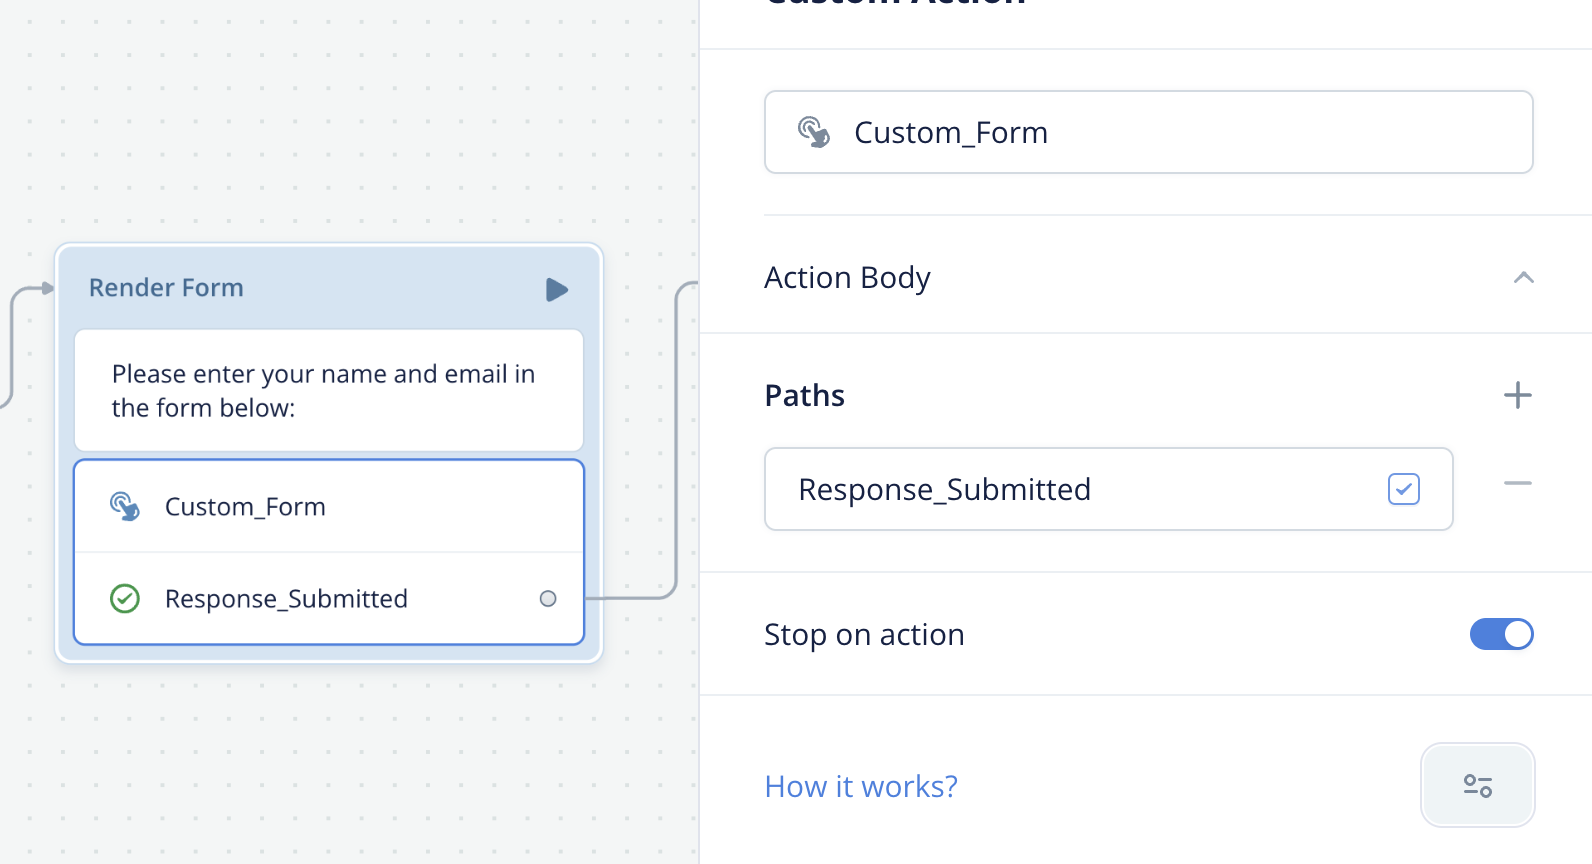
When triggered, your agent's web chat widget receives a trace like the one shown below. This is what triggers the extension to appear.
JavaScript
```
{
"type": "Custom_Form",
"payload": "{}",
"defaultPath": 0,
"paths": [
{ "event": { "type": "Response_Submitted" } }
]
}
```
## Step 4: Retrieve user input
Once the form is submitted, the values are stored in the last\_event system variable. Access them in a [JavaScript step](/docs/javascript-step).
JavaScript
```
name = last_event.payload.name
```
## Congratulations!
You just built your first extension! Check out our extensions repo for examples of more extensions you can build.
[Repo
## Sample extensions repo
Disable/enable the input field, embed videos and maps, accept input via a form, and trigger a confetti animation with these sample extensions.
View repo →](https://github.com/voiceflow-gallagan/vf-extensions-demo/)
Updated 6 months ago
---
[Custom forms and extensions](/docs/custom-web-chat-widgets)[Allowing dangerous HTML elements](/docs/web-chat-developer-information)
Ask AI
* [Table of Contents](#)
* + [Step 1: Create the extension](#step-1-create-the-extension)
+ [Step 2: Register the extension](#step-2-register-the-extension)
+ [Step 3: Trigger the extension](#step-3-trigger-the-extension)
+ [Step 4: Retrieve user input](#step-4-retrieve-user-input)
+ [Congratulations!](#congratulations)
Latest Blog Posts
- MCP Moves to the Linux Foundation: Neutral Stewardship for Agentic InfrastructureBy Om-Shree-0709 on .mcpanthropicLinux Foundation
MCP directory API
We provide all the information about MCP servers via our MCP API.
curl -X GET 'https://glama.ai/api/mcp/v1/servers/florinel-chis/voiceflow-doc-mcp'
If you have feedback or need assistance with the MCP directory API, please join our Discord server