MCP Unity Editor (Game Engine)




                              ,/(/.   *(/,
                          */(((((/.   *((((((*.
                     .*((((((((((/.   *((((((((((/.
                 ./((((((((((((((/    *((((((((((((((/,

             ,/(((((((((((((/*.           */(((((((((((((/*.
            ,%%#((/((((((*                    ,/(((((/(#&@@(
            ,%%##%%##((((((/*.             ,/((((/(#&@@@@@@(
            ,%%######%%##((/(((/*.    .*/(((//(%@@@@@@@@@@@(
            ,%%####%#(%%#%%##((/((((((((//#&@@@@@@&@@@@@@@@(
            ,%%####%(    /#%#%%%##(//(#@@@@@@@%,   #@@@@@@@(
            ,%%####%(        *#%###%@@@@@@(        #@@@@@@@(
            ,%%####%(           #%#%@@@@,          #@@@@@@@(
            ,%%##%%%(           #%#%@@@@,          #@@@@@@@(
            ,%%%#*              #%#%@@@@,             *%@@@(
            .,      ,/##*.      #%#%@@@@,     ./&@#*      *`
                ,/#%#####%%#/,  #%#%@@@@, ,/&@@@@@@@@@&\.
                 `*#########%%%%###%@@@@@@@@@@@@@@@@@@&*´
                    `*%%###########%@@@@@@@@@@@@@@&*´
                        `*%%%######%@@@@@@@@@@&*´
                            `*#%%##%@@@@@&*´
                               `*%#%@&*´

     ███╗   ███╗ ██████╗██████╗         ██╗   ██╗███╗   ██╗██╗████████╗██╗   ██╗
     ████╗ ████║██╔════╝██╔══██╗        ██║   ██║████╗  ██║██║╚══██╔══╝╚██╗ ██╔╝
     ██╔████╔██║██║     ██████╔╝        ██║   ██║██╔██╗ ██║██║   ██║    ╚████╔╝
     ██║╚██╔╝██║██║     ██╔═══╝         ██║   ██║██║╚██╗██║██║   ██║     ╚██╔╝
     ██║ ╚═╝ ██║╚██████╗██║             ╚██████╔╝██║ ╚████║██║   ██║      ██║
     ╚═╝     ╚═╝ ╚═════╝╚═╝              ╚═════╝ ╚═╝  ╚═══╝╚═╝   ╚═╝      ╚═╝
MCP Unity is an implementation of the Model Context Protocol for Unity Editor, allowing AI assistants to interact with your Unity projects. This package provides a bridge between Unity and a Node.js server that implements the MCP protocol, enabling AI agents like Cursor, Windsurf, Claude Code, Codex CLI, GitHub Copilot, Google Antigravity, and OpenCode to execute operations within the Unity Editor.
Features
IDE Integration - Package Cache Access
MCP Unity provides automatic integration with VSCode-like IDEs (Visual Studio Code, Cursor, Windsurf, Google Antigravity) by adding the Unity Library/PackedCache folder to your workspace. This feature:
Improves code intelligence for Unity packages
Enables better autocompletion and type information for Unity packages
Helps AI coding assistants understand your project's dependencies
MCP Server Tools
The following tools are available for manipulating and querying Unity scenes and GameObjects via MCP:
execute_menu_item: Executes Unity menu items (functions tagged with the MenuItem attribute)
Example prompt: "Execute the menu item 'GameObject/Create Empty' to create a new empty GameObject"
select_gameobject: Selects game objects in the Unity hierarchy by path or instance ID
Example prompt: "Select the Main Camera object in my scene"
update_gameobject: Updates a GameObject's core properties (name, tag, layer, active/static state), or creates the GameObject if it does not exist
Example prompt: "Set the Player object's tag to 'Enemy' and make it inactive"
update_component: Updates component fields on a GameObject or adds it to the GameObject if it does not contain the component
Example prompt: "Add a Rigidbody component to the Player object and set its mass to 5"
add_package: Installs new packages in the Unity Package Manager
Example prompt: "Add the TextMeshPro package to my project"
run_tests: Runs tests using the Unity Test Runner
Example prompt: "Run all the EditMode tests in my project"
send_console_log: Send a console log to Unity
Example prompt: "Send a console log to Unity Editor"
add_asset_to_scene: Adds an asset from the AssetDatabase to the Unity scene
Example prompt: "Add the Player prefab from my project to the current scene"
create_prefab: Creates a prefab with optional MonoBehaviour script and serialized field values
Example prompt: "Create a prefab named 'Player' from the 'PlayerController' script"
create_scene: Creates a new scene and saves it to the specified path
Example prompt: "Create a new scene called 'Level1' in the Scenes folder"
load_scene: Loads a scene by path or name, with optional additive loading
Example prompt: "Load the MainMenu scene"
delete_scene: Deletes a scene by path or name and removes it from Build Settings
Example prompt: "Delete the old TestScene from my project"
get_gameobject: Gets detailed information about a specific GameObject including all components
Example prompt: "Get the details of the Player GameObject"
get_console_logs: Retrieves logs from the Unity console with pagination support
Example prompt: "Show me the last 20 error logs from the Unity console"
recompile_scripts: Recompiles all scripts in the Unity project
Example prompt: "Recompile scripts in my Unity project"
save_scene: Saves the current active scene, with optional Save As to a new path
Example prompt: "Save the current scene" or "Save the scene as 'Assets/Scenes/Level2.unity'"
get_scene_info: Gets information about the active scene including name, path, dirty state, and all loaded scenes
Example prompt: "What scenes are currently loaded in my project?"
unload_scene: Unloads a scene from the hierarchy (does not delete the scene asset)
Example prompt: "Unload the UI scene from the hierarchy"
duplicate_gameobject: Duplicates a GameObject in the scene with optional renaming and reparenting
Example prompt: "Duplicate the Enemy prefab 5 times and rename them Enemy_1 through Enemy_5"
delete_gameobject: Deletes a GameObject from the scene
Example prompt: "Delete the old Player object from the scene"
reparent_gameobject: Changes the parent of a GameObject in the hierarchy
Example prompt: "Move the HealthBar object to be a child of the UI Canvas"
move_gameobject: Moves a GameObject to a new position (local or world space)
Example prompt: "Move the Player object to position (10, 0, 5) in world space"
rotate_gameobject: Rotates a GameObject to a new rotation (local or world space, Euler angles or quaternion)
Example prompt: "Rotate the Camera 45 degrees on the Y axis"
scale_gameobject: Scales a GameObject to a new local scale
Example prompt: "Scale the Enemy object to twice its size"
set_transform: Sets position, rotation, and scale of a GameObject in a single operation
Example prompt: "Set the Cube's position to (0, 5, 0), rotation to (0, 90, 0), and scale to (2, 2, 2)"
create_material: Creates a new material with specified shader and saves it to the project
Example prompt: "Create a red material called 'EnemyMaterial' using the URP Lit shader"
assign_material: Assigns a material to a GameObject's Renderer component
Example prompt: "Assign the 'EnemyMaterial' to the Enemy GameObject"
modify_material: Modifies properties of an existing material (colors, floats, textures)
Example prompt: "Change the color of 'EnemyMaterial' to blue and set metallic to 0.8"
get_material_info: Gets detailed information about a material including shader and all properties
Example prompt: "Show me all the properties of the 'PlayerMaterial'"
batch_execute: Executes multiple tool operations in a single batch request, reducing round-trips and enabling atomic operations with optional rollback on failure
Example prompt: "Create 10 empty GameObjects named Enemy_1 through Enemy_10 in a single batch operation"
MCP App tools
show_unity_dashboard: Opens the Unity dashboard MCP App in VS Code (requires VS Code 1.109+)
Example prompt: "Open the Unity dashboard app"
get_play_mode_status: Gets Unity play mode status (isPlaying, isPaused)
Example prompt: "Is Unity in play mode?"
set_play_mode_status: Controls Unity play mode with actions: 'play' (start or unpause), 'pause' (toggle pause), 'stop' (exit play mode), 'step' (advance one frame)
Example prompt: "Start Unity play mode" or "Pause the game" or "Step forward one frame"
MCP Server Resources
unity://menu-items: Retrieves a list of all available menu items in the Unity Editor to facilitate execute_menu_item tool
Example prompt: "Show me all available menu items related to GameObject creation"
unity://scenes-hierarchy: Retrieves a list of all game objects in the current Unity scene hierarchy
Example prompt: "Show me the current scenes hierarchy structure"
unity://gameobject/{id}: Retrieves detailed information about a specific GameObject by instance ID or object path in the scene hierarchy, including all GameObject components with it's serialized properties and fields
Example prompt: "Get me detailed information about the Player GameObject"
unity://logs: Retrieves a list of all logs from the Unity console
Example prompt: "Show me the recent error messages from the Unity console"
unity://packages: Retrieves information about installed and available packages from the Unity Package Manager
Example prompt: "List all the packages currently installed in my Unity project"
unity://assets: Retrieves information about assets in the Unity Asset Database
Example prompt: "Find all texture assets in my project"
unity://tests/{testMode}: Retrieves information about tests in the Unity Test Runner
Example prompt: "List all available tests in my Unity project"
ui://unity-dashboard: Unity dashboard MCP App UI
Example prompt: "Open the Unity dashboard app"
MCP Server Prompts
Prompts are pre-configured templates that provide guided workflows for common Unity tasks. They help AI assistants understand the proper sequence of operations and available tools for specific scenarios.
unity_dashboard: Opens the Unity dashboard MCP app with contextual information about its features
Usage: In your AI assistant, use the prompt "unity_dashboard" to get guided access to the Unity dashboard
gameobject_handling_strategy: Provides a structured workflow for working with GameObjects, including which tools and resources to use
Usage: In your AI assistant, use the prompt "gameobject_handling_strategy" with a GameObject ID, name, or path to get step-by-step guidance
Related MCP server: MCP For Unity
Requirements
NOTE
Project Paths with Spaces
MCP Unity supports project paths containing spaces. However, if you experience connection issues, try moving your project to a path without spaces as a troubleshooting step.
Examples:
Installation
Installing this MCP Unity Server is a multi-step process:
Step 1: Install Node.js
To run MCP Unity server, you'll need to have Node.js 18 or later installed on your computer:
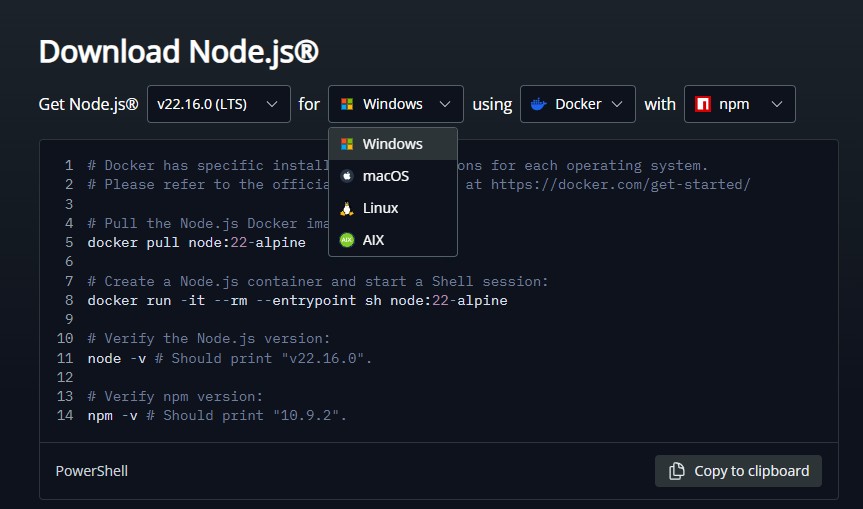
Visit the Node.js download page
Download the Windows Installer (.msi) for the LTS version (recommended)
Run the installer and follow the installation wizard
Verify the installation by opening PowerShell and running:
Visit the Node.js download page
Download the macOS Installer (.pkg) for the LTS version (recommended)
Run the installer and follow the installation wizard
Alternatively, if you have Homebrew installed, you can run:
Verify the installation by opening Terminal and running:
Step 2: Install Unity MCP Server package via Unity Package Manager
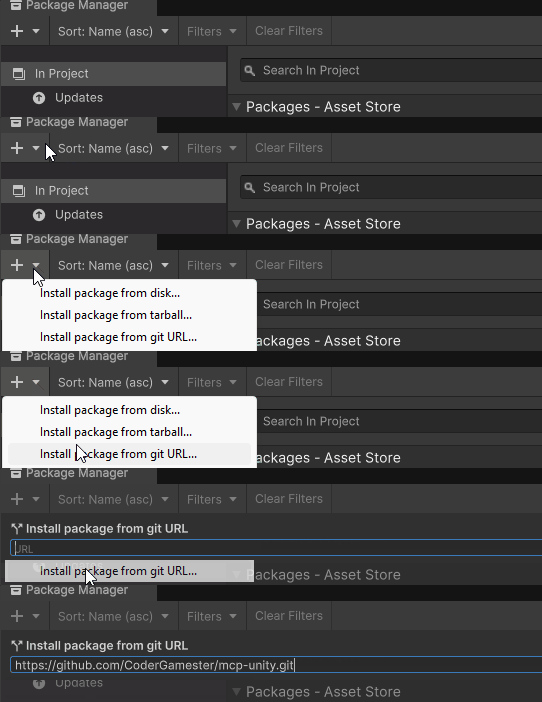
Open the Unity Package Manager (Window > Package Manager)
Click the "+" button in the top-left corner
Select "Add package from git URL..."
Enter: https://github.com/CoderGamester/mcp-unity.git
Click "Add"
Step 3: Configure AI LLM Client
Open the Unity Editor
Navigate to Tools > MCP Unity > Server Window
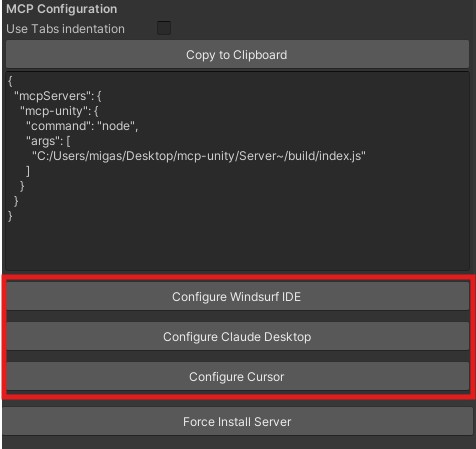
Click on the "Configure" button for your AI LLM client as shown in the image below
Global vs. Project configuration:
Configure [Client] — writes to your global user config file (e.g. ~/.claude.json). Uses an absolute path. Applies to all projects on your machine. Best for personal, single-developer setups.
Configure [Client] (Project) — writes to a .mcp.json file (or equivalent) in the Unity project root. Uses a relative path, so it works across machines. Intended to be committed to git and shared with the team. Best for collaborative projects or when you want the config to travel with the project.
If in doubt, prefer the (Project) variant — the relative path is more portable and won't break if you move your project folder.
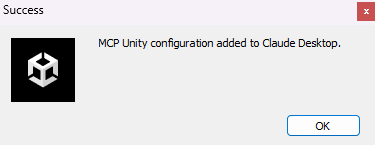
Confirm the configuration installation with the given popup
Open the MCP configuration file of your AI client and add the MCP Unity server configuration:
Replace ABSOLUTE/PATH/TO with the absolute path to your MCP Unity installation or just copy the text from the Unity Editor MCP Server window (Tools > MCP Unity > Server Window).
For configs that live inside the Unity project tree and get committed to git (e.g. <project>/.vscode/mcp.json, <project>/opencode.json, <project>/.cursor/mcp.json, <project>/.mcp.json, <project>/.codex/config.toml), prefer a project-relative path so the same file works across machines. Toggle "Use relative path" in the Server Window to switch the copy-paste snippet between absolute and project-relative forms. The Configure GitHub Copilot, Configure OpenCode, Configure Cursor (Project), Configure Claude Code (Project), and Configure Codex CLI (Project) buttons already emit relative paths automatically.
Project-local buttons (Cursor / Claude Code / Codex CLI) write the MCP server entry into the Unity project directory instead of your global user config, so other (non-Unity) projects don't see MCP connection-failure warnings. For Codex CLI (Project) specifically, you must approve the project trust prompt the first time you run codex from the project root, otherwise Codex ignores <project>/.codex/config.toml.
For JSON-based clients (Cursor, Windsurf, Claude Code, GitHub Copilot, etc.):
{
   "mcpServers": {
       "mcp-unity": {
          "command": "node",
          "args": [
             "ABSOLUTE/PATH/TO/mcp-unity/Server~/build/index.js"
          ]
       }
   }
}
For workspace-scoped VS Code / GitHub Copilot (.vscode/mcp.json), use ${workspaceFolder} so the path is portable across machines:
{
   "mcpServers": {
       "mcp-unity": {
          "command": "node",
          "args": [
             "${workspaceFolder}/Library/PackageCache/com.gamelovers.mcp-unity@<hash>/Server~/build/index.js"
          ]
       }
   }
}
For Codex CLI (~/.codex/config.toml):
[mcp_servers.mcp-unity]
command = "node"
args = ["ABSOLUTE/PATH/TO/mcp-unity/Server~/build/index.js"]
For Cursor — project-local (.cursor/mcp.json in the Unity project root, project-relative path):
{
   "mcpServers": {
       "mcp-unity": {
          "command": "node",
          "args": [
             "Library/PackageCache/com.gamelovers.mcp-unity@<hash>/Server~/build/index.js"
          ]
       }
   }
}
For Claude Code — project-local (.mcp.json in the Unity project root, project-relative path — Claude Code's team-shared MCP config):
{
   "mcpServers": {
       "mcp-unity": {
          "command": "node",
          "args": [
             "Library/PackageCache/com.gamelovers.mcp-unity@<hash>/Server~/build/index.js"
          ]
       }
   }
}
For Codex CLI — project-local (.codex/config.toml in the Unity project root, project-relative path):
[mcp_servers.mcp-unity]
command = "node"
args = ["Library/PackageCache/com.gamelovers.mcp-unity@<hash>/Server~/build/index.js"]
Codex layers this file over the global ~/.codex/config.toml, but only when the project is marked trusted. The first time you cd into the project and run codex, approve the trust prompt — otherwise Codex ignores .codex/config.toml.
For OpenCode (opencode.json in the Unity project root):
{
  "$schema": "https://opencode.ai/config.json",
  "mcp": {
    "mcp-unity": {
      "type": "local",
      "enabled": true,
      "command": ["node", "Library/PackageCache/com.gamelovers.mcp-unity@<hash>/Server~/build/index.js"],
      "environment": {}
    }
  }
}
Note: the @<hash> segment in the UPM package cache path changes when the package is updated. If you update MCP Unity, re-run the Configure button (or update the path manually) so the snippet points at the new cache directory.
Start Unity Editor MCP Server
Open the Unity Editor
Navigate to Tools > MCP Unity > Server Window
Click "Start Server" to start the WebSocket server
Open your AI Coding IDE (e.g. Cursor, Windsurf, Claude Code, Codex CLI, GitHub Copilot, Google Antigravity, OpenCode, etc.) and start executing Unity tools
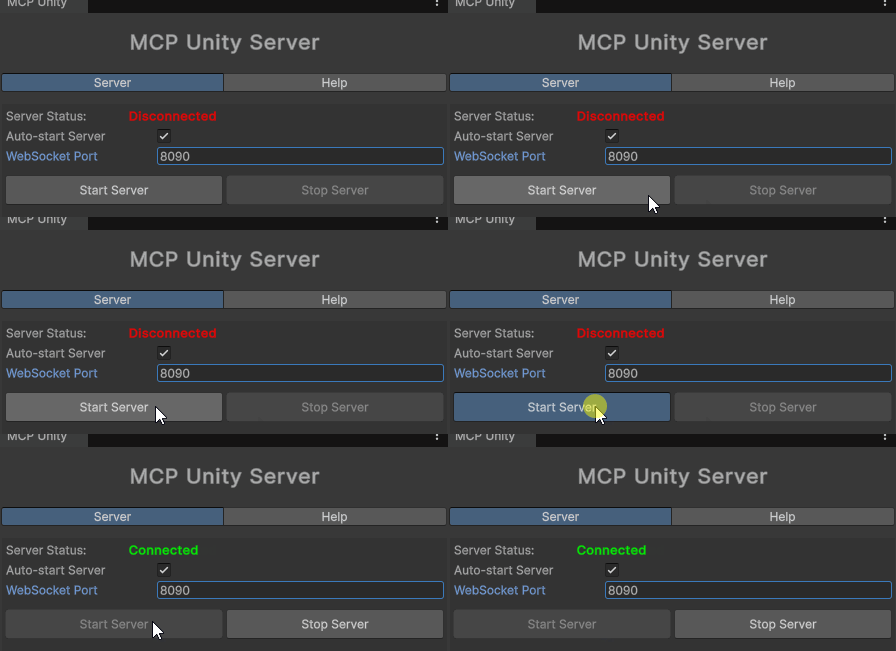
When the AI client connects to the WebSocket server, it will automatically show in the green box in the window
Optional: Set WebSocket Port
By default, the WebSocket server runs on port '8090'. To change it:
Open the Unity Editor
Navigate to Tools > MCP Unity > Server Window
Change the "Connection Port" value to your desired port number
Unity persists the value in ProjectSettings/McpUnitySettings.json
Restart the Node.js server
The Node bridge discovers that project settings file from its installed package path, so it does not depend on the MCP client's working directory. To override it for one Node process, set UNITY_PORT, for example: UNITY_PORT=9001 node build/index.js.
Optional: Set Timeout
By default, the timeout between the MCP server and the WebSocket is 10 seconds.
To change it:
Open the Unity Editor
Navigate to Tools > MCP Unity > Server Window
Change the "Request Timeout (seconds)" value to your desired timeout seconds
Unity persists the value in ProjectSettings/McpUnitySettings.json
Restart the Node.js server
To override it for one Node process, set UNITY_REQUEST_TIMEOUT (in seconds), for example: UNITY_REQUEST_TIMEOUT=30 node build/index.js.
TIP
The timeout between your AI Coding IDE (e.g., Claude Desktop, Cursor IDE, Windsurf IDE) and the MCP Server depends on the IDE.
Optional: Run a Persistent Headless MCP Host
MCP Unity remains disabled in -batchmode by default so CI and cloud builds do not start a bridge or run npm. To run a long-lived headless Editor as an MCP host, opt in before launching Unity by either enabling Allow Batch Mode Server in the Server Window or setting MCP_UNITY_ALLOW_BATCH_MODE=true:
MCP_UNITY_ALLOW_BATCH_MODE=true Unity -batchmode -nographics -projectPath /path/to/project -logFile /path/to/unity.log
The Unity-side WebSocket server starts normally when opted in, but it never runs npm install or npm run build in batch mode. Ensure the Node bridge is already built and available to the MCP client.
Bridge Configuration Resolution
The Node bridge resolves each connection value in this order: its environment variable (UNITY_PORT, UNITY_HOST, or UNITY_REQUEST_TIMEOUT), MCP_UNITY_SETTINGS_PATH, the ProjectSettings/McpUnitySettings.json file found above the installed package, then a file found above its working directory, and finally the defaults. Generated MCP configurations set MCP_UNITY_SETTINGS_PATH and MCP_UNITY_AUTH_TOKEN_PATH explicitly. The bridge logs the value source and warns before falling back to defaults.
Bridge Security and Package Installation
MCP Unity creates a per-project 256-bit authentication token at Library/McpUnity/bridge-token. Token resolution is strict: MCP_UNITY_AUTH_TOKEN takes precedence, followed by MCP_UNITY_AUTH_TOKEN_PATH, followed by the token beside the discovered Unity project. Explicit missing or malformed values fail without fallback. Generated configurations use the token-file path and never copy the secret into ProjectSettings.
The Unity endpoint requires HTTP Basic credentials with username mcp-unity, and rejects every WebSocket handshake that supplies an Origin header. Direct WebSocket integrations must authenticate and omit Origin. Use the Server Window to copy or regenerate the token; after rotation, restart all MCP client processes.
The add_package tool is disabled by default because Unity packages can execute Editor code when they compile. Enable Allow Package Installation in Tools > MCP Unity > Server Window, or set AllowPackageInstallation to true in ProjectSettings/McpUnitySettings.json, only when package sources and MCP clients are trusted.
Version 1.5.0 intentionally rejects 1.4.x Node bridges. Upgrade both the Unity and Node package components, run the Unity Configure action again if the package-cache path changed, and restart MCP clients.
Optional: Allow Remote MCP Bridge Connections
By default, the WebSocket server binds to 'localhost'. To allow MCP bridge connections from other machines:
Open the Unity Editor
Navigate to Tools > MCP Unity > Server Window
Enable the "Allow Remote Connections" checkbox
Unity will bind the WebSocket server to '0.0.0.0' (all interfaces)
Restart the Node.js server to apply the new host configuration
Set the environment variable UNITY_HOST to your Unity machine's IP address when running the MCP bridge remotely: UNITY_HOST=192.168.1.100 node server.js
Remote transport remains unencrypted ws://. Authentication prevents unauthorized access but does not hide traffic; restrict remote use to a trusted network, VPN, or SSH tunnel. A remote bridge that cannot read the Unity project token file must receive MCP_UNITY_AUTH_TOKEN through a secure secret mechanism.
Debugging the Server
The MCP Unity server is built using Node.js . It requires to compile the TypeScript code to JavaScript in the build directory.
In case of issues, you can force install it in by:
Open the Unity Editor
Navigate to Tools > MCP Unity > Server Window
Click on "Force Install Server" button
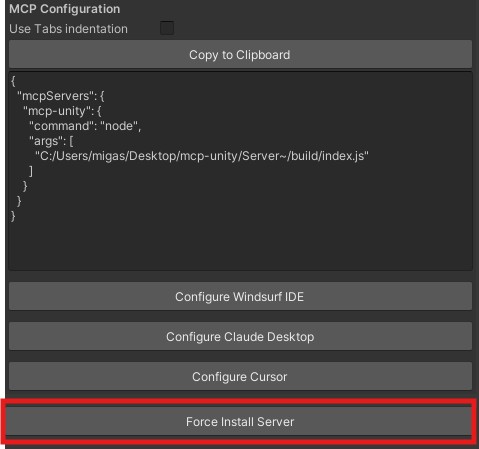
If you want to build it manually, you can follow these steps:
Open a terminal/PowerShell/Command Prompt
Navigate to the Server directory:
cd ABSOLUTE/PATH/TO/mcp-unity/Server~
Install dependencies:
Build the server:
Run the server:
Debug the server with @modelcontextprotocol/inspector:
npx @modelcontextprotocol/inspector node Server~/build/index.js
npx @modelcontextprotocol/inspector node Server~/build/index.js
Don't forget to shutdown the server with Ctrl + C before closing the terminal or debugging it with the MCP Inspector.
Enable logging on your terminal or into a log.txt file:
$env:LOGGING = "true"
$env:LOGGING_FILE = "true"
set LOGGING=true
set LOGGING_FILE=true
Frequently Asked Questions
MCP Unity is a powerful bridge that connects your Unity Editor environment to AI assistants LLM tools using the Model Context Protocol (MCP).
In essence, MCP Unity:
Exposes Unity Editor functionalities (like creating objects, modifying components, running tests, etc.) as "tools" and "resources" that an AI can understand and use.
Runs a WebSocket server inside Unity and a Node.js server (acting as a WebSocket client to Unity) that implements the MCP. This allows AI assistants to send commands to Unity and receive information back.
Enables you to use natural language prompts with your AI assistant to perform complex tasks within your Unity project, significantly speeding up development workflows.
MCP Unity offers several compelling advantages for developers, artists, and project managers:
Accelerated Development: Automate repetitive tasks, generate boilerplate code, and manage assets using AI prompts. This frees up your time to focus on creative and complex problem-solving.
Enhanced Productivity: Interact with Unity Editor features without needing to manually click through menus or write scripts for simple operations. Your AI assistant becomes a direct extension of your capabilities within Unity.
Improved Accessibility: Allows users who are less familiar with the deep intricacies of the Unity Editor or C# scripting to still make meaningful contributions and modifications to a project through AI guidance.
Seamless Integration: Designed to work with various AI assistants and IDEs that support MCP, providing a consistent way to leverage AI across your development toolkit.
Extensibility: The protocol and the toolset can be expanded. You can define new tools and resources to expose more of your project-specific or Unity's functionality to AI.
Collaborative Potential: Facilitates a new way of collaborating where AI can assist in tasks traditionally done by team members, or help in onboarding new developers by guiding them through project structures and operations.
Unity 6.2 is set to introduce new built-in AI tools, including the previous Unity Muse (for generative AI capabilities like texture and animation generation) and Unity Sentis (for running neural networks in Unity runtime). As Unity 6.2 is not yet fully released, this comparison is based on publicly available information and anticipated functionalities:
Focus:
MCP Unity: Primarily focuses on Editor automation and interaction. It allows external AI (like LLM-based coding assistants) to control and query the Unity Editor itself to manipulate scenes, assets, and project settings. It's about augmenting the developer's workflow within the Editor.
Unity 6.2 AI:
Aims at in-Editor content creation (generating textures, sprites, animations, behaviors, scripts) and AI-powered assistance for common tasks, directly integrated into the Unity Editor interface.
A fine-tuned model to ask any question about Unity's documentation and API structure, with customized examples more accurate to Unity's environment.
Adds the functionality to run AI model inference, allowing developers to deploy and run pre-trained neural networks within your game or application for features like NPC behavior, image recognition, etc.
Use Cases:
MCP Unity: "Create a new 3D object, name it 'Player', add a Rigidbody, and set its mass to 10." "Run all Play Mode tests." "Ask to fix the error on the console log." "Execute the custom menu item 'Prepare build for iOS' and fix any errors that may occur."
Unity 6.2 AI: "Generate a sci-fi texture for this material." "Update all trees position in the scene to be placed inside of terrain zones tagged with 'forest'." "Create a walking animation for this character." "Generate 2D sprites to complete the character." "Ask details about the error on the console log."
Complementary, Not Mutually Exclusive:
MCP Unity and Unity's native AI tools can be seen as complementary. You might use MCP Unity with your AI coding assistant to set up a scene or batch-modify assets, and then use Unity AI tools to generate a specific texture, or to create animations, or 2D sprites for one of those assets. MCP Unity provides a flexible, protocol-based way to interact with the Editor, which can be powerful for developers who want to integrate with a broader range of external AI services or build custom automation workflows.
MCP Unity is designed to work with any AI assistant or development environment that can act as an MCP client. The ecosystem is growing, but current known integrations or compatible platforms include:
Cursor
Windsurf
Claude Desktop
Claude Code
Codex CLI
GitHub Copilot
Google Antigravity
OpenCode
Yes, absolutely! One of the significant benefits of the MCP Unity architecture is its extensibility.
In Unity (C#): You can create new C# classes that inherit from McpToolBase (or a similar base for resources) to expose custom Unity Editor functionality. These tools would then be registered in McpUnityServer.cs. For example, you could write a tool to automate a specific asset import pipeline unique to your project.
In Node.js Server (TypeScript): You would then define the corresponding TypeScript tool handler in the Server/src/tools/ directory, including its Zod schema for inputs/outputs, and register it in Server/src/index.ts. This Node.js part will forward the request to your new C# tool in Unity.
This allows you to tailor the AI's capabilities to the specific needs and workflows of your game or application.
Yes, MCP Unity is an open-source project distributed under the MIT License. You are free to use, modify, and distribute it according to the license terms.
Ensure the WebSocket server is running (check the Server Window in Unity)
Send a console log message from MCP client to force a reconnection between MCP client and Unity server
Change the port number in the Unity Editor MCP Server window. (Tools > MCP Unity > Server Window)
Check the Unity Console for error messages
Ensure Node.js is properly installed and accessible in your PATH
Verify that all dependencies are installed in the Server directory
The run_tests tool returns the following response:
Error:
Connection failed: Unknown error
This error occurs because the bridge connection is lost when the domain reloads upon switching to Play Mode. The workaround is to turn off Reload Domain in Edit > Project Settings > Editor > "Enter Play Mode Settings".
Some MCP clients may fail while parsing tool schemas when they contain local JSON pointer references such as #/properties/position.
MCP Unity avoids this by registering transform tool inputs (set_transform, move_gameobject, rotate_gameobject, scale_gameobject) with fresh nested vector schemas per field, so the generated schema does not rely on local #/properties/... references.
If you still see this error:
update your MCP client to the latest version,
rebuild the Node server (cd Server~ && npm run build),
confirm your package version includes this compatibility fix.
Troubleshooting: WSL2 (Windows 11) networking
When running the MCP (Node.js) server inside WSL2 while Unity runs on Windows 11, connecting to ws://localhost:8090/McpUnity may fail with ECONNREFUSED.
Cause: WSL2 and Windows have separate network namespaces — localhost inside WSL2 does not point to the Windows host. By default, Unity listens on localhost:8090.
Solution 1 — Enable WSL2 Mirrored mode networking (preferred)
[wsl2]
networkingMode=mirrored
After enabling, localhost is shared between Windows and WSL2, so the default config (localhost:8090) works.
Solution 2 — Point the Node client to the Windows host
Set in your WSL shell before starting the MCP client:
# Use the Windows host IP detected from resolv.conf
export UNITY_HOST=$(grep -m1 nameserver /etc/resolv.conf | awk '{print $2}')
With this, Server~/src/unity/mcpUnity.ts will connect to ws://$UNITY_HOST:8090/McpUnity instead of localhost (it reads UNITY_HOST, and may also honor a Host in ProjectSettings/McpUnitySettings.json if present).
Solution 3 — Allow remote connections from Unity
Unity: Tools → MCP Unity → Server Window → enable “Allow Remote Connections” (Unity binds to 0.0.0.0).
Ensure Windows Firewall allows inbound TCP on your configured port (default 8090).
From WSL2, connect to the Windows host IP (see Solution 2) or to localhost if mirrored mode is enabled.
NOTE
Default port is8090. You can change it in the Unity Server Window (Tools → MCP Unity → Server Window). The value maps to McpUnitySettings and is persisted in ProjectSettings/McpUnitySettings.json.
Validate connectivity
npm i -g wscat
# After enabling mirrored networking
wscat -c ws://localhost:8090/McpUnity
# Or using the Windows host IP
wscat -c ws://$UNITY_HOST:8090/McpUnity
Running Tests
C# Tests (Unity)
Run tests using Unity's Test Runner:
Open Unity Editor
Navigate to Window > General > Test Runner
Select "EditMode" tab
Click "Run All" to execute all tests
TypeScript Tests (Server)
Run tests using Jest:
To run tests in watch mode:
Support & Feedback
If you have any questions or need support, please open an issue on this repository or alternative you can reach out on:
Contributing
Contributions are welcome! Please feel free to submit a Pull Request or open an Issue with your request.
Commit your changes following the Conventional Commits format.
License
This project is under MIT License
Acknowledgements

