Task Manager MCP Server

by jhawkins11
Verified

local-only server

The server can only run on the client’s local machine because it depends on local resources.

Integrations

  • Runs an Express server to serve static frontend files and provide API endpoints for the UI, enabling task management and feature planning functionality.

  • Integrates with Git to analyze code changes using 'git diff HEAD', enabling code review functionality and automated task creation based on detected changes.

  • Uses WebSockets to handle real-time communication for the clarification workflow, allowing the UI to interact with the server when additional information is needed.

任务管理器 MCP 服务器

这是一个 MCP 服务器,旨在与 Cursor 等 AI 代码编辑器集成。其主要目标是最大限度地发挥 Cursor 的代理功能和 Gemini 2.5 出色的架构能力,同时克服 Cursor 极其有限的上下文窗口。它的灵感主要来自 Roo Code 的 Boomerang 模式,但我发现它非常昂贵,因为唯一兼容其应用机器人的模型是 Claude 3.7 Sonnet。使用这款服务器,您可以同时享受两种功能:无限上下文窗口和无限使用,只需支付 Cursor 每月 20 美元的订阅费。

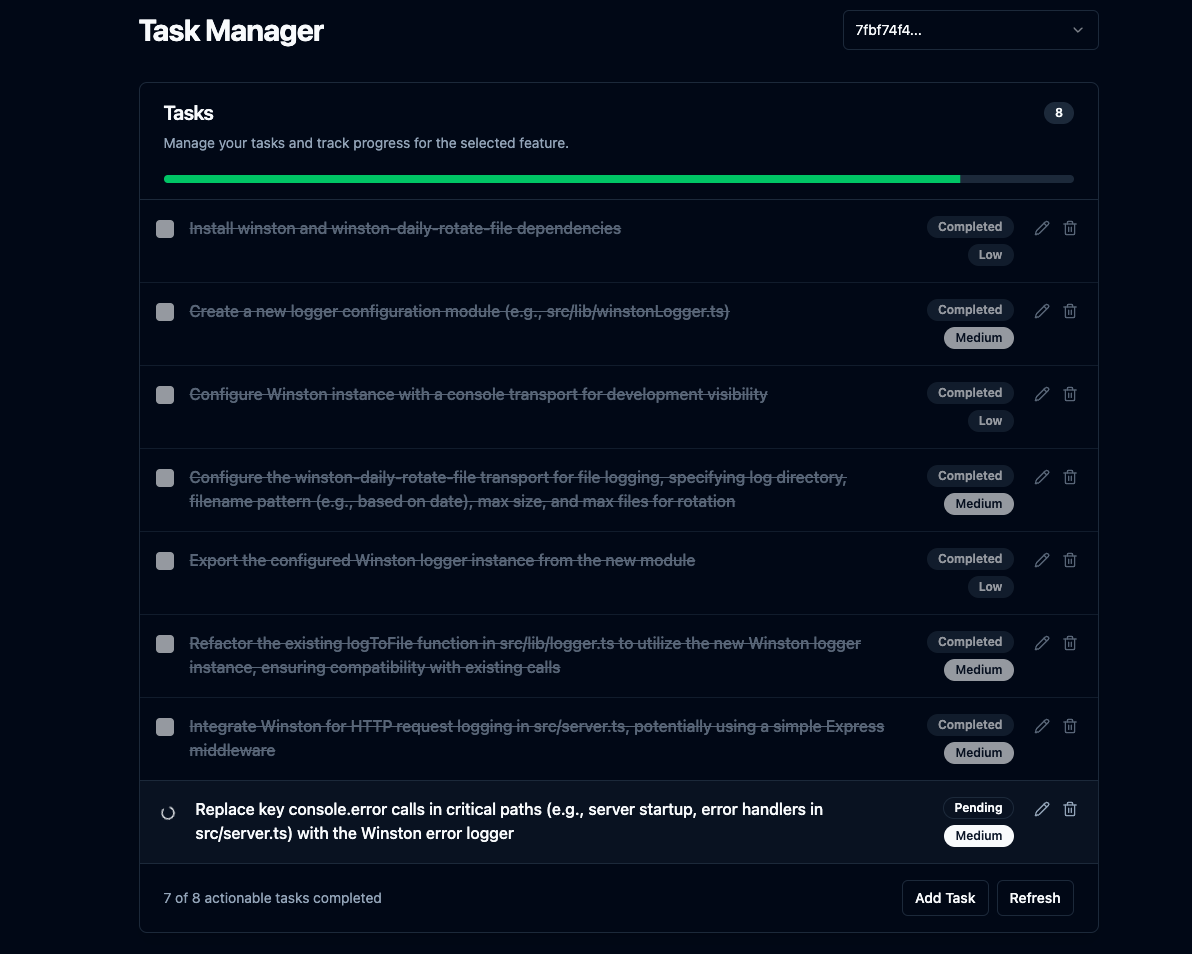
此外,它还包含一个 Svelte UI,允许您查看任务列表和进度、手动调整计划以及查看更改。

Svelte UI

核心功能

  • **复杂特征规划:**为其提供特征描述,它会通过repomix使用具有项目上下文的 LLM 为 AI 代理生成逐步的编码计划,并对高强度任务进行递归任务分解。
  • **集成 UI 服务器:**运行 Express 服务器来提供静态前端文件,并为 UI 提供基本的 API 端点。规划完成后或需要澄清时,会在默认浏览器中打开 UI,并显示任务列表和进度。
  • **无限上下文窗口:**在需要时使用 Gemini 2.5 的 100 万个令牌上下文窗口和repomix的截断。
  • **对话历史:**在每个功能的.mcp/features/中的单独 JSON 文件中跟踪每个功能的对话历史,当用户要求调整计划时,Gemini 2.5 可以获得上下文。
  • **澄清工作流程:**处理 LLM 需要更多信息的情况,暂停计划并通过 WebSockets 与连接的 UI 交互。
  • **任务 CRUD:**允许通过 UI 创建、读取、更新和删除任务。
  • **代码审查:**使用 LLM 分析git diff HEAD输出,并在需要时创建新任务。
  • **自动审查(可选):**如果已配置( AUTO_REVIEW_ON_COMPLETION=true ),则在功能的最后一个原始任务完成后自动运行代码审查流程。
  • **计划调整:**允许通过adjust_plan工具在创建计划后对其进行调整。

设置

先决条件:

  • Node.js
  • npm
  • Git

安装与构建:

  1. 克隆:
    git clone https://github.com/jhawkins11/task-manager-mcp.git cd task-manager-mcp
  2. 安装后端依赖:
    npm install
  3. **配置:**您稍后将直接在 Cursor 的 MCP 设置中配置 API 密钥(请参阅使用部分),但您可能仍需要一个本地.env文件进行手动测试(请参阅配置部分)。
  4. **构建:**此命令构建后端和前端服务器,并将 Svelte UI 复制到dist/frontend-ui/目录。
    npm run build

运行服务器(手动):

对于不使用Cursor 的本地测试,您可以直接使用 Node 或 npm 脚本运行服务器。此方法使用.env文件进行配置。

直接使用 Node(使用绝对路径):

node /full/path/to/your/task-manager-mcp/dist/server.js

使用 npm start:

npm start

这将启动 MCP 服务器 (stdio)、WebSocket 服务器以及 UI 的 HTTP 服务器。UI 可以通过http://localhost:\ <UI_PORT> (默认 3000)访问。

配置(手动运行的.env 文件):

如果手动运行(不通过 Cursor),请在项目根目录中创建一个 .env 文件,用于保存 API 密钥和端口。注意:通过 Cursor 运行时,这些内容应在 Cursor 的 mcp.json 配置中设置(参见“用法”部分)。

# .env - USED ONLY FOR MANUAL `npm start` or `node dist/server.js` # === OpenRouter (Recommended) === # Get key: https://openrouter.ai/keys OPENROUTER_API_KEY=sk-or-v1-xxxxxxxxxxxxxxxxxxxxxxxxxxxxxxxxxxxxxxxxxxxxxxxx OPENROUTER_MODEL=google/gemini-2.5-pro-exp-03-25:free FALLBACK_OPENROUTER_MODEL=google/gemini-2.5-flash-preview:thinking # === Google AI API (Alternative) === # GEMINI_API_KEY=your_google_ai_api_key # GEMINI_MODEL=gemini-1.5-flash-latest # FALLBACK_GEMINI_MODEL=gemini-1.5-flash-latest # === UI / WebSocket Ports === # Default is 4999 if not set. UI_PORT=4999 WS_PORT=4999 # === Auto Review === # If true, the agent will automatically run the 'review_changes' tool after the last task is completed. # Defaults to false. AUTO_REVIEW_ON_COMPLETION=false

避免成本

**重要提示:**强烈建议将您自己的 Google AI API 密钥集成到 OpenRouter,以避免免费模型的速率限制。请参阅下文。

**使用 OpenRouter 的免费套餐:**使用 OpenRouter 上标记为“免费”的型号(例如本文撰写时的 google/gemini-2.5-pro-exp-03-25:free),并连接您自己的 Google AI API 密钥,可以显著降低或消除成本。查看此 Reddit 帖子了解更多信息: https://www.reddit.com/r/ChatGPTCoding/comments/1jrp1tj/a \_simple\_guide\_to\_setting\_up\_gemini\_25\_pro\_free/

**回退成本:**如果主服务器达到速率限制,服务器会自动使用回退模型重试。默认回退模型 (FALLBACK_OPENROUTER_MODEL) 通常采用更快/更便宜的模型,例如 Gemini Flash,但根据 OpenRouter 当前的定价/层级,它可能仍会产生相关成本。请查看 OpenRouter 的网站,并根据需要调整配置中的回退模型。

与光标一起使用(任务管理器模式)

这是该服务器的主要用途。

1. 在 Cursor 中配置 MCP 服务器:

构建服务器( npm run build )后,您需要告诉 Cursor 如何运行它。

找到 Cursor 的 MCP 配置文件。该文件可以是:

  • **项目特定:**在项目根目录内的.cursor/mcp.json创建/编辑文件。
  • **全局:**在用户主目录中创建/编辑~/.cursor/mcp.json文件(供所有项目使用)。

将以下条目添加到该 JSON 文件中的 mcpServers 对象:

{ "mcpServers": { "task-manager-mcp": { "command": "node", "args": ["/full/path/to/your/task-manager-mcp/dist/server.js"], "env": { "OPENROUTER_API_KEY": "sk-or-v1-xxxxxxxxxxxxxxxxxxxx" // optional: my recommended model for MCP is Gemini 2.5 Pro Free which is already set by default // "OPENROUTER_MODEL": "google/gemini-2.5-pro-exp-03-25:free", // also optional // "FALLBACK_OPENROUTER_MODEL": "google/gemini-2.5-flash-preview:thinking", // optional: the default port for the UI is 4999 if not set // "UI_PORT": "4999", // optional: the default port for the WebSocket server is 4999 if not set // "WS_PORT": "4999" // Add GEMINI_API_KEY here instead if using Google directly // Add any other necessary env vars here } } // Add other MCP servers here if you have them } }

重要的:

  • /full/path/to/your/task-manager-mcp/dist/server.js替换为您机器上已编译服务器脚本的绝对路径。
  • sk-or-v1-xxxxxxxxxxxxxxxxxxxx替换为您的实际 OpenRouter API 密钥(或者如果直接使用 Google AI,则设置 GEMINI_API_KEY)。
  • 这里定义的环境变量将在 Cursor 启动时传递给服务器进程,覆盖任何.env文件。

2.创建自定义光标模式:

  1. 转到光标设置->功能->聊天->启用自定义模式。
  2. 返回聊天视图,单击模式选择器(左下角),然后单击添加自定义模式。
  3. 给它一个名字(例如,“MCP Planner”,“Task Dev”),选择一个图标/快捷方式。
  4. 启用工具:确保此服务器公开的工具( plan_featuremark_task_completeget_next_taskreview_changesadjust_plan )在此模式下可用且已启用。您可能需要根据您的工作流程启用其他工具,例如 Codebase、Terminal 等。
  5. 代理的推荐说明:将这些规则准确粘贴到“自定义说明”文本框中:
Always use plan_feature mcp tool when getting feature request before doing anything else. ALWAYS!!!!!!!! It will return the first step of the implementation. DO NOT IMPLEMENT MORE THAN WHAT THE TASK STATES. After you're done run mark_task_complete which will give you the next task. If the user says "review" use the review_changes tool. The review_changes tool will generate new tasks for you to follow, just like plan_feature. After a review, follow the same one-at-a-time task completion workflow: complete each review-generated task, mark it complete, and call get_next_task until all are done. If clarification is required at any step, you will not receive the next task and will have to run get_next_task manually after the user answers the clarification question through the UI. IMPORTANT: Your job is to complete the tasks one at a time. DO NOT DO ANY OTHER CHANGES, ONLY WHAT THE CURRENT TASK SAYS TO DO.
  1. 保存自定义模式。

预期工作流程(使用自定义模式):

  1. 在光标中选择新的自定义模式。
  2. 向 Cursor 提出功能请求(例如,“使用 JWT 添加身份验证”)。
  3. Cursor 将按照说明调用plan_feature工具。
  4. 服务器进行规划、保存数据,并返回 JSON 响应(包含文本内容)给 Cursor。
    • 如果成功:响应包含status: "completed"以及message字段中第一个任务的描述。UI(如果正在运行)将启动/更新。
    • 如果需要澄清:响应包含status: "awaiting_clarification"featureIduiUrl ,以及指示代理等待并稍后调用get_next_task说明。UI 将根据问题启动/更新。
  5. Cursor 仅实现所描述的任务(如果提供)。
  6. 如果需要澄清,用户可在 UI 中回答,服务器将恢复规划并通过 WebSocket 更新 UI。然后,代理将按照指示,使用featureId调用get_next_task
  7. 如果任务已完成,Cursor 会调用mark_task_complete (使用taskIdfeatureId )。
  8. 服务器将任务标记为完成并在响应消息中返回下一个待处理的任务。
  9. 光标重复步骤4-8。
  10. 如果用户要求 Cursor “审查”,它会调用review_changes

API 端点(用于 UI)

集成的 Express 服务器为前端提供了以下基本端点:

  • GET /api/features :返回现有功能 ID 的列表。
  • GET /api/tasks/:featureId :返回特定功能的任务列表。
  • GET /api/tasks :返回最近创建/修改的功能的任务。
  • GET /api/features/:featureId/pending-question :检查该功能是否有有效的澄清问题。
  • POST /api/tasks :为某项功能创建新任务。
  • PUT /api/tasks/:taskId :更新现有任务。
  • DELETE /api/tasks/:taskId :删除任务。
  • (静态文件) :提供来自dist/frontend-ui/文件(例如index.html )。
-
security - not tested
F
license - not found
-
quality - not tested

MCP 服务器与 Cursor 等 AI 编辑器集成,以最大限度地发挥代理功能,同时解决上下文窗口限制,并为任务规划和实施跟踪提供 Svelte UI。

  1. Svelte UI
    1. Core Features
      1. Setup
        1. Prerequisites:
        2. Installation & Build:
        3. Running the Server (Manually):
        4. Configuration (.env file for Manual Running):
      2. Avoiding Costs
        1. Usage with Cursor (Task Manager Mode)
          1. 1. Configure the MCP Server in Cursor:
          2. 2. Create a Custom Cursor Mode:
        2. Expected Workflow (Using the Custom Mode):
          1. API Endpoints (for UI)
            ID: d927orecg8