
Runs as a Node.js application with built-in support for scraping, indexing and searching Node.js packages and libraries.
Uses OpenAI's embedding capabilities to generate vector embeddings for documentation chunks, enabling semantic searching of documentation content.
Enables scraping, indexing, and searching React documentation with version-specific support, allowing users to search across different React versions.
Uses semantic-release to automate the release process based on commit messages, handling version bumping and changelog generation.
Supports scraping and indexing SemVer documentation, with examples showing how to fetch and search through the node-semver documentation.
Leverages SQLite with sqlite-vec for efficient vector similarity search and FTS5 for full-text search capabilities when indexing documentation.
Click on "Install Server".
Wait a few minutes for the server to deploy. Once ready, it will show a "Started" state.
In the chat, type
@followed by the MCP server name and your instructions, e.g., "@docs-mcp-serversearch for React hooks documentation, version 18.2.0"
That's it! The server will respond to your query, and you can continue using it as needed.
Here is a step-by-step guide with screenshots.
Grounded Docs: Your AI's Up-to-Date Documentation Expert
AI coding assistants often struggle with outdated documentation and hallucinations. The Docs MCP Server solves this by providing a personal, always-current knowledge base for your AI. It indexes 3rd party documentation from various sources (websites, GitHub, npm, PyPI, local files) and offers powerful, version-aware search tools via the Model Context Protocol (MCP).
This enables your AI agent to access the latest official documentation, dramatically improving the quality and reliability of generated code and integration details. It's free, open-source, runs locally for privacy, and integrates seamlessly into your development workflow.
Why Use the Docs MCP Server?
LLM-assisted coding promises speed and efficiency, but often falls short due to:
🌀 Stale Knowledge: LLMs train on snapshots of the internet and quickly fall behind new library releases and API changes.
👻 Code Hallucinations: AI can invent plausible-looking code that is syntactically correct but functionally wrong or uses non-existent APIs.
❓ Version Ambiguity: Generic answers rarely account for the specific version dependencies in your project, leading to subtle bugs.
⏳ Verification Overhead: Developers spend valuable time double-checking AI suggestions against official documentation.
Docs MCP Server solves these problems by:
✅ Providing Up-to-Date Context: Fetches and indexes documentation directly from official sources (websites, GitHub, npm, PyPI, local files) on demand.
🎯 Delivering Version-Specific Answers: Search queries can target exact library versions, ensuring information matches your project's dependencies.
💡 Reducing Hallucinations: Grounds the LLM in real documentation for accurate examples and integration details.
⚡ Boosting Productivity: Get trustworthy answers faster, integrated directly into your AI assistant workflow.
Related MCP server: mcp-hn
✨ Key Features
Accurate & Version-Aware AI Responses: Provides up-to-date, version-specific documentation to reduce AI hallucinations and improve code accuracy.
Broad Source Compatibility: Scrapes documentation from websites, GitHub repos, package manager sites (npm, PyPI), and local file directories.
Advanced Search & Processing: Intelligently chunks documentation semantically, generates embeddings, and combines vector similarity with full-text search.
Flexible Embedding Models: Supports various providers including OpenAI (and compatible APIs), Google Gemini/Vertex AI, Azure OpenAI, and AWS Bedrock. Vector search is optional.
Enterprise Authentication: Optional OAuth2/OIDC authentication with dynamic client registration for secure deployments.
Web Interface: Easy-to-use web interface for searching and managing documentation.
Local & Private: Runs entirely on your machine, ensuring data and queries remain private.
Free & Open Source: Community-driven and freely available.
Simple Deployment: Easy setup via Docker or
npx.Seamless Integration: Works with MCP-compatible clients (like Claude, Cline, Roo).
What is semantic chunking?
Semantic chunking splits documentation into meaningful sections based on structure—like headings, code blocks, and tables—rather than arbitrary text size. Docs MCP Server preserves logical boundaries, keeps code and tables intact, and removes navigation clutter from HTML docs. This ensures LLMs receive coherent, context-rich information for more accurate and relevant answers.
How to Run the Docs MCP Server
Choose your deployment method:
Standalone Server (Recommended)
Run a standalone server that includes both MCP endpoints and web interface in a single process. This is the easiest way to get started.
Option 1: Docker
Install Docker.
Start the server:
docker run --rm \ -v docs-mcp-data:/data \ -p 6280:6280 \ ghcr.io/arabold/docs-mcp-server:latest \ --protocol http --host 0.0.0.0 --port 6280Optional: Add
-e OPENAI_API_KEY="your-openai-api-key"to enable vector search for improved results.
Option 2: npx
Install Node.js 20.x or later.
Start the server:
npx @arabold/docs-mcp-server@latestThis runs the server on port 6280 by default.
Optional: Prefix with
OPENAI_API_KEY="your-openai-api-key"to enable vector search for improved results.
Configure Your MCP Client
Add this to your MCP settings (VS Code, Claude Desktop, etc.):
Alternative connection types:
Restart your AI assistant after updating the config.
Access the Web Interface
Open http://localhost:6280 in your browser to manage documentation and monitor jobs.
CLI Usage with Standalone Server
You can also use CLI commands to interact with the local database:
Adding Library Documentation
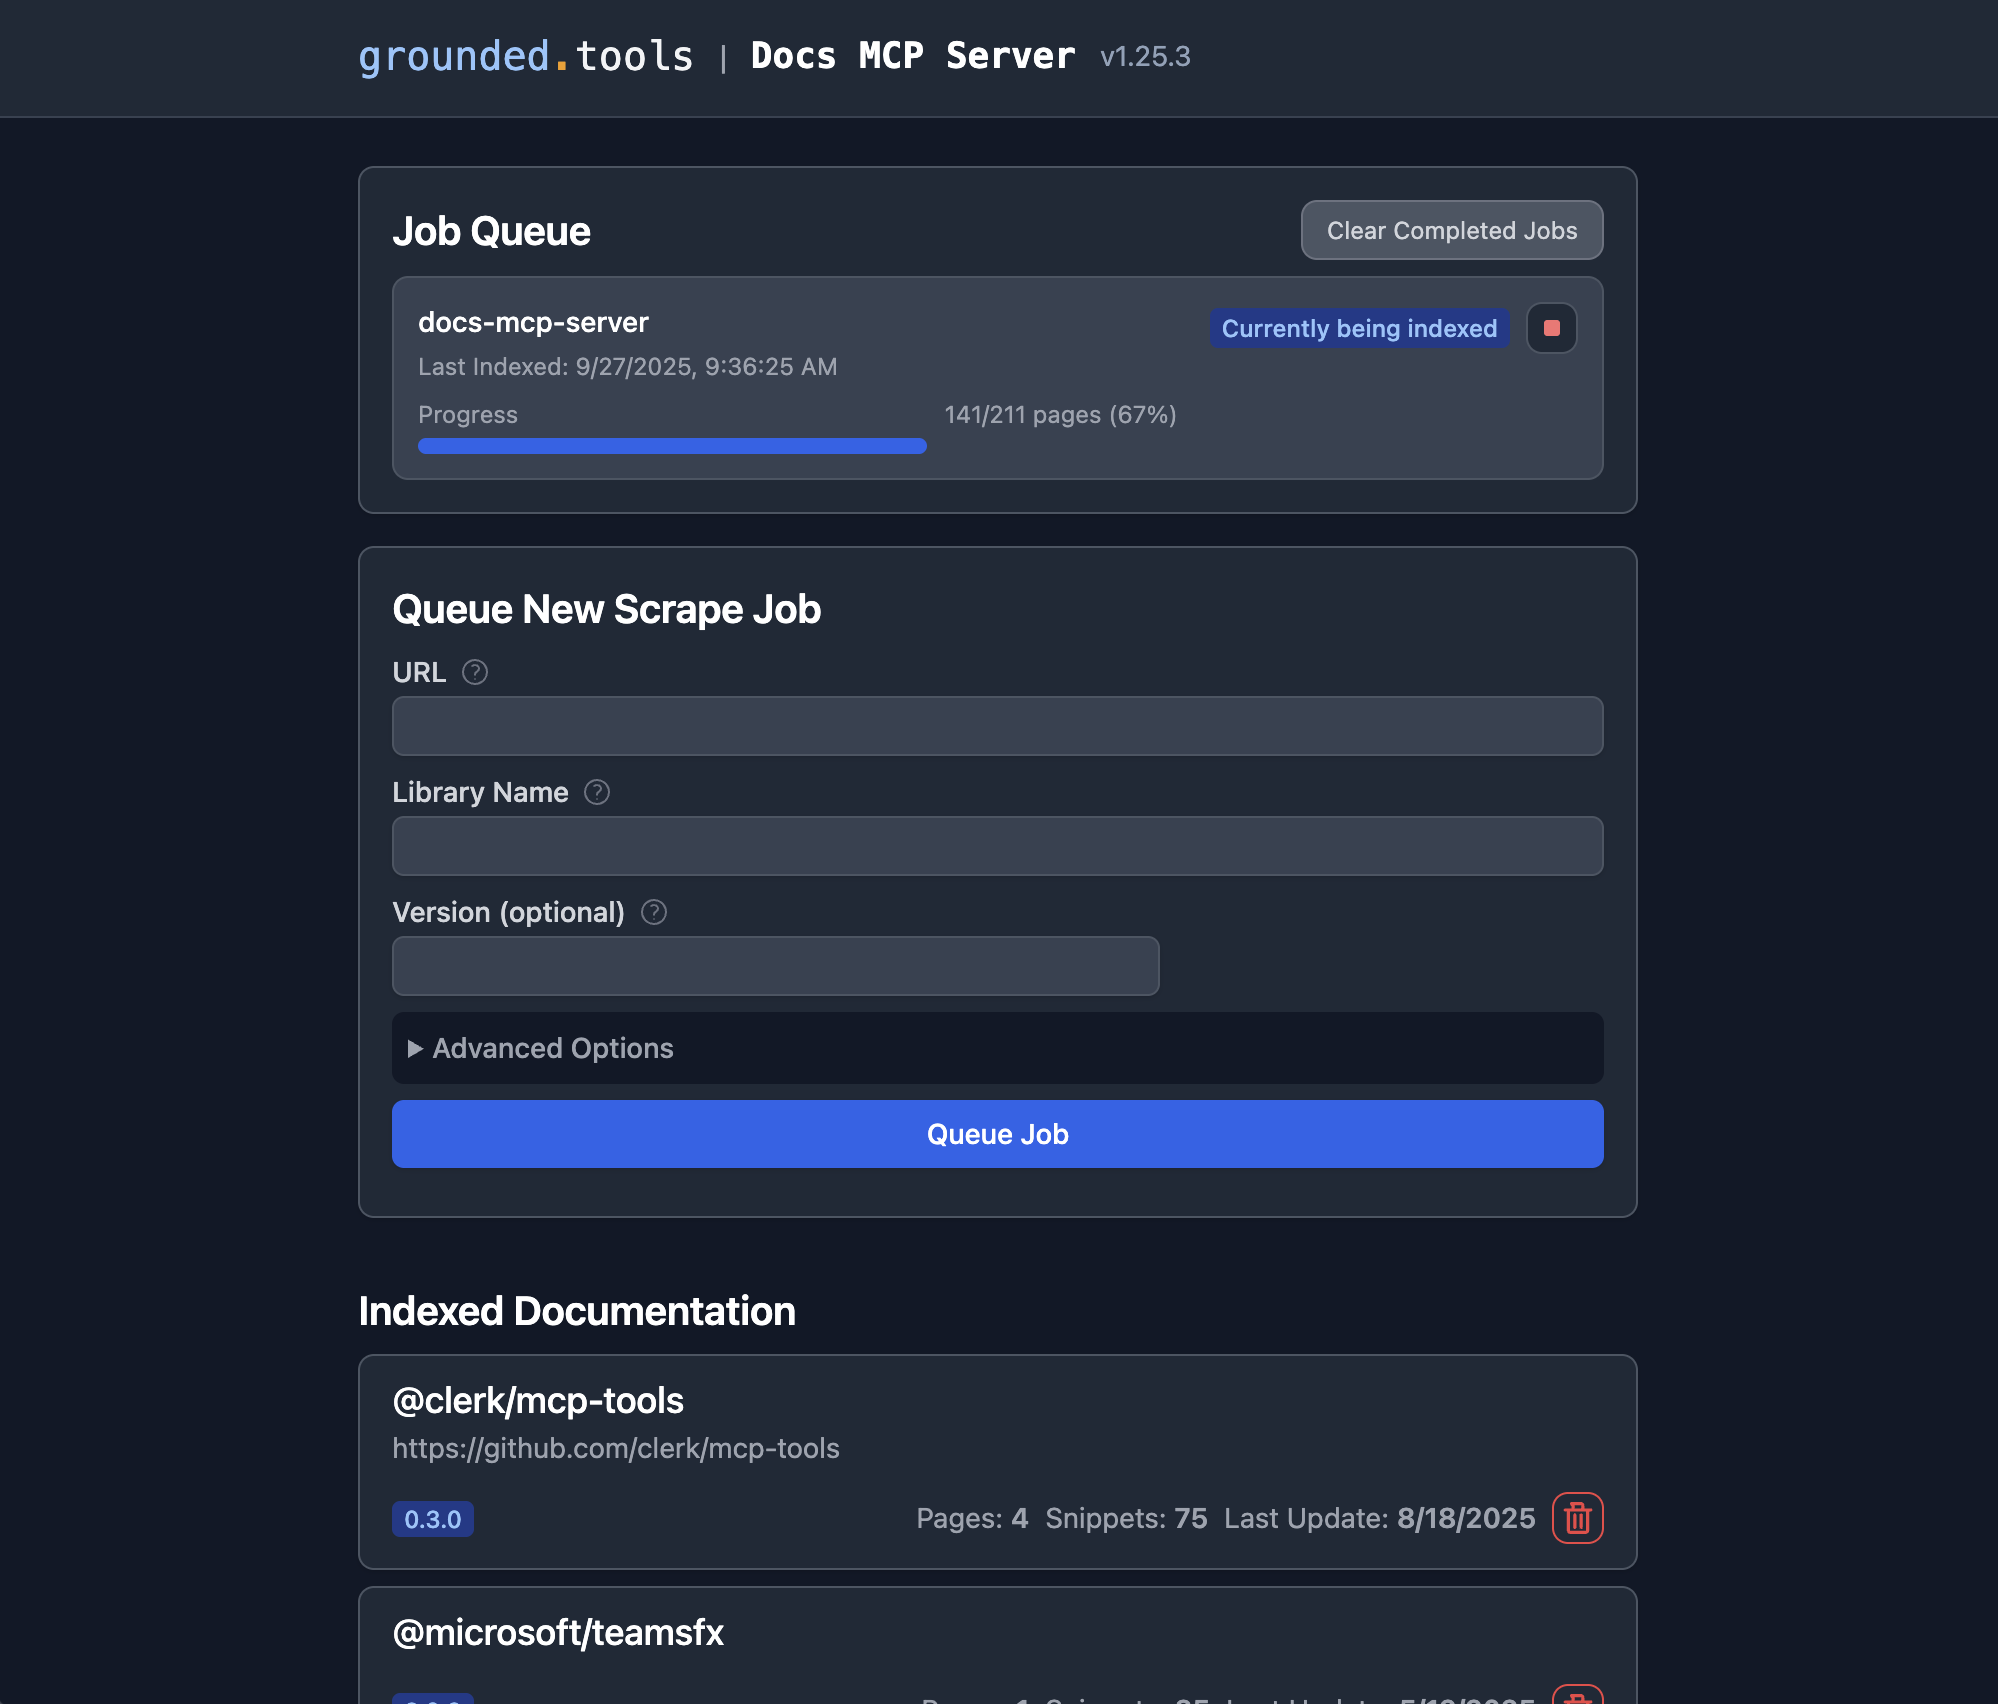
Open the Web Interface at
http://localhost:6280.Use the "Add New Documentation" form.
Enter the documentation URL, library name, and (optionally) version.
Click "Start Indexing". Monitor progress in the Job Queue.
Repeat for each library you want indexed.
Once a job completes, the docs are searchable via your AI assistant or the Web UI.
Benefits:
Single command setup with both web UI and MCP server
Persistent data storage (Docker volume or local directory)
No repository cloning required
Full feature access including web interface
To stop the server, press Ctrl+C.
Embedded Server
Run the MCP server directly embedded in your AI assistant without a separate process or web interface. This method provides MCP integration only.
Configure Your MCP Client
Add this to your MCP settings (VS Code, Claude Desktop, etc.):
Optional: To enable vector search for improved results, add an env section with your API key:
Restart your application after updating the config.
Adding Library Documentation
Option 1: Use MCP Tools
Your AI assistant can index new documentation using the built-in scrape_docs tool:
Option 2: Launch Web Interface
Start a temporary web interface that shares the same database:
Then open http://localhost:6281 to manage documentation. Stop the web interface when done (Ctrl+C).
Option 3: CLI Commands
Use CLI commands directly (avoid running scrape jobs concurrently with embedded server):
Benefits:
Direct integration with AI assistant
No separate server process required
Persistent data storage in user's home directory
Shared database with standalone server and CLI
Limitations:
No web interface (unless launched separately)
Documentation indexing requires MCP tools or separate commands
Scraping Local Files and Folders
You can index documentation from your local filesystem by using a file:// URL as the source. This works in both the Web UI and CLI.
Examples:
Web:
https://react.dev/reference/reactLocal file:
file:///Users/me/docs/index.htmlLocal folder:
file:///Users/me/docs/my-library
Requirements:
All files with a MIME type of
text/*are processed. This includes HTML, Markdown, plain text, and source code files such as.js,.ts,.tsx,.css, etc. Binary files, PDFs, images, and other non-text formats are ignored.You must use the
file://prefix for local files/folders.The path must be accessible to the server process.
If running in Docker:
You must mount the local folder into the container and use the container path in your
file://URL.Example Docker run:
docker run --rm \ -e OPENAI_API_KEY="your-key" \ -v /absolute/path/to/docs:/docs:ro \ -v docs-mcp-data:/data \ -p 6280:6280 \ ghcr.io/arabold/docs-mcp-server:latest \ scrape mylib file:///docs/my-libraryIn the Web UI, enter the path as
file:///docs/my-library(matching the container path).
See the tooltips in the Web UI and CLI help for more details.
Advanced: Docker Compose (Scaling)
For production deployments or when you need to scale processing, use Docker Compose to run separate services. The system selects either a local in-process worker or a remote worker client based on the configuration, ensuring consistent behavior across modes.
Start the services:
Service architecture:
Worker (port 8080): Handles documentation processing jobs
MCP Server (port 6280): Provides
/sseendpoint for AI toolsWeb Interface (port 6281): Browser-based management interface
Configure your MCP client:
Alternative connection types:
Access interfaces:
Web Interface:
http://localhost:6281MCP Endpoint (HTTP):
http://localhost:6280/mcpMCP Endpoint (SSE):
http://localhost:6280/sse
This architecture allows independent scaling of processing (workers) and user interfaces.
Configuration
The Docs MCP Server runs without any configuration and uses full-text search only. To enable vector search for improved results, configure an embedding provider via environment variables.
Command Line Argument Overrides
Many CLI arguments can be overridden using environment variables. This is useful for Docker deployments, CI/CD pipelines, or setting default values.
Environment Variable | CLI Argument | Description | Used by Commands |
|
| Custom path for data storage directory | all |
|
| Disable telemetry ( | all |
|
| MCP server protocol (auto, stdio, http) | default, mcp |
|
| Server port | default, mcp, web, worker |
|
| Web interface port (web command only) | web |
|
| Server port (fallback if DOCS_MCP_PORT not set) | default, mcp, web, worker |
|
| Server host/bind address | default, mcp, web, worker |
|
| Server host (fallback if DOCS_MCP_HOST not set) | default, mcp, web, worker |
|
| Embedding model configuration | default, mcp, web, worker |
|
| Enable OAuth2/OIDC authentication | default, mcp |
|
| OAuth2 provider issuer/discovery URL | default, mcp |
|
| JWT audience claim (resource identifier) | default, mcp |
Usage Examples:
Embedding Provider Configuration
The Docs MCP Server is configured via environment variables. Set these in your shell, Docker, or MCP client config.
Variable | Description |
| Embedding model to use (see below for options). |
| OpenAI API key for embeddings. |
| Custom OpenAI-compatible API endpoint (e.g., Ollama). |
| Google API key for Gemini embeddings. |
| Path to Google service account JSON for Vertex AI. |
| AWS key for Bedrock embeddings. |
| AWS secret for Bedrock embeddings. |
| AWS region for Bedrock. |
| Azure OpenAI API key. |
| Azure OpenAI instance name. |
| Azure OpenAI deployment name. |
| Azure OpenAI API version. |
See examples above for usage.
Embedding Model Options
Set DOCS_MCP_EMBEDDING_MODEL to one of:
text-embedding-3-small(default, OpenAI)openai:snowflake-arctic-embed2(OpenAI-compatible, Ollama)vertex:text-embedding-004(Google Vertex AI)gemini:embedding-001(Google Gemini)aws:amazon.titan-embed-text-v1(AWS Bedrock)microsoft:text-embedding-ada-002(Azure OpenAI)Or any OpenAI-compatible model name
Provider-Specific Configuration Examples
Here are complete configuration examples for different embedding providers:
OpenAI (Default):
Ollama (Local):
LM Studio (Local):
Google Gemini:
Google Vertex AI:
AWS Bedrock:
Azure OpenAI:
For more architectural details, see the ARCHITECTURE.md.
For enterprise authentication and security features, see the Authentication Guide.
Telemetry
The Docs MCP Server includes privacy-first telemetry to help improve the product. We collect anonymous usage data to understand how the tool is used and identify areas for improvement.
What We Collect
Command usage patterns and success rates
Tool execution metrics (counts, durations, error types)
Pipeline job statistics (progress, completion rates)
Service configuration patterns (auth enabled, read-only mode)
Performance metrics (response times, processing efficiency)
Protocol usage (stdio vs HTTP, transport modes)
What We DON'T Collect
Search query content or user input
URLs being scraped or accessed
Document content or scraped data
Authentication tokens or credentials
Personal information or identifying data
Disabling Telemetry
You can disable telemetry collection entirely:
Option 1: CLI Flag
Option 2: Environment Variable
Option 3: Docker
For more details about our telemetry practices, see the Telemetry Guide.
Development
To develop or contribute to the Docs MCP Server:
Fork the repository and create a feature branch.
Follow the code conventions in ARCHITECTURE.md.
Write clear commit messages (see Git guidelines above).
Open a pull request with a clear description of your changes.
For questions or suggestions, open an issue.
Architecture
For details on the project's architecture and design principles, please see ARCHITECTURE.md.
Notably, the vast majority of this project's code was generated by the AI assistant Cline, leveraging the capabilities of this very MCP server.
License
This project is licensed under the MIT License. See LICENSE for details.