ContextForge MCP Gateway
OfficialContextForge
MCP, A2A 및 REST/gRPC API를 중앙 집중식 거버넌스, 검색 및 관측 가능성과 함께 연합하는 오픈 소스 레지스트리 및 프록시입니다. 에이전트 및 도구 호출을 최적화하며 플러그인을 지원합니다.
![]()


ContextForge는 도구, 에이전트 및 API를 AI 클라이언트를 위한 하나의 깔끔한 엔드포인트로 연합하는 오픈 소스 레지스트리 및 프록시입니다. AI 인프라 전반에 걸쳐 중앙 집중식 거버넌스, 검색 및 관측 가능성을 제공합니다:
도구 게이트웨이 — MCP, REST, gRPC-to-MCP 변환 및 TOON 압축
에이전트 게이트웨이 — A2A 프로토콜, OpenAI 호환 및 Anthropic 에이전트 라우팅
API 게이트웨이 — REST 서비스를 위한 속도 제한, 인증, 재시도 및 리버스 프록시
플러그인 확장성 — 추가 전송, 프로토콜 및 통합을 위한 40개 이상의 플러그인
관측 가능성 — Phoenix, Jaeger, Zipkin 및 기타 OTLP 백엔드를 사용한 OpenTelemetry 추적
이 서비스는 완전히 호환되는 MCP 서버로 실행되며, PyPI 또는 Docker를 통해 배포할 수 있고, Redis 기반 페더레이션 및 캐싱을 통해 Kubernetes의 다중 클러스터 환경으로 확장 가능합니다.
목차
📌 빠른 링크
리소스 | 설명 |
uvx, Docker, Compose 또는 로컬 개발을 통한 빠른 시작 | |
지원 옵션, FAQ, 커뮤니티 채널 | |
버그 신고, 기능 요청, 기여 방법 | |
전체 가이드, 튜토리얼, API 참조 |
개요 및 목표
ContextForge는 모든 Model Context Protocol (MCP) 서버, A2A 서버 또는 REST/gRPC API를 연합하여 중앙 집중식 거버넌스, 검색 및 관측 가능성을 제공하는 오픈 소스 레지스트리 및 프록시입니다. 에이전트 및 도구 호출을 최적화하며 플러그인을 지원합니다. 자세한 내용은 프로젝트 로드맵을 참조하세요.
현재 지원하는 기능:
다중 MCP 및 REST 서비스 전반의 페더레이션
외부 AI 에이전트(OpenAI, Anthropic, 사용자 지정)를 위한 A2A(Agent-to-Agent) 통합
자동 리플렉션 기반 서비스 검색을 통한 gRPC-to-MCP 변환
레거시 API를 MCP 호환 도구 및 서버로 가상화
HTTP, JSON-RPC, WebSocket, SSE(구성 가능한 keepalive 포함), stdio 및 스트리밍 가능한 HTTP를 통한 전송
실시간 관리, 구성 및 로그 모니터링을 위한 관리자 UI(에어갭 배포 지원)
사용자 범위 OAuth 토큰 및 무조건적인
X-Upstream-Authorization헤더 지원을 통한 내장 인증, 재시도 및 속도 제한Phoenix, Jaeger, Zipkin 및 기타 OTLP 백엔드를 사용한 OpenTelemetry 관측 가능성
Docker 또는 PyPI, Redis 기반 캐싱 및 다중 클러스터 페더레이션을 통한 확장 가능한 배포

향후 기능 목록은 ContextForge 로드맵을 확인하세요.
모든 MCP 서버 또는 REST API 연합
MCP 프로토콜 버전 선택 가능 (예:
2025-11-25)다양한 백엔드를 위한 단일 통합 인터페이스 노출
비 MCP 서비스를 가상 MCP 서버로 래핑
최소한의 구성으로 도구, 프롬프트 및 리소스 등록
서버 리플렉션 프로토콜을 통한 gRPC-to-MCP 변환
자동 서비스 검색 및 메서드 인트로스펙션
REST API를 다음 기능을 갖춘 도구로 조정:
자동 JSON 스키마 추출
헤더, 토큰 및 사용자 지정 인증 지원
재시도, 시간 초과 및 속도 제한 정책
프롬프트: Jinja2 템플릿, 멀티모달 지원, 롤백/버전 관리
리소스: URI 기반 액세스, MIME 감지, 캐싱, SSE 업데이트
도구: 입력 유효성 검사 및 동시성 제어가 포함된 기본 또는 조정된 도구
HTMX + Alpine.js로 구축된 관리자 UI
필터링, 검색 및 내보내기 기능을 갖춘 실시간 로그 뷰어
인증: 기본, JWT 또는 사용자 지정 체계
구조화된 로그, 상태 엔드포인트, 메트릭
7,000개 이상의 테스트, Makefile 타겟, 라이브 리로드, 사전 커밋 훅
OpenTelemetry (OTLP) 프로토콜 지원을 통한 벤더 중립적 추적
다중 백엔드 지원: Phoenix(LLM 중심), Jaeger, Zipkin, Tempo, DataDog, New Relic
연합 게이트웨이 및 서비스 전반의 분산 추적
도구, 프롬프트, 리소스 및 게이트웨이 작업의 자동 계측
LLM 특정 메트릭: 토큰 사용량, 비용, 모델 성능
비활성화 시 오버헤드 제로 및 정상적인 성능 저하
Phoenix, Jaeger 및 기타 백엔드 설정 가이드는 **관측 가능성 문서**를 참조하세요.
빠른 시작 - PyPI
ContextForge는 PyPI에 mcp-contextforge-gateway로 게시되어 있습니다.
요약: (uv를 사용하는 단일 명령)
# Quick start with environment variables
BASIC_AUTH_PASSWORD=pass \
MCPGATEWAY_UI_ENABLED=true \
MCPGATEWAY_ADMIN_API_ENABLED=true \
PLATFORM_ADMIN_EMAIL=admin@example.com \
PLATFORM_ADMIN_PASSWORD=changeme \
PLATFORM_ADMIN_FULL_NAME="Platform Administrator" \
uvx --from mcp-contextforge-gateway mcpgateway --host 0.0.0.0 --port 4444

# Or better: use the provided .env.example
cp .env.example .env
# Edit .env to customize your settings
uvx --from mcp-contextforge-gateway mcpgateway --host 0.0.0.0 --port 4444
Python ≥ 3.11
curl + jq - 마지막 스모크 테스트 단계에서만 필요
1 - 설치 및 실행 (복사-붙여넣기 친화적)
# 1️⃣  Isolated env + install from pypi
mkdir mcpgateway && cd mcpgateway
python3 -m venv .venv && source .venv/bin/activate
pip install --upgrade pip
pip install mcp-contextforge-gateway

# 2️⃣  Copy and customize the configuration
# Download the example environment file
curl -O https://raw.githubusercontent.com/IBM/mcp-context-forge/main/.env.example
cp .env.example .env
# Edit .env to customize your settings (especially passwords!)

# Or set environment variables directly:
export MCPGATEWAY_UI_ENABLED=true
export MCPGATEWAY_ADMIN_API_ENABLED=true
export PLATFORM_ADMIN_EMAIL=admin@example.com
export PLATFORM_ADMIN_PASSWORD=changeme
export PLATFORM_ADMIN_FULL_NAME="Platform Administrator"

BASIC_AUTH_PASSWORD=pass JWT_SECRET_KEY=my-test-key-but-now-longer-than-32-bytes \
  mcpgateway --host 0.0.0.0 --port 4444 &   # admin/pass

# 3️⃣  Generate a bearer token & smoke-test the API
export MCPGATEWAY_BEARER_TOKEN=$(python3 -m mcpgateway.utils.create_jwt_token \
    --username admin@example.com --exp 10080 --secret my-test-key-but-now-longer-than-32-bytes)

curl -s -H "Authorization: Bearer $MCPGATEWAY_BEARER_TOKEN" \
     http://127.0.0.1:4444/version | jq
# 1️⃣ Isolated env + install from PyPI
mkdir mcpgateway ; cd mcpgateway
python3 -m venv .venv ; .\.venv\Scripts\Activate.ps1
pip install --upgrade pip
pip install mcp-contextforge-gateway
# 2️⃣ Copy and customize the configuration
# Download the example environment file
Invoke-WebRequest -Uri "https://raw.githubusercontent.com/IBM/mcp-context-forge/main/.env.example" -OutFile ".env.example"
Copy-Item .env.example .env
# Edit .env to customize your settings
# Or set environment variables (session-only)
$Env:MCPGATEWAY_UI_ENABLED = "true"
$Env:MCPGATEWAY_ADMIN_API_ENABLED = "true"
# Note: Basic auth for API is disabled by default (API_ALLOW_BASIC_AUTH=false)
$Env:JWT_SECRET_KEY = "my-test-key-but-now-longer-than-32-bytes"
$Env:PLATFORM_ADMIN_EMAIL = "admin@example.com"
$Env:PLATFORM_ADMIN_PASSWORD = "changeme"
$Env:PLATFORM_ADMIN_FULL_NAME = "Platform Administrator"
# 3️⃣ Launch the gateway
mcpgateway.exe --host 0.0.0.0 --port 4444
# Optional: background it
# Start-Process -FilePath "mcpgateway.exe" -ArgumentList "--host 0.0.0.0 --port 4444"
# 4️⃣ Bearer token and smoke-test
$Env:MCPGATEWAY_BEARER_TOKEN = python3 -m mcpgateway.utils.create_jwt_token `
--username admin@example.com --exp 10080 --secret my-test-key-but-now-longer-than-32-bytes
curl -s -H "Authorization: Bearer $Env:MCPGATEWAY_BEARER_TOKEN" `
http://127.0.0.1:4444/version | jq# 1️⃣ Isolated env + install from PyPI using uv
mkdir mcpgateway ; cd mcpgateway
uv venv
.\.venv\Scripts\activate
uv pip install mcp-contextforge-gateway
# Continue with steps 2️⃣-4️⃣ above....env.example을 .env로 복사하고 설정을 조정하세요(또는 환경 변수로 사용).
# 1️⃣ Spin up the sample GO MCP time server using mcpgateway.translate & docker (replace docker with podman if needed)
python3 -m mcpgateway.translate \
--stdio "docker run --rm -i ghcr.io/ibm/fast-time-server:latest -transport=stdio" \
--expose-sse \
--port 8003
# Or using the official mcp-server-git using uvx:
pip install uv # to install uvx, if not already installed
python3 -m mcpgateway.translate --stdio "uvx mcp-server-git" --expose-sse --port 9000
# Alternative: running the local binary
# cd mcp-servers/go/fast-time-server; make build
# python3 -m mcpgateway.translate --stdio "./dist/fast-time-server -transport=stdio" --expose-sse --port 8002
# NEW: Expose via multiple protocols simultaneously!
python3 -m mcpgateway.translate \
--stdio "uvx mcp-server-git" \
--expose-sse \
--expose-streamable-http \
--port 9000
# Now accessible via both /sse (SSE) and /mcp (streamable HTTP) endpoints
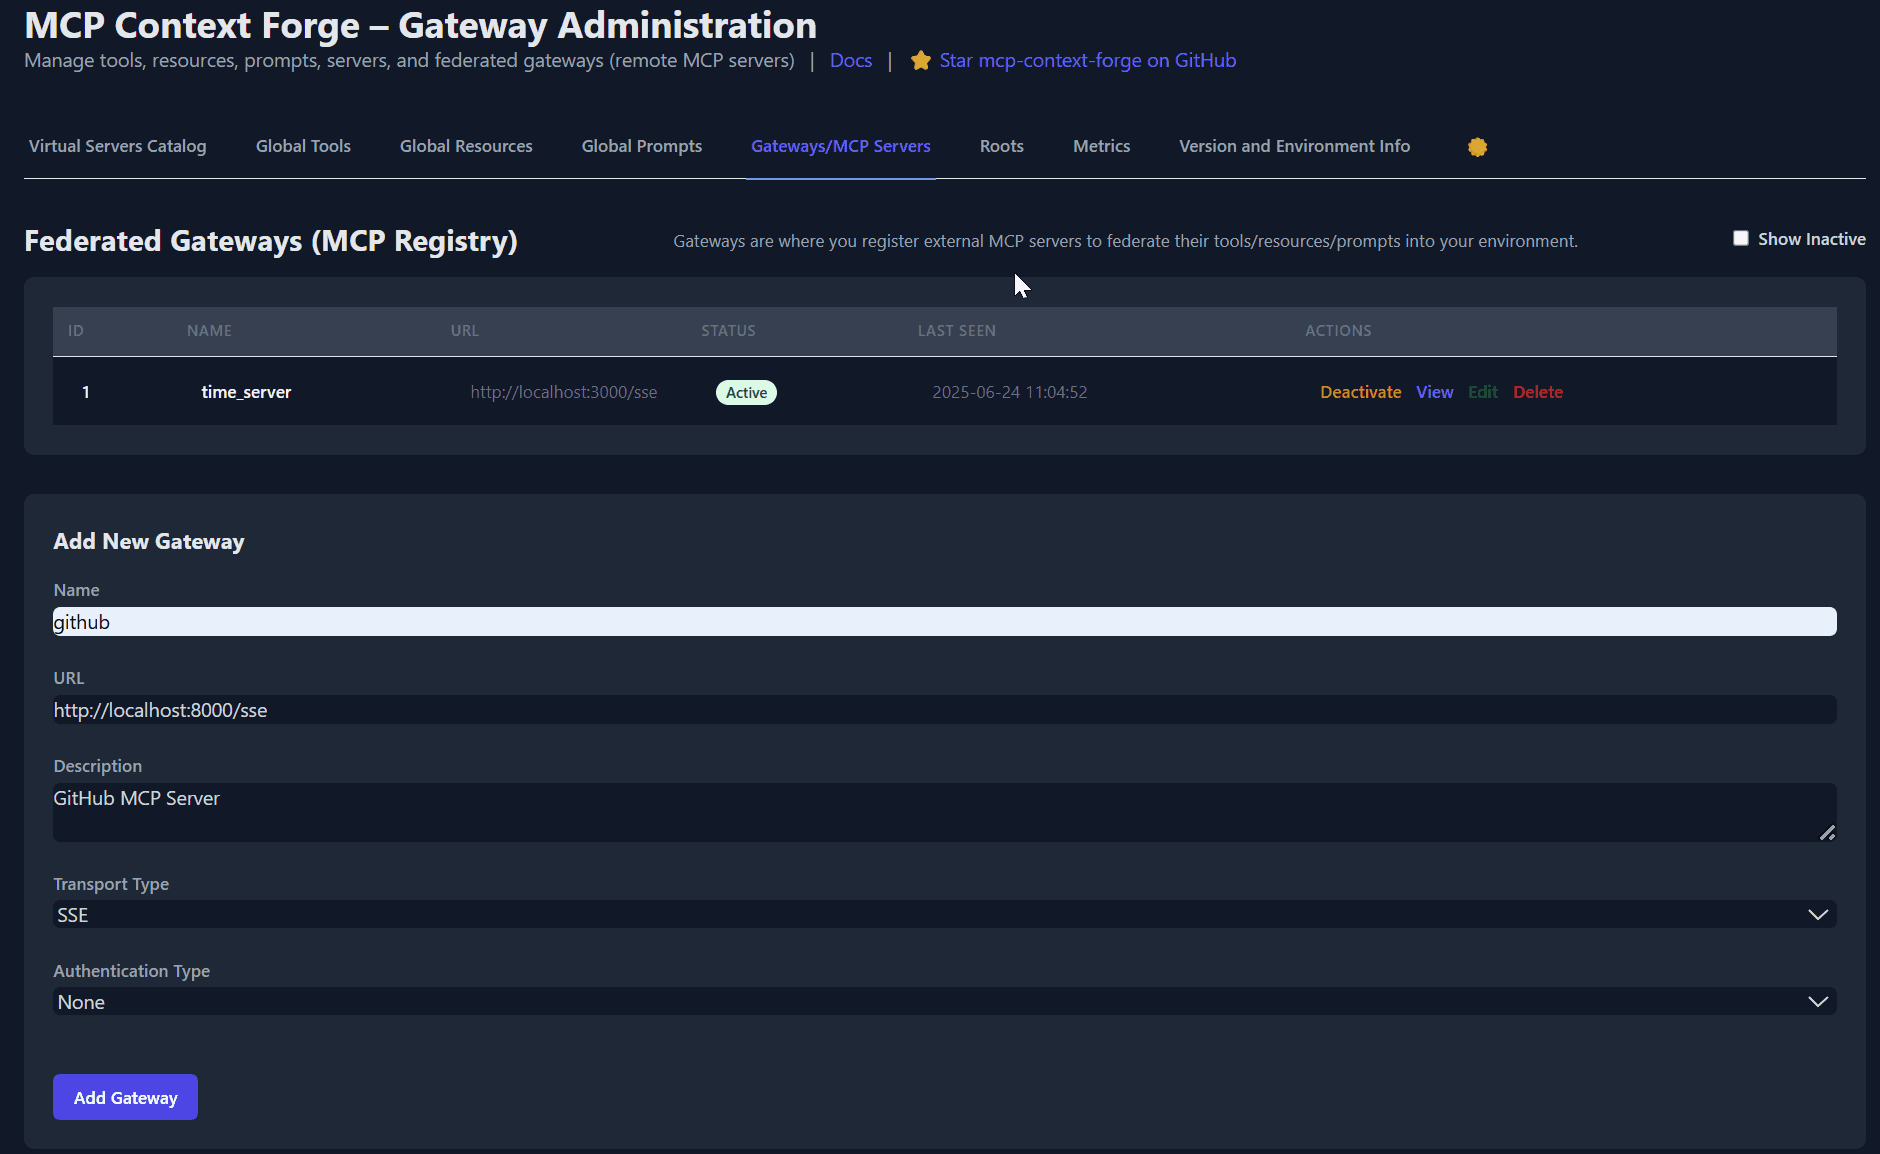
# 2️⃣ Register it with the gateway
curl -s -X POST -H "Authorization: Bearer $MCPGATEWAY_BEARER_TOKEN" \
-H "Content-Type: application/json" \
-d '{"name":"fast_time","url":"http://localhost:8003/sse"}' \
http://localhost:4444/gateways
# 3️⃣ Verify tool catalog
curl -s -H "Authorization: Bearer $MCPGATEWAY_BEARER_TOKEN" http://localhost:4444/tools | jq
# 4️⃣ Create a *virtual server* bundling those tools. Use the ID of tools from the tool catalog (Step #3) and pass them in the associatedTools list.
curl -s -X POST -H "Authorization: Bearer $MCPGATEWAY_BEARER_TOKEN" \
-H "Content-Type: application/json" \
-d '{"server":{"name":"time_server","description":"Fast time tools","associated_tools":[<ID_OF_TOOLS>]}}' \
http://localhost:4444/servers | jq
# Example curl
curl -s -X POST -H "Authorization: Bearer $MCPGATEWAY_BEARER_TOKEN"
-H "Content-Type: application/json"
-d '{"server":{"name":"time_server","description":"Fast time tools","associated_tools":["6018ca46d32a4ac6b4c054c13a1726a2"]}}' \
http://localhost:4444/servers | jq
# 5️⃣ List servers (should now include the UUID of the newly created virtual server)
curl -s -H "Authorization: Bearer $MCPGATEWAY_BEARER_TOKEN" http://localhost:4444/servers | jq
# 6️⃣ Client HTTP endpoint. Inspect it interactively with the MCP Inspector CLI (or use any MCP client)
npx -y @modelcontextprotocol/inspector
# Transport Type: Streamable HTTP, URL: http://localhost:4444/servers/UUID_OF_SERVER_1/mcp, Header Name: "Authorization", Bearer Tokenexport MCP_AUTH="Bearer ${MCPGATEWAY_BEARER_TOKEN}"
export MCP_SERVER_URL=http://localhost:4444/servers/UUID_OF_SERVER_1/mcp
python3 -m mcpgateway.wrapper # Ctrl-C to exituv를 사용하거나 Docker/Podman 내부에서 실행할 수도 있습니다. 위의 컨테이너 섹션을 참조하세요.
MCP Inspector에서 MCP_AUTH 및 MCP_SERVER_URL 환경 변수를 정의하고, 명령으로 python3를, 인수로 -m mcpgateway.wrapper를 선택하세요.
echo $PWD/.venv/bin/python3 # Using the Python3 full path ensures you have a working venv
export MCP_SERVER_URL='http://localhost:4444/servers/UUID_OF_SERVER_1/mcp'
export MCP_AUTH="Bearer ${MCPGATEWAY_BEARER_TOKEN}"
npx -y @modelcontextprotocol/inspector
또는
인수로 URL과 인증을 전달하세요(환경 변수를 설정할 필요 없음)
npx -y @modelcontextprotocol/inspector
command as `python`
Arguments as `-m mcpgateway.wrapper --url "http://localhost:4444/servers/UUID_OF_SERVER_1/mcp" --auth "Bearer <your token>"`
stdio와 함께 Claude와 같은 MCP 클라이언트를 사용할 때:
{
  "mcpServers": {
    "mcpgateway-wrapper": {
      "command": "python",
      "args": ["-m", "mcpgateway.wrapper"],
      "env": {
        "MCP_AUTH": "Bearer your-token-here",
        "MCP_SERVER_URL": "http://localhost:4444/servers/UUID_OF_SERVER_1",
        "MCP_TOOL_CALL_TIMEOUT": "120"
      }
    }
  }
}
빠른 시작 - 컨테이너
Docker 또는 Podman과 함께 GHCR의 공식 OCI 이미지를 사용하세요. 참고: 현재 arm64는 프로덕션에서 지원되지 않습니다. 예를 들어 Apple Silicon 칩(M1, M2 등)이 탑재된 MacOS에서 실행 중인 경우, Rosetta를 사용하여 컨테이너를 실행하거나 PyPi를 통해 설치할 수 있습니다.
🚀 빠른 시작 - Docker Compose
PostgreSQL 및 Redis를 사용하여 30초 이내에 전체 스택을 실행하세요:
# Clone and start the stack
git clone https://github.com/IBM/mcp-context-forge.git
cd mcp-context-forge

# Start with PostgreSQL (recommended for production)
docker compose up -d

# Check status
docker compose ps

# View logs
docker compose logs -f gateway

# Access Admin UI: http://localhost:8080/admin (login with PLATFORM_ADMIN_EMAIL/PASSWORD)
# Generate API token
docker compose exec gateway python3 -m mcpgateway.utils.create_jwt_token \
  --username admin@example.com --exp 10080 --secret my-test-key-but-now-longer-than-32-bytes
제공되는 기능:
🗄️ PostgreSQL - 55개 이상의 테이블을 갖춘 프로덕션 준비 데이터베이스
🚀 ContextForge - 관리자 UI를 갖춘 완전한 기능의 게이트웨이
📊 Redis - 고성능 캐싱 및 세션 저장소
🔧 관리 도구 - 데이터베이스 관리를 위한 pgAdmin, Redis Insight
🌐 Nginx 프록시 - 포트 8080의 캐싱 리버스 프록시
HTTPS 활성화 (선택 사항):
# Start with TLS enabled (auto-generates self-signed certs)
make compose-tls

# Access via HTTPS: https://localhost:8443/admin

# Or bring your own certificates:
# Unencrypted key:
mkdir -p certs
cp your-cert.pem certs/cert.pem && cp your-key.pem certs/key.pem
make compose-tls

# Passphrase-protected key:
mkdir -p certs
cp your-cert.pem certs/cert.pem && cp your-encrypted-key.pem certs/key-encrypted.pem
echo "KEY_FILE_PASSWORD=your-passphrase" >> .env
make compose-tls
☸️ 빠른 시작 - Helm (Kubernetes)
엔터프라이즈급 기능을 갖춘 Kubernetes에 배포하세요:
# Add Helm repository (when available)
# helm repo add mcp-context-forge https://ibm.github.io/mcp-context-forge
# helm repo update

# For now, use local chart
git clone https://github.com/IBM/mcp-context-forge.git
cd mcp-context-forge/charts/mcp-stack

# Install with PostgreSQL (default)
helm install mcp-gateway . \
  --set mcpContextForge.secret.PLATFORM_ADMIN_EMAIL=admin@yourcompany.com \
  --set mcpContextForge.secret.PLATFORM_ADMIN_PASSWORD=changeme \
  --set mcpContextForge.secret.JWT_SECRET_KEY=your-secret-key

# Check deployment status
kubectl get pods -l app.kubernetes.io/name=mcp-context-forge

# Port forward to access Admin UI
kubectl port-forward svc/mcp-gateway-mcp-context-forge 4444:80
# Access: http://localhost:4444/admin

# Generate API token
kubectl exec deployment/mcp-gateway-mcp-context-forge -- \
  python3 -m mcpgateway.utils.create_jwt_token \
  --username admin@yourcompany.com --exp 10080 --secret your-secret-key
SSRF 참고: Helm은 기본적으로 엄격한 SSRF 설정(
SSRF_ALLOW_PRIVATE_NETWORKS=false)을 사용합니다. 클러스터 내 도구 URL(예: fast-time 또는 fast-test 서비스)을 등록하는 경우,mcpContextForge.config.SSRF_ALLOWED_NETWORKS를 통해 클러스터 CIDR만 허용하거나, 로컬 전용 벤치마크 설정의 경우 일시적으로SSRF_ALLOW_PRIVATE_NETWORKS=true로 설정하세요.docs/docs/manage/configuration.md#ssrf-protection및docs/docs/deployment/helm.md를 참조하세요.
엔터프라이즈 기능:
🔄 자동 확장 - CPU/메모리 타겟을 갖춘 HPA
🗄️ 데이터베이스 선택 - PostgreSQL(프로덕션), SQLite(개발)
📊 관측 가능성 - Prometheus 메트릭, OpenTelemetry 추적
🔒 보안 - RBAC, 네트워크 정책, 비밀 관리
🚀 고가용성 - Redis 클러스터링을 갖춘 다중 복제본 배포
📈 모니터링 - 내장 Grafana 대시보드 및 알림
🐳 Docker (단일 컨테이너)
docker run -d --name mcpgateway \
  -p 4444:4444 \
  -e MCPGATEWAY_UI_ENABLED=true \
  -e MCPGATEWAY_ADMIN_API_ENABLED=true \
  -e HOST=0.0.0.0 \
  -e JWT_SECRET_KEY=my-test-key-but-now-longer-than-32-bytes \
  -e AUTH_REQUIRED=true \
  -e PLATFORM_ADMIN_EMAIL=admin@example.com \
  -e PLATFORM_ADMIN_PASSWORD=changeme \
  -e PLATFORM_ADMIN_FULL_NAME="Platform Administrator" \
  -e DATABASE_URL=sqlite:///./mcp.db \
  -e SECURE_COOKIES=false \
  ghcr.io/ibm/mcp-context-forge:1.0.0-RC-2

# Tail logs and generate API key
docker logs -f mcpgateway
docker run --rm -it ghcr.io/ibm/mcp-context-forge:1.0.0-RC-2 \
python3 -m mcpgateway.utils.create_jwt_token --username admin@example.com --exp 10080 --secret my-test-key-but-now-longer-than-32-bytes**http://localhost:4444/admin**으로 이동하여 PLATFORM_ADMIN_EMAIL / PLATFORM_ADMIN_PASSWORD로 로그인하세요.
SQLite 데이터베이스 유지:
mkdir -p $(pwd)/data && touch $(pwd)/data/mcp.db && chmod 777 $(pwd)/data
docker run -d --name mcpgateway --restart unless-stopped \
  -p 4444:4444 -v $(pwd)/data:/data \
  -e DATABASE_URL=sqlite:////data/mcp.db \
  -e MCPGATEWAY_UI_ENABLED=true -e MCPGATEWAY_ADMIN_API_ENABLED=true \
  -e HOST=0.0.0.0 -e JWT_SECRET_KEY=my-test-key-but-now-longer-than-32-bytes \
  -e PLATFORM_ADMIN_EMAIL=admin@example.com -e PLATFORM_ADMIN_PASSWORD=changeme \
  ghcr.io/ibm/mcp-context-forge:1.0.0-RC-2
호스트 네트워킹 (로컬 MCP 서버 액세스):
docker run -d --name mcpgateway --network=host \
  -v $(pwd)/data:/data -e DATABASE_URL=sqlite:////data/mcp.db \
  -e MCPGATEWAY_UI_ENABLED=true -e HOST=0.0.0.0 -e PORT=4444 \
  ghcr.io/ibm/mcp-context-forge:1.0.0-RC-2
에어갭 배포 (인터넷 없음):
GXP
This server cannot be installed
Resources
Unclaimed servers have limited discoverability.
Looking for Admin?
If you are the server author, to access and configure the admin panel.
Appeared in Searches
Latest Blog Posts
MCP directory API
We provide all the information about MCP servers via our MCP API.
curl -X GET 'https://glama.ai/api/mcp/v1/servers/IBM/mcp-context-forge'
If you have feedback or need assistance with the MCP directory API, please join our Discord server