ContextForge
Eine Open-Source-Registry und ein Proxy, der MCP-, A2A- und REST/gRPC-APIs mit zentraler Governance, Discovery und Observability föderiert. Optimiert Agenten- & Tool-Aufrufe und unterstützt Plugins.










ContextForge ist eine Open-Source-Registry und ein Proxy, der Tools, Agenten und APIs in einem sauberen Endpunkt für Ihre KI-Clients zusammenführt. Es bietet zentrale Governance, Discovery und Observability für Ihre gesamte KI-Infrastruktur:
Tools Gateway — MCP, REST, gRPC-zu-MCP-Übersetzung und TOON-Kompression
Agent Gateway — A2A-Protokoll, OpenAI-kompatibles und Anthropic-Agenten-Routing
API Gateway — Ratenbegrenzung, Authentifizierung, Wiederholungsversuche und Reverse-Proxy für REST-Dienste
Plugin-Erweiterbarkeit — Über 40 Plugins für zusätzliche Transporte, Protokolle und Integrationen
Observability — OpenTelemetry-Tracing mit Phoenix, Jaeger, Zipkin und anderen OTLP-Backends
Es läuft als vollständig konformer MCP-Server, ist über PyPI oder Docker bereitstellbar und skaliert in Multi-Cluster-Umgebungen auf Kubernetes mit Redis-basierter Föderation und Caching.
Related MCP server: ContextForge MCP Gateway
Inhaltsverzeichnis
📌 Schnelllinks
Übersicht & Ziele
ContextForge ist eine Open-Source-Registry und ein Proxy, der jeden Model Context Protocol (MCP)-Server, A2A-Server oder jede REST/gRPC-API föderiert und zentrale Governance, Discovery und Observability bietet. Es optimiert Agenten- und Tool-Aufrufe und unterstützt Plugins. Weitere Details finden Sie in der Projekt-Roadmap.
Es unterstützt derzeit:
Föderation über mehrere MCP- und REST-Dienste hinweg
A2A (Agent-to-Agent)-Integration für externe KI-Agenten (OpenAI, Anthropic, benutzerdefiniert)
gRPC-zu-MCP-Übersetzung durch automatische, reflexionsbasierte Service-Discovery
Virtualisierung von Legacy-APIs als MCP-konforme Tools und Server
Transport über HTTP, JSON-RPC, WebSocket, SSE (mit konfigurierbarem Keepalive), stdio und streamable-HTTP
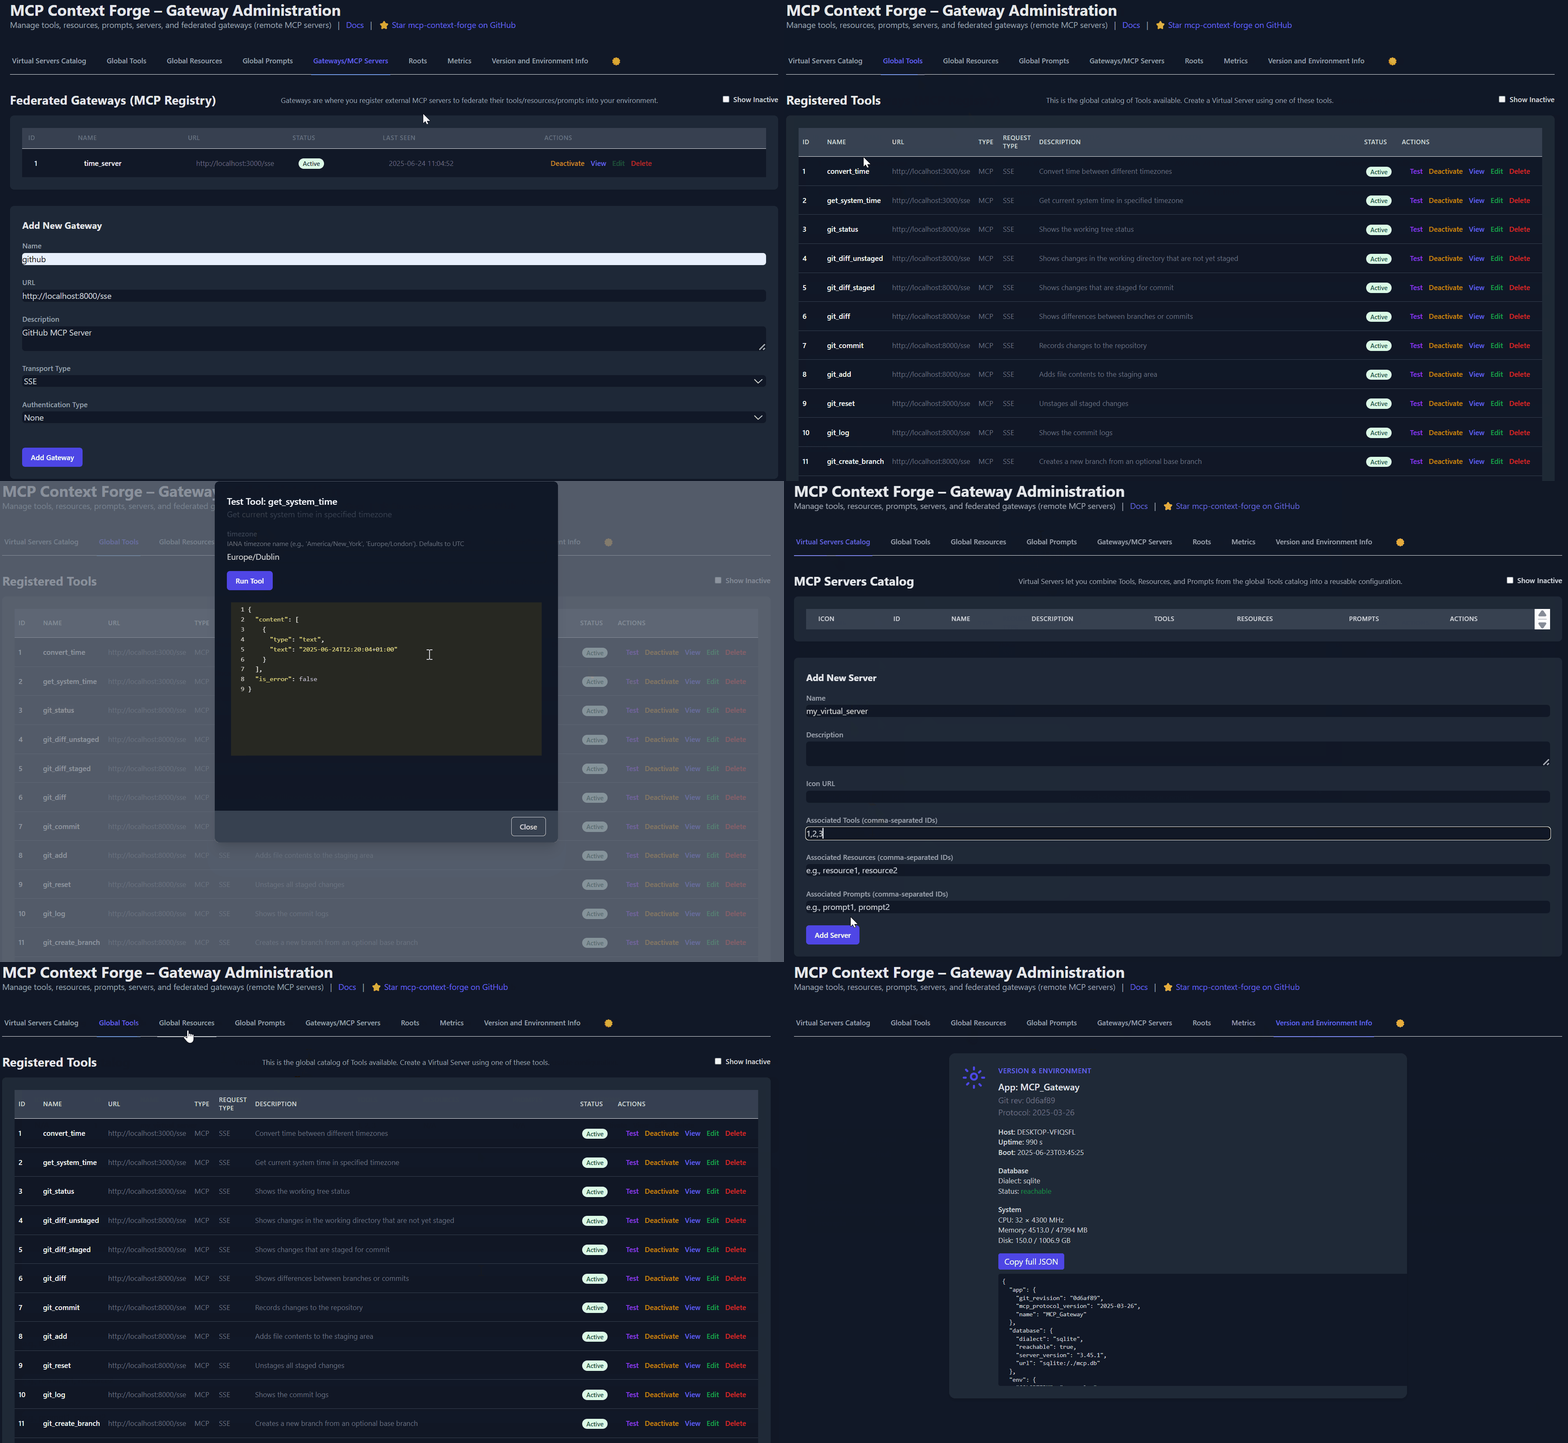
Eine Admin-UI für Echtzeit-Management, Konfiguration und Log-Überwachung (mit Unterstützung für Airgapped-Bereitstellungen)
Integrierte Authentifizierung, Wiederholungsversuche und Ratenbegrenzung mit benutzerbezogenen OAuth-Tokens und bedingungsloser Unterstützung für den X-Upstream-Authorization-Header
OpenTelemetry-Observability mit Phoenix, Jaeger, Zipkin und anderen OTLP-Backends
Skalierbare Bereitstellungen über Docker oder PyPI, Redis-basiertes Caching und Multi-Cluster-Föderation

Eine Liste kommender Funktionen finden Sie in der ContextForge Roadmap
Föderiert jeden MCP-Server oder jede REST-API
Ermöglicht die Wahl Ihrer MCP-Protokollversion (z. B. 2025-11-25)
Stellt eine einzige, einheitliche Schnittstelle für verschiedene Backends bereit
Kapselt Nicht-MCP-Dienste als virtuelle MCP-Server
Registriert Tools, Prompts und Ressourcen mit minimaler Konfiguration
gRPC-zu-MCP-Übersetzung über das Server-Reflektionsprotokoll
Automatische Service-Discovery und Methoden-Introspektion
Prompts: Jinja2-Vorlagen, multimodale Unterstützung, Rollback/Versionierung
Ressourcen: URI-basierter Zugriff, MIME-Erkennung, Caching, SSE-Updates
Tools: Nativ oder adaptiert, mit Eingabevalidierung und Nebenläufigkeitskontrollen
Admin-UI basierend auf HTMX + Alpine.js
Echtzeit-Log-Viewer mit Filter-, Such- und Exportfunktionen
Authentifizierung: Basic, JWT oder benutzerdefinierte Schemata
Strukturierte Logs, Health-Endpunkte, Metriken
Über 7.000 Tests, Makefile-Targets, Live-Reload, Pre-commit-Hooks
Anbieter-agnostisches Tracing mit Unterstützung für das OpenTelemetry (OTLP)-Protokoll
Unterstützung mehrerer Backends: Phoenix (LLM-fokussiert), Jaeger, Zipkin, Tempo, DataDog, New Relic
Verteiltes Tracing über föderierte Gateways und Dienste hinweg
Automatische Instrumentierung von Tools, Prompts, Ressourcen und Gateway-Operationen
LLM-spezifische Metriken: Token-Verbrauch, Kosten, Modellleistung
Kein Overhead bei Deaktivierung mit anmutigem Abbau (Graceful Degradation)
Siehe Observability-Dokumentation für Einrichtungsanleitungen mit Phoenix, Jaeger und anderen Backends.
Schnellstart - PyPI
ContextForge ist auf PyPI als mcp-contextforge-gateway veröffentlicht.
TLDR;:
(einzelner Befehl unter Verwendung von uv)
# Quick start with environment variables
BASIC_AUTH_PASSWORD=pass \
MCPGATEWAY_UI_ENABLED=true \
MCPGATEWAY_ADMIN_API_ENABLED=true \
PLATFORM_ADMIN_EMAIL=admin@example.com \
PLATFORM_ADMIN_PASSWORD=changeme \
PLATFORM_ADMIN_FULL_NAME="Platform Administrator" \
uvx --from mcp-contextforge-gateway mcpgateway --host 0.0.0.0 --port 4444

# Or better: use the provided .env.example
cp .env.example .env
# Edit .env to customize your settings
uvx --from mcp-contextforge-gateway mcpgateway --host 0.0.0.0 --port 4444
1 - Installieren & Ausführen (Copy-Paste-freundlich)
# 1️⃣  Isolated env + install from pypi
mkdir mcpgateway && cd mcpgateway
python3 -m venv .venv && source .venv/bin/activate
pip install --upgrade pip
pip install mcp-contextforge-gateway

# 2️⃣  Copy and customize the configuration
# Download the example environment file
curl -O https://raw.githubusercontent.com/IBM/mcp-context-forge/main/.env.example
cp .env.example .env
# Edit .env to customize your settings (especially passwords!)

# Or set environment variables directly:
export MCPGATEWAY_UI_ENABLED=true
export MCPGATEWAY_ADMIN_API_ENABLED=true
export PLATFORM_ADMIN_EMAIL=admin@example.com
export PLATFORM_ADMIN_PASSWORD=changeme
export PLATFORM_ADMIN_FULL_NAME="Platform Administrator"

BASIC_AUTH_PASSWORD=pass JWT_SECRET_KEY=my-test-key-but-now-longer-than-32-bytes \
  mcpgateway --host 0.0.0.0 --port 4444 &   # admin/pass

# 3️⃣  Generate a bearer token & smoke-test the API
export MCPGATEWAY_BEARER_TOKEN=$(python3 -m mcpgateway.utils.create_jwt_token \
    --username admin@example.com --exp 10080 --secret my-test-key-but-now-longer-than-32-bytes)

curl -s -H "Authorization: Bearer $MCPGATEWAY_BEARER_TOKEN" \
     http://127.0.0.1:4444/version | jq
# 1️⃣  Isolated env + install from PyPI
mkdir mcpgateway ; cd mcpgateway
python3 -m venv .venv ; .\.venv\Scripts\Activate.ps1
pip install --upgrade pip
pip install mcp-contextforge-gateway

# 2️⃣  Copy and customize the configuration
# Download the example environment file
Invoke-WebRequest -Uri "https://raw.githubusercontent.com/IBM/mcp-context-forge/main/.env.example" -OutFile ".env.example"
Copy-Item .env.example .env
# Edit .env to customize your settings

# Or set environment variables (session-only)
$Env:MCPGATEWAY_UI_ENABLED        = "true"
$Env:MCPGATEWAY_ADMIN_API_ENABLED = "true"
# Note: Basic auth for API is disabled by default (API_ALLOW_BASIC_AUTH=false)
$Env:JWT_SECRET_KEY               = "my-test-key-but-now-longer-than-32-bytes"
$Env:PLATFORM_ADMIN_EMAIL         = "admin@example.com"
$Env:PLATFORM_ADMIN_PASSWORD      = "changeme"
$Env:PLATFORM_ADMIN_FULL_NAME     = "Platform Administrator"

# 3️⃣  Launch the gateway
mcpgateway.exe --host 0.0.0.0 --port 4444

#   Optional: background it
# Start-Process -FilePath "mcpgateway.exe" -ArgumentList "--host 0.0.0.0 --port 4444"

# 4️⃣  Bearer token and smoke-test
$Env:MCPGATEWAY_BEARER_TOKEN = python3 -m mcpgateway.utils.create_jwt_token `
    --username admin@example.com --exp 10080 --secret my-test-key-but-now-longer-than-32-bytes

curl -s -H "Authorization: Bearer $Env:MCPGATEWAY_BEARER_TOKEN" `
     http://127.0.0.1:4444/version | jq
# 1️⃣  Isolated env + install from PyPI using uv
mkdir mcpgateway ; cd mcpgateway
uv venv
.\.venv\Scripts\activate
uv pip install mcp-contextforge-gateway

# Continue with steps 2️⃣-4️⃣ above...
Kopieren Sie .env.example nach .env und passen Sie die Einstellungen an (oder verwenden Sie sie als Umgebungsvariablen).
# 1️⃣  Spin up the sample GO MCP time server using mcpgateway.translate & docker (replace docker with podman if needed)
python3 -m mcpgateway.translate \
     --stdio "docker run --rm -i ghcr.io/ibm/fast-time-server:latest -transport=stdio" \
     --expose-sse \
     --port 8003

# Or using the official mcp-server-git using uvx:
pip install uv # to install uvx, if not already installed
python3 -m mcpgateway.translate --stdio "uvx mcp-server-git" --expose-sse --port 9000

# Alternative: running the local binary
# cd mcp-servers/go/fast-time-server; make build
# python3 -m mcpgateway.translate --stdio "./dist/fast-time-server -transport=stdio" --expose-sse --port 8002

# NEW: Expose via multiple protocols simultaneously!
python3 -m mcpgateway.translate \
     --stdio "uvx mcp-server-git" \
     --expose-sse \
     --expose-streamable-http \
     --port 9000
# Now accessible via both /sse (SSE) and /mcp (streamable HTTP) endpoints

# 2️⃣  Register it with the gateway
curl -s -X POST -H "Authorization: Bearer $MCPGATEWAY_BEARER_TOKEN" \
     -H "Content-Type: application/json" \
     -d '{"name":"fast_time","url":"http://localhost:8003/sse"}' \
     http://localhost:4444/gateways

# 3️⃣  Verify tool catalog
curl -s -H "Authorization: Bearer $MCPGATEWAY_BEARER_TOKEN" http://localhost:4444/tools | jq

# 4️⃣  Create a *virtual server* bundling those tools. Use the ID of tools from the tool catalog (Step #3) and pass them in the associatedTools list.
curl -s -X POST -H "Authorization: Bearer $MCPGATEWAY_BEARER_TOKEN" \
     -H "Content-Type: application/json" \
     -d '{"server":{"name":"time_server","description":"Fast time tools","associated_tools":[<ID_OF_TOOLS>]}}' \
     http://localhost:4444/servers | jq

# Example curl
curl -s -X POST -H "Authorization: Bearer $MCPGATEWAY_BEARER_TOKEN"
     -H "Content-Type: application/json"
     -d '{"server":{"name":"time_server","description":"Fast time tools","associated_tools":["6018ca46d32a4ac6b4c054c13a1726a2"]}}' \
     http://localhost:4444/servers | jq

# 5️⃣  List servers (should now include the UUID of the newly created virtual server)
curl -s -H "Authorization: Bearer $MCPGATEWAY_BEARER_TOKEN" http://localhost:4444/servers | jq

# 6️⃣  Client HTTP endpoint. Inspect it interactively with the MCP Inspector CLI (or use any MCP client)
npx -y @modelcontextprotocol/inspector
# Transport Type: Streamable HTTP, URL: http://localhost:4444/servers/UUID_OF_SERVER_1/mcp,  Header Name: "Authorization", Bearer Token
export MCP_AUTH="Bearer ${MCPGATEWAY_BEARER_TOKEN}"
export MCP_SERVER_URL=http://localhost:4444/servers/UUID_OF_SERVER_1/mcp
python3 -m mcpgateway.wrapper  # Ctrl-C to exit
Sie können es auch mit uv oder innerhalb von Docker/Podman ausführen - siehe den Abschnitt Container oben.
Definieren Sie im MCP Inspector die Umgebungsvariablen MCP_AUTH und MCP_SERVER_URL, wählen Sie python3 als Befehl und -m mcpgateway.wrapper als Argumente.
echo $PWD/.venv/bin/python3 # Using the Python3 full path ensures you have a working venv
export MCP_SERVER_URL='http://localhost:4444/servers/UUID_OF_SERVER_1/mcp'
export MCP_AUTH="Bearer ${MCPGATEWAY_BEARER_TOKEN}"
npx -y @modelcontextprotocol/inspector
oder
Übergeben Sie die URL und die Authentifizierung als Argumente (keine Notwendigkeit, Umgebungsvariablen zu setzen)
npx -y @modelcontextprotocol/inspector
command as `python`
Arguments as `-m mcpgateway.wrapper --url "http://localhost:4444/servers/UUID_OF_SERVER_1/mcp" --auth "Bearer <your token>"`
Bei Verwendung eines MCP-Clients wie Claude mit stdio:
{
  "mcpServers": {
    "mcpgateway-wrapper": {
      "command": "python",
      "args": ["-m", "mcpgateway.wrapper"],
      "env": {
        "MCP_AUTH": "Bearer your-token-here",
        "MCP_SERVER_URL": "http://localhost:4444/servers/UUID_OF_SERVER_1",
        "MCP_TOOL_CALL_TIMEOUT": "120"
      }
    }
  }
}
Schnellstart - Container
Verwenden Sie das offizielle OCI-Image von GHCR mit Docker oder Podman.
Hinweis: Derzeit wird arm64 in der Produktion nicht unterstützt. Wenn Sie z. B. auf MacOS mit Apple Silicon-Chips (M1, M2 usw.) arbeiten, können Sie die Container mit Rosetta ausführen oder stattdessen über PyPi installieren.
🚀 Schnellstart - Docker Compose
Starten Sie einen vollständigen Stack mit PostgreSQL und Redis in unter 30 Sekunden:
# Clone and start the stack
git clone https://github.com/IBM/mcp-context-forge.git
cd mcp-context-forge

# Start with PostgreSQL (recommended for production)
docker compose up -d

# Check status
docker compose ps

# View logs
docker compose logs -f gateway

# Access Admin UI: http://localhost:8080/admin (login with PLATFORM_ADMIN_EMAIL/PASSWORD)
# Generate API token
docker compose exec gateway python3 -m mcpgateway.utils.create_jwt_token \
  --username admin@example.com --exp 10080 --secret my-test-key-but-now-longer-than-32-bytes
Was Sie erhalten:
🗄️ PostgreSQL - Produktionsbereite Datenbank mit über 55 Tabellen
🚀 ContextForge - Voll ausgestattetes Gateway mit Admin-UI
📊 Redis - Hochleistungs-Caching und Sitzungsspeicherung
🔧 Admin-Tools - pgAdmin, Redis Insight für Datenbankmanagement
🌐 Nginx Proxy - Caching Reverse-Proxy auf Port 8080
HTTPS aktivieren (optional):
# Start with TLS enabled (auto-generates self-signed certs)
make compose-tls

# Access via HTTPS: https://localhost:8443/admin

# Or bring your own certificates:
# Unencrypted key:
mkdir -p certs
cp your-cert.pem certs/cert.pem && cp your-key.pem certs/key.pem
make compose-tls

# Passphrase-protected key:
mkdir -p certs
cp your-cert.pem certs/cert.pem && cp your-encrypted-key.pem certs/key-encrypted.pem
echo "KEY_FILE_PASSWORD=your-passphrase" >> .env
make compose-tls
☸️ Schnellstart - Helm (Kubernetes)
Bereitstellung auf Kubernetes mit Funktionen auf Enterprise-Niveau:
# Add Helm repository (when available)
# helm repo add mcp-context-forge https://ibm.github.io/mcp-context-forge
# helm repo update

# For now, use local chart
git clone https://github.com/IBM/mcp-context-forge.git
cd mcp-context-forge/charts/mcp-stack

# Install with PostgreSQL (default)
helm install mcp-gateway . \
  --set mcpContextForge.secret.PLATFORM_ADMIN_EMAIL=admin@yourcompany.com \
  --set mcpContextForge.secret.PLATFORM_ADMIN_PASSWORD=changeme \
  --set mcpContextForge.secret.JWT_SECRET_KEY=your-secret-key

# Check deployment status
kubectl get pods -l app.kubernetes.io/name=mcp-context-forge

# Port forward to access Admin UI
kubectl port-forward svc/mcp-gateway-mcp-context-forge 4444:80
# Access: http://localhost:4444/admin

# Generate API token
kubectl exec deployment/mcp-gateway-mcp-context-forge -- \
  python3 -m mcpgateway.utils.create_jwt_token \
  --username admin@yourcompany.com --exp 10080 --secret your-secret-key
SSRF-Hinweis: Helm verwendet standardmäßig strenge SSRF-Einstellungen (SSRF_ALLOW_PRIVATE_NETWORKS=false).
Wenn Sie In-Cluster-Tool-URLs registrieren (z. B. fast-time- oder fast-test-Dienste),
erlauben Sie nur Ihre Cluster-CIDRs über mcpContextForge.config.SSRF_ALLOWED_NETWORKS oder,
für lokale Benchmark-Setups, setzen Sie vorübergehend SSRF_ALLOW_PRIVATE_NETWORKS=true.
Siehe docs/docs/manage/configuration.md#ssrf-protection und docs/docs/deployment/helm.md.
Enterprise-Funktionen:
🔄 Auto-Scaling - HPA mit CPU/Speicher-Zielen
🗄️ Datenbankwahl - PostgreSQL (prod), SQLite (dev)
📊 Observability - Prometheus-Metriken, OpenTelemetry-Tracing
🔒 Sicherheit - RBAC, Netzwerkrichtlinien, Secret-Management
🚀 Hochverfügbarkeit - Multi-Replica-Bereitstellungen mit Redis-Clustering
📈 Überwachung - Integrierte Grafana-Dashboards und Alarmierung
🐳 Docker (Einzelner Container)
docker run -d --name mcpgateway \
  -p 4444:4444 \
  -e MCPGATEWAY_UI_ENABLED=true \
  -e MCPGATEWAY_ADMIN_API_ENABLED=true \
  -e HOST=0.0.0.0 \
  -e JWT_SECRET_KEY=my-test-key-but-now-longer-than-32-bytes \
  -e AUTH_REQUIRED=true \
  -e PLATFORM_ADMIN_EMAIL=admin@example.com \
  -e PLATFORM_ADMIN_PASSWORD=changeme \
  -e PLATFORM_ADMIN_FULL_NAME="Platform Administrator" \
  -e DATABASE_URL=sqlite:///./mcp.db \
  -e SECURE_COOKIES=false \
  ghcr.io/ibm/mcp-context-forge:1.0.0-RC-2

# Tail logs and generate API key
docker logs -f mcpgateway
docker run --rm -it ghcr.io/ibm/mcp-context-forge:1.0.0-RC-2 \
  python3 -m mcpgateway.utils.create_jwt_token --username admin@example.com --exp 10080 --secret my-test-key-but-now-longer-than-32-bytes
Navigieren Sie zu http://localhost:4444/admin und melden Sie sich mit PLATFORM_ADMIN_EMAIL / PLATFORM_ADMIN_PASSWORD an.
SQLite-Datenbank persistieren:
mkdir -p $(pwd)/data && touch $(pwd)/data/mcp.db && chmod 777 $(pwd)/data
docker run -d --name mcpgateway --restart unless-stopped \
  -p 4444:4444 -v $(pwd)/data:/data \
  -e DATABASE_URL=sqlite:////data/mcp.db \
  -e MCPGATEWAY_UI_ENABLED=true -e MCPGATEWAY_ADMIN_API_ENABLED=true \
  -e HOST=0.0.0.0 -e JWT_SECRET_KEY=my-test-key-but-now-longer-than-32-bytes \
  -e PLATFORM_ADMIN_EMAIL=admin@example.com -e PLATFORM_ADMIN_PASSWORD=changeme \
  ghcr.io/ibm/mcp-context-forge:1.0.0-RC-2
Host-Netzwerk (Zugriff auf lokale MCP-Server):
docker run -d --name mcpgateway --network=host \
  -v $(pwd)/data:/data -e DATABASE_URL=sqlite:////data/mcp.db \
  -e MCPGATEWAY_UI_ENABLED=true -e HOST=0.0.0.0 -e PORT=4444 \
  ghcr.io/ibm/mcp-context-forge:1.0.0-RC-2
Airgapped-Bereitstellung (kein Internet):
docker build -f Containerfile.lite -t mcpgateway:airgapped .
docker run -d --name mcpgateway -p 4444:4444 \
  -e MCPGATEWAY_UI_AIRGAPPED=true -e MCPGATEWAY_UI_ENABLED=true \
  -e HOST=0.0.0.0 -e JWT_SECRET_KEY=my-test-key-but-now-longer-than-32-bytes \
  mcpgateway:airgapped
🦭 Podman (Rootless-freundlich)
podman run -d --name mcpgateway \
  -p 4444:4444 -e HOST=0.0.0.0 -e DATABASE_URL=sqlite:///./mcp.db \
  ghcr.io/ibm/mcp-context-forge:1.0.0-RC-2