
MCP Server Template for Cursor IDE
This server template for Cursor IDE provides several functionalities:
Fetch website content: Retrieve content from specified URLs
Check server mood: Get a cheerful response with a heart ❤️
Access documentation: Fetch Railway CLI documentation with customization options
Manage prompt templates for various development tasks:
Root cause analysis and issue fixing
Starting new projects
Proceeding with tasks
Handling change requests
Analyzing and fixing linter errors
Generating unit tests
Documenting system infrastructure and tool stack
Provides Docker setup and deployment options for running the MCP server with Docker Compose, including build, run, and monitoring commands.
Supports environment variable configuration through .env files for customizing server behavior and connection settings.
Enables one-click deployment of the MCP server to Heroku cloud platform, providing a hosted endpoint that can be connected to Cursor IDE.
Provides macOS-specific installation instructions using Homebrew for setting up the uv package manager.
Includes test support with pytest for verifying the functionality of the MCP server components.
Supports traditional Python setup using the uv package manager for installation and running the MCP server with various transport options.
Fetches and provides access to Railway CLI documentation through dedicated tools for retrieving and optimizing Railway documentation content.
Click on "Install Server".
Wait a few minutes for the server to deploy. Once ready, it will show a "Started" state.
In the chat, type
@followed by the MCP server name and your instructions, e.g., "@MCP Server Template for Cursor IDEwhat tools does this template provide?"
That's it! The server will respond to your query, and you can continue using it as needed.
Here is a step-by-step guide with screenshots.
MCP Server Template for Cursor IDE
A simple template for creating custom tools for Cursor IDE using Model Context Protocol (MCP). Create your own repository from this template, modify the tools, and connect them to your Cursor IDE.
Quick Start
Click "Deploy to Heroku" button

After deployment, configure Cursor:
Open Cursor Settings → Features
Add new MCP server
Use your Heroku URL with
/ssepath (e.g.,https://<your-app-name>.herokuapp.com/sse)
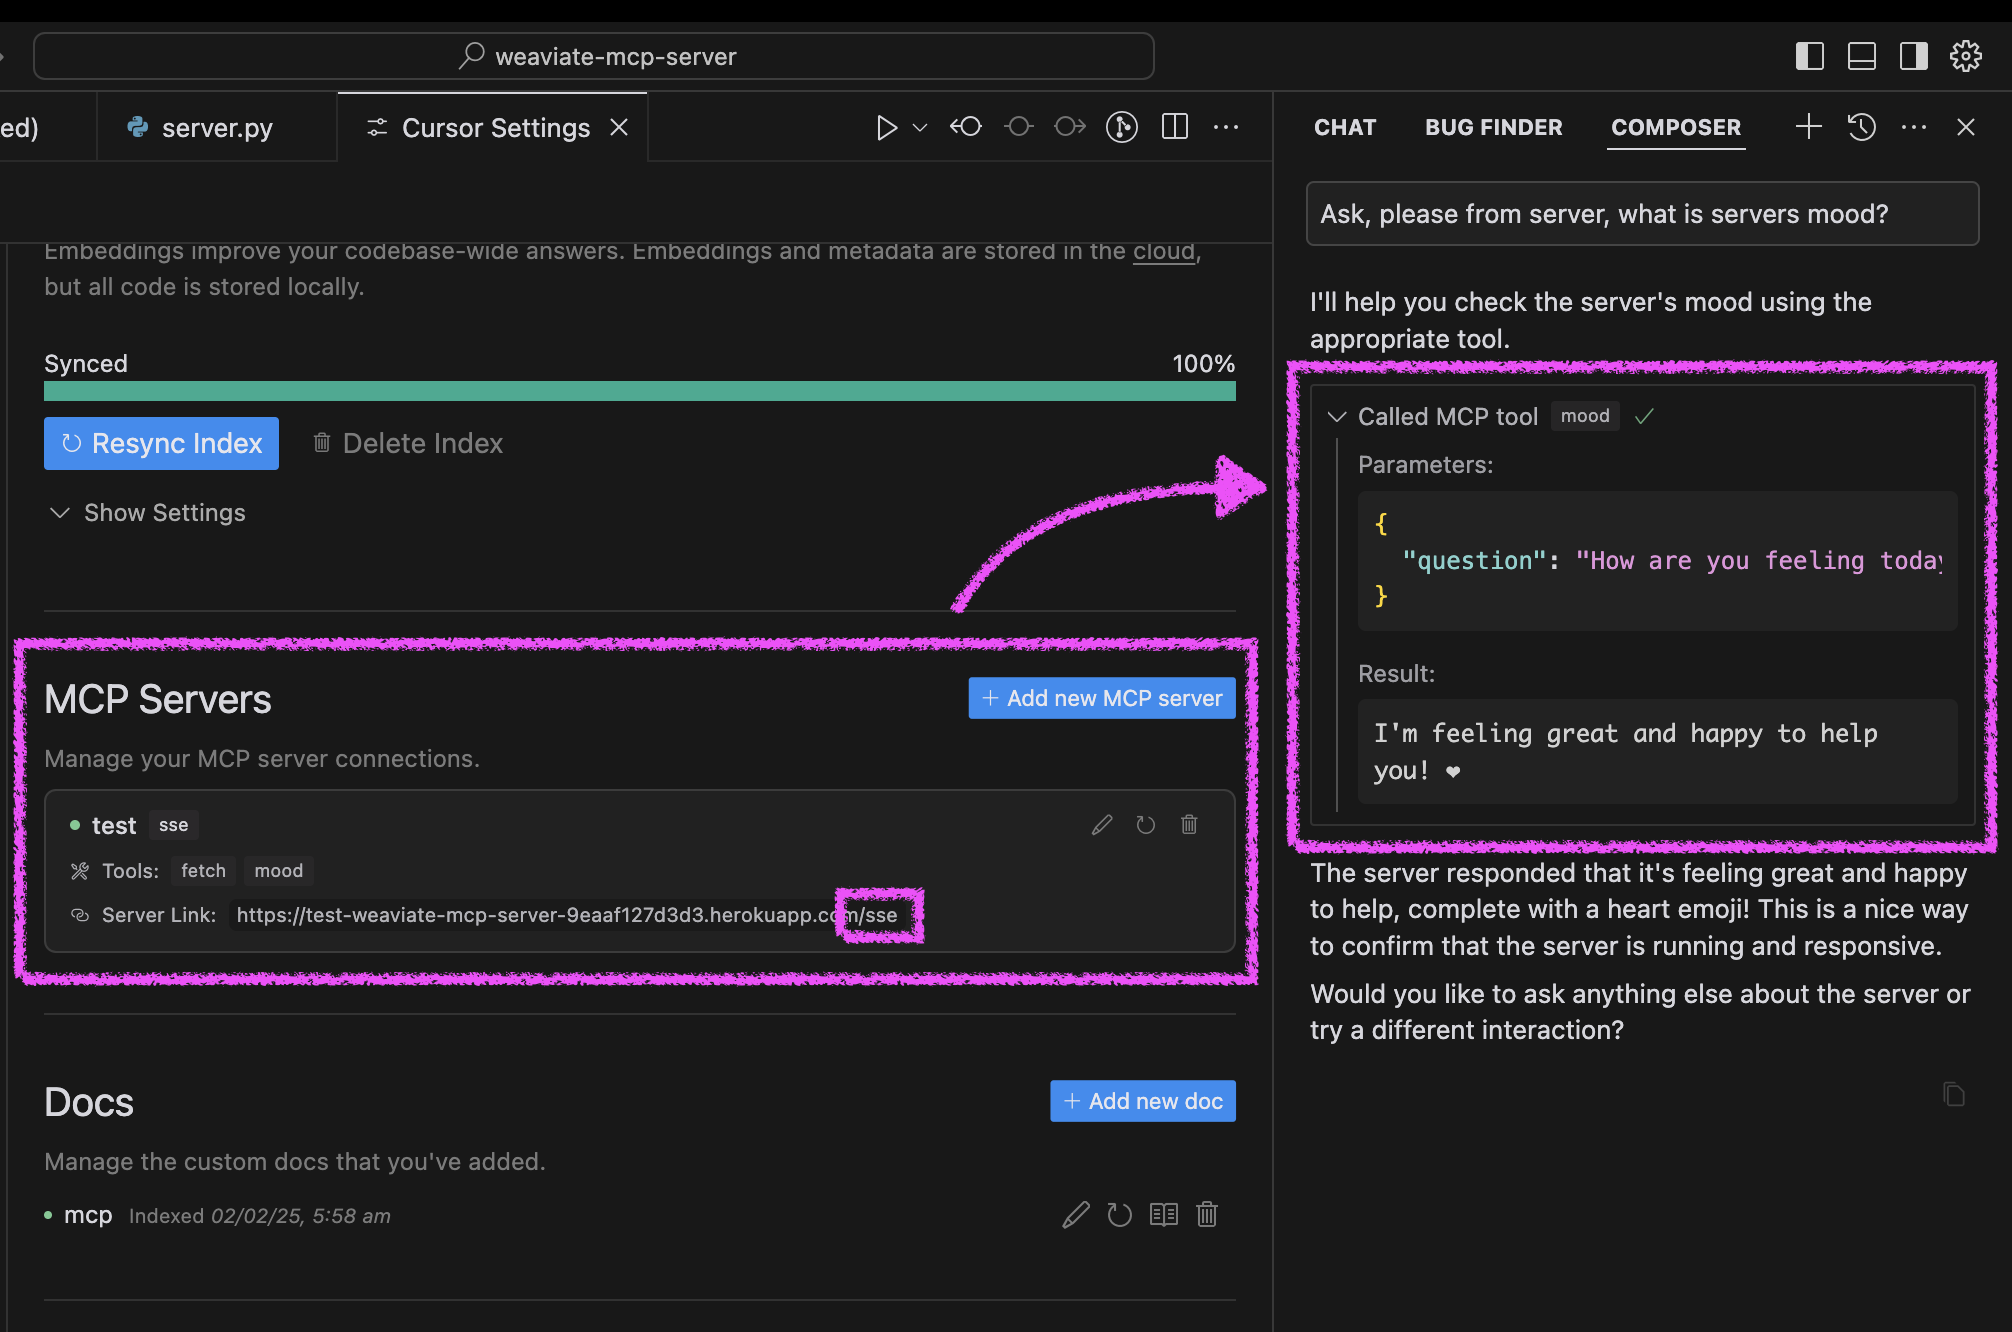
Test your agent's mood in Cursor:
Ask your agent "Please ask about our server mood and let me know how it is."
The server will respond with a cheerful message and a heart ❤️
Related MCP server: MCP Server Template for Cursor IDE
Alternative Setup Methods
You can run the server in three ways: using Docker, traditional Python setup, or directly in Cursor IDE.
Docker Setup
The project includes Docker support for easy deployment:
Initial setup:
# Clone the repository
git clone https://github.com/kirill-markin/weaviate-mcp-server.git
cd weaviate-mcp-server

# Create environment file
cp .env.example .env
Build and run using Docker Compose:
# Build and start the server
docker compose up --build -d

# View logs
docker compose logs -f

# Check server status
docker compose ps

# Stop the server
docker compose down
The server will be available at:
SSE endpoint: http://localhost:8000/sse
Quick test:
# Test the server endpoint
curl -i http://localhost:8000/sse
Connect to Cursor IDE:
Open Cursor Settings → Features
Add new MCP server
Type: Select "sse"
URL: Enter
http://localhost:8000/sse
Traditional Setup
First, install the uv package manager:
# Install uv on macOS
brew install uv
# Or install via pip (any OS)
pip install uv
Start the server using either stdio (default) or SSE transport:
# Install the package with development dependencies
uv pip install -e ".[dev]"

# Using stdio transport (default)
uv run mcp-hitchcode

# Using SSE transport on custom port
uv run mcp-hitchcode --transport sse --port 8000

# Run tests
uv run pytest -v
After installation, you can connect the server directly to Cursor IDE:
Right-click on the
cursor-run-mcp-server.shfile in CursorSelect "Copy Path" to copy the absolute path
Open Cursor Settings (gear icon)
Navigate to Features tab
Scroll down to "MCP Servers"
Click "Add new MCP server"
Fill in the form:
Name: Choose any name (e.g., "my-mcp-server-1")
Type: Select "stdio" (not "sse" because we run the server locally)
Command: Paste the absolute path to
cursor-run-mcp-server.shthat you copied earlier. For example:/Users/kirillmarkin/weaviate-mcp-server/cursor-run-mcp-server.sh
Environment Variables
Available environment variables (can be set in .env):
MCP_SERVER_PORT(default: 8000) - Port to run the server onMCP_SERVER_HOST(default: 0.0.0.0) - Host to bind the server toDEBUG(default: false) - Enable debug modeMCP_USER_AGENT- Custom User-Agent for website fetching
Additional options
Installing via Smithery
To install MCP Server Template for Cursor IDE for Claude Desktop automatically via Smithery:
npx -y @smithery/cli install @kirill-markin/example-mcp-server --client claudeGlama server review
Maintenance
Resources
Unclaimed servers have limited discoverability.
Looking for Admin?
If you are the server author, to access and configure the admin panel.
Appeared in Searches
Latest Blog Posts
- Who's Calling? MCP Hosts Are an Identity Blind Spot (And the Spec Knows It)By Om-Shree-0709 on .mcpAgent IdentityOAuth 2.1
- Your AI Chatbot Just Exposed Your CEO's Salary to an InternBy Om-Shree-0709 on .Agent IdentityMCP SecurityOAuth Delegation
- Why MCP Servers Need Execution Sandboxing (And Why Your Current Stack Isn't Enough)By Om-Shree-0709 on .Agentic AiPrompt InjectionWebAssembly
MCP directory API
We provide all the information about MCP servers via our MCP API.
curl -X GET 'https://glama.ai/api/mcp/v1/servers/jankowtf/mcp-hitchcode'
If you have feedback or need assistance with the MCP directory API, please join our Discord server