QGISMCP

Integrations

  • Allows direct interaction with and control of QGIS GIS software, enabling project creation/manipulation, layer loading/management, processing algorithm execution, and running arbitrary PyQGIS code for geospatial data visualization and analysis.

QGISMCP - QGIS 模型上下文协议集成

QGISMCP 通过模型上下文协议 (MCP) 将QGIS连接到Claude AI ,使 Claude 能够直接与 QGIS 交互并控制 QGIS。此集成可实现快速辅助项目创建、图层加载、代码执行等功能。

该项目主要基于Siddharth AhujaBlenderMCP项目

特征

  • 双向通信:通过基于套接字的服务器将 Claude AI 连接到 QGIS。
  • 项目操作:在 QGIS 中创建、加载和保存项目。
  • 图层操作:向项目添加和删除矢量或栅格图层。
  • 执行处理:执行处理算法(处理工具箱)。
  • 代码执行:使用 Claude 在 QGIS 中运行任意 Python 代码。功能非常强大,但使用此工具时也需格外谨慎。

成分

该系统由两个主要组件组成:

  1. QGIS 插件:QGIS 插件,在 QGIS 内部创建一个套接字服务器来接收和执行命令。
  2. MCP 服务器:一个实现模型上下文协议并连接到 QGIS 插件的 Python 服务器。

安装

先决条件

  • QGIS 3.X(仅在 3.22 上测试)
  • 云桌面
  • Python 3.10 或更高版本
  • uv 包管理器:

如果你使用的是 Mac,请将 uv 安装为

brew install uv

在 Windows Powershell 上

powershell -ExecutionPolicy ByPass -c "irm https://astral.sh/uv/install.ps1 | iex"

否则,安装说明在其网站上:安装 uv

⚠️ 在安装 UV 之前请勿继续

下载代码

下载此 repo 到你的电脑。你可以使用以下命令克隆它:

git clone git@github.com:jjsantos01/qgis_mcp.git

QGIS 插件

您需要将文件夹qgis_mcp_plugin及其内容复制到您的 QGIS 配置文件插件文件夹中。

您可以在 QGIS 中获取您的配置文件文件夹,进入菜单Settings - > User profiles - > Open active profile folder然后,转到Python/plugins并粘贴文件夹qgis_mcp_plugin

在 Windows 计算机上,插件文件夹通常位于: C:\Users\USER\AppData\Roaming\QGIS\QGIS3\profiles\default\python\plugins和在 MacOS 上: ~/Library/Application\ Support/QGIS/QGIS3/profiles/default/python/plugins

然后关闭 QGIS 并重新打开。前往菜单选项Plugins -> Installing and Managing Plugins ,选择All选项卡并搜索“QGIS MCP”,然后勾选 QGIS MCP 复选框。

Claude 用于桌面集成

转到Claude > Settings > Developer > Edit Config > claude_desktop_config.json以包含以下内容:

如果您找不到“开发人员选项卡”或claude_desktop_config.json ,请查看此文档

{ "mcpServers": { "qgis": { "command": "uv", "args": [ "--directory", "/ABSOLUTE/PATH/TO/PARENT/REPO/FOLDER/qgis_mcp/src/qgis_mcp", "run", "qgis_mcp_server.py" ] } } }

用法

启动连接

  1. 在 QGIS 中,转到plugins -> QGIS MCP -> QGIS MCP
  2. 点击“启动服务器”

与 Claude 一起使用

一旦在 Claude 上设置了配置文件,并且服务器在 QGIS 上运行,您将看到一个带有 QGIS MCP 工具的锤子图标。
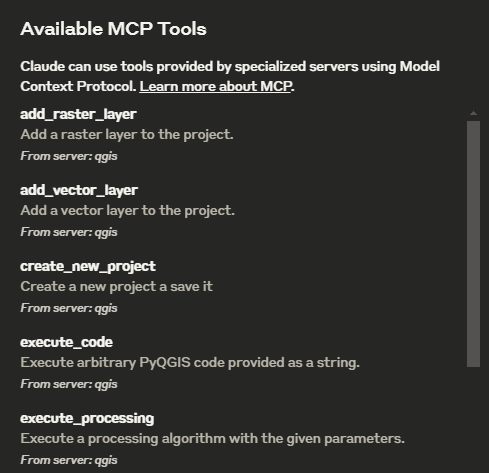
工具

  • ping - 简单的 ping 命令来检查服务器连接
  • get_qgis_info - 获取有关当前安装的 QGIS 信息
  • load_project - 从指定路径加载 QGIS 项目
  • create_new_project创建新项目并保存
  • get_project_info - 获取当前项目信息
  • add_vector_layer - 向项目添加矢量图层
  • add_raster_layer - 向项目添加栅格图层
  • get_layers - 检索当前项目中的所有层
  • remove_layer - 根据 ID 从项目中删除图层
  • zoom_to_layer - 缩放到指定图层的范围
  • get_layer_features - 从具有可选限制的矢量图层中检索特征
  • execute_processing处理算法
  • save_project - 将当前项目保存到给定路径
  • render_map - 将当前地图视图渲染为图像文件
  • execute_code以字符串形式提供的任意 PyQGIS 代码

示例命令

这是我用于演示的示例:

You have access to the tools to work with QGIS. You will do the following: 1. Ping to check the connection. If it works, continue with the following steps. 2. Create a new project and save it at: "C:/Users/USER/GitHub/qgis_mcp/data/cdmx.qgz" 3. Load the vector layer: ""C:/Users/USER/GitHub/qgis_mcp/data/cdmx/mgpc_2019.shp" and name it "Colonias". 4. Load the raster layer: "C:/Users/USER/GitHub/qgis_mcp/data/09014.tif" and name it "BJ" 5. Zoom to the "BJ" layer. 6. Execute the centroid algorithm on the "Colonias" layer. Skip the geometry check. Save the output to "colonias_centroids.geojson". 7. Execute code to create a choropleth map using the "POB2010" field in the "Colonias" layer. Use the quantile classification method with 5 classes and the Spectral color ramp. 8. Render the map to "C:/Users/USER/GitHub/qgis_mcp/data/cdmx.png" 9. Save the project.
-
security - not tested
F
license - not found
-
quality - not tested

通过模型上下文协议将 QGIS 连接到 Claude AI,实现 AI 辅助项目创建、图层操作、处理算法执行以及在 QGIS 内运行 Python 代码。

  1. Features
    1. Components
      1. Installation
        1. Prerequisites
        2. Download code
        3. QGIS plugin
        4. Claude for Desktop Integration
      2. Usage
        1. Starting the Connection
        2. Using with Claude
        3. Example Commands
      ID: s4qv0wycq6