🪄 ImageSorcery MCP

by sunriseapps
MIT License
8
  • Linux
  • Apple
Integrations
  • Supports downloading and using models from Hugging Face Hub for various computer vision tasks like object detection.

  • Uses Imgur for image hosting and sharing in the demonstration examples, displaying the results of image processing operations.

  • Utilizes NumPy for image manipulation operations, particularly for the cropping functionality through OpenCV's NumPy slicing approach.

🪄 ImageSorcery MCP

基于 ComputerVision 的🪄 图像识别和编辑工具,适用于 AI 助手

❌ 不使用 ImageSorcery MCP

AI助手在处理图像时受到限制:

  • ❌无法直接修改或分析图像
  • ❌ 无法裁剪、调整大小或处理图像
  • ❌ 一些 LLM 无法检测物体或从图像中提取文本
  • ❌ 仅限于口头描述,没有视觉处理

✅ 使用 ImageSorcery MCP

🪄 ImageSorcery为 AI 助手提供强大的图像处理能力:

  • ✅ 精确裁剪、调整大小和旋转图像
  • ✅ 在图像上绘制文本和形状
  • ✅ 使用最先进的模型检测物体
  • ✅ 使用 OCR 从图像中提取文本
  • ✅ 获取详细的图像元数据
  • ✅ 使用各种预先训练的模型进行物体检测、OCR 等

只需让你的人工智能帮助完成图像任务:

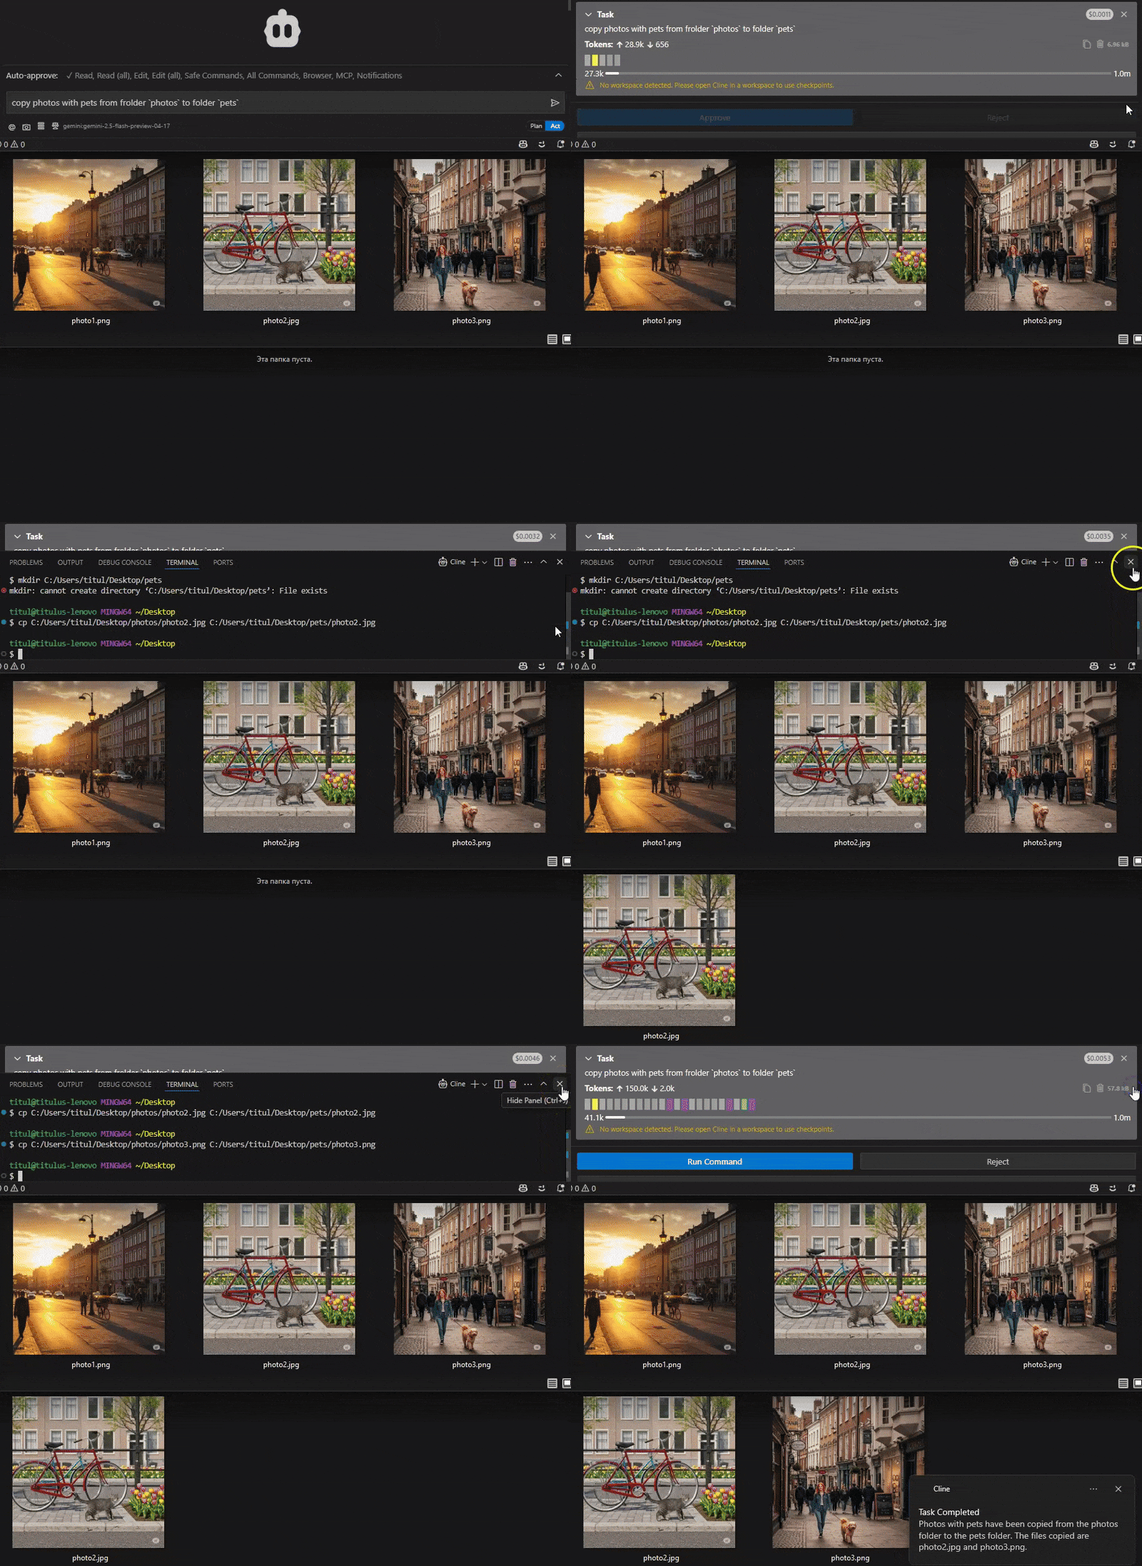
“将带有宠物的照片从photos夹复制到pets文件夹”

“在 photo.jpg 中找到一只猫,并将图像的高度和宽度裁剪一半,使猫位于中心” 😉***提示:*使用文件的完整路径”。

“使用foduucom/web-form-ui-field-detection模型对这个form.jpg上的表单字段进行计数,并使用已描述字段的列表填充form.md 😉***提示:*指定模型和置信度”。

😉***提示:*添加“使用 imagesorcery”以确保它将使用适当的工具。

您的工具将结合下面列出的多个工具来实现您的目标。

🛠️ 可用工具

工具描述示例提示
crop使用 OpenCV 的 NumPy 切片方法裁剪图像“将我的图像‘input.png’从坐标(10,10)裁剪到(200,200)并将其保存为‘cropped.png’”
resize使用 OpenCV 调整图像大小“将我的图像‘photo.jpg’调整为 800x600 像素并将其保存为‘resized_photo.jpg’”
rotate使用 imutils.rotate_bound 函数旋转图像“将我的图像‘photo.jpg’旋转 45 度并将其保存为‘rotated_photo.jpg’”
draw_texts使用 OpenCV 在图像上绘制文本“在位置 (50,50) 添加文字‘Hello World’,并在我的图片‘photo.jpg’的右下角添加‘Copyright 2023’”
draw_rectangles使用 OpenCV 在图像上绘制矩形“在我的图片‘photo.jpg’上从 (50,50) 到 (150,100) 绘制一个红色矩形,并从 (200,150) 到 (300,250) 绘制一个填充的蓝色矩形”
get_metainfo获取图像文件的元数据信息“获取有关我的图像‘photo.jpg’的元数据信息”
detect使用 Ultralytics 的模型检测图像中的物体“检测我的图像‘photo.jpg’中的物体,置信度阈值为 0.4”
find根据文本描述查找图像中的对象“在我的图片‘photo.jpg’中查找所有置信度阈值为 0.4 的狗”
get_models列出模型目录中所有可用的模型“列出模型目录中所有可用的模型”
ocr使用 EasyOCR 对图像进行光学字符识别 (OCR)“使用 OCR 从我的图像‘document.jpg’中提取英语文本”

😉***提示:*每个工具的详细信息和使用说明可以在工具的/src/imagesorcery_mcp/tools/README.md中找到。

🚀 入门

要求

  • Python 3.10或更高版本
  • Claude.appCline或其他 MCP 客户端

安装

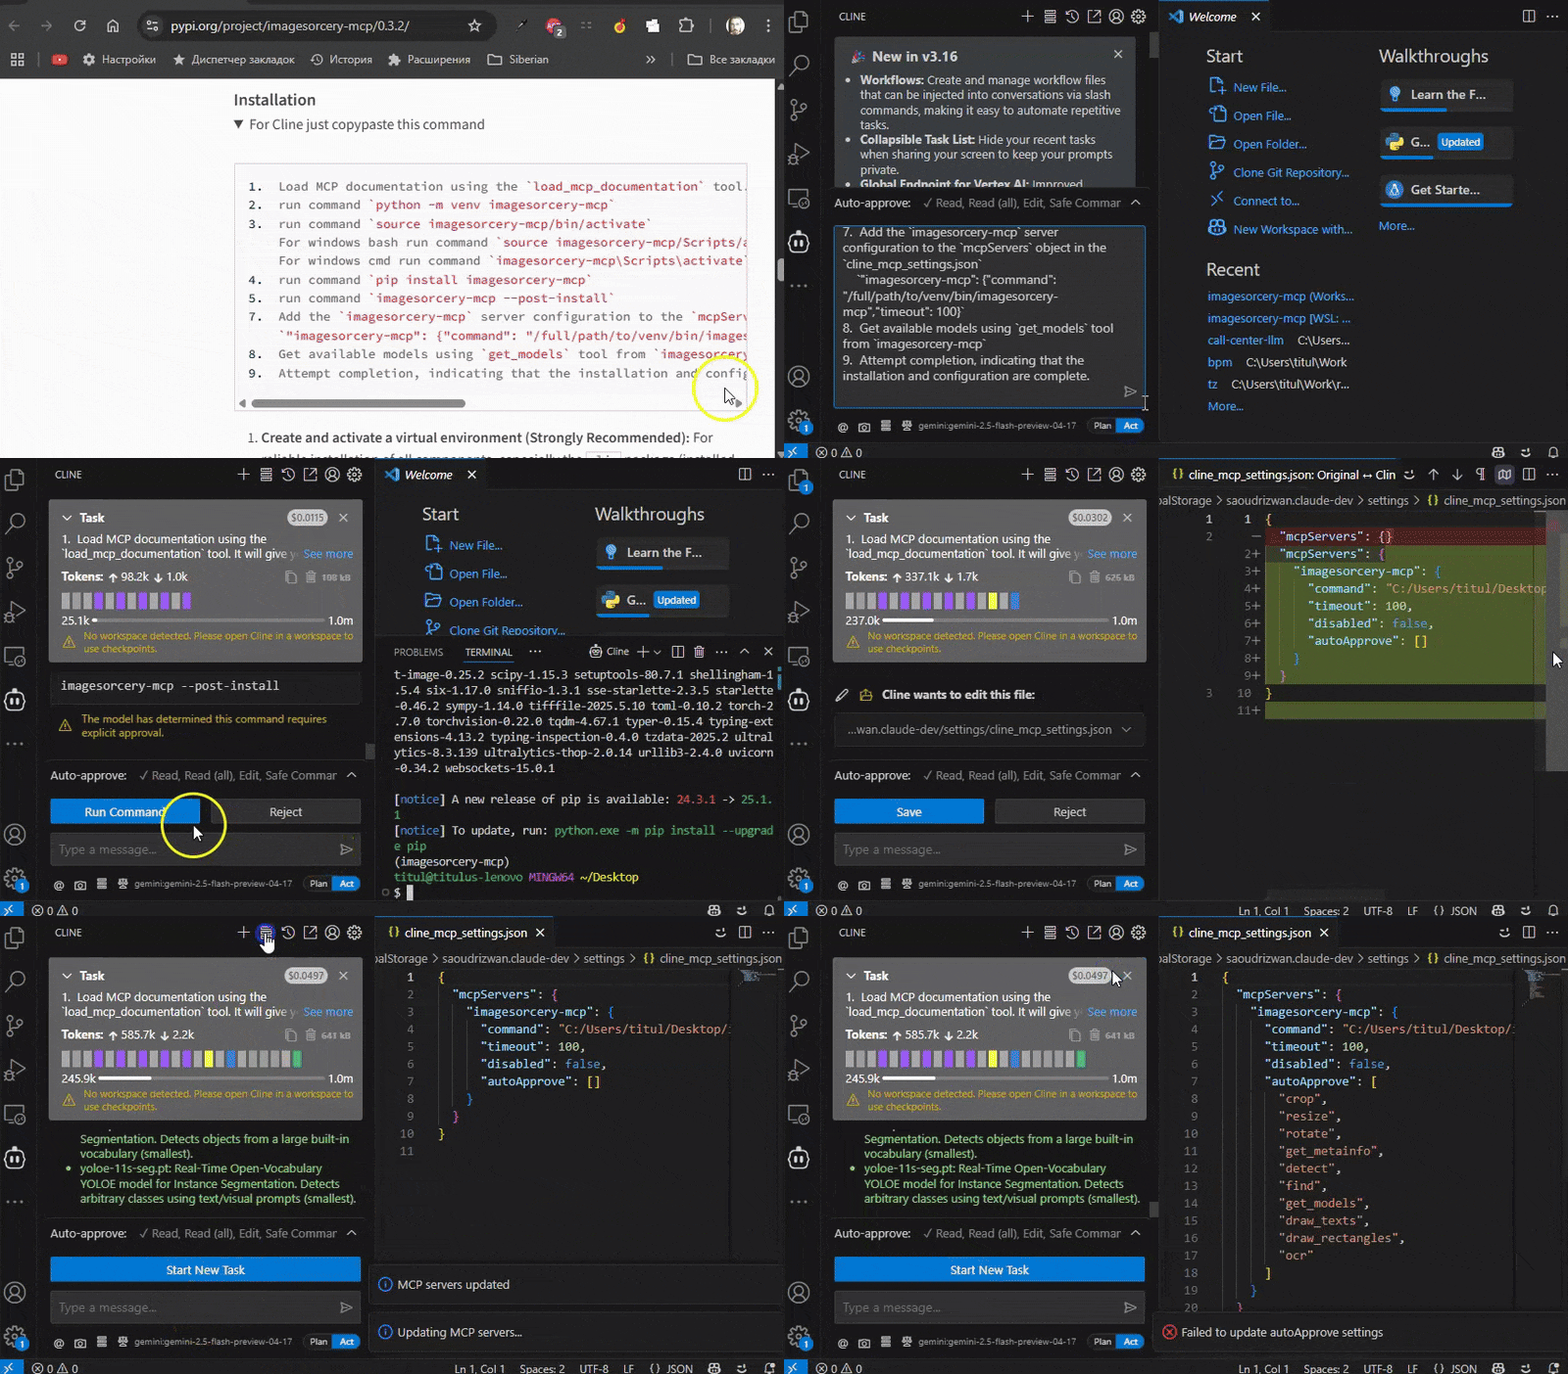
1. Load MCP documentation if you have the tool for it. It will give you path to *MCP-configuration file* and other needed instructions. 2. Run command `python -m venv imagesorcery-mcp` 3. Run command `source imagesorcery-mcp/bin/activate` For windows bash run command `source imagesorcery-mcp/Scripts/activate` For windows cmd run command `imagesorcery-mcp\Scripts\activate` 4. Run command `pip install imagesorcery-mcp` 5. Run command `imagesorcery-mcp --post-install` 6. Create or modify *MCP-configuration file*. 7. Add the `imagesorcery-mcp` server configuration to the `mcpServers` object in the *MCP-configuration file* `"imagesorcery-mcp": {"command": "/full/path/to/venv/bin/imagesorcery-mcp","timeout": 100}` 8. Get available models using `get_models` tool from `imagesorcery-mcp` 9. Attempt completion, indicating that the installation and configuration are complete.
  1. **创建并激活虚拟环境(强烈推荐):**为了可靠地安装所有组件,尤其是clip包(通过安装后脚本安装),强烈建议使用 Python 的内置venv模块而不是uv venv
    python -m venv imagesorcery-mcp source imagesorcery-mcp/bin/activate # For Linux/macOS # source imagesorcery-mcp\Scripts\activate # For Windows
  2. **将包安装到激活的虚拟环境中:**您可以使用pipuv pip
    pip install imagesorcery-mcp # OR, if you prefer using uv for installation into the venv: # uv pip install imagesorcery-mcp
  3. **运行安装后脚本:**此步骤至关重要。它会下载所需的模型,并尝试将 GitHub 上的clip Python 包安装到活动的虚拟环境中。
    imagesorcery-mcp --post-install
  • 创建一个models目录(通常在虚拟环境的站点包目录内,或者如果全局安装则在用户特定位置)来存储预先训练的模型。
  • 在那里生成初始models/model_descriptions.json文件。
  • detect工具所需的默认 YOLO 模型( yoloe-11l-seg-pf.ptyoloe-11s-seg-pf.ptyoloe-11l-seg.ptyoloe-11s-seg.pt )下载到此models目录中。
  • 尝试将 Ultralytics GitHub 仓库中的clip Python 包直接安装到活动的 Python 环境中。这是find工具中文本提示功能所必需的。
  • find工具所需的 CLIP 模型文件下载到models目录中。

您可以随时运行此过程来恢复默认模型并尝试安装clip

  • **使用uv venv创建虚拟环境:**根据测试,使用uv venv创建的虚拟环境可能无法包含pip ,从而导致imagesorcery-mcp --post-install脚本无法自动从 GitHub 安装clip包(这可能会导致在clip安装步骤中出现“没有名为 pip 的模块”错误)。如果您选择使用uv venv
    1. 创建并激活您的uv venv
    2. 安装imagesorcery-mcpuv pip install imagesorcery-mcp
    3. clip包手动安装到活动的uv venv中:
      uv pip install git+https://github.com/ultralytics/CLIP.git
    4. 运行imagesorcery-mcp --post-install 。这将下载模型,但可能无法安装clip Python 包。为了通过安装后脚本更顺畅地自动安装clip ,建议使用python -m venv (如上文步骤 1 所述)来创建虚拟环境。
  • **使用uvx imagesorcery-mcp --post-install**直接使用uvx运行安装后脚本(例如, uvx imagesorcery-mcp --post-install )可能会导致clip Python 包安装失败。这是因为uvx创建的临时环境通常不提供脚本可用的pip 。此命令会下载模型,但不会安装clip包。如果您打算使用uvx运行主imagesorcery-mcp服务器并需要clip功能,则需要确保clip包安装在uvx可以找到的 Python 环境中,或者考虑将imagesorcery-mcp安装到使用python -m venv创建的持久环境中。

⚙️ 配置 MCP 客户端

将这些设置添加到您的 MCP 客户端。如果imagesorcery-mcp安装后位于系统 PATH 中,您可以直接使用imagesorcery-mcp作为命令。否则,您需要提供可执行文件的完整路径。

"mcpServers": { "imagesorcery-mcp": { "command": "imagesorcery-mcp", // Or /full/path/to/venv/bin/imagesorcery-mcp if installed in a venv "transportType": "stdio", "autoApprove": ["detect", "crop", "get_models", "draw_texts", "get_metainfo", "rotate", "resize", "classify", "draw_rectangles", "find", "ocr"], "timeout": 100 } }
"mcpServers": { "imagesorcery-mcp": { "command": "imagesorcery-mcp.exe", // Or C:\\full\\path\\to\\venv\\Scripts\\imagesorcery-mcp.exe if installed in a venv "transportType": "stdio", "autoApprove": ["detect", "crop", "get_models", "draw_texts", "get_metainfo", "rotate", "resize", "classify", "draw_rectangles", "find", "ocr"], "timeout": 100 } }

📦其他型号

某些工具要求在models目录中提供特定模型:

# Download models for the detect tool download-yolo-models --ultralytics yoloe-11l-seg download-yolo-models --huggingface ultralytics/yolov8:yolov8m.pt

下载模型时,脚本会自动更新models/model_descriptions.json文件:

  • 对于 Ultralytics 模型:描述在src/imagesorcery_mcp/scripts/create_model_descriptions.py中预定义,包括有关每个模型的用途、大小和特征的详细信息。
  • 对于 Hugging Face 模型:描述会自动从 Hugging Face Hub 上的模型卡中提取。脚本会尝试使用模型索引或描述第一行中的模型名称。

下载模型后,建议检查models/model_descriptions.json中的描述,并根据需要进行调整,以提供有关模型功能和用例的更准确或详细的信息。

🤝 贡献

目录结构

该存储库的组织结构如下:

. ├── .gitignore # Specifies intentionally untracked files that Git should ignore. ├── pyproject.toml # Configuration file for Python projects, including build system, dependencies, and tool settings. ├── pytest.ini # Configuration file for the pytest testing framework. ├── README.md # The main documentation file for the project. ├── setup.sh # A shell script for quick setup (legacy, for reference or local use). ├── models/ # This directory stores pre-trained models used by tools like `detect` and `find`. It is typically ignored by Git due to the large file sizes. │ ├── model_descriptions.json # Contains descriptions of the available models. │ ├── settings.json # Contains settings related to model management and training runs. │ └── *.pt # Pre-trained model. ├── src/ # Contains the source code for the 🪄 ImageSorcery MCP server. │ └── imagesorcery_mcp/ # The main package directory for the server. │ ├── __init__.py # Makes `imagesorcery_mcp` a Python package. │ ├── __main__.py # Entry point for running the package as a script. │ ├── logging_config.py # Configures the logging for the server. │ ├── server.py # The main server file, responsible for initializing FastMCP and registering tools. │ ├── logs/ # Directory for storing server logs. │ ├── scripts/ # Contains utility scripts for model management. │ │ ├── README.md # Documentation for the scripts. │ │ ├── __init__.py # Makes `scripts` a Python package. │ │ ├── create_model_descriptions.py # Script to generate model descriptions. │ │ ├── download_clip.py # Script to download CLIP models. │ │ ├── post_install.py # Script to run post-installation tasks. │ │ └── download_models.py # Script to download other models (e.g., YOLO). │ └── tools/ # Contains the implementation of individual MCP tools. │ ├── README.md # Documentation for the tools. │ ├── __init__.py # Import the central logger │ └── *.py # Implements the tool. └── tests/ # Contains test files for the project. ├── test_server.py # Tests for the main server functionality. ├── data/ # Contains test data, likely image files used in tests. └── tools/ # Contains tests for individual tools.

开发设置

  1. 克隆存储库:
git clone https://github.com/sunriseapps/imagesorcery-mcp.git # Or your fork cd imagesorcery-mcp
  1. (推荐)创建并激活虚拟环境:
python -m venv venv source venv/bin/activate # For Linux/macOS # venv\Scripts\activate # For Windows
  1. 以可编辑模式安装软件包以及开发依赖项:
pip install -e ".[dev]"

这将安装imagesorcery-mcp以及来自[project.dependencies][project.optional-dependencies].dev所有依赖项(包括buildtwine )。

规则

这些规则适用于所有贡献者:人类和人工智能。

  1. 阅读项目中的所有README.md文件。了解项目结构和目的。了解贡献指南。仔细思考它与你的任务有何关联,以及如何进行相应的修改。
  2. 阅读pyproject.toml 。重点关注以下几个部分: [tool.ruff][tool.ruff.lint][project.optional-dependencies][project]dependencies 。严格遵循pyproject.toml中定义的代码风格。遵循pyproject.toml依赖项中定义的技术栈,如果没有充分的理由,请勿添加任何新的依赖项。
  3. 在新文件和现有文件中编写代码。如果需要新的依赖项,请更新pyproject.toml并通过pip install -e .pip install -e ".[dev]"安装它们。请勿直接通过pip install安装。请查看现有源代码以获取示例(例如src/imagesorcery_mcp/server.pysrc/imagesorcery_mcp/tools/crop.py )。请遵循现有代码的代码风格、命名约定、输入输出数据格式、代码结构、架构等。
  4. 使用您的更改更新相关的README.md文件。请遵循现有README.md文件的格式和结构。
  5. 为你的代码编写测试。查看现有测试用例(例如tests/test_server.pytests/tools/test_crop.py )。遵循现有测试用例的代码风格、命名规范、输入输出数据格式、代码结构、架构等。
  6. 运行测试和 linter 以确保一切正常:
pytest ruff check .

如果失败,请修复代码并进行测试。所有新代码必须符合 Linter 规则并通过所有测试。

编码提示

  • 在适当的情况下使用类型提示
  • 使用 pydantic 进行数据验证和序列化

📝 有疑问吗?

如果您对此项目有任何疑问、问题或建议,请随时联系:

  • 项目作者: titulus ,来自 LinkedIn
  • Sunrise Apps 首席执行官: Vlad Karm (来自 LinkedIn)

您还可以在存储库中打开问题以报告错误或请求功能。

📜 许可证

本项目遵循 MIT 许可证。这意味着您可以自由使用、修改和分发该软件,但须遵守 MIT 许可证的条款和条件。
Related MCP Servers

View all related MCP servers

MCP directory API

We provide all the information about MCP servers via our MCP API.

curl -X GET 'https://glama.ai/api/mcp/v1/servers/sunriseapps/imagesorcery-mcp'

If you have feedback or need assistance with the MCP directory API, please join our Discord server