
Concurrent Browser MCP
Provides browser automation capabilities, allowing interaction with websites through Firefox browser instances.
Supports navigation and interaction with GitHub pages, as demonstrated in the screenshot testing functionality.
Enables extraction of Markdown content from webpages with the browser_get_markdown tool.
Click on "Install Server".
Wait a few minutes for the server to deploy. Once ready, it will show a "Started" state.
In the chat, type
@followed by the MCP server name and your instructions, e.g., "@Concurrent Browser MCPopen three browser tabs to google.com, youtube.com, and github.com in parallel"
That's it! The server will respond to your query, and you can continue using it as needed.
Here is a step-by-step guide with screenshots.
concurrent-browser-mcp
A multi-concurrent browser MCP (Model Context Protocol) server built with Playwright.
中文 | English
Features
🚀 Multi-Instance Concurrency: Support running multiple browser instances simultaneously
🎯 Instance Management: Dynamically create, manage, and clean up browser instances
🔧 Flexible Configuration: Support various browser types and custom configurations
🛡️ Resource Management: Automatically clean up timed-out instances to prevent resource leaks
🌐 Full Feature Support: Complete browser automation capabilities (navigation, clicking, input, screenshots, etc.)
💻 Cross-Platform: Support Chromium, Firefox, WebKit
Related MCP server: Better Browser MCP
Installation
Option 1: Install from npm (Recommended)
# Global installation
npm install -g concurrent-browser-mcp

# Or use npx directly (no installation required)
npx concurrent-browser-mcp
Option 2: Build from Source
# Clone repository
git clone https://github.com/sailaoda/concurrent-browser-mcp.git
cd concurrent-browser-mcp

# Install dependencies
npm install

# Build project
npm run build

# Optional: Global link (for local development)
npm link
Option 3: Quick Install Script
git clone https://github.com/sailaoda/concurrent-browser-mcp.git
cd concurrent-browser-mcp
./install.sh
Quick Start
1. Basic Usage
# Start server (default configuration)
npx concurrent-browser-mcp

# Custom configuration
npx concurrent-browser-mcp --max-instances 25 --browser firefox --headless false
2. MCP Client Configuration
Choose the appropriate configuration based on your installation method:
Using npm global installation or npx
{
  "mcpServers": {
    "concurrent-browser": {
      "command": "npx",
      "args": ["concurrent-browser-mcp", "--max-instances", "20"]
    }
  }
}
Using global installation version
{
  "mcpServers": {
    "concurrent-browser": {
      "command": "concurrent-browser-mcp",
      "args": ["--max-instances", "20"]
    }
  }
}
Using local build version
If you built from source, you can reference the local build version directly:
{
  "mcpServers": {
    "concurrent-browser": {
      "command": "node",
      "args": ["/path/to/concurrent-browser-mcp/dist/index.js", "--max-instances", "20"],
      "cwd": "/path/to/concurrent-browser-mcp"
    }
  }
}
Or use relative path (if config file and project are in the same directory level):
{
  "mcpServers": {
    "concurrent-browser": {
      "command": "node",
      "args": ["./concurrent-browser-mcp/dist/index.js", "--max-instances", "20"]
    }
  }
}
Using npm link version (development mode)
If you used npm link:
{
  "mcpServers": {
    "concurrent-browser": {
      "command": "concurrent-browser-mcp",
      "args": ["--max-instances", "20"]
    }
  }
}
Command Line Options
Option | Description | Default |
| Maximum number of instances | 20 |
| Instance timeout in minutes | 30 |
| Cleanup interval in minutes | 5 |
| Default browser type (chromium/firefox/webkit) | chromium |
| Default headless mode | true |
| Default viewport width | 1280 |
| Default viewport height | 720 |
| Default user agent | - |
| Proxy server address (e.g., http://127.0.0.1:7890) | - |
| Disable automatic proxy detection | false |
| Ignore HTTPS errors | false |
| Bypass CSP | false |
Proxy Configuration
concurrent-browser-mcp supports flexible proxy configuration to help you use browser automation features in network environments that require proxies.
Proxy Configuration Methods
1. Specify Proxy via Command Line
# Use specified proxy server
npx concurrent-browser-mcp --proxy http://127.0.0.1:7890
2. Automatic Local Proxy Detection (Enabled by Default)
The system automatically detects proxies in the following order:
Environment Variables:
HTTP_PROXY,HTTPS_PROXY,ALL_PROXYCommon Proxy Ports: 7890, 1087, 8080, 3128, 8888, 10809, 20171
System Proxy Settings (macOS): Automatically reads system network settings
# Auto-detection enabled by default (no additional parameters needed)
npx concurrent-browser-mcp

# Explicitly disable auto-detection
npx concurrent-browser-mcp --no-proxy-auto-detect
3. Proxy Settings in MCP Configuration File
Using specified proxy:
{
  "mcpServers": {
    "concurrent-browser": {
      "command": "npx",
      "args": ["concurrent-browser-mcp", "--proxy", "http://127.0.0.1:7890"]
    }
  }
}
Disable proxy:
{
  "mcpServers": {
    "concurrent-browser": {
      "command": "npx",
      "args": ["concurrent-browser-mcp", "--no-proxy-auto-detect"]
    }
  }
}
Proxy Detection Logs
The proxy detection results will be displayed at startup:
🚀 Starting Concurrent Browser MCP Server...
Max instances: 20
Default browser: chromium
Headless mode: yes
Viewport size: 1280x720
Instance timeout: 30 minutes
Cleanup interval: 5 minutes
Proxy: Auto-detection enabled  # or shows detected proxy address
Supported Proxy Types
HTTP proxy:
http://proxy-server:portHTTPS proxy:
https://proxy-server:portSOCKS5 proxy:
socks5://proxy-server:port
Notes
Proxy configuration applies to all created browser instances
Authentication with username/password is not supported
Proxy can be set via environment variables without manual configuration
Proxy detection is completed automatically at service startup without affecting runtime performance
Available Tools
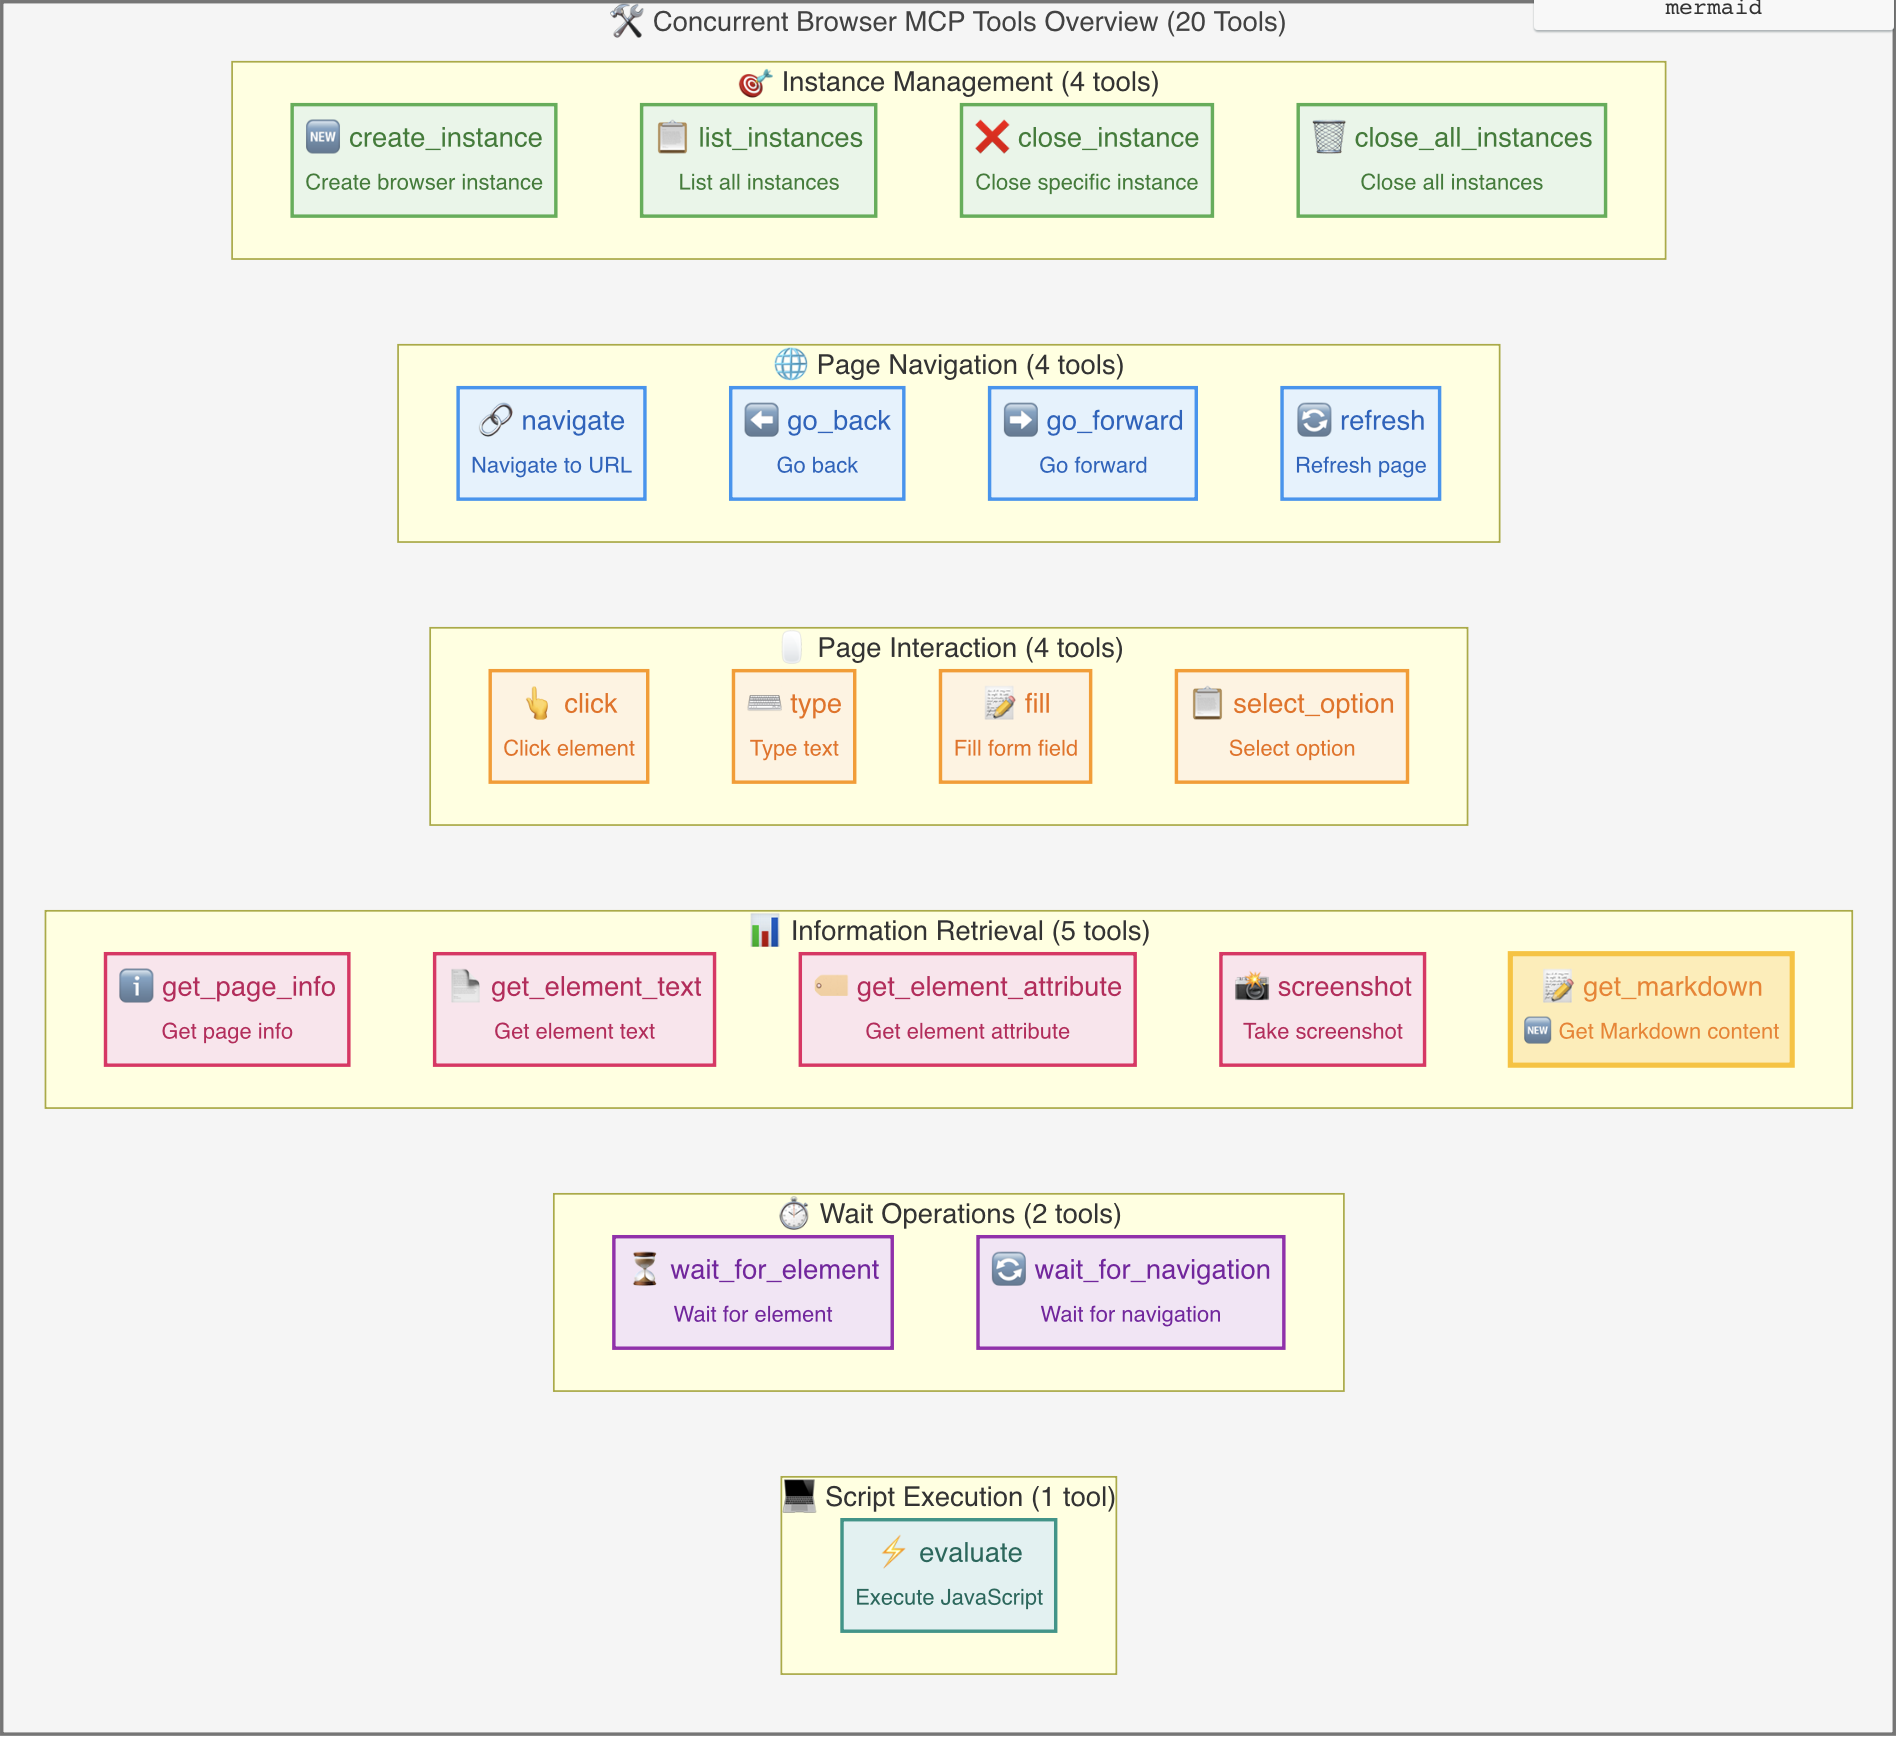
Instance Management
browser_create_instance: Create a new browser instancebrowser_list_instances: List all instancesbrowser_close_instance: Close a specific instancebrowser_close_all_instances: Close all instances
Page Navigation
browser_navigate: Navigate to a specified URLbrowser_go_back: Go back to previous pagebrowser_go_forward: Go forward to next pagebrowser_refresh: Refresh current page
Page Interaction
browser_click: Click on page elementsbrowser_type: Type text contentbrowser_fill: Fill form fieldsbrowser_select_option: Select dropdown options
Page Information
browser_get_page_info: Get detailed page information including full HTML content, page statistics, and metadatabrowser_get_element_text: Get element textbrowser_get_element_attribute: Get element attributesbrowser_screenshot: Take page screenshotsbrowser_get_markdown: 🆕 Get Markdown content
Wait Operations
browser_wait_for_element: Wait for element to appearbrowser_wait_for_navigation: Wait for page navigation to complete
JavaScript Execution
browser_evaluate: Execute JavaScript code
Usage Examples
1. Create Browser Instance
// Create a new Chrome instance
await callTool('browser_create_instance', {
  browserType: 'chromium',
  headless: false,
  viewport: { width: 1920, height: 1080 },
  metadata: {
    name: 'main-browser',
    description: 'Main browser instance'
  }
});
2. Navigation and Interaction
// Navigate to website
await callTool('browser_navigate', {
  instanceId: 'your-instance-id',
  url: 'https://example.com'
});

// Click element
await callTool('browser_click', {
  instanceId: 'your-instance-id',
  selector: 'button.submit'
});

// Input text
await callTool('browser_type', {
  instanceId: 'your-instance-id',
  selector: 'input[name="search"]',
  text: 'search query'
});
3. Get Page Information
// Take screenshot
await callTool('browser_screenshot', {
  instanceId: 'your-instance-id',
  fullPage: true
});

// Get page information
await callTool('browser_get_page_info', {
  instanceId: 'your-instance-id'
});
4. Concurrent Operations
// Create multiple instances for parallel processing
const instances = await Promise.all([
  callTool('browser_create_instance', { metadata: { name: 'worker-1' } }),
  callTool('browser_create_instance', { metadata: { name: 'worker-2' } }),
  callTool('browser_create_instance', { metadata: { name: 'worker-3' } })
]);

// Navigate to different pages in parallel
await Promise.all(instances.map(async (instance, index) => {
  await callTool('browser_navigate', {
    instanceId: instance.data.instanceId,
    url: `https://example${index + 1}.com`
  });
}));
Architecture Design
┌─────────────────────────────────────────────────────────────────┐
│                         MCP Client                              │
├─────────────────────────────────────────────────────────────────┤
│                    Concurrent Browser MCP Server                │
│  ┌─────────────────┐  ┌─────────────────┐  ┌─────────────────┐  │
│  │  Browser Tools  │  │ Browser Manager │  │  MCP Server     │  │
│  │                 │  │                 │  │                 │  │
│  │ - Tool Defs     │  │ - Instance Mgmt │  │ - Request       │  │
│  │ - Execution     │  │ - Lifecycle     │  │   Handling      │  │
│  │ - Validation    │  │ - Cleanup       │  │ - Error Mgmt    │  │
│  └─────────────────┘  └─────────────────┘  └─────────────────┘  │
├─────────────────────────────────────────────────────────────────┤
│                        Playwright                              │
│  ┌─────────────────┐  ┌─────────────────┐  ┌─────────────────┐  │
│  │   Browser 1     │  │   Browser 2     │  │   Browser N     │  │
│  │   (Chromium)    │  │   (Firefox)     │  │   (WebKit)      │  │
│  └─────────────────┘  └─────────────────┘  └─────────────────┘  │
└─────────────────────────────────────────────────────────────────┘
Real Functionality Testing
In addition to simulation demo scripts, we also provide real browser functionality test scripts that let you see actual screenshot results:
🧪 Run Real Tests
# Run real browser screenshot test
node test-real-screenshot.js
This test script will:
Start real browser: Using Chromium engine
Visit websites: Navigate to example.com and github.com
Save screenshots: Generate real PNG screenshot files
File output: Generate screenshot files in current directory
📸 Test Output Example
🚀 Starting real browser screenshot test...
✅ Browser started
✅ Page created
🌐 Navigating to https://example.com...
✅ Page loaded successfully
📸 Taking screenshot and saving as screenshot-2025-07-19T11-04-18-660Z.png...
✅ Screenshot saved: screenshot-2025-07-19T11-04-18-660Z.png
📊 File size: 23.57 KB
📂 File location: /path/to/screenshot-2025-07-19T11-04-18-660Z.png
🌐 Visiting https://github.com...
✅ github screenshot saved: screenshot-github-2025-07-19T11-04-18-660Z.png (265.99 KB)
🛑 Browser closed
🖼️ View Screenshot Files
After testing, you can find actual screenshot files in the project directory:
# View generated screenshot files
ls -la screenshot-*.png

# Open in system default image viewer
open screenshot-*.png    # macOS
start screenshot-*.png   # Windows
xdg-open screenshot-*.png # Linux
Differences from Traditional MCP Browser Servers
Feature | Traditional MCP Browser Server | Concurrent Browser MCP |
Instance Management | Single instance | Multi-instance concurrency |
Resource Isolation | None | Complete isolation |
Concurrent Processing | Serial | Parallel |
Instance Lifecycle | Manual management | Automatic management |
Resource Cleanup | Manual | Automatic |
Scalability | Limited | Highly scalable |
Development Guide
Local Development Environment Setup
# 1. Clone project
git clone https://github.com/sailaoda/concurrent-browser-mcp.git
cd concurrent-browser-mcp

# 2. Install dependencies
npm install

# 3. Build project
npm run build

# 4. Local link (optional, for global command testing)
npm link
Available npm Scripts
# Build TypeScript project
npm run build

# Development mode (file watching)
npm run dev

# Run code linting
npm run lint

# Fix code formatting issues
npm run lint:fix

# Clean build artifacts
npm run clean

# Run tests
npm test
Project Structure
concurrent-browser-mcp/
├── src/                    # Source code directory
│   ├── index.ts           # CLI entry point
│   ├── server.ts          # MCP server main logic
│   ├── browser-manager.ts # Browser instance manager
│   └── tools.ts           # MCP tool definitions and implementation
├── dist/                  # Build artifacts directory
├── assets/                # Static resources directory
├── examples/              # Example scripts
├── test-real-screenshot.js # Real test script
├── config.example.json    # Configuration example
├── package.json           # Project configuration
├── tsconfig.json         # TypeScript configuration
└── README.md             # Project documentation
Using Local Build Version
After building, you can use the local version in several ways:
Option 1: Run build files directly
# Run built files
node dist/index.js --max-instances 20

# Use absolute path in MCP configuration
{
  "mcpServers": {
    "concurrent-browser": {
      "command": "node",
      "args": ["/absolute/path/to/concurrent-browser-mcp/dist/index.js", "--max-instances", "20"]
    }
  }
}
Option 2: Use npm link (recommended for development)
# Execute link in project root directory
npm link

# Now you can use it like a global package
concurrent-browser-mcp --max-instances 20

# Use in MCP configuration
{
  "mcpServers": {
    "concurrent-browser": {
      "command": "concurrent-browser-mcp",
      "args": ["--max-instances", "20"]
    }
  }
}
Option 3: Use in project directory
# Run directly in project directory
cd /path/to/concurrent-browser-mcp
npm run build
node dist/index.js

# MCP configuration using relative path
{
  "mcpServers": {
    "concurrent-browser": {
      "command": "node",
      "args": ["./concurrent-browser-mcp/dist/index.js"],
      "cwd": "/parent/directory/path"
    }
  }
}
Testing and Debugging
# Run real browser tests
node test-real-screenshot.js

# Run simulated MCP call tests
node examples/demo.js

# Start development server (with debug output)
node dist/index.js --max-instances 5 --browser chromium --headless false
Contributing Guidelines
Fork this project
Create feature branch (
git checkout -b feature/amazing-feature)Commit changes (
git commit -m 'Add some amazing feature')Push to branch (
git push origin feature/amazing-feature)Open Pull Request
Maintenance
Latest Blog Posts
- Your AI Chatbot Just Exposed Your CEO's Salary to an InternBy Om-Shree-0709 on .Agent IdentityMCP SecurityOAuth Delegation
- Why MCP Servers Need Execution Sandboxing (And Why Your Current Stack Isn't Enough)By Om-Shree-0709 on .Agentic AiPrompt InjectionWebAssembly
MCP directory API
We provide all the information about MCP servers via our MCP API.
curl -X GET 'https://glama.ai/api/mcp/v1/servers/sailaoda/concurrent-browser-mcp'
If you have feedback or need assistance with the MCP directory API, please join our Discord server