
actors-mcp-server
OfficialIntegrates with Facebook through the Facebook Posts Scraper Actor to extract data from Facebook posts from multiple pages/profiles.
Integrates with Google Search through the Google Search Results Scraper to scrape Google Search Engine Results Pages (SERPs).
Integrates with Google Maps through the Google Maps Email Extractor Actor to extract contact details from Google Maps listings.
Integrates with Instagram through the Instagram Scraper Actor to scrape Instagram posts, profiles, places, photos, and comments.
Click on "Install Server".
Wait a few minutes for the server to deploy. Once ready, it will show a "Started" state.
In the chat, type
@followed by the MCP server name and your instructions, e.g., "@actors-mcp-serverscrape recent posts from Elon Musk's Twitter profile"
That's it! The server will respond to your query, and you can continue using it as needed.
Here is a step-by-step guide with screenshots.
The Apify Model Context Protocol (MCP) server at mcp.apify.com enables your AI agents to extract data from social media, search engines, maps, e-commerce sites, and any other website using thousands of ready-made scrapers, crawlers, and automation tools from the Apify Store. It supports OAuth, allowing you to connect from clients like Claude.ai or Visual Studio Code using just the URL.
🚀 Use the hosted Apify MCP Server!
For the easiest setup and most powerful features, connect your AI assistant to our hosted server:
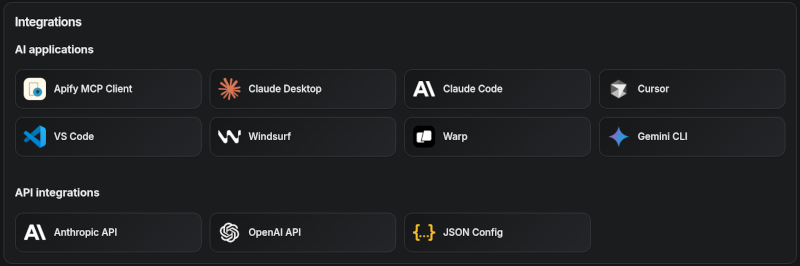
Apify MCP Server is compatible with Claude Code, Claude.ai, Cursor, VS Code and any client that adheres to the Model Context Protocol.
Check out the MCP clients section for more details or visit the MCP configuration page.
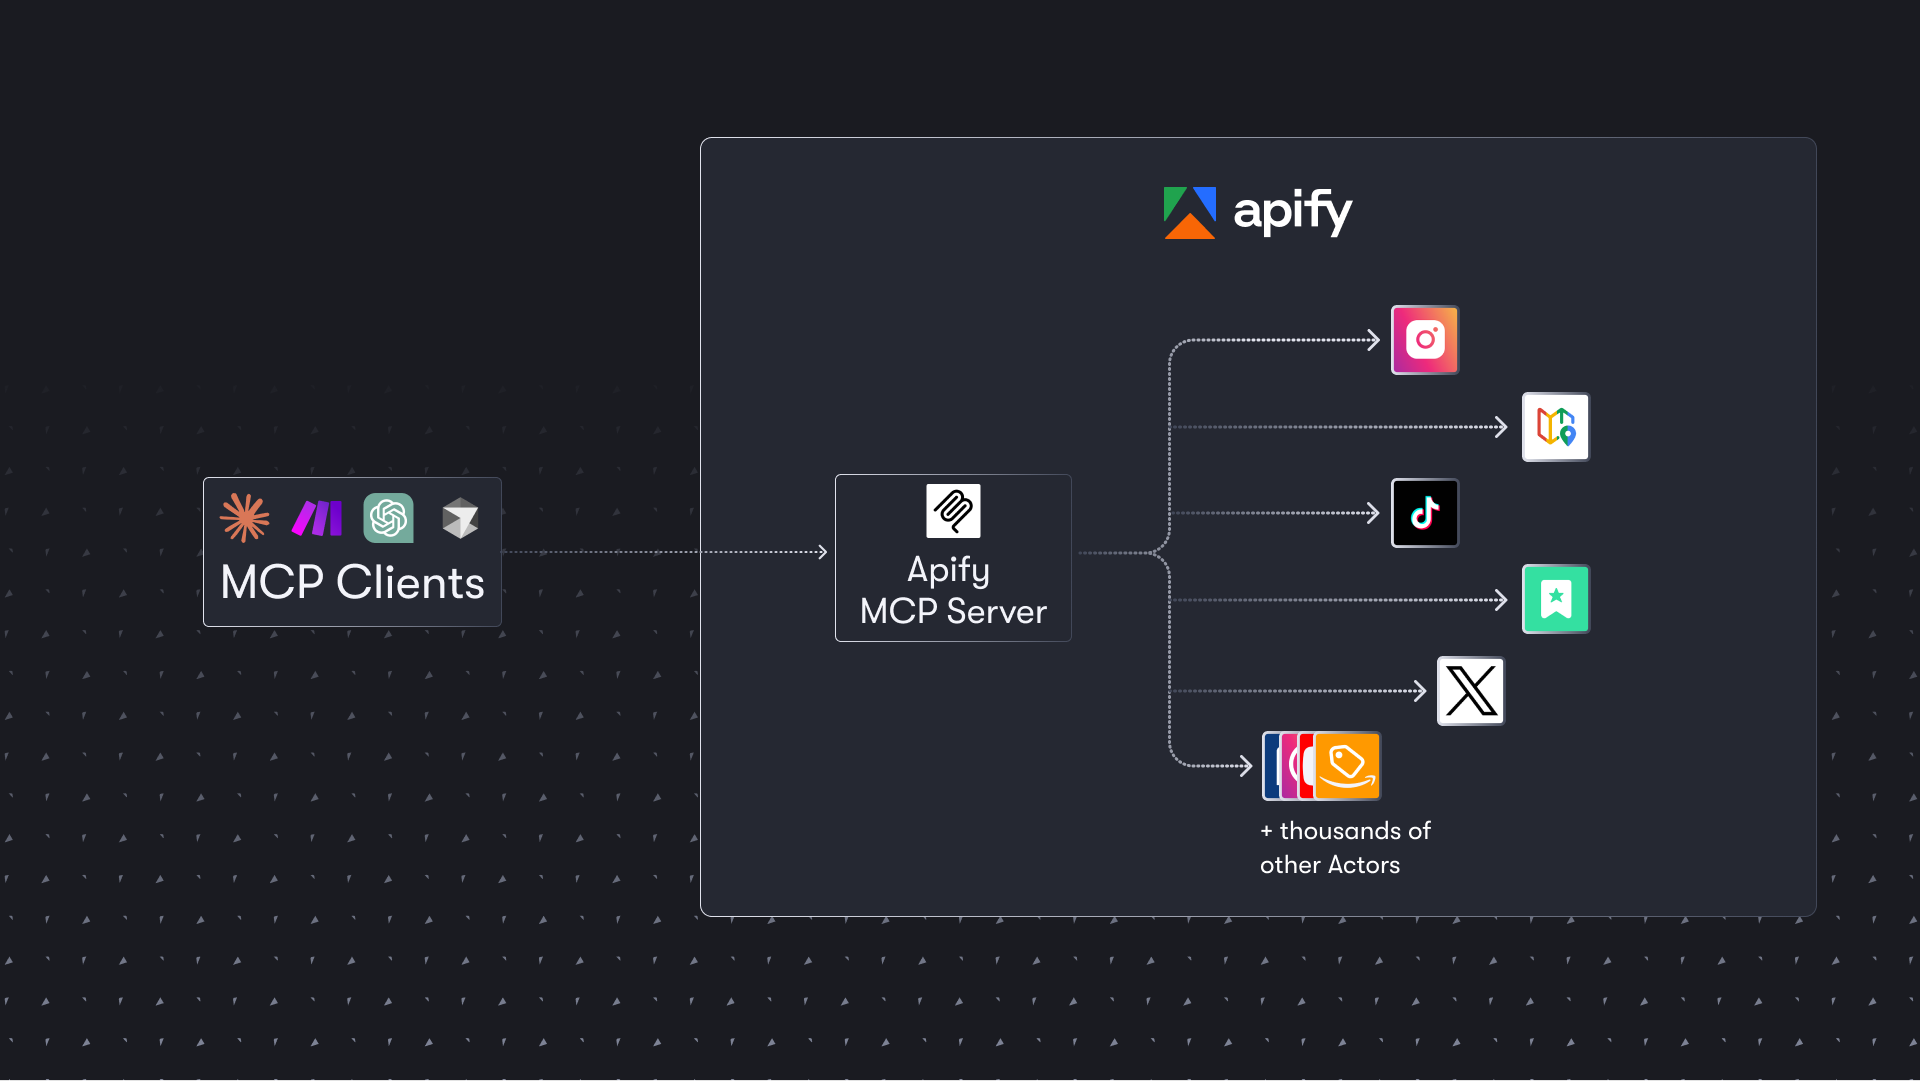
Table of Contents
🌐 Introducing the Apify MCP server
The Apify MCP Server allows an AI assistant to use any Apify Actor as a tool to perform a specific task. For example, it can:
Use Facebook Posts Scraper to extract data from Facebook posts from multiple pages/profiles.
Use Google Maps Email Extractor to extract contact details from Google Maps.
Use Google Search Results Scraper to scrape Google Search Engine Results Pages (SERPs).
Use Instagram Scraper to scrape Instagram posts, profiles, places, photos, and comments.
Use RAG Web Browser to search the web, scrape the top N URLs, and return their content.
Video tutorial: Integrate 8,000+ Apify Actors and Agents with Claude
🚀 Quickstart
You can use the Apify MCP Server in two ways:
HTTPS Endpoint (mcp.apify.com): Connect from your MCP client via OAuth or by including the Authorization: Bearer <APIFY_TOKEN> header in your requests. This is the recommended method for most use cases. Because it supports OAuth, you can connect from clients like Claude.ai or Visual Studio Code using just the URL: https://mcp.apify.com.
https://mcp.apify.comstreamable transport
Standard Input/Output (stdio): Ideal for local integrations and command-line tools like the Claude for Desktop client.
Set the MCP client server command to
npx @apify/actors-mcp-serverand theAPIFY_TOKENenvironment variable to your Apify API token.See
npx @apify/actors-mcp-server --helpfor more options.
You can find detailed instructions for setting up the MCP server in the Apify documentation.
⚠️ SSE transport deprecation on April 1, 2026
Udate your MCP client config before April 1, 2026. The Apify MCP server is dropping Server-Sent Events (SSE) transport in favor of Streamable HTTP, in line with the official MCP spec.
Go to mcp.apify.com to update the installation for your client of choice, with a valid endpoint.
🤖 MCP clients
Apify MCP Server is compatible with any MCP client that adheres to the Model Context Protocol, but the level of support for dynamic tool discovery and other features may vary between clients.
To interact with the Apify MCP server, you can use clients such as: Claude Desktop, Visual Studio Code, or Apify Tester MCP Client.
Visit mcp.apify.com to configure the server for your preferred client.
Supported clients matrix
The following table outlines the tested MCP clients and their level of support for key features.
Client | Dynamic Tool Discovery | Notes |
Claude.ai (web) | 🟡 Partial | Tools mey need to be reloaded manually in the client |
Claude Desktop | 🟡 Partial | Tools may need to be reloaded manually in the client |
VS Code (Genie) | ✅ Full | |
Cursor | ✅ Full | |
Apify Tester MCP Client | ✅ Full | Designed for testing Apify MCP servers |
OpenCode | ✅ Full |
Smart tool selection based on client capabilities:
When the actors tool category is requested, the server intelligently selects the most appropriate Actor-related tools based on the client's capabilities:
Clients with dynamic tool support (e.g., Claude.ai web, VS Code Genie): The server provides the
add-actortool instead ofcall-actor. This allows for a better user experience where users can dynamically discover and add new Actors as tools during their conversation.Clients with limited dynamic tool support (e.g., Claude Desktop): The server provides the standard
call-actortool along with other Actor category tools, ensuring compatibility while maintaining functionality.
🪄 Try Apify MCP instantly
Want to try Apify MCP without any setup?
Check out Apify Tester MCP Client
This interactive, chat-like interface provides an easy way to explore the capabilities of Apify MCP without any local setup. Just sign in with your Apify account and start experimenting with web scraping, data extraction, and automation tools!
Or use the MCP bundle file (formerly known as Anthropic Desktop extension file, or DXT) for one-click installation: Apify MCP server MCPB file
🛠️ Tools, resources, and prompts
The MCP server provides a set of tools for interacting with Apify Actors. Since the Apify Store is large and growing rapidly, the MCP server provides a way to dynamically discover and use new Actors.
Actors
Any Apify Actor can be used as a tool.
By default, the server is pre-configured with one Actor, apify/rag-web-browser, and several helper tools.
The MCP server loads an Actor's input schema and creates a corresponding MCP tool.
This allows the AI agent to know exactly what arguments to pass to the Actor and what to expect in return.
For example, for the apify/rag-web-browser Actor, the input parameters are:
{
  "query": "restaurants in San Francisco",
  "maxResults": 3
}
You don't need to manually specify which Actor to call or its input parameters; the LLM handles this automatically. When a tool is called, the arguments are automatically passed to the Actor by the LLM. You can refer to the specific Actor's documentation for a list of available arguments.
Helper tools
One of the most powerful features of using MCP with Apify is dynamic tool discovery. It gives an AI agent the ability to find new tools (Actors) as needed and incorporate them. Here are some special MCP operations and how the Apify MCP Server supports them:
Apify Actors: Search for Actors, view their details, and use them as tools for the AI.
Apify documentation: Search the Apify documentation and fetch specific documents to provide context to the AI.
Actor runs: Get lists of your Actor runs, inspect their details, and retrieve logs.
Apify storage: Access data from your datasets and key-value stores.
Overview of available tools
Here is an overview list of all the tools provided by the Apify MCP Server.
Tool name | Category | Description | Enabled by default |
| actors | Search for Actors in the Apify Store. | ✅ |
| actors | Retrieve detailed information about a specific Actor. | ✅ |
| actors | Call an Actor and get its run results. Use fetch-actor-details first to get the Actor's input schema. | ❔ |
Actor (see tool configuration) | An Actor tool to browse the web. | ✅ | |
| docs | Search the Apify documentation for relevant pages. | ✅ |
| docs | Fetch the full content of an Apify documentation page by its URL. | ✅ |
| runs | Get detailed information about a specific Actor run. | |
| runs | Get a list of an Actor's runs, filterable by status. | |
| runs | Retrieve the logs for a specific Actor run. | |
| storage | Get metadata about a specific dataset. | |
| storage | Retrieve items from a dataset with support for filtering and pagination. | |
| storage | Generate a JSON schema from dataset items. | |
| storage | Get metadata about a specific key-value store. | |
| storage | List the keys within a specific key-value store. | |
| storage | Get the value associated with a specific key in a key-value store. | |
| storage | List all available datasets for the user. | |
| storage | List all available key-value stores for the user. | |
| experimental | Add an Actor as a new tool for the user to call. | ❔ |
| - | Retrieve the output from an Actor call which is not included in the output preview of the Actor tool. | ✅ |
Note:
When using the
actorstool category, clients that support dynamic tool discovery (like Claude.ai web and VS Code) automatically receive theadd-actortool instead ofcall-actorfor enhanced Actor discovery capabilities.The
get-actor-outputtool is automatically included with any Actor-related tool, such ascall-actor,add-actor, or any specific Actor tool likeapify-slash-rag-web-browser. When you call an Actor - either through thecall-actortool or directly via an Actor tool (e.g.,apify-slash-rag-web-browser) - you receive a preview of the output. The preview depends on the Actor's output format and length; for some Actors and runs, it may include the entire output, while for others, only a limited version is returned to avoid overwhelming the LLM. To retrieve the full output of an Actor run, use theget-actor-outputtool (supports limit, offset, and field filtering) with thedatasetIdprovided by the Actor call.
Tool annotations
All tools include metadata annotations to help MCP clients and LLMs understand tool behavior:
title: Short display name for the tool (e.g., "Search Actors", "Call Actor", "apify/rag-web-browser")readOnlyHint:truefor tools that only read data without modifying state (e.g.,get-dataset,fetch-actor-details)openWorldHint:truefor tools that access external resources outside the Apify platform (e.g.,call-actorexecutes external Actors,get-html-skeletonscrapes external websites). Tools that interact only with the Apify platform (likesearch-actorsorfetch-apify-docs) do not have this hint.
Tools configuration
The tools configuration parameter is used to specify loaded tools - either categories or specific tools directly, and Apify Actors. For example, tools=storage,runs loads two categories; tools=add-actor loads just one tool.
When no query parameters are provided, the MCP server loads the following tools by default:
actorsdocsapify/rag-web-browser
If the tools parameter is specified, only the listed tools or categories will be enabled - no default tools will be included.
Easy configuration:
Use the UI configurator to configure your server, then copy the configuration to your client.
Configuring the hosted server:
The hosted server can be configured using query parameters in the URL. For example, to load the default tools, use:
https://mcp.apify.com?tools=actors,docs,apify/rag-web-browserFor minimal configuration, if you want to use only a single Actor tool - without any discovery or generic calling tools, the server can be configured as follows:
https://mcp.apify.com?tools=apify/my-actorThis setup exposes only the specified Actor (apify/my-actor) as a tool. No other tools will be available.
Configuring the CLI:
The CLI can be configured using command-line flags. For example, to load the same tools as in the hosted server configuration, use:
npx @apify/actors-mcp-server --tools actors,docs,apify/rag-web-browserThe minimal configuration is similar to the hosted server configuration:
npx @apify/actors-mcp-server --tools apify/my-actorAs above, this exposes only the specified Actor (apify/my-actor) as a tool. No other tools will be available.
⚠️ Important recommendation
The default tools configuration may change in future versions. When no
toolsparameter is specified, the server currently loads default tools, but this behavior is subject to change.For production use and stable interfaces, always explicitly specify the
toolsparameter to ensure your configuration remains consistent across updates.
UI mode configuration
The uiMode parameter enables OpenAI-specific widget rendering in tool responses. When enabled, tools like search-actors return interactive widget responses optimized for OpenAI clients.
Configuring the hosted server:
Enable UI mode using the ui query parameter:
https://mcp.apify.com?ui=openaiYou can combine it with other parameters:
https://mcp.apify.com?tools=actors,docs&ui=openaiConfiguring the CLI:
The CLI can be configured using command-line flags. For example, to enable UI mode:
npx @apify/actors-mcp-server --ui openaiYou can also set it via the UI_MODE environment variable:
export UI_MODE=openai
npx @apify/actors-mcp-server
Backward compatibility
The v2 configuration preserves backward compatibility with v1 usage. Notes:
actorsparam (URL) and--actorsflag (CLI) are still supported.Internally they are merged into
toolsselectors.Examples:
?actors=apify/rag-web-browser≡?tools=apify/rag-web-browser;--actors apify/rag-web-browser≡--tools apify/rag-web-browser.
enable-adding-actors(CLI) andenableAddingActors(URL) are supported but deprecated.Prefer
tools=experimentalor including the specific tooltools=add-actor.Behavior remains: when enabled with no
toolsspecified, the server exposes onlyadd-actor; when categories/tools are selected,add-actoris also included.
enableActorAutoLoadingremains as a legacy alias forenableAddingActorsand is mapped automatically.Defaults remain compatible: when no
toolsare specified, the server loadsactors,docs, andapify/rag-web-browser.If any
toolsare specified, the defaults are not added (same as v1 intent for explicit selection).
call-actoris now included by default via theactorscategory (additive change). To exclude it, specify an explicittoolslist withoutactors.previewcategory is deprecated and removed. Use specific tool names instead.
Existing URLs and commands using ?actors=... or --actors continue to work unchanged.
Prompts
The server provides a set of predefined example prompts to help you get started interacting with Apify through MCP. For example, there is a GetLatestNewsOnTopic prompt that allows you to easily retrieve the latest news on a specific topic using the RAG Web Browser Actor.
Resources
The server does not yet provide any resources.
Related MCP server: MCP Video Digest
📡 Telemetry
The Apify MCP Server collects telemetry data about tool calls to help Apify understand usage patterns and improve the service. By default, telemetry is enabled for all tool calls.
Opting out of telemetry
You can opt out of telemetry by setting the --telemetry-enabled CLI flag to false or the TELEMETRY_ENABLED environment variable to false.
CLI flags take precedence over environment variables.
Examples
For the remote server (mcp.apify.com):
# Disable via URL parameter
https://mcp.apify.com?telemetry-enabled=false
For the local stdio server:
# Disable via CLI flag
npx @apify/actors-mcp-server --telemetry-enabled=false

# Or set environment variable
export TELEMETRY_ENABLED=false
npx @apify/actors-mcp-server
⚙️ Development
Please see the CONTRIBUTING.md guide for contribution guidelines and commit message conventions.
For detailed development setup, project structure, and local testing instructions, see the DEVELOPMENT.md guide.
Prerequisites
Node.js (v18 or higher)
Create an environment file, .env, with the following content:
APIFY_TOKEN="your-apify-token"Build the actor-mcp-server package:
npm run buildStart HTTP streamable MCP server
Run using Apify CLI:
export APIFY_TOKEN="your-apify-token"
export APIFY_META_ORIGIN=STANDBY
apify run -p
Once the server is running, you can use the MCP Inspector to debug the server exposed at http://localhost:3001.
Start standard input/output (stdio) MCP server
You can launch the MCP Inspector with this command:
export APIFY_TOKEN="your-apify-token"
npx @modelcontextprotocol/inspector node ./dist/stdio.js
Upon launching, the Inspector will display a URL that you can open in your browser to begin debugging.
🐦 Canary PR releases
Apify MCP is split across two repositories: this one for core MCP logic and the private apify-mcp-server-internal for the hosted server.
Changes must be synchronized between both.
To create a canary release, add the beta tag to your PR branch.
This publishes the package to pkg.pr.new for staging and testing before merging.
See the workflow file for details.
🐋 Docker Hub integration
The Apify MCP Server is also available on Docker Hub, registered via the mcp-registry repository. The entry in servers/apify-mcp-server/server.yaml should be deployed automatically by the Docker Hub MCP registry (deployment frequency is unknown). Before making major changes to the stdio server version, be sure to test it locally to ensure the Docker build passes. To test, change the source.branch to your PR branch and run task build -- apify-mcp-server. For more details, see CONTRIBUTING.md.
🐛 Troubleshooting (local MCP server)
Make sure you have
nodeinstalled by runningnode -v.Make sure the
APIFY_TOKENenvironment variable is set.Always use the latest version of the MCP server by using
@apify/actors-mcp-server@latest.
Debugging the NPM package
To debug the server, use the MCP Inspector tool:
export APIFY_TOKEN="your-apify-token"
npx @modelcontextprotocol/inspector npx -y @apify/actors-mcp-server
💡 Limitations
The Actor input schema is processed to be compatible with most MCP clients while adhering to JSON Schema standards. The processing includes:
Descriptions are truncated to 500 characters (as defined in
MAX_DESCRIPTION_LENGTH).Enum fields are truncated to a maximum combined length of 2000 characters for all elements (as defined in
ACTOR_ENUM_MAX_LENGTH).Required fields are explicitly marked with a
REQUIREDprefix in their descriptions for compatibility with frameworks that may not handle the JSON schema properly.Nested properties are built for special cases like proxy configuration and request list sources to ensure the correct input structure.
Array item types are inferred when not explicitly defined in the schema, using a priority order: explicit type in items > prefill type > default value type > editor type.
Enum values and examples are added to property descriptions to ensure visibility, even if the client doesn't fully support the JSON schema.
Rental Actors are only available for use with the hosted MCP server at https://mcp.apify.com. When running the server locally via stdio, you can only access Actors that are already added to your local toolset. To dynamically search for and use any Actor from the Apify Store—including rental Actors—connect to the hosted endpoint.
🤝 Contributing
We welcome contributions to improve the Apify MCP Server! Here's how you can help:
🐛 Report issues: Find a bug or have a feature request? Open an issue.
🔧 Submit pull requests: Fork the repo and submit pull requests with enhancements or fixes.
📚 Documentation: Improvements to docs and examples are always welcome.
💡 Share use cases: Contribute examples to help other users.
For major changes, please open an issue first to discuss your proposal and ensure it aligns with the project's goals.
📚 Learn more
This server cannot be installed
Resources
Unclaimed servers have limited discoverability.
Looking for Admin?
If you are the server author, to access and configure the admin panel.
Latest Blog Posts
MCP directory API
We provide all the information about MCP servers via our MCP API.
curl -X GET 'https://glama.ai/api/mcp/v1/servers/apify/actors-mcp-server'
If you have feedback or need assistance with the MCP directory API, please join our Discord server