
Provides data storage integration with examples for database operations and analytics workloads
Powers the HTTP transport layer with streamable HTTP server capabilities for web-based MCP client connections
Enables distributed tracing and metrics collection with auto-instrumentation for monitoring MCP server operations and tool executions
Provides database administration capabilities through the containerized deployment stack with pgAdmin interface
Offers caching services and session management through the containerized deployment with Redis Insight administration interface
Click on "Install Server".
Wait a few minutes for the server to deploy. Once ready, it will show a "Started" state.
In the chat, type
@followed by the MCP server name and your instructions, e.g., "@IBM i MCP Servershow me the top 5 active jobs by CPU usage"
That's it! The server will respond to your query, and you can continue using it as needed.
Here is a step-by-step guide with screenshots.


MCP server for IBM i
Overview
The IBM i MCP Server enables AI agents to interact with IBM i systems through the Model Context Protocol (MCP). It provides secure, SQL-based access to Db2 for i databases, allowing AI applications like Claude, VSCode Copilot, Bob, and custom agents to query system information, monitor performance, and execute database operations.
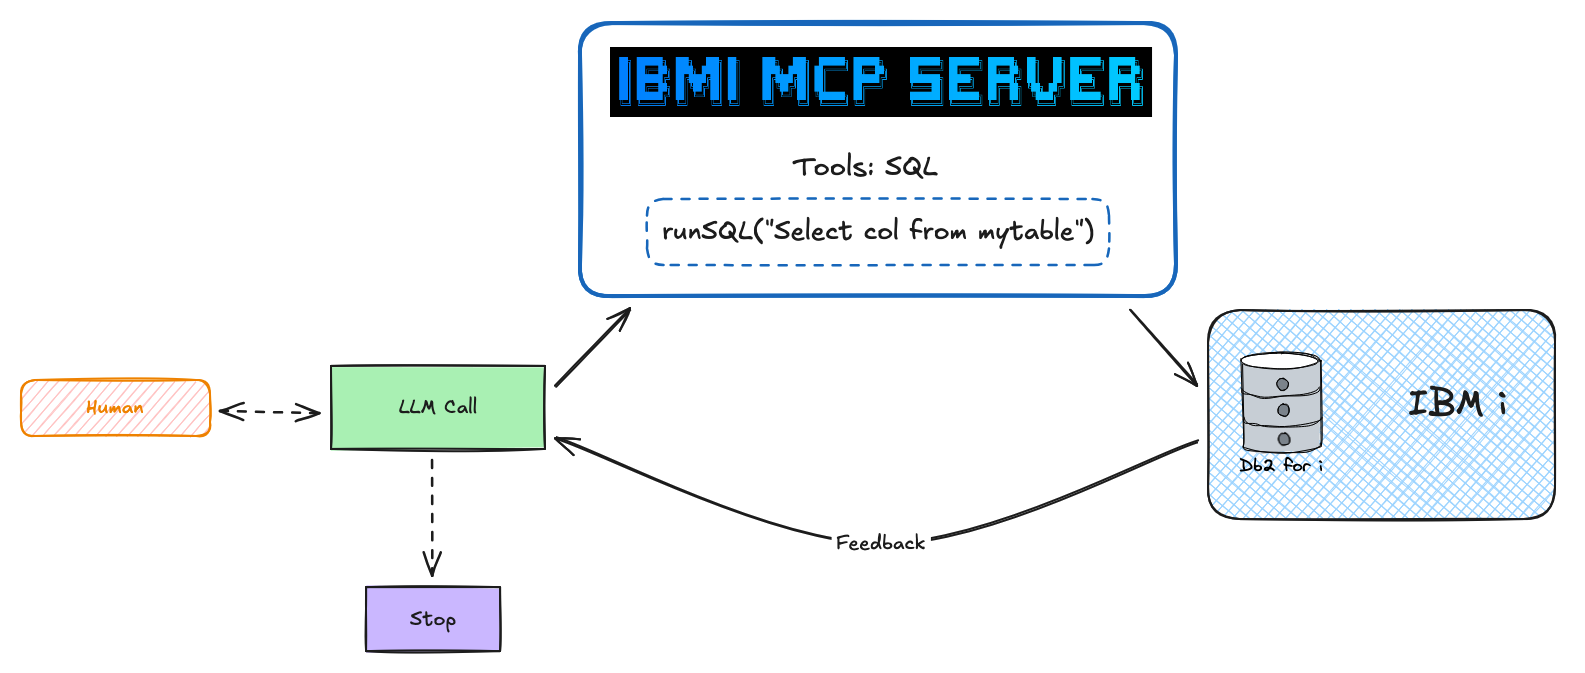
How it works: AI clients connect via MCP → Server executes YAML-defined SQL tools → Results stream back to the AI agent through Mapepire.
📚
The Docs are continuously evolving. Please check back frequently for updates and new guides. If there's something missing, feel free to open an issue!
📁 Repository Structure
Directory | Purpose | Documentation |
| MCP server implementation (TypeScript) | |
| YAML-based SQL tool configurations | |
| AI agent examples and integrations | |
| Python client examples for testing | |
| Docker, Podman, OpenShift configs | |
| Example Full stack Agent app (AgentOS) |
📖 Quick Navigation
🚀 MCP Server - Get started with the server
🧩 SQL Tools - Create custom SQL tools
🤖 AI Agents - Use agent frameworks
🐍 Python Clients - Test with Python clients
📦 Deployment - Deploy to production
📡 Setup Mapepire - Install prerequisite
🚀 MCP Server
The MCP Server enables AI agents to execute SQL queries on IBM i systems through YAML-defined SQL tools.
Quick Start
Prerequisites:
Mapepire running on IBM i (port 8076)
Node.js 18+ installed
Get Started:
Clone the repository:
git clone https://github.com/IBM/ibmi-mcp-server.git cd ibmi-mcp-serverConfigure your IBM i connection:
cat > .env << 'EOF' DB2i_HOST=your-ibmi-host.com DB2i_USER=your-username DB2i_PASS=your-password DB2i_PORT=8076 DB2i_IGNORE_UNAUTHORIZED=true EOFStart the server:
npx -y @ibm/ibmi-mcp-server@latest \ --transport http \ --tools ./tools/performance/performance.yamlThe server will use our pre-configured tools for:
📊 Performance monitoring (system status, memory pools, active jobs)
See the Tools Guide for more toolsets.
Verify it's running:
# Check server health curl http://localhost:3010/healthz # List available tools curl -X POST http://localhost:3010/mcp \ -H "Content-Type: application/json" \ -H "Accept: application/json, text/event-stream" \ -d '{"jsonrpc":"2.0","id":1,"method":"tools/list"}' | \ grep -o '"name":"[^"]*"' | sed 's/"name":"//g' | sed 's/"//g' | head -20
Next Steps:
Create Custom Tools - Build your own SQL tools
Connect AI Clients - Integrate with Claude, VSCode, Bob, etc.
Additional links:
🧩 SQL Tools
YAML-based SQL tool configurations that define what queries AI agents can execute on your IBM i system.
Quick Start
Create a custom tool file tools/my-tools.yaml:
Run the server with your tools:
Available Tool Collections
The tools/ directory includes ready-to-use configurations:
Performance Monitoring - System status, active jobs, CPU/memory metrics
Security & Audit - User profiles, authorities, security events
Job Management - Active jobs, job queues, subsystems
Storage & IFS - Disk usage, IFS objects, save files
Database - Tables, indexes, constraints, statistics
🤖 AI Agents
Pre-built AI agent examples using popular frameworks to interact with IBM i systems through the MCP Server.
Available Agent Frameworks
Framework | Language | Use Case | Documentation |
Agno | Python | Production-ready agents with built-in observability | |
LangChain | Python | Complex workflows and tool chaining | |
Google ADK | Python | Google AI ecosystem integration |
What Agents Can Do
System Monitoring: Real-time performance analysis and health checks
Troubleshooting: Diagnose issues using natural language queries
Reporting: Generate system reports and insights
Automation: Execute administrative tasks through conversation
🐍 Python Clients
Simple Python client examples for testing and interacting with the MCP Server.
📦 Deployment
Production-ready deployment configurations for containerized environments.
Deployment Options
Docker & Podman - Complete stack with MCP Context Forge Gateway
OpenShift - Kubernetes deployment with S2I builds
Production Features - HTTPS, authentication, monitoring, caching
📡 Setup Mapepire
Before you can use the ibmi-mcp-server, you must install and configure Mapepire on your IBM i system.
What is Mapepire?
Mapepire is a modern, high-performance database server for IBM i that provides SQL query execution capabilities over WebSocket connections. It acts as a gateway between modern application architectures (like MCP servers, AI agents, and REST APIs) and IBM i's Db2 for i database.
Why Mapepire Enables AI and MCP Workloads
Traditional IBM i database access methods (ODBC, JDBC) don't align well with modern AI and MCP architectures that require:
Fast, lightweight connections: AI agents make frequent, short-lived database queries
WebSocket support: Enables real-time, bidirectional communication for streaming results
Modern JSON-based protocols: Simplifies integration with TypeScript/JavaScript ecosystems
Low-latency responses: Essential for interactive AI conversations and tool executions
Mapepire bridges this gap by providing a modern, WebSocket-based SQL query interface that's optimized for the request/response patterns of AI agents and MCP tools.
Installation
Quick Install (IBM i SSH Session):
Important Notes:
By default, Mapepire runs on port
8076. You'll need this port number when configuring theDB2i_PORTvariable in your.envfile.Ensure your IBM i firewall allows inbound connections on port 8076
For production deployments, configure SSL/TLS certificates (see official guide)
📜 License
This project is licensed under the Apache License 2.0. See the LICENSE file for details.