
Integrates OpenAI models through LangChain for AI agent functionality
Orchestrates intelligent conversation flows with dynamic context management, multi-pet handling logic, and state management across conversation nodes
Provides AI-powered pet name suggestions using OpenAI's API through the suggest_pet_names tool
Implements OAuth2/OIDC authentication and authorization using Asgardeo as the identity provider, with JWT token validation via JWKS endpoints
Click on "Install Server".
Wait a few minutes for the server to deploy. Once ready, it will show a "Started" state.
In the chat, type
@followed by the MCP server name and your instructions, e.g., "@MCP Authentication Exampleauthenticate me and check the weather for my pet's walk"
That's it! The server will respond to your query, and you can continue using it as needed.
Here is a step-by-step guide with screenshots.
Pawsome Pet Care - AI-Powered Veterinary Assistant with Asgardeo Authentication
This project demonstrates a sophisticated AI-powered pet care chatbot system that integrates a secured MCP (Model Context Protocol) server with an intelligent LangGraph agent, using Asgardeo as the OAuth2/OIDC provider for authentication and authorization.
🌟 Key Features
Secure MCP Server with Asgardeo OAuth2 authentication
Intelligent LangGraph Agent with dynamic context management
Multi-Pet Context Handling with automatic pet selection logic
JWT Token Validation with JWKS endpoint integration
OpenAI Integration for AI-powered pet name suggestions
RESTful Web Interface with CORS support
Real-time Chat with conversation memory
Prerequisites
Python 3.12 or higher
Asgardeo account and application setup
OpenAI API key (for pet name suggestions)
pip (Python package installer)
Project Structure
Installation
Clone or download this project
Create a virtual environment (recommended)
python -m venv .venv source .venv/bin/activate # On Windows: .venv\Scripts\activateInstall required dependencies
pip install -r requirements.txtKey dependencies include:
fastmcp- Fast MCP server frameworkpython-dotenv- Environment variable managementopenai- OpenAI API integrationpyjwt- JWT token handlinglanggraph- Agent orchestrationlangchain-openai- OpenAI LangChain integrationaiohttp- Async HTTP serverhttpx- HTTP client
Configure environment variables
Create a
.envfile in the project root directory:# Asgardeo OAuth2 Configuration ## Asgardeo Configuration ## 1. Create an Asgardeo Application 1. Login to your [Asgardeo](https://asgardeo.io/) account. 2. Navigate to the **Applications** tab and select the **MCP Client Application**. 3. Add your application name and callback URL. ## 2. Get Your Application Credentials
Once the application is created, get both the Client ID and Tenant Name:
Client ID: Found in the application's Protocol tab.
Tenant Name: Your organization's tenant name (visible in the URL). AUTH_ISSUER=https://api.asgardeo.io/t/ CLIENT_ID= JWKS_URL=https://api.asgardeo.io/t//oauth2/jwks
OpenAI Configuration
OPENAI_API_KEY=
**Example with actual values:** ```bash # Asgardeo OAuth2 Configuration AUTH_ISSUER=https://api.asgardeo.io/t/pawsomepets CLIENT_ID=abc123xyz789_client_id_from_asgardeo JWKS_URL=https://api.asgardeo.io/t/pawsomepets/oauth2/jwks # OpenAI Configuration OPENAI_API_KEY=sk-proj-abc123xyz789
🔐 Asgardeo Configuration
1. Create an MCP Client Application in Asgardeo
Login to your Asgardeo account at https://console.asgardeo.io
Navigate to the Applications tab and select MCP Client Application template
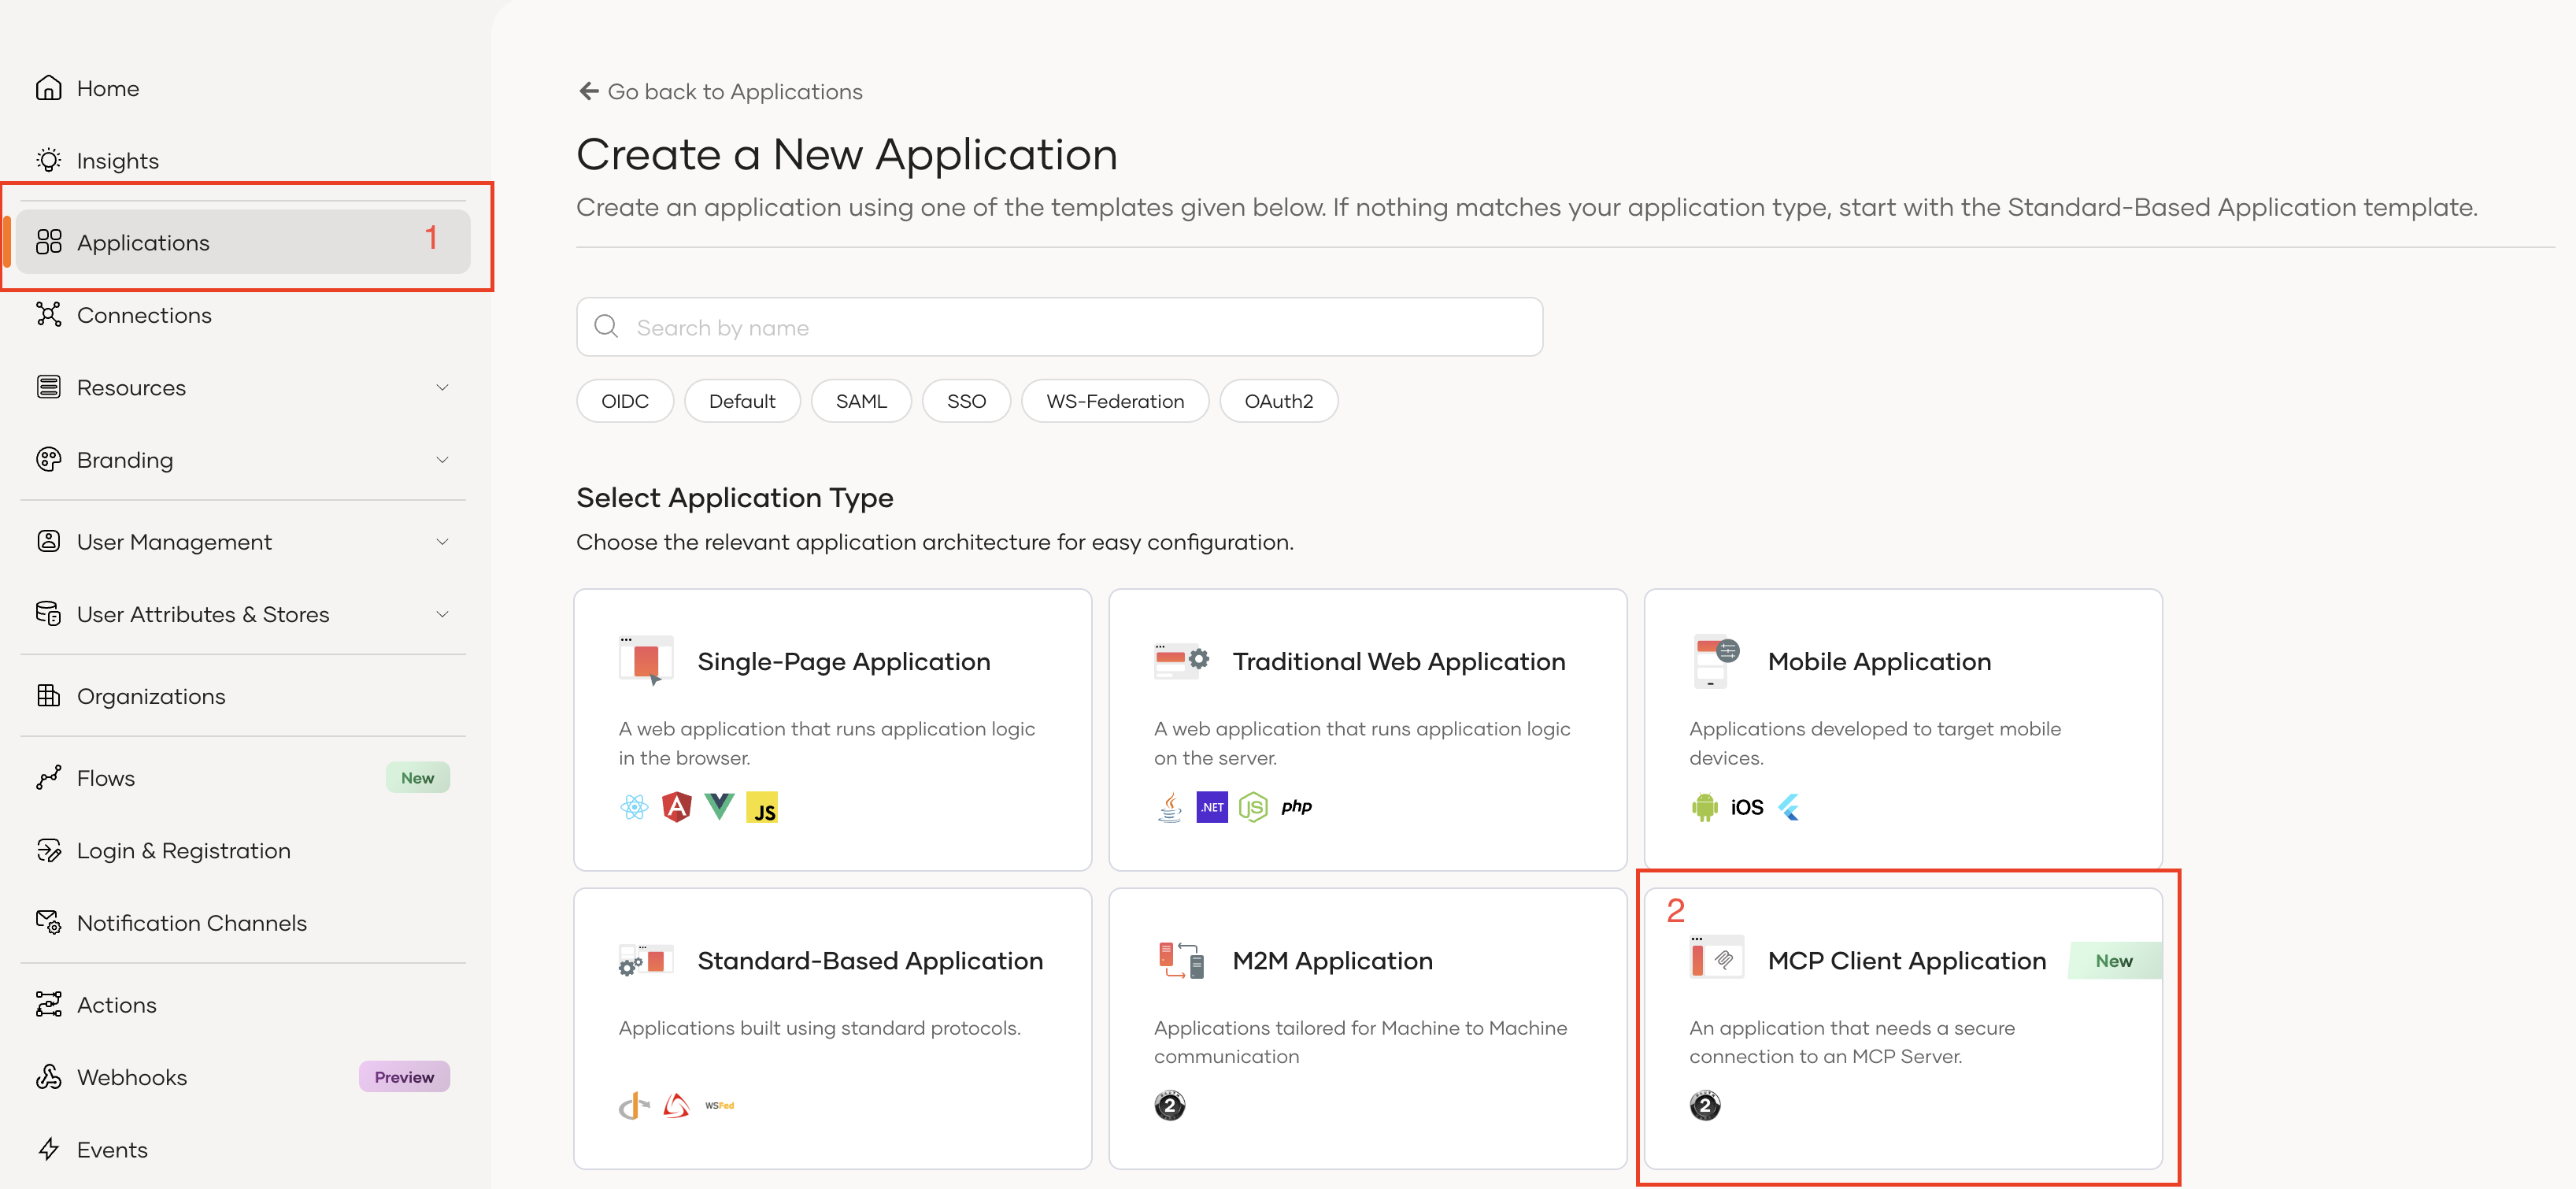
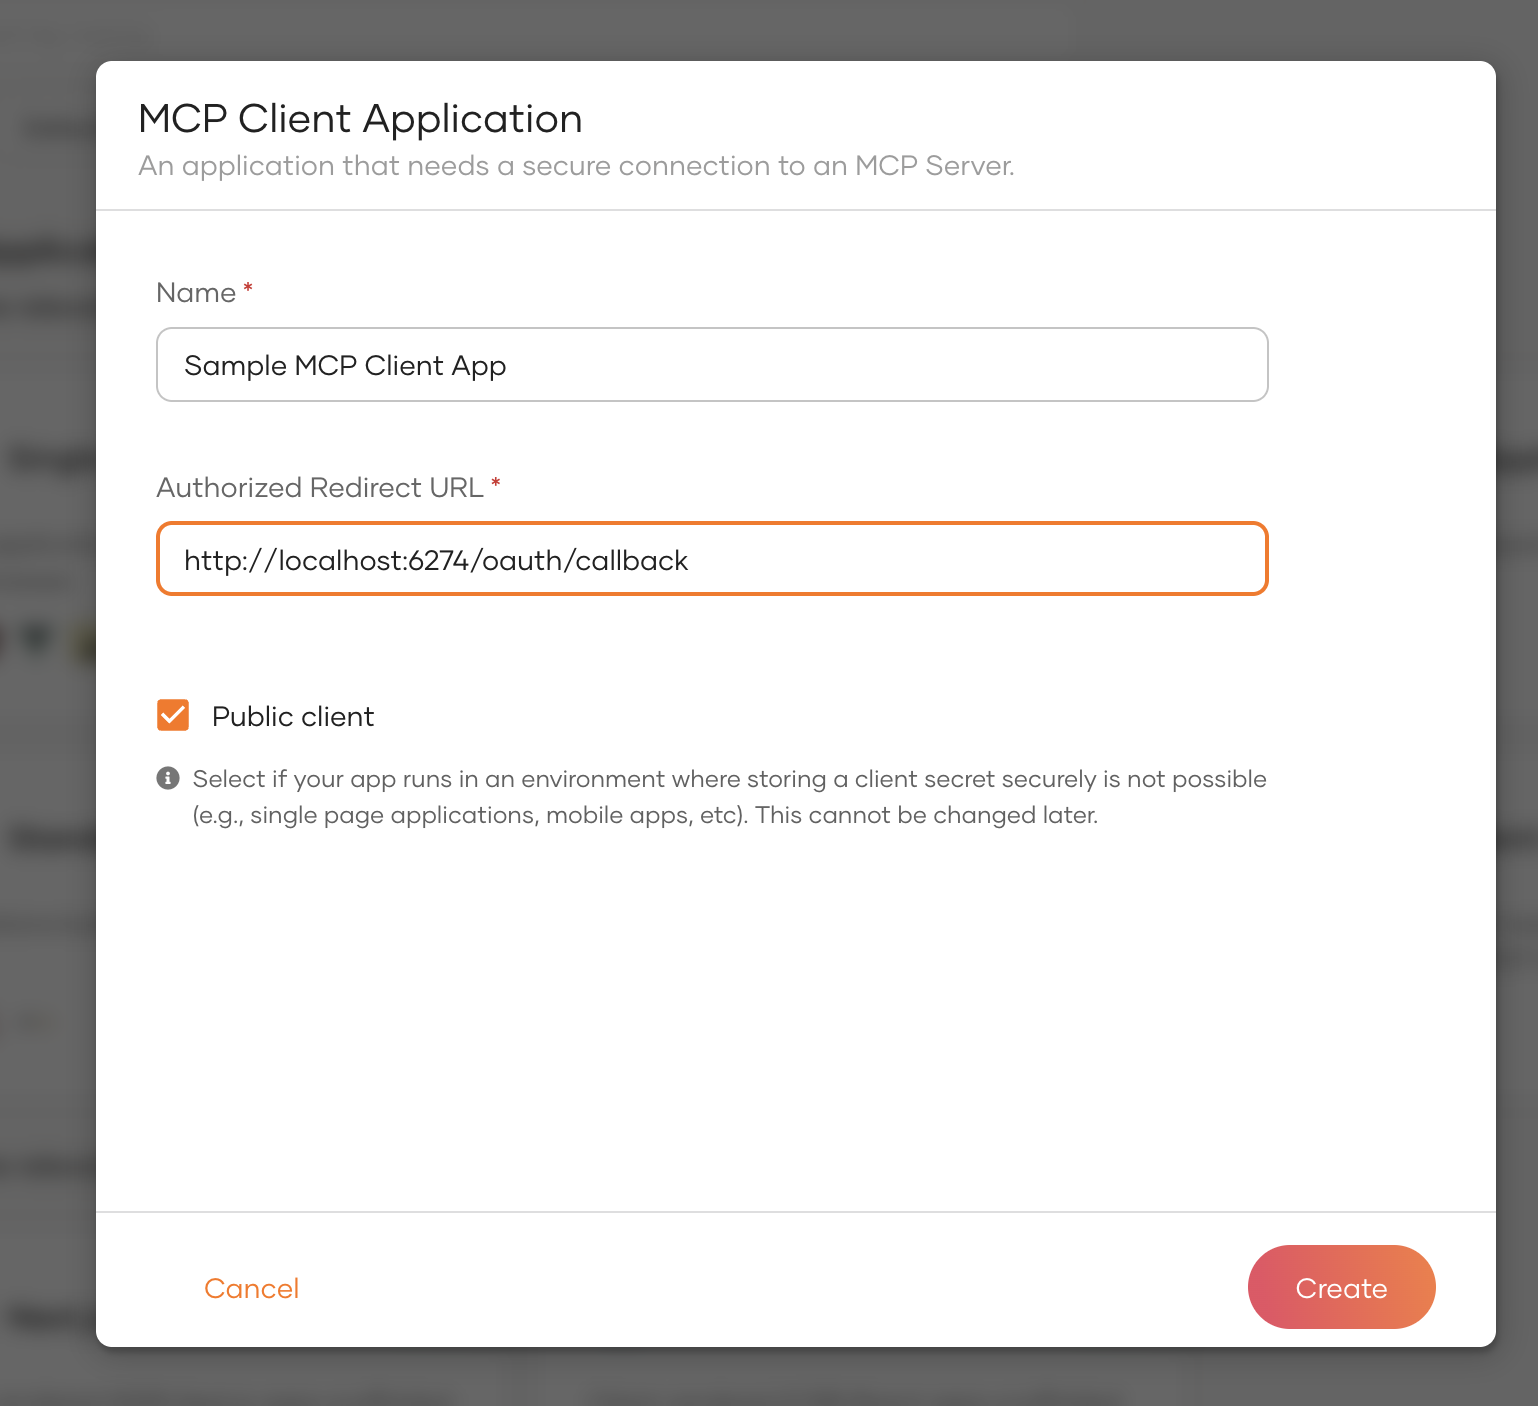
Configure your application:
Application Name: Pawsome Pet Care MCP
Authorized Redirect URLs: Add the callback URL for your client application
For MCP Inspector:
http://localhost:6274/oauth/callbackFor the agent:
http://localhost:8080/callback
2. Get Your Application Credentials
Once the application is created, retrieve the following:
Client ID: Found in the application's Protocol tab
Tenant Name: Your organization's tenant name (e.g.,
pawsomepets)
3. Configure Required Scopes
Ensure your Asgardeo application has the following scopes enabled:
openid- Standard OpenID Connect scopeemail- User email address accessprofile- User profile informationinternal_login- Required for user authentication
4. Update Environment Variables
Replace the placeholders in your .env file:
Replace
<your-tenant>with your actual Asgardeo tenant nameReplace
<your-client-id>with your OAuth2 client ID from Asgardeo
Security Note: Never commit your .env file to version control. Add .env to your .gitignore file.
Architecture Overview
MCP Server (main.py)
The MCP server provides secured tools for pet management:
JWT Token Verification
Validates incoming tokens using Asgardeo JWKS endpoint
Extracts user claims (subject, scopes, audience)
Implements RFC 9728 Protected Resource Metadata
Available Tools:
get_user_id_by_email- Retrieves user ID from emailget_pets_by_user_id- Lists all pets for a userget_pet_vaccination_info- Fetches vaccination historybook_vet_appointment- Books veterinary appointmentscancel_appointment- Cancels existing appointmentssuggest_pet_names- AI-powered pet name suggestions via OpenAI
LangGraph Agent (agent.py)
The agent orchestrates intelligent conversations with dynamic context management:
Authentication Flow
Implements OAuth2 Authorization Code Flow with PKCE
Automatically opens browser for Asgardeo login
Retrieves user email from ID token and SCIM2/Me endpoint
Exchanges authorization code for access token
State Management
Maintains conversation history per session
Caches user context (user ID, pets, active pet)
Dynamically resolves pet context from user messages
Graph Nodes:
load_context- Loads user data at conversation startclassify- Determines user intentmcp_agent- Executes MCP tool calls with dynamic contextgreeting,services,pricing,general- Intent-specific handlers
Multi-Pet Logic:
Single pet: Automatic context selection
Multiple pets: Detects pet names in messages or asks for clarification
No pets: Informs user appropriately
Running the System
1. Start the MCP Server
The server will start on http://localhost:8000 using streamable-http transport.
2. Start the Agent Server
The agent will:
Open your browser for Asgardeo authentication
Wait for authorization callback
Retrieve your user email
Start the chat server on
http://localhost:8080
3. Access the Web Interface
Open http://localhost:8080 in your browser to interact with the chatbot.
Testing with MCP Inspector
Setup MCP Inspector
Install and run MCP Inspector:
npx @modelcontextprotocol/inspectorNote: Ensure version
0.16.3or higher.Configure Inspector Callback:
Add
http://localhost:6274/oauth/callbackto your Asgardeo application's authorized redirect URLs
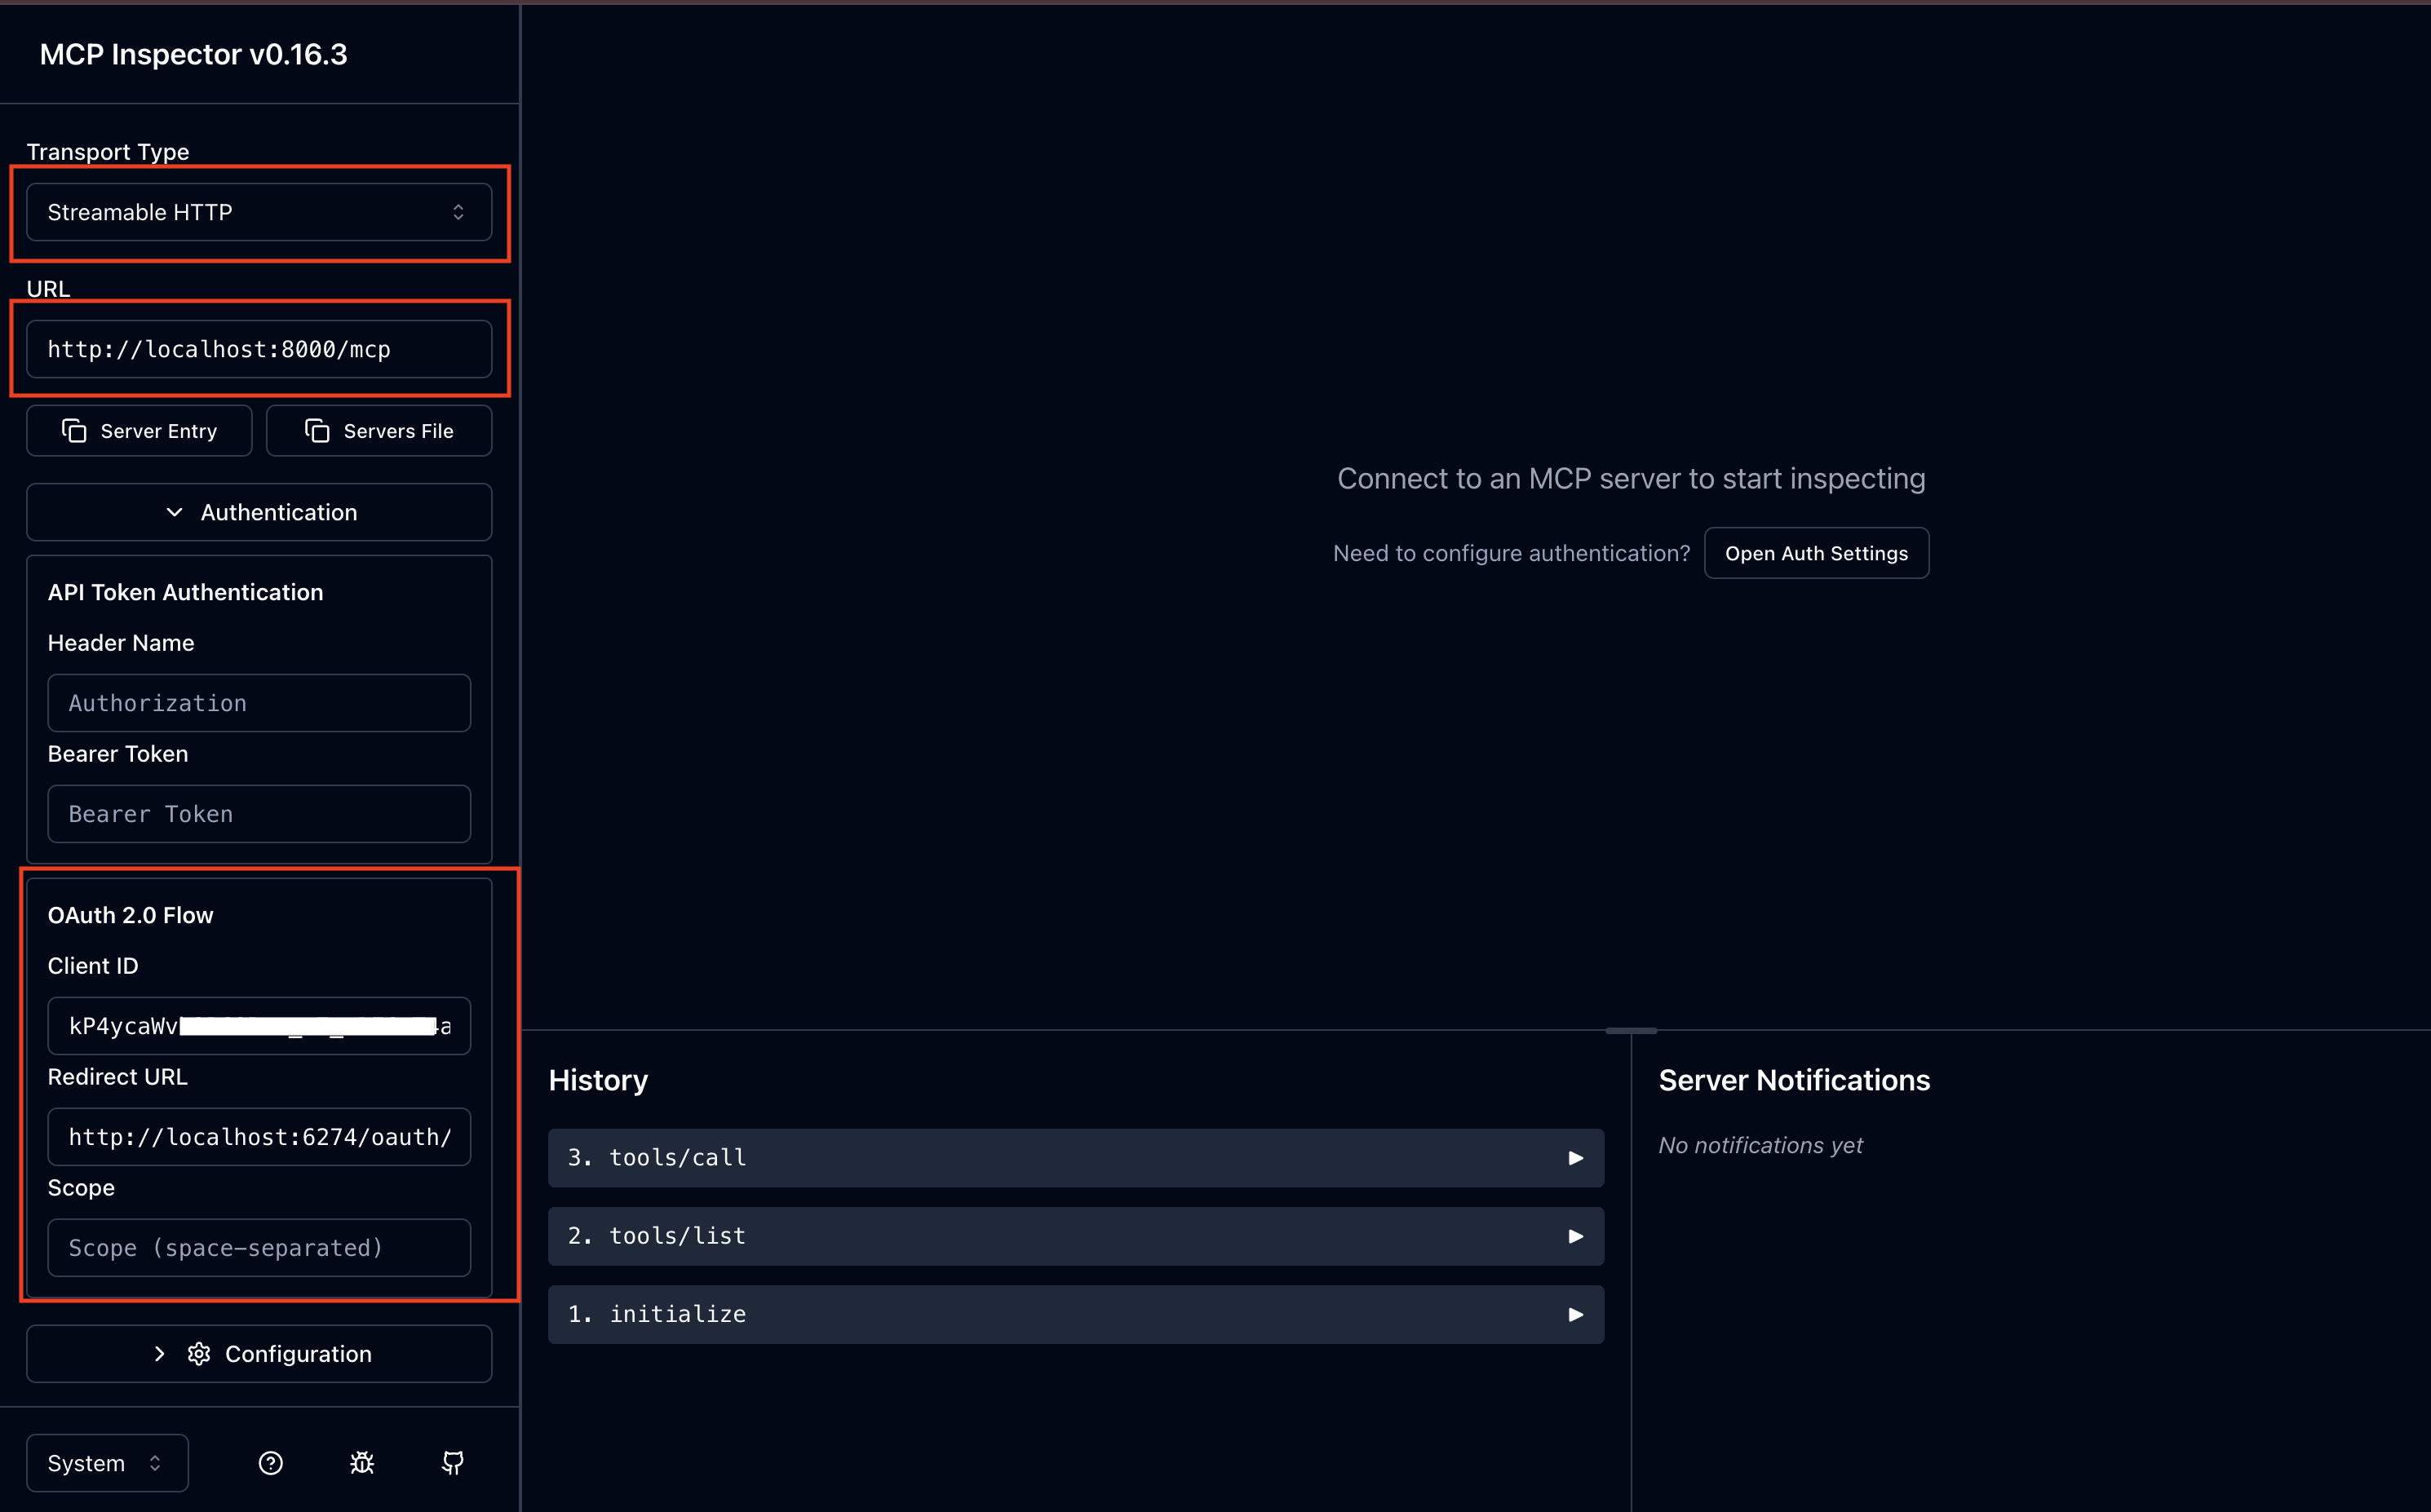
Connect to MCP Server:
Open the Inspector URL (e.g.,
http://localhost:6274/?MCP_PROXY_AUTH_TOKEN=<token>)Configure the server connection:
Transport: HTTP SSE
URL:
http://localhost:8000/mcpAuth: OAuth2 with Asgardeo settings
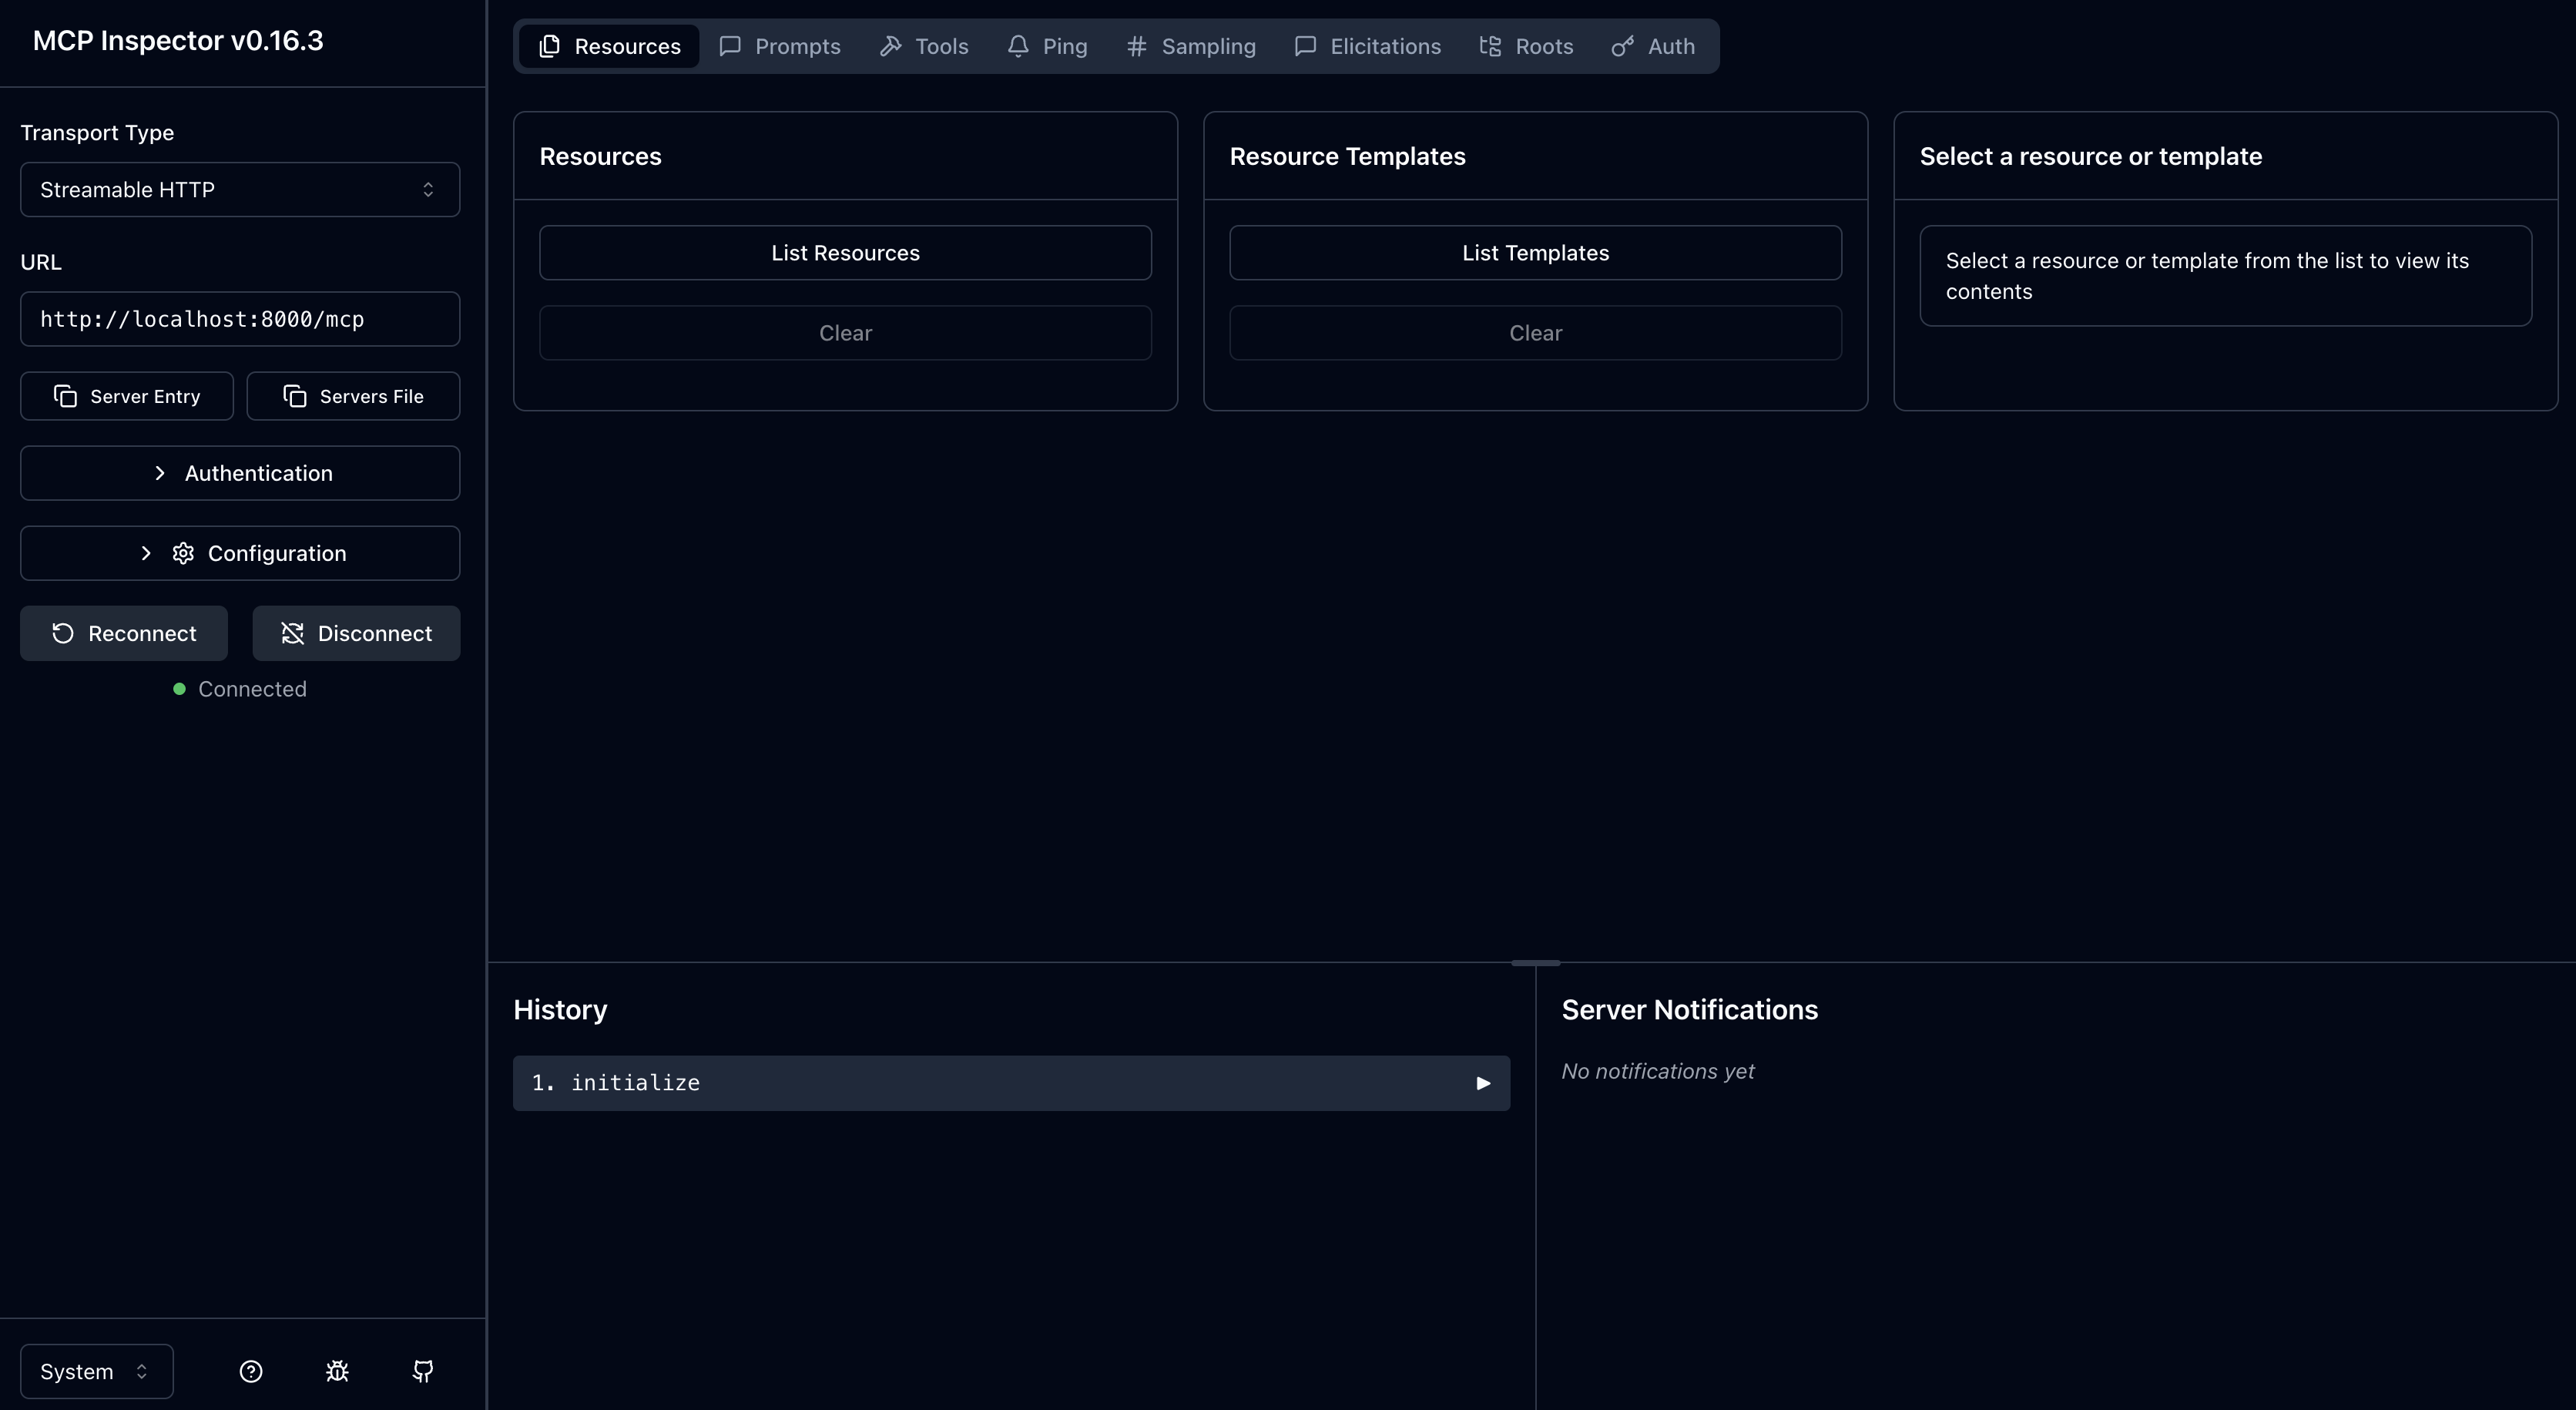
Test Authentication:
Click Connect
You'll be redirected to Asgardeo for login
After successful authentication, you can test the tools
Sample Conversation Flows
Example 1: Single Pet User
Example 2: Multiple Pet User
Example 3: Booking Appointment
Security Features
JWT Token Validation
Validates tokens against Asgardeo JWKS endpoint
Verifies issuer, audience, and expiration
Extracts and validates scopes
Authorization Flow
OAuth2 Authorization Code Flow with PKCE
Secure token exchange
No client secret required (PKCE protects public clients)
Scope-Based Access Control
Tools require valid access tokens
Future enhancement: Scope-specific tool access
User Context Isolation
Each user sees only their own pets
Session-based conversation memory
Context caching per session ID
Troubleshooting
Email Not Retrieved from ID Token
The agent includes fallback logic to retrieve email from SCIM2/Me endpoint if not present in ID token:
Token Validation Failures
Check the following:
JWKS URL is correct and accessible
Issuer URL matches exactly (including tenant)
Client ID is correct
Token has not expired
Connection Issues
Ensure MCP server is running on
http://localhost:8000Verify agent server is running on
http://localhost:8080Check firewall settings for local ports
Advanced Configuration
Custom Port Configuration
Modify port settings in the respective files:
MCP Server (main.py):
Agent Server (agent.py):
Adding New Tools
To add new MCP tools:
Define the tool in
main.py:
The agent will automatically discover and use the new tool.
Contributing
Contributions are welcome! Please ensure:
Code follows PEP 8 style guidelines
All new tools include proper authentication checks
Documentation is updated for new features
License
This project is provided as-is for demonstration purposes.
Powered by Asgardeo - Enterprise-grade identity and access management for modern applications.