
Community platform integration mentioned for user support and updates related to the MCP server
Supports containerized deployment of the MCP server services for easier setup and management
Integrates with Flux models for advanced image generation capabilities through ComfyUI workflows
Integrates with Ollama for local LLM support, allowing AI agents to use locally hosted models for controlling ComfyUI workflows and AIGC operations
Provides support for OpenAI models through the LiteLLM framework, enabling AI agents to leverage OpenAI's capabilities for multimodal content generation using ComfyUI workflows
Community platform integration mentioned for user support and updates related to the MCP server
Click on "Install Server".
Wait a few minutes for the server to deploy. Once ready, it will show a "Started" state.
In the chat, type
@followed by the MCP server name and your instructions, e.g., "@pixelle-mcp-Image-generationgenerate an image of a futuristic cityscape at sunset using flux"
That's it! The server will respond to your query, and you can continue using it as needed.
Here is a step-by-step guide with screenshots.
https://github.com/user-attachments/assets/65422cef-96f9-44fe-a82b-6a124674c417
📋 Recent Updates
✅ 2025-09-29: Added RunningHub cloud ComfyUI support, enabling workflow execution without local GPU and ComfyUI environment
✅ 2025-09-03: Architecture refactoring from three services to unified application; added CLI tool support; published to PyPI
✅ 2025-08-12: Integrated the LiteLLM framework, adding multi-model support for Gemini, DeepSeek, Claude, Qwen, and more
Related MCP server: Comfy MCP Server
🚀 Features
✅ 🔄 Full-modal Support: Supports TISV (Text, Image, Sound/Speech, Video) full-modal conversion and generation
✅ 🚀 Dual Execution Modes: Local ComfyUI self-hosted environment + RunningHub cloud ComfyUI service, users can flexibly choose based on their needs
✅ 🧩 ComfyUI Ecosystem: Built on ComfyUI, inheriting all capabilities from the open ComfyUI ecosystem
✅ 🔧 Zero-code Development: Defines and implements the Workflow-as-MCP Tool solution, enabling zero-code development and dynamic addition of new MCP Tools
✅ 🗄️ MCP Server: Based on the MCP protocol, supporting integration with any MCP client (including but not limited to Cursor, Claude Desktop, etc.)
✅ 🌐 Web Interface: Developed based on the Chainlit framework, inheriting Chainlit's UI controls and supporting integration with more MCP Servers
✅ 📦 One-click Deployment: Supports PyPI installation, CLI commands, Docker and other deployment methods, ready to use out of the box
✅ ⚙️ Simplified Configuration: Uses environment variable configuration scheme, simple and intuitive configuration
✅ 🤖 Multi-LLM Support: Supports multiple mainstream LLMs, including OpenAI, Ollama, Gemini, DeepSeek, Claude, Qwen, and more
📁 Project Architecture
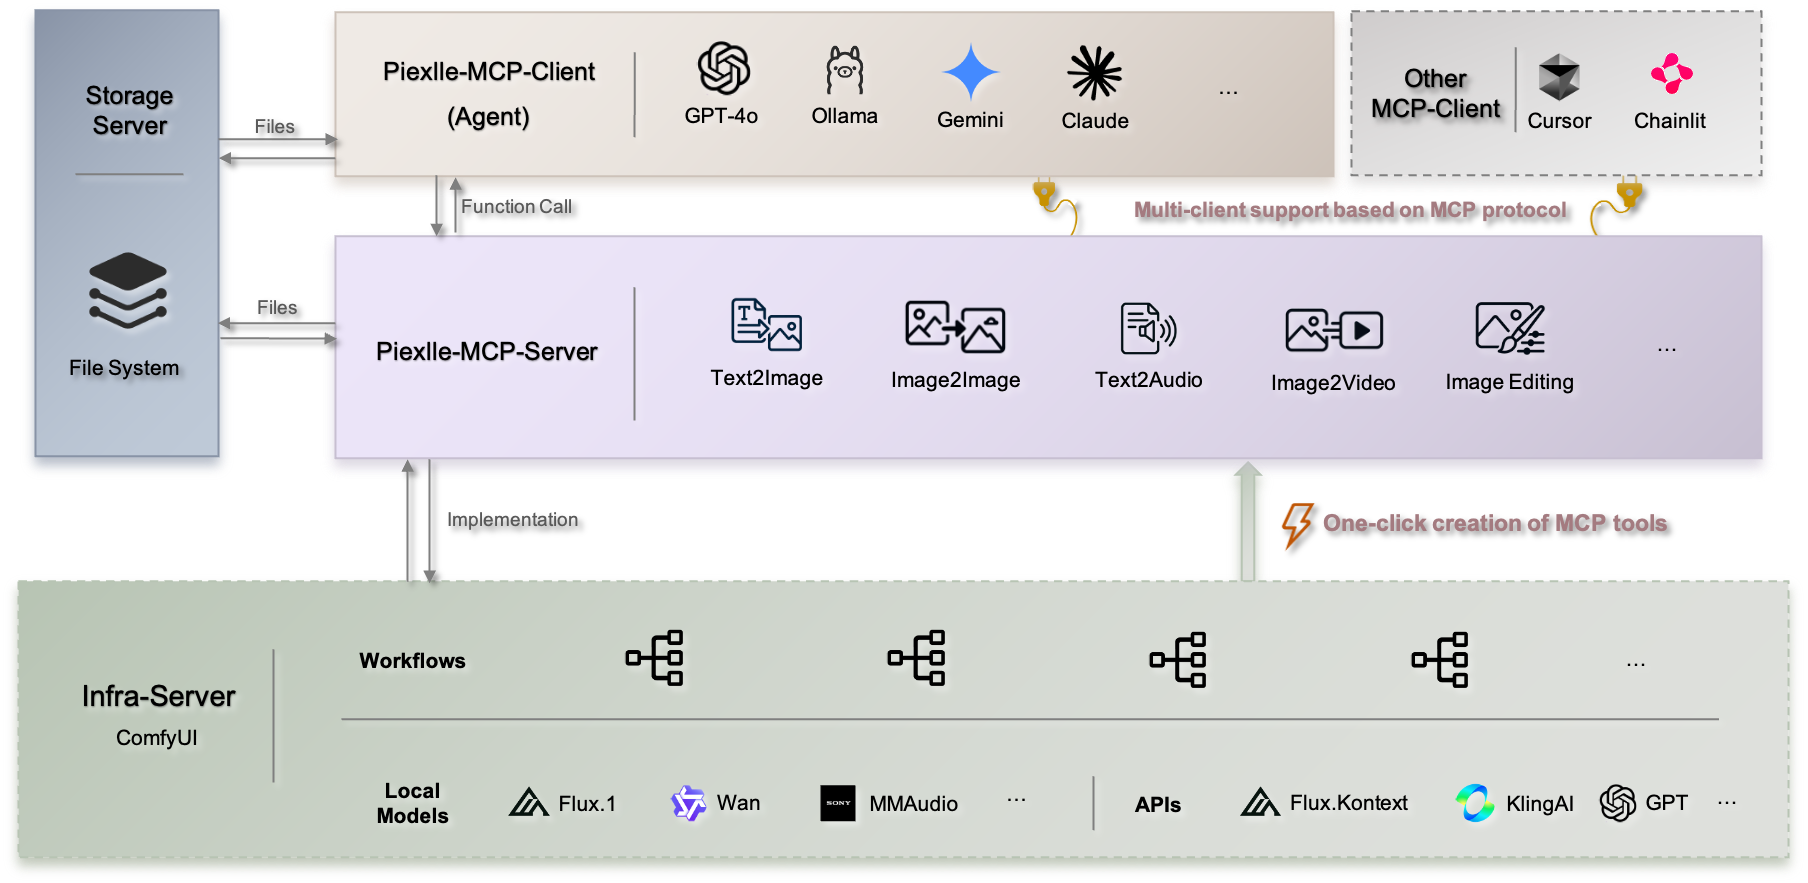
Pixelle MCP adopts a unified architecture design, integrating MCP server, web interface, and file services into one application, providing:
🌐 Web Interface: Chainlit-based chat interface supporting multimodal interaction
🔌 MCP Endpoint: For external MCP clients (such as Cursor, Claude Desktop) to connect
📁 File Service: Handles file upload, download, and storage
🛠️ Workflow Engine: Supports both local ComfyUI and cloud ComfyUI (RunningHub) workflows, automatically converts workflows into MCP tools
🏃♂️ Quick Start
Choose the deployment method that best suits your needs, from simple to complex:
🎯 Method 1: One-click Experience
💡 Zero configuration startup, perfect for quick experience and testing
🚀 Temporary Run
📦 Persistent Installation
After startup, it will automatically enter the configuration wizard to guide you through execution engine selection (ComfyUI/RunningHub) and LLM configuration.
🛠️ Method 2: Local Development Deployment
💡 Supports custom workflows and secondary development
📥 1. Get Source Code
🚀 2. Start Service
📚 View Complete CLI Reference →
🔧 3. Add Custom Workflows (Optional)
⚠️ Important: Make sure to test workflows in ComfyUI first to ensure they run properly, otherwise execution will fail.
🐳 Method 3: Docker Deployment
💡 Suitable for production environments and containerized deployment
📋 1. Prepare Configuration
🚀 2. Start Container
🌐 Access Services
Regardless of which method you use, after startup you can access via:
🌐 Web Interface: http://localhost:9004
Default username and password are both🔌 MCP Endpoint: http://localhost:9004/pixelle/mcp
For MCP clients like Cursor, Claude Desktop to connect
💡 Port Configuration: Default port is 9004, can be customized via environment variable PORT=your_port.
⚙️ Initial Configuration
On first startup, the system will automatically detect configuration status:
🚀 Execution Engine Selection: Choose between local ComfyUI or RunningHub cloud service
🤖 LLM Configuration: Configure at least one LLM provider (OpenAI, Ollama, etc.)
📁 Workflow Directory: System will automatically create necessary directory structure
🌐 RunningHub Cloud Mode Advantages
✅ Zero Hardware Requirements: No need for local GPU or high-performance hardware
✅ No Environment Setup: No need to install and configure ComfyUI locally
✅ Ready to Use: Register and get API key to start immediately
✅ Stable Performance: Professional cloud infrastructure ensures stable execution
✅ Auto Scaling: Automatically handles concurrent requests and resource allocation
🏠 Local ComfyUI Mode Advantages
✅ Full Control: Complete control over execution environment and model versions
✅ Privacy Protection: All data processing happens locally, ensuring data privacy
✅ Custom Models: Support for custom models and nodes not available in cloud
✅ No Network Dependency: Can work offline without internet connection
✅ Cost Control: No cloud service fees for high-frequency usage
🆘 Need Help? Join community groups for support (see Community section below)
🛠️ Add Your Own MCP Tool
⚡ One workflow = One MCP Tool, supports two addition methods:
📋 Method 1: Local ComfyUI Workflow - Export API format workflow files 📋 Method 2: RunningHub Workflow ID - Use cloud workflow IDs directly
🎯 1. Add the Simplest MCP Tool
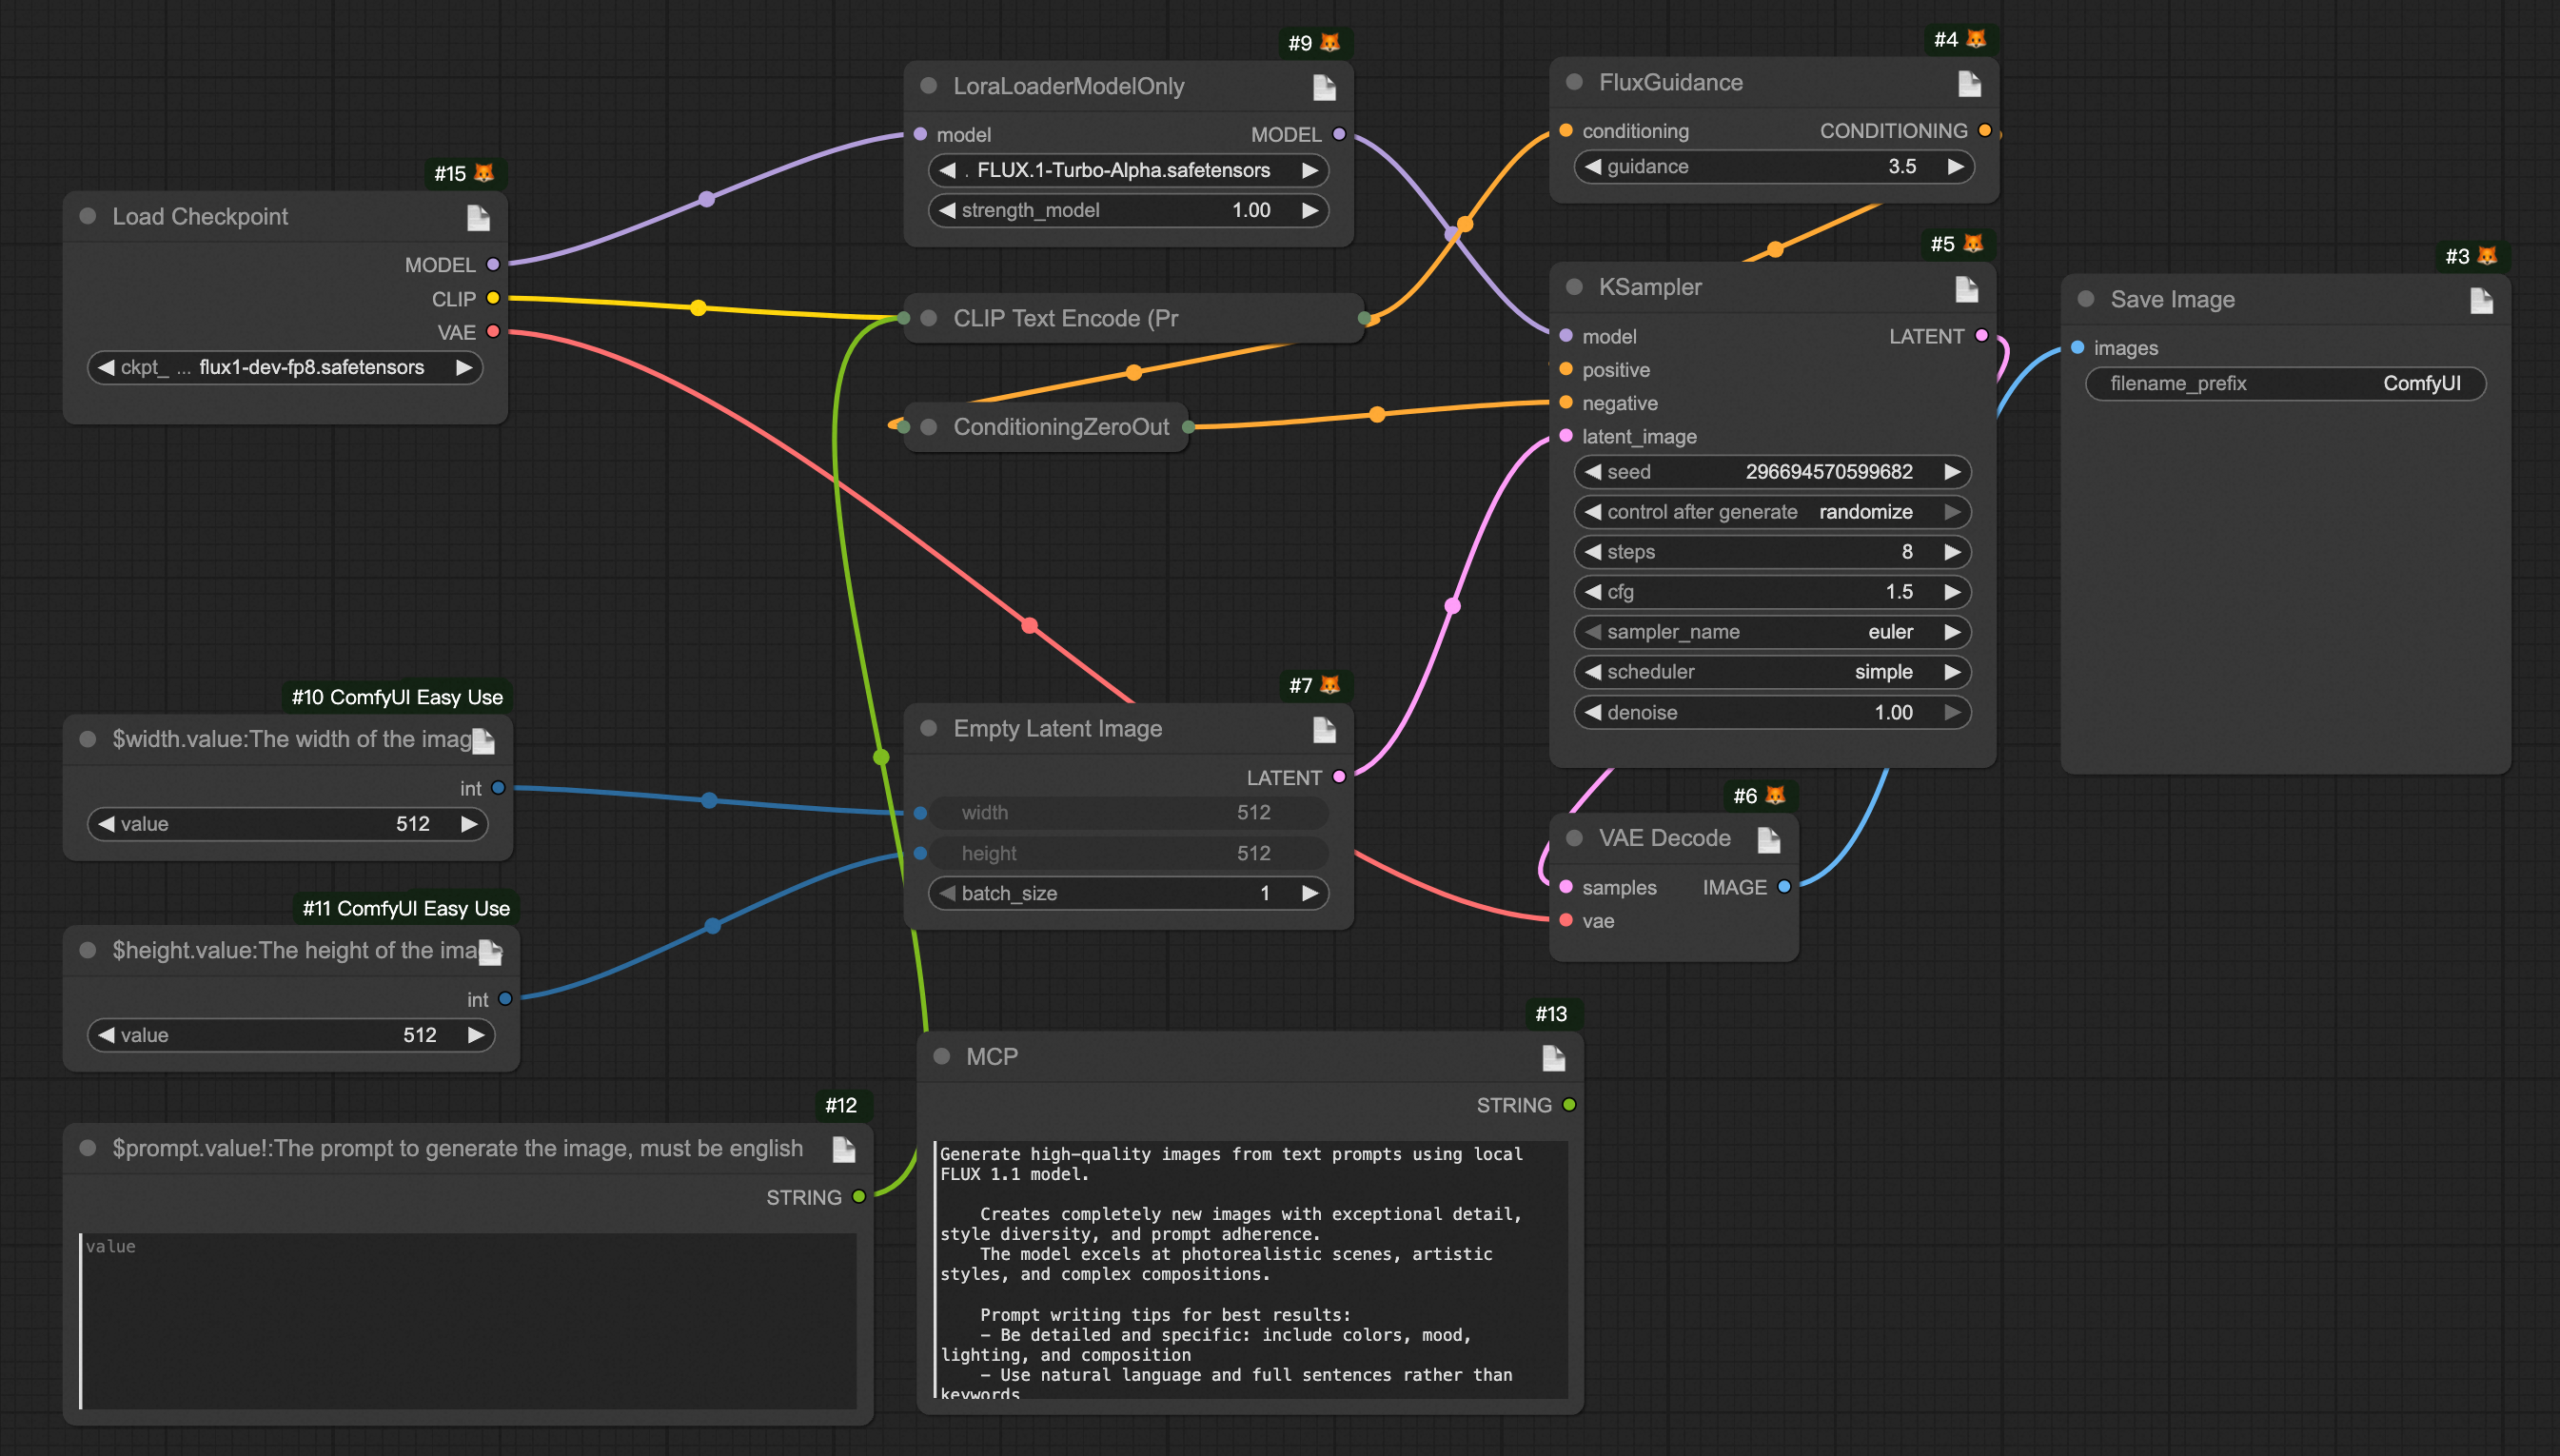
📝 Build a workflow in ComfyUI for image Gaussian blur (Get it here), then set the
LoadImagenode's title to$image.image!as shown below: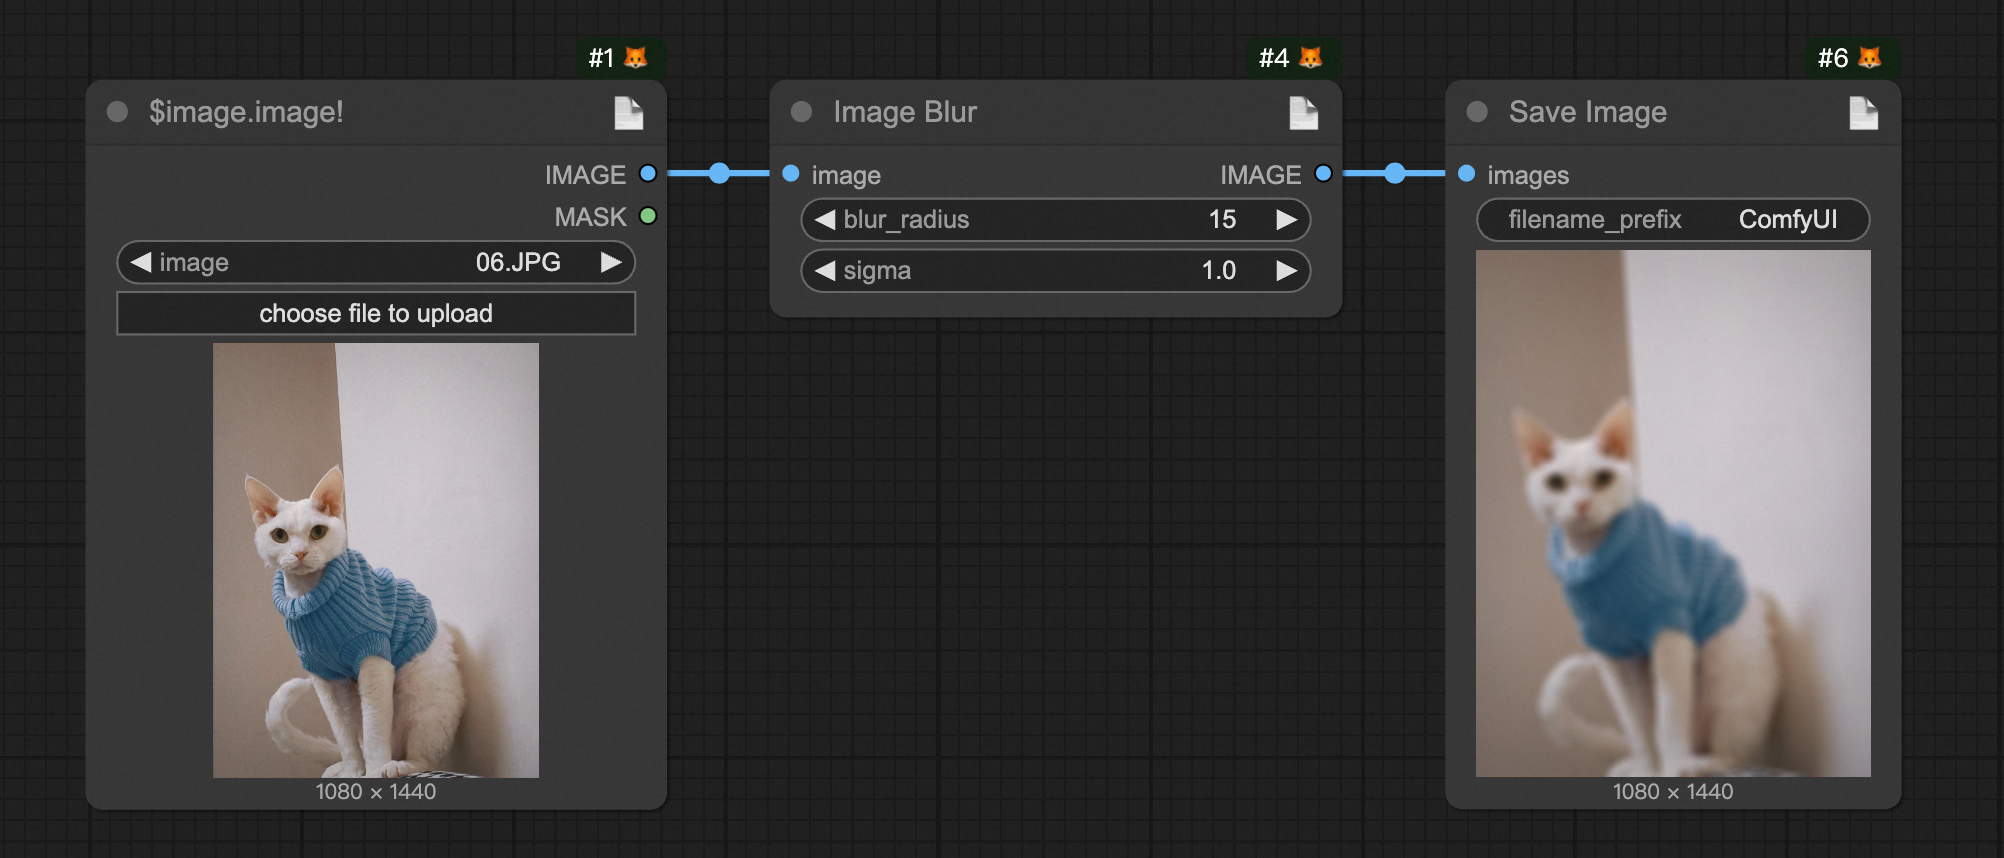
📤 Export it as an API format file and rename it to
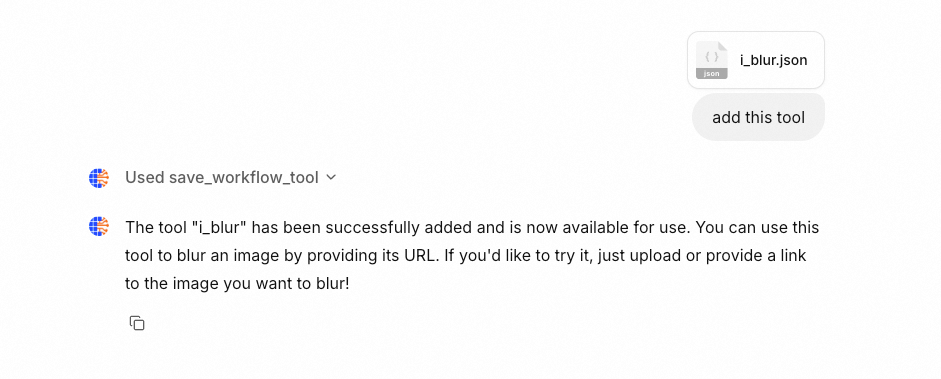
i_blur.json. You can export it yourself or use our pre-exported version (Get it here)📋 Copy the exported API workflow file (must be API format), input it on the web page, and let the LLM add this Tool
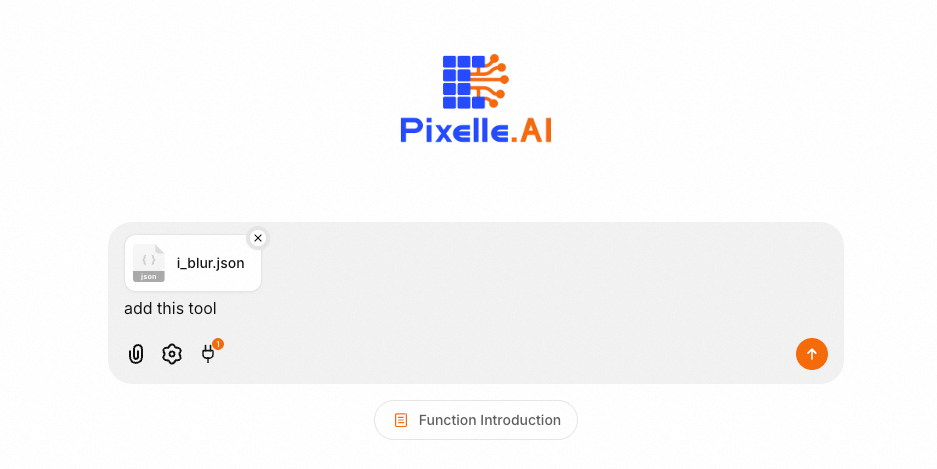
✨ After sending, the LLM will automatically convert this workflow into an MCP Tool
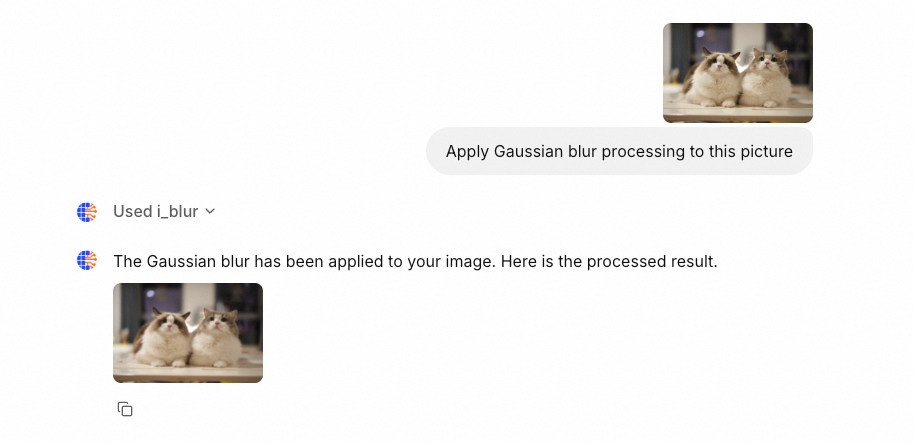
🎨 Now, refresh the page and send any image to perform Gaussian blur processing via LLM
🔌 2. Add a Complex MCP Tool
The steps are the same as above, only the workflow part differs (Download workflow: UI format and API format)
Note: When using RunningHub, you only need to input the corresponding workflow ID, no need to download and upload workflow files.
🔧 ComfyUI Workflow Custom Specification
🎨 Workflow Format
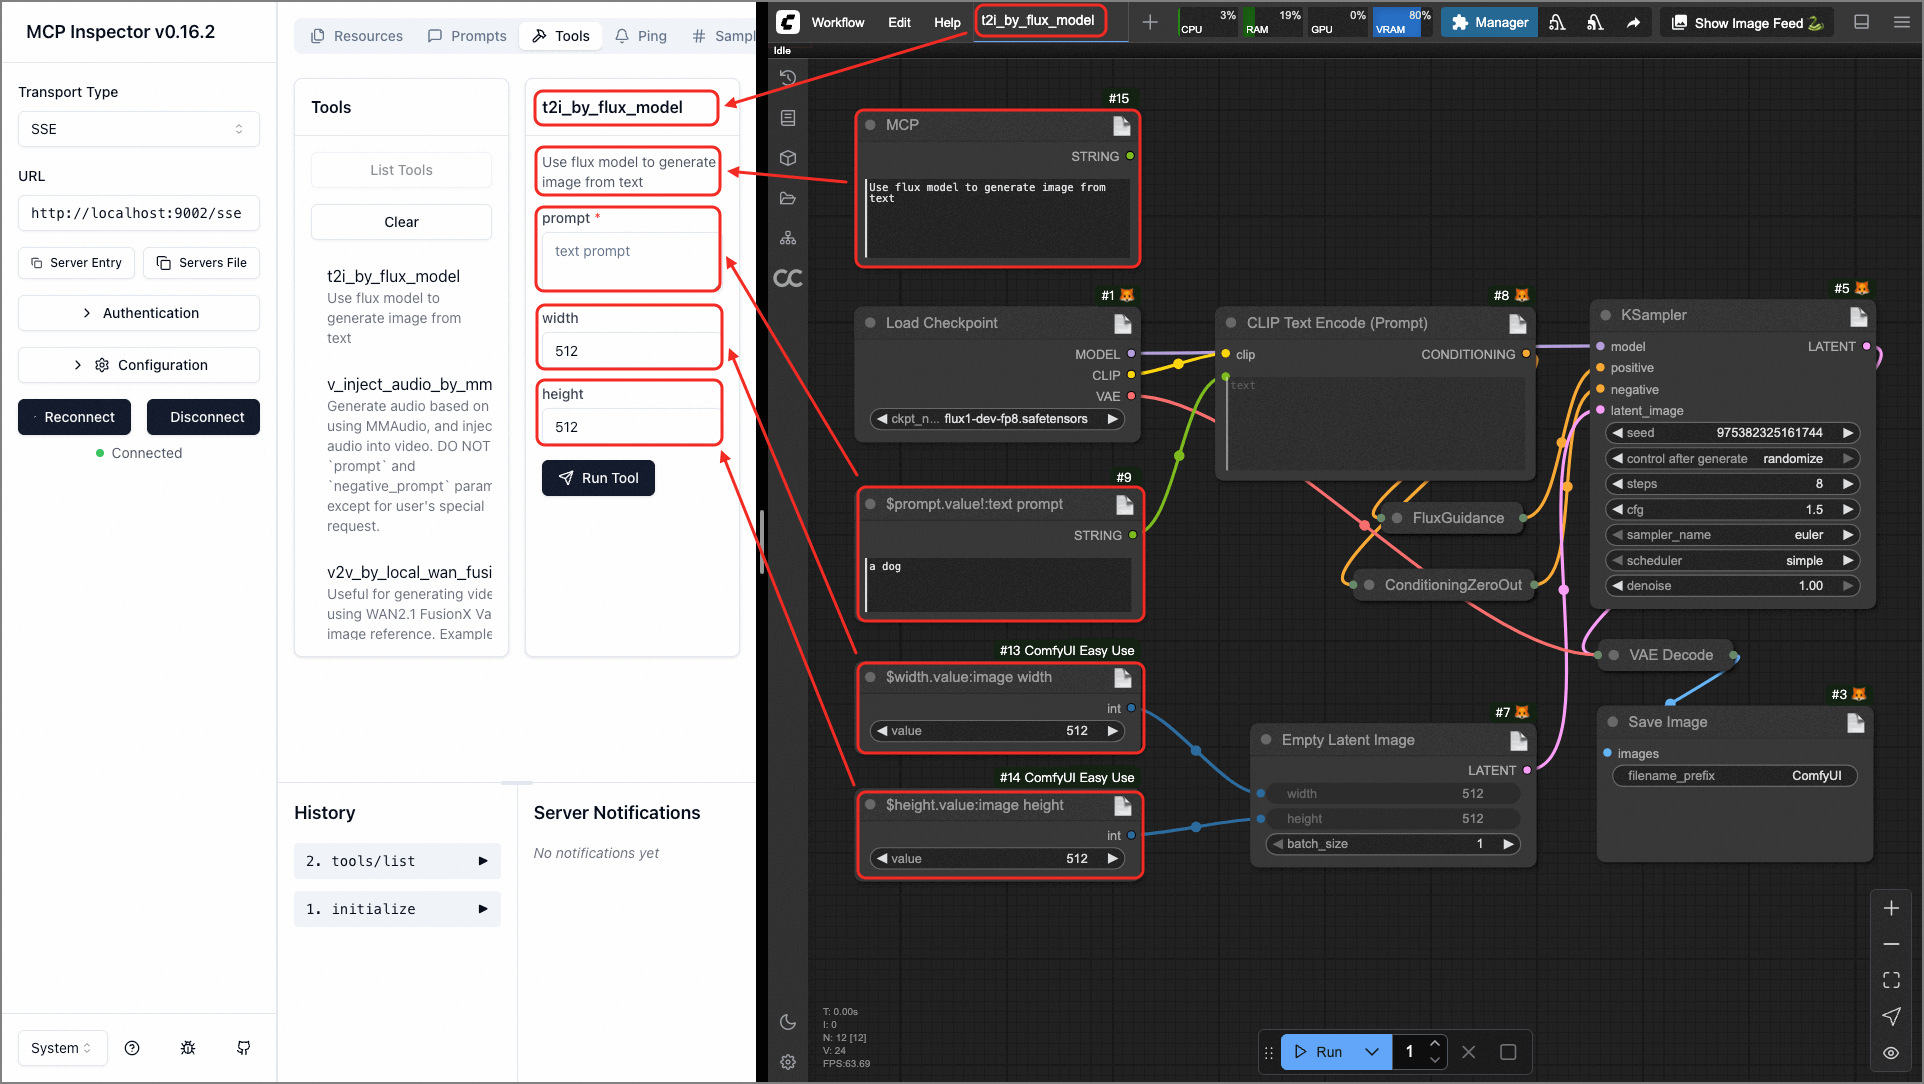
The system supports ComfyUI workflows. Just design your workflow in the canvas and export it as API format. Use special syntax in node titles to define parameters and outputs.
📝 Parameter Definition Specification
In the ComfyUI canvas, double-click the node title to edit, and use the following DSL syntax to define parameters:
🔍 Syntax Explanation:
param_name: The parameter name for the generated MCP tool function~: Optional, indicates URL parameter upload processing, returns relative pathfield_name: The corresponding input field in the node!: Indicates this parameter is requireddescription: Description of the parameter
💡 Example:
Required parameter example:
Set LoadImage node title to:
$image.image!:Input image URLMeaning: Creates a required parameter named
image, mapped to the node'simagefield
URL upload processing example:
Set any node title to:
$image.~image!:Input image URLMeaning: Creates a required parameter named
image, system will automatically download URL and upload to ComfyUI, returns relative path
📝 Note:
LoadImage,VHS_LoadAudioUpload,VHS_LoadVideoand other nodes have built-in functionality, no need to add~marker
🎯 Type Inference Rules
The system automatically infers parameter types based on the current value of the node field:
🔢
int: Integer values (e.g. 512, 1024)📊
float: Floating-point values (e.g. 1.5, 3.14)✅
bool: Boolean values (e.g. true, false)📝
str: String values (default type)
📤 Output Definition Specification
🤖 Method 1: Auto-detect Output Nodes
The system will automatically detect the following common output nodes:
🖼️
SaveImage- Image save node🎬
SaveVideo- Video save node🔊
SaveAudio- Audio save node📹
VHS_SaveVideo- VHS video save node🎵
VHS_SaveAudio- VHS audio save node
🎯 Method 2: Manual Output Marking
Usually used for multiple outputs Use
$output.var_namein any node title to mark output:
Set node title to:
$output.resultThe system will use this node's output as the tool's return value
📄 Tool Description Configuration (Optional)
You can add a node titled MCP in the workflow to provide a tool description:
Add a
String (Multiline)or similar text node (must have a single string property, and the node field should be one of: value, text, string)Set the node title to:
MCPEnter a detailed tool description in the value field
⚠️ Important Notes
🔒 Parameter Validation: Optional parameters (without !) must have default values set in the node
🔗 Node Connections: Fields already connected to other nodes will not be parsed as parameters
🏷️ Tool Naming: Exported file name will be used as the tool name, use meaningful English names
📋 Detailed Descriptions: Provide detailed parameter descriptions for better user experience
🎯 Export Format: Must export as API format, do not export as UI format
💬 Community
Scan the QR codes below to join our communities for latest updates and technical support:
Discord Community | WeChat Group |
🤝 How to Contribute
We welcome all forms of contribution! Whether you're a developer, designer, or user, you can participate in the project in the following ways:
🐛 Report Issues
📋 Submit bug reports on the Issues page
🔍 Please search for similar issues before submitting
📝 Describe the reproduction steps and environment in detail
💡 Feature Suggestions
🚀 Submit feature requests in Issues
💭 Describe the feature you want and its use case
🎯 Explain how it improves user experience
🔧 Code Contributions
📋 Contribution Process
🍴 Fork this repo to your GitHub account
🌿 Create a feature branch:
git checkout -b feature/your-feature-name💻 Develop and add corresponding tests
📝 Commit changes:
git commit -m "feat: add your feature"📤 Push to your repo:
git push origin feature/your-feature-name🔄 Create a Pull Request to the main repo
🎨 Code Style
🐍 Python code follows PEP 8 style guide
📖 Add appropriate documentation and comments for new features
🧩 Contribute Workflows
📦 Share your ComfyUI workflows with the community
🛠️ Submit tested workflow files
📚 Add usage instructions and examples for workflows
🙏 Acknowledgements
❤️ Sincere thanks to the following organizations, projects, and teams for supporting the development and implementation of this project.
License
This project is released under the MIT License (LICENSE, SPDX-License-identifier: MIT).