
hh-mcp-comfyui
[](https://mseep.ai/app/zjf2671-hh-mcp-comfyui)
# ComfyUI MCP 服务
[](docs/README.EN.md)
[](README.md)

[](LiCENSE)
这是一个基于Model Context Protocol (MCP)的ComfyUI图像生成服务,通过API调用本地ComfyUI实例生成图片。
## 功能特性
- 通过MCP协议提供图像生成服务,实现自然语言生图自由
- 支持动态替换工作流中的提示词和尺寸等参数
- 自动加载workflows目录下的工作流文件作为资源
## 新增功能记录
- [2025-06-29] 支持kontext图片编辑工作流

- [2025-05-11] 支持工作流文件目录动态配置
- [2025-05-09] 增加docker构建方式,支持Python 3.12+
- [2025-05-07] 增加pip构建方式
- [2025-05-06] 把项目目录src/hh修改成src/hh_mcp_comfyui,增加uvx构建方式
- [2025-04-26] 增加图生图和移除背景样例工作流及支持图生图工具
- [2025-04-20] 加入文生图生成工具
## 效果
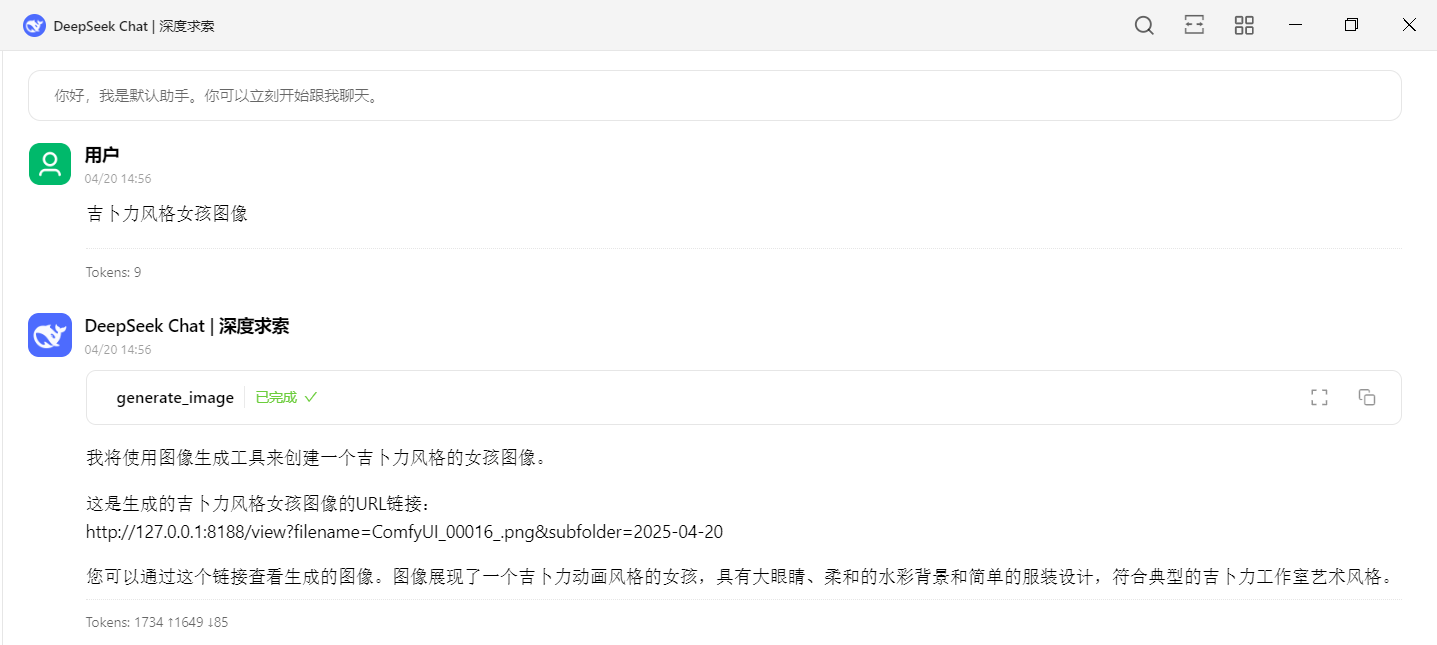
- **Cherry Studio中使用效果**
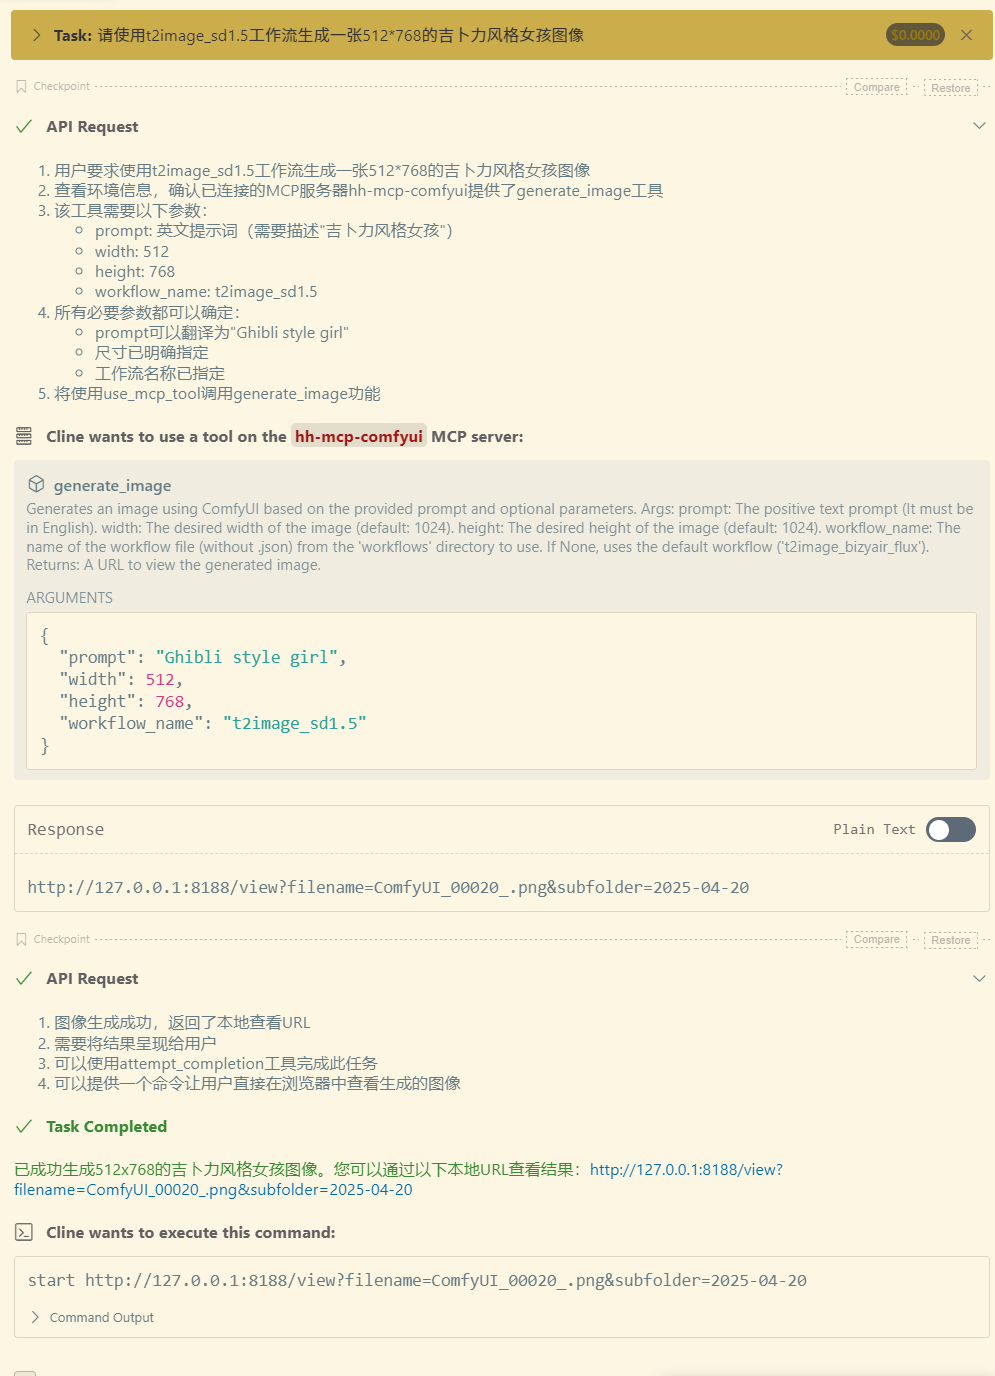
- **Cline中使用效果**

## 安装依赖
**1. 确保已安装Python 3.12+**
**2. 使用uv管理Python环境:**
- 安装uv:
```bash
# On macOS and Linux.
$ curl -LsSf https://astral.sh/uv/install.sh | sh
# On Windows.
$ powershell -ExecutionPolicy ByPass -c "irm https://astral.sh/uv/install.ps1 | iex"
# 更新uv(非必要操作):
$ uv self update
```
## 测试运行服务
- **uvx方式**
```bash
$ uvx hh-mcp-comfyui
INFO:hh_mcp_comfyui.server:Scanning for workflows in: C:\Users\tianw\AppData\Local\uv\cache\archive-v0\dp4MTo0f1qL0DdYF_BYCL\Lib\site-packages\hh_mcp_comfyui\workflows
INFO:hh_mcp_comfyui.server:Starting ComfyUI MCP Server...
```
- **pip方式**
```bash
$ pip install hh_mcp_comfyui
$ python -m hh_mcp_comfyui
INFO:hh_mcp_comfyui.server:Scanning for workflows in: F:\Python\Python313\Lib\site-packages\hh_mcp_comfyui\workflows
INFO:hh_mcp_comfyui.server:Starting ComfyUI MCP Server...
```
**出现上面的信息表示服务启动成功**
## 使用方法
> **必须确保本地ComfyUI实例正在运行(默认地址: http://127.0.0.1:8188) [ComfyUI安装地址](https://github.com/comfyanonymous/ComfyUI.git)**
### Cherry Studio、Cline、Cursor等客户端的使用方式
<details>
<summary>uvx MCP服务配置</summary>
```bash
{
"mcpServers": {
"hh-mcp-comfyui": {
"command": "uvx",
"args": [
"hh-mcp-comfyui@latest"
],
"env": {
"COMFYUI_API_BASE": "http://127.0.0.1:8188",
"COMFYUI_WORKFLOWS_DIR": "/path/hh-mcp-comfyui/workflows"
}
}
}
}
```
</details>
<details>
<summary>pip MCP服务配置</summary>
**需要先执行命令窗口先执行:pip install hh_mcp_comfyui**
```bash
{
"mcpServers": {
"hh-mcp-comfyui": {
"command": "python",
"args": [
"-m",
"hh_mcp_comfyui"
],
"env": {
"COMFYUI_API_BASE": "http://127.0.0.1:8188",
"COMFYUI_WORKFLOWS_DIR": "/path/hh-mcp-comfyui/workflows"
}
}
}
}
```
</details>
<details>
<summary>docker MCP服务配置</summary>
**前提是已安装docker**
```bash
{
"mcpServers": {
"hh-mcp-comfyui": {
"command": "docker",
"args": [
"run",
"--net=host",
"-v",
"/path/hh-mcp-comfyui/workflows:/app/workflows",
"-i",
"--rm",
"zjf2671/hh-mcp-comfyui:latest"
],
"env": {
"COMFYUI_API_BASE": "http://127.0.0.1:8188"
}
}
}
}
```
</details>
## 样例工作流copy到指定工作流目录:
(**注意**:使用下面uvx或pip方式找到你的安装工作流目录的位置把样例工作流添加进去,然后重启你的MCP服务)
- **uvx**
```bash
$ uvx hh-mcp-comfyui
```

- **pip**
```bash
#首先安装依赖
$ pip install hh_mcp_comfyui
$ python -m hh_mcp_comfyui
```

## 测试
> **使用MCP Inspector测试服务端工具**
- **uvx方式**
```bash
$ npx @modelcontextprotocol/inspector uvx hh-mcp-comfyui
```
- **pip方式**
```bash
$ pip install hh_mcp_comfyui
$ npx @modelcontextprotocol/inspector python -m hh_mcp_comfyui
```
- **docker方式**
```bash
$ npx @modelcontextprotocol/inspector docker run --net=host -i --rm zjf2671/hh-mcp-comfyui
```
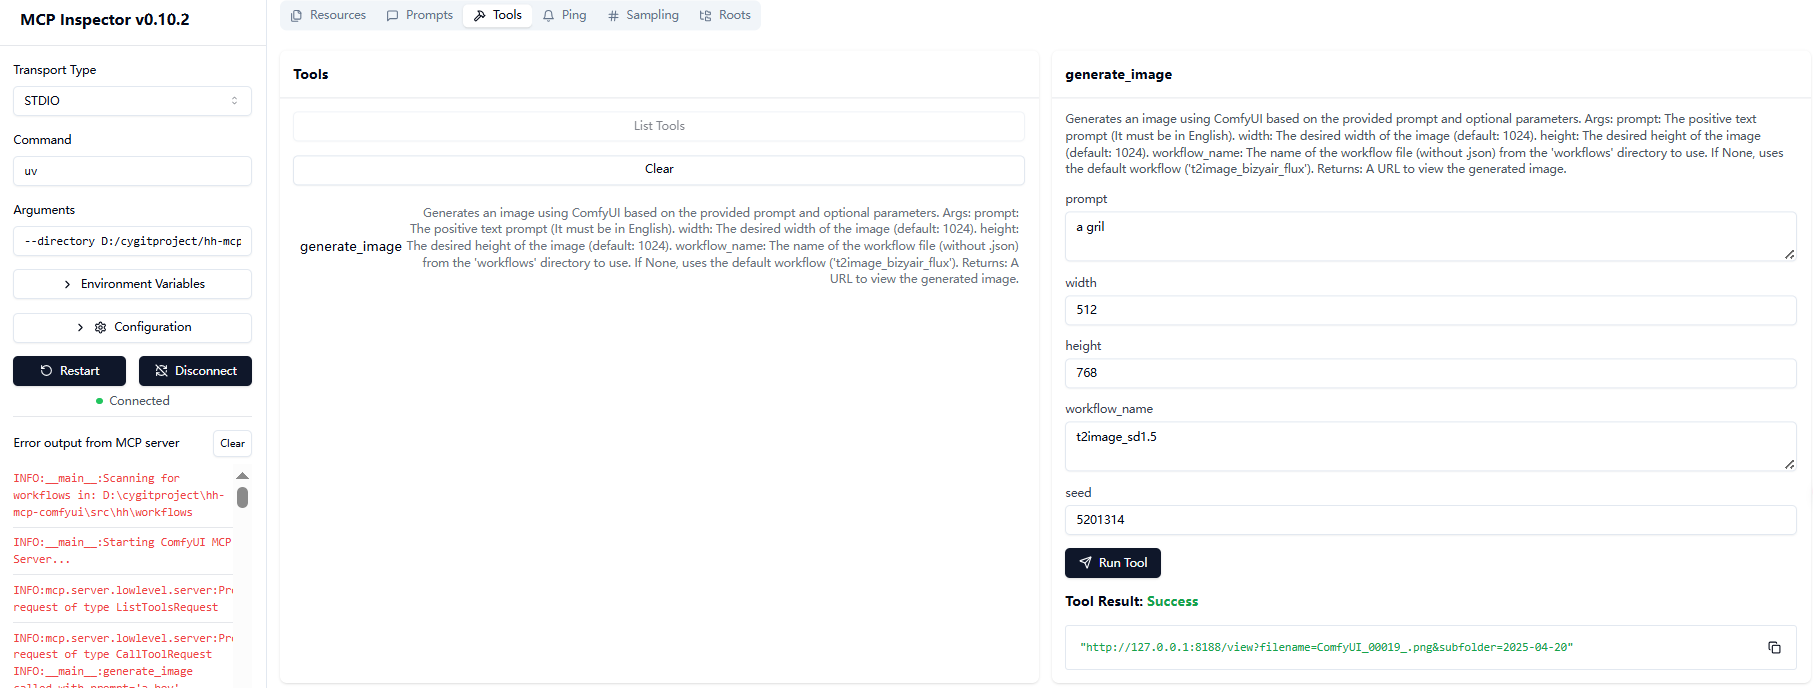
然后点击连接如图即可调试:
## 使用注意事项(针对没有用过comfyui的特别注意)
- 默认工作流为`t2image_bizyair_flux`
- 图片尺寸默认为1024x1024
- 服务启动时会自动加载workflows目录下的所有JSON工作流文件
- 如果你使用的是本项目中的**样例工作流**需要在comfyui中下载个插件,详细操作请查看:[样例工作流插件安装教程](https://ziitefe2yxn.feishu.cn/wiki/PlSmwBbBWiA0iDkc07scb4EEnHc)
- 如果使用你本地的comfyui工作流的话,先要保证你的工作流能在comfyui正常运行,然后需要导出(API)的JSON格式,并放入到你本地的`/path/hh_mcp_comfyui/workflows`目录中
## 添加新工作流
1. 将工作流JSON文件放入`/path/hh_mcp_comfyui/workflows`目录中
如果是uvx和pip启动方式请看上面 《**样例工作流copy到指定工作流目录**》 的使用方式
2. 重启服务自动加载新工作流
## 开发
### 项目结构
```
.
├── .gitignore
├── .python-version
├── pyproject.toml
├── README.md
├── uv.lock
├── example/ # 示例工作流目录
│ └── workflows/
│ ├── i2image_bizyair_sdxl.json
│ ├── t2image_bizyair_flux.json
│ ├── i2image_cogview4.json
│ └── t2image_sd1.5.json
├── src/ # 源代码目录
│ └── hh_mcp_comfyui/
│ ├── comfyui_client.py # ComfyUI客户端实现
│ ├── server.py # MCP服务主文件
│ └── workflows/ # 工作流文件目录
```
### 初始化项目开发环境:
```bash
# Clone the repository.
$ git clone https://github.com/zjf2671/hh-mcp-comfyui.git
$ cd hh-mcp-comfyui
# Initialized venv
$ uv venv
# Activate the virtual environment.
$ .venv\Scripts\activate
# Install dependencies.
$ uv lock
Resolved 30 packages in 1ms
# sync dependencies.
$ uv sync
Resolved 30 packages in 2.54s
Audited 29 package in 0.02ms
```
### 检查服务是否正常
```bash
$ uv --directory 你本地安装目录/hh-mcp-comfyui run hh-mcp-comfyui
INFO:__main__:Scanning for workflows in: D:\cygitproject\hh-mcp-comfyui\src\hh_mcp_comfyui\workflows
INFO:__main__:Registered resource: workflow://t2image_bizyair_flux -> t2image_bizyair_flux.json
INFO:__main__:Starting ComfyUI MCP Server...
```
### 使用MCP Inspector测试服务端工具
```bash
$ npx @modelcontextprotocol/inspector uv --directory 你本地安装目录/hh-mcp-comfyui run hh-mcp-comfyui
```
### MCP配置
```bash
{
"mcpServers": {
"hh-mcp-comfyui": {
"command": "uv",
"args": [
"--directory",
"项目绝对路径(例如:D:/hh-mcp-comfyui)",
"run",
"hh-mcp-comfyui"
],
"env": {
"COMFYUI_API_BASE": "http://127.0.0.1:8188",
"COMFYUI_WORKFLOWS_DIR": "/path/hh-mcp-comfyui/workflows"
}
}
}
}
```
## 贡献
1. Fork项目
2. 创建特性分支 (`git checkout -b feature/AmazingFeature`)
3. 提交更改 (`git commit -m 'Add some AmazingFeature'`)
4. 推送到分支 (`git push origin feature/AmazingFeature`)
5. 打开Pull Request
---
## 如有问题可以到公众号中联系我:
*<center></center>*
<center><u>👆 扫码关注,发现更多好玩的!</u></center>
---
TDQS
Scored across 2 tools
The two tools have clearly distinct purposes: one takes an input image for image-to-image generation, the other takes a text prompt for text-to-image generation. An agent can easily select the appropriate tool based on whether they have a reference image.
Both tool names follow a consistent 'generate_image_from_<source>' pattern (image vs text). The naming is uniform and predictable, making it easy for an agent to infer the function.
With only 2 tools, the server is very focused but slightly sparse for a general ComfyUI interface. It covers the two fundamental generation modes, which is reasonable for a minimal setup, though a few more tools (e.g., upscale or inpaint) would be expected.
The server covers the two core ComfyUI workflows (text-to-image and image-to-image), but lacks common operations like upscaling, inpainting, or workflow management. There are notable gaps that agents cannot work around.