

F
licenseNot graded
qualityD
maintenanceEnables AI assistants to access real-time Transport for London data, including tube/bus arrivals, line status, journey planning, and disruptions.
1
-

Provides real-time access to Transport for London data including line status monitoring, detailed disruption information, and journey planning between London locations using the TfL Unified API.
Click on "Deploy Server".
Wait a few minutes for the server to deploy. Once ready, it will show a "Started" state.
In the chat, type @ followed by the MCP server name and your instructions, e.g., "@TfL Journey Status MCP Server Is the Central line running normally?"
That's it! The server will respond to your query, and you can continue using it as needed.
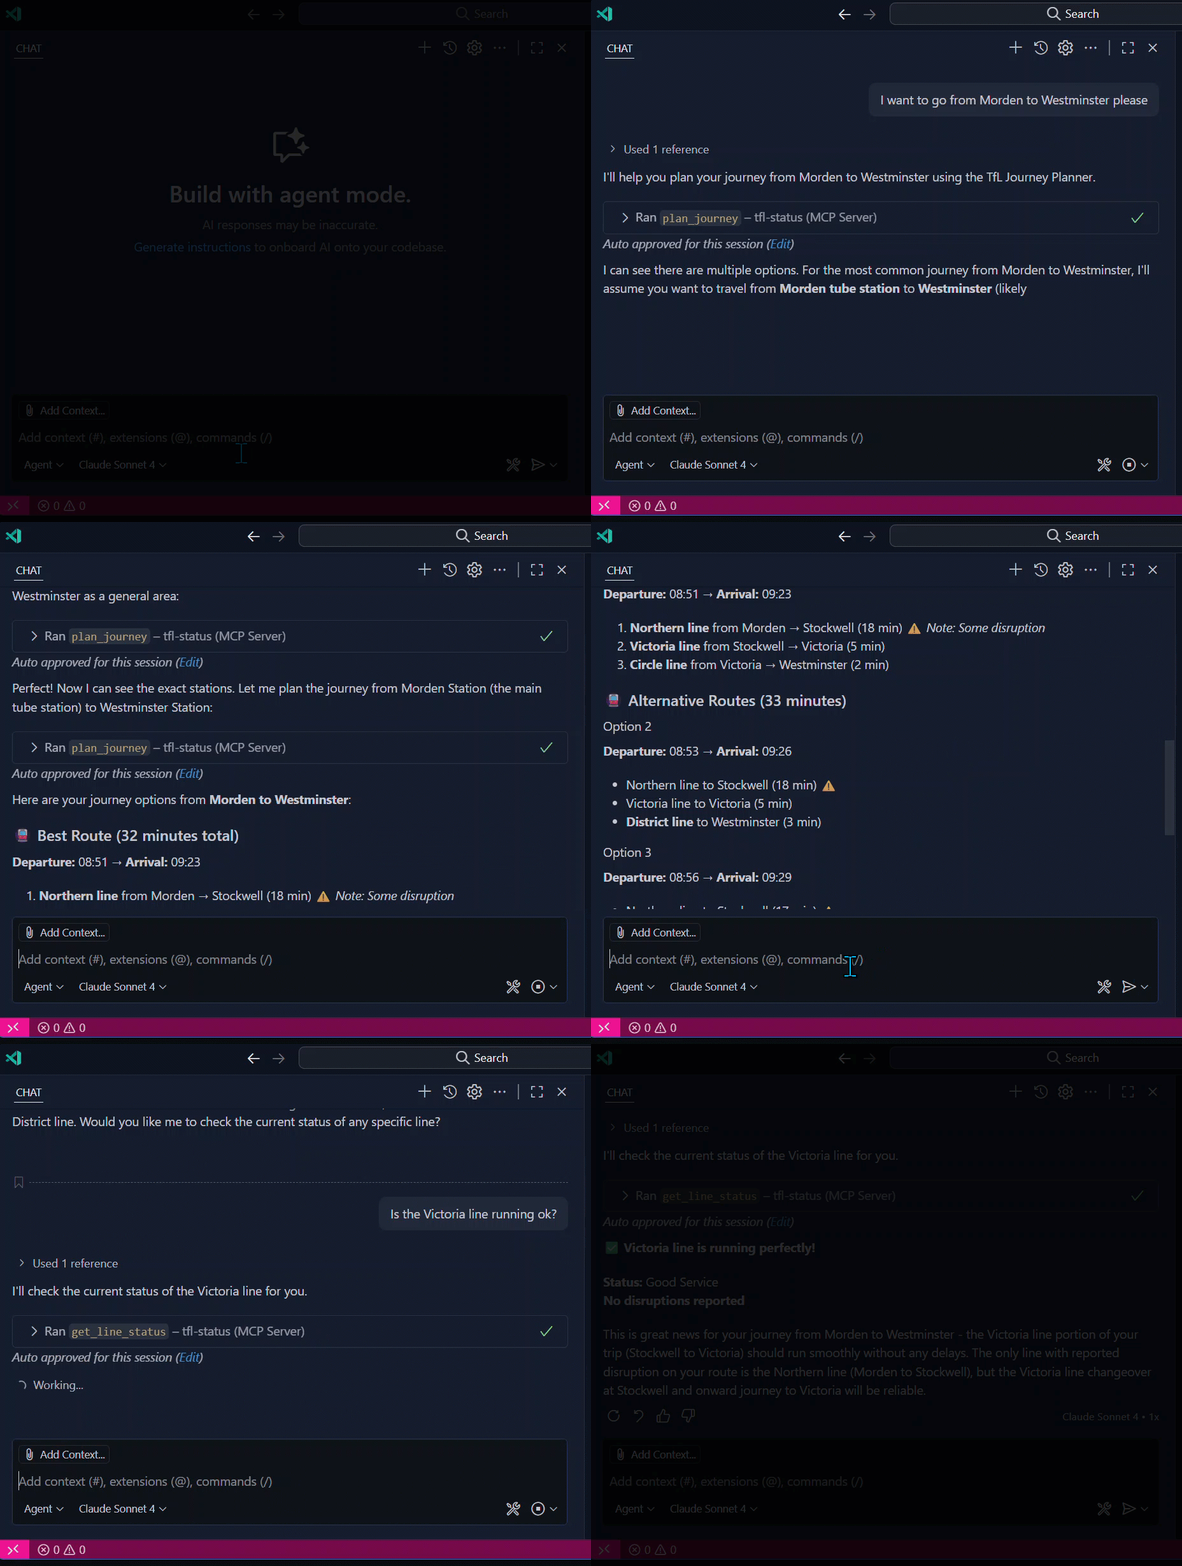
Here is a step-by-step guide with screenshots.
This Model Context Protocol (MCP) server provides AI assistants with access to real-time Transport for London data through a set of automated tools.
⚠️ Important Disclaimer: This is not an official Transport for London (TfL) MCP server. This is an independent project that uses the publicly available TfL Unified API to provide transport data. It is not affiliated with, endorsed by, or officially supported by Transport for London.
Related MCP server: mcp-tfl-journey
This server enables AI assistants (like Claude Desktop and VS Code GitHub Copilot) to access live TfL data by providing three main capabilities:
get_line_status - Get the current status of any TfL line (e.g., Central, Victoria, Piccadilly)
get_line_status_detail - Get detailed status information including disruption details for a TfL line
plan_journey - Plan journeys between two locations using the TfL Journey Planner
With this MCP server connected, AI assistants can help users:
Check if their tube line is running normally before commuting
Get detailed information about service disruptions
Plan optimal routes between London locations
Provide real-time transport advice for London travel
Example interactions:
"Is the Central line running normally?"
"Plan a journey from King's Cross to Heathrow Airport"
"What's causing delays on the Northern line today?"
Let's set things up!
Choose your preferred installation method:
The easiest way to use this MCP server is through npm:
npm install -g london-transport-mcpYou can get a free API key from the TfL API Portal.
Method 1: Environment Variable (Recommended) Set the environment variable in your system:
# Windows (PowerShell)
$env:TFL_API_KEY="your_actual_tfl_api_key_here"

# macOS/Linux
export TFL_API_KEY="your_actual_tfl_api_key_here"
Method 2: MCP Configuration Include the API key directly in your MCP configuration (see examples below).
For Claude Desktop (Settings → Developers → Edit Config):
{
  "mcpServers": {
    "london-transport": {
      "command": "npx",
      "args": ["london-transport-mcp"],
      "env": {
        "TFL_API_KEY": "your_actual_tfl_api_key_here"
      }
    }
  }
}
For VS Code GitHub Copilot (Settings → GitHub Copilot › MCP: Servers):
{
  "london-transport": {
    "command": "npx",
    "args": ["london-transport-mcp"],
    "env": {
      "TFL_API_KEY": "your_actual_tfl_api_key_here"
    }
  }
}
That's it! No manual installation or path configuration required.
For developers who want to modify the code or contribute:
Before starting, please ensure you have:
npm (included with Node)
Warning: if you run with a lower version of Node, fetch won't be present. Tools use fetch to make HTTP calls. To work around this, you can modify the tools to use node-fetch instead. Make sure that node-fetch is installed as a dependency and then import it as fetch into each tool file.
1. Clone the repository
git clone https://github.com/anoopt/london-tfl-journey-status-mcp-server.git
cd london-tfl-journey-status-mcp-server
2. Install dependencies
npm install3. Configure your TfL API key
Create a .env file in the project root with your TfL API key:
TFL_API_KEY=your_actual_tfl_api_key_hereYou can get a free API key from the TfL API Portal.
We strongly recommend testing your MCP server with Postman before connecting it to an AI assistant. The Postman Desktop Application provides the easiest way to run and test MCP servers.
Download the latest Postman Desktop Application from postman.com/downloads.
Open Postman Desktop
Create a new MCP Request (see the documentation for detailed steps)
Set the type to STDIO
Set the command to the full path to your node executable followed by the full path to mcpServer.js
To get the required paths, run these commands in your terminal:
# Get the full path to node
which node

# Get the full path to mcpServer.js
realpath mcpServer.js

# Check your node version (should be 18+)
node --version
Example command format:
/usr/local/bin/node /full/path/to/TfL-Status-MCP-Server/mcpServer.jsClick Connect in your Postman MCP Request
You should see the three TfL tools listed
Test each tool:
Try get_line_status with lineId: "central"
Try plan_journey with fromLocation: "King's Cross" and toLocation: "Westminster"
Try get_line_status_detail with lineId: "piccadilly"
If all tools work correctly in Postman, you're ready to connect to an AI assistant!
Once you've tested with Postman, you can connect your MCP server to AI assistants:
If you're using the local development setup, you'll need to specify full paths:
Step 1: Use the same node and mcpServer.js paths from the Postman testing step.
Step 2: Open Claude Desktop → Settings → Developers → Edit Config and add:
{
  "mcpServers": {
    "london-transport": {
      "command": "node",
      "args": ["/full/path/to/mcpServer.js"]
    }
  }
}
Step 3: Restart Claude Desktop and verify the MCP server shows with a green circle.
Step 1: Install the GitHub Copilot extension in VS Code if you haven't already.
Step 2: Open VS Code → Settings (Ctrl+,) → Search for "MCP" → GitHub Copilot › MCP: Servers
Step 3: Add your TfL MCP server configuration:
{
  "london-transport": {
    "command": "node",
    "args": ["/full/path/to/mcpServer.js"]
  }
}
Step 4: Restart VS Code and the MCP server will be available to GitHub Copilot.
Now you can ask your AI assistant things like:
"Check the status of the Central line"
"Plan a journey from London Bridge to Camden Town"
View all available tools and their parameters:
npm run list-toolsOpen Postman with the correct MCP configuration automatically:
npm run postmanFor production deployments, you can use Docker:
1. Build Docker image
docker build -t <your_server_name> .2. AI Assistant Integration
Add Docker server configuration to your AI assistant:
For Claude Desktop (Settings → Developers → Edit Config):
{
  "mcpServers": {
    "tfl-status": {
      "command": "docker",
      "args": ["run", "-i", "--rm", "--env-file=.env", "tfl-mcp-server"]
    }
  }
}
For VS Code GitHub Copilot (Settings → GitHub Copilot › MCP: Servers):
{
  "tfl-status": {
    "command": "docker",
    "args": ["run", "-i", "--rm", "--env-file=.env", "tfl-mcp-server"]
  }
}
Add your environment variables (API keys, etc.) inside the
.envfile.
The project comes bundled with the following minimal Docker setup:
FROM node:22.12-alpine AS builder

WORKDIR /app
COPY package.json package-lock.json ./
RUN npm install

COPY . .

ENTRYPOINT ["node", "mcpServer.js"]To run the server with Streamable HTTP support, use the --streamable-http flag. This launches the server with the /mcp endpoint enabled:
node mcpServer.js --streamable-httpTo run the server with Server-Sent Events (SSE) support, use the --sse flag. This launches the server with the /sse and /messages endpoints enabled:
node mcpServer.js --sseTo run the server using standard input/output (stdio), simply run the script without any flags. This mode is ideal for CLI tools or programmatic integration via stdin and stdout.
node mcpServer.jsTo add more TfL API endpoints or other transport APIs:
Create new tool files in the tools/tfl/ directory
Follow the pattern in existing tools like tools/tfl/status.js
Add your new tool file to tools/paths.js
Test with Postman before deploying
This server uses the Transport for London Unified API. All tools automatically include your API key from the .env file.
Extend your MCP server with more tools easily:
Visit Postman MCP Generator.
Pick new API request(s), generate a new MCP server, and download it.
Copy new generated tool(s) into your existing project's tools/ folder.
Update your tools/paths.js file to include new tool references.
Visit the Postman MCP Generator page for updates and new capabilities.
Join the #mcp-lab channel in the Postman Discord to share what you've built and get help.
Get the status of a TfL line from the Transport for London Unified API.
Inputs: lineId (required), app_key.
Get the status and details of a TfL line.
Inputs: lineId (required), app_key.
Plan journeys between two locations using the TfL Journey Planner.
Inputs: fromLocation (required), toLocation (required), app_key.
Recent tool additions, removals, and schema changes observed during successful MCP inspections.
Loading tool schema changelog…
Scored across 3 tools
The tools 'get_line_status' and 'get_line_status_detail' have significant overlap in purpose, both retrieving line status information with only a vague distinction in detail level. This creates ambiguity for an agent trying to choose between them, as the descriptions don't clearly differentiate when to use each tool.
All three tools follow a consistent verb_noun naming pattern with snake_case. 'get_line_status' and 'get_line_status_detail' share the same verb prefix, while 'plan_journey' uses a different but still clear verb. The naming is mostly consistent with only minor deviation in verb choice.
With only 3 tools, this server feels thin for a transportation domain that typically involves multiple operations. While the core functions are present, the count is borderline low for what could be a more comprehensive TfL API surface covering additional journey planning or status features.
For a TfL journey status server, there are significant gaps in coverage. Missing are tools for station information, arrival predictions, service disruptions beyond line status, and journey planning variations (like alternatives or real-time updates). The surface provides only basic line status and journey planning, leaving many common transportation queries unaddressed.
Get date-specific quotes and book private UK airport and cruise-port transfers through your AI assistant. Compare vehicle options, validate flights, retrieve bookings, amend details and cancel with customer confirmation. No registration required to start, subject to service limits; optional API-key and OAuth access for registered integrations. Transfer fares are payable separately and cancellation conditions apply. Live demo and connection instructions: https://ai.airport-pickups-london.com/ Technical documentation: https://mcp.airport-pickups-london.com/docs
Transport for London (TfL) Unified API MCP — keyless.
Check UK Delay Repay, UK261 flights and TfL refunds. Save claims and check commutes on request.
Live UK rail boards, journey planning, train history, units, lifts, disruptions, punctuality.