
A
licenseB
qualityD
maintenanceA server that enables LLMs like Claude to interact with Azure Cosmos DB databases through natural language queries, acting as a translator between AI assistants and database systems.
4
3
MIT

このリポジトリには、Azure Cosmos DB 用の MCP サーバーとクライアントの作成方法を示すプロジェクトが含まれています。このプロジェクトは 2 つの部分に分かれています。
フロントエンドアプリケーション: 製品カタログを表示し、ユーザーがカタログ内の製品を見つけて過去の注文を取得するのに役立つ AI アシスタントを備えた NextJS 15 アプリケーション
Azure Cosmos DB NoSQL データベースに接続され、データベースから製品と注文を読み取る役割を担う MCP サーバー コンポーネント。
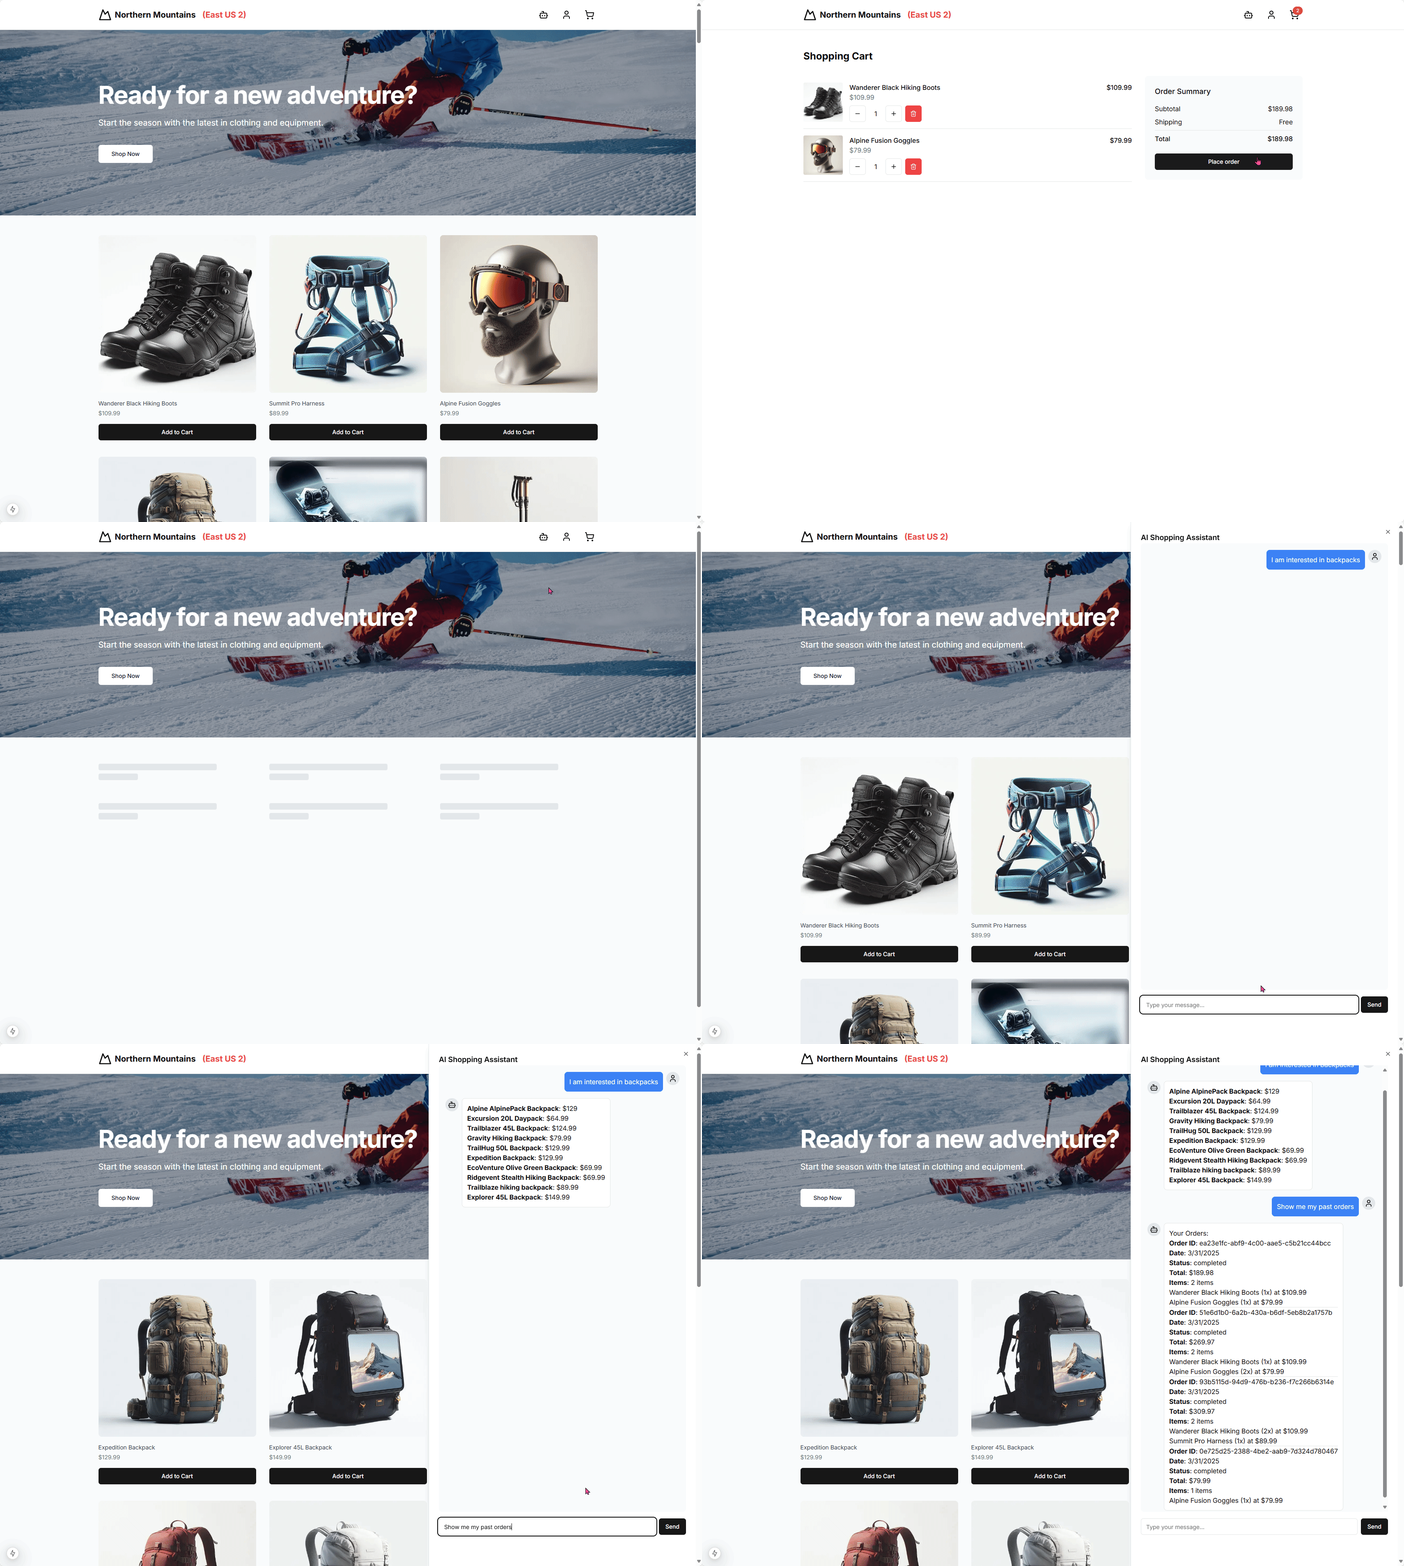
製品カタログを保存する Azure Cosmos DB NoSQL データベース
MCP サーバー コンポーネントとして機能する Node.js サーバー
Related MCP server: PlayFab MCP Server
Azure Cosmos DB
Azure ポータルで、Azure Cosmos DB for NoSQL アカウントを作成します。
Azure Cosmos DB アカウントに一意の名前を付けます。このチュートリアルの残りの部分では、cosmos-eastus2-nosql-2 を使用します。
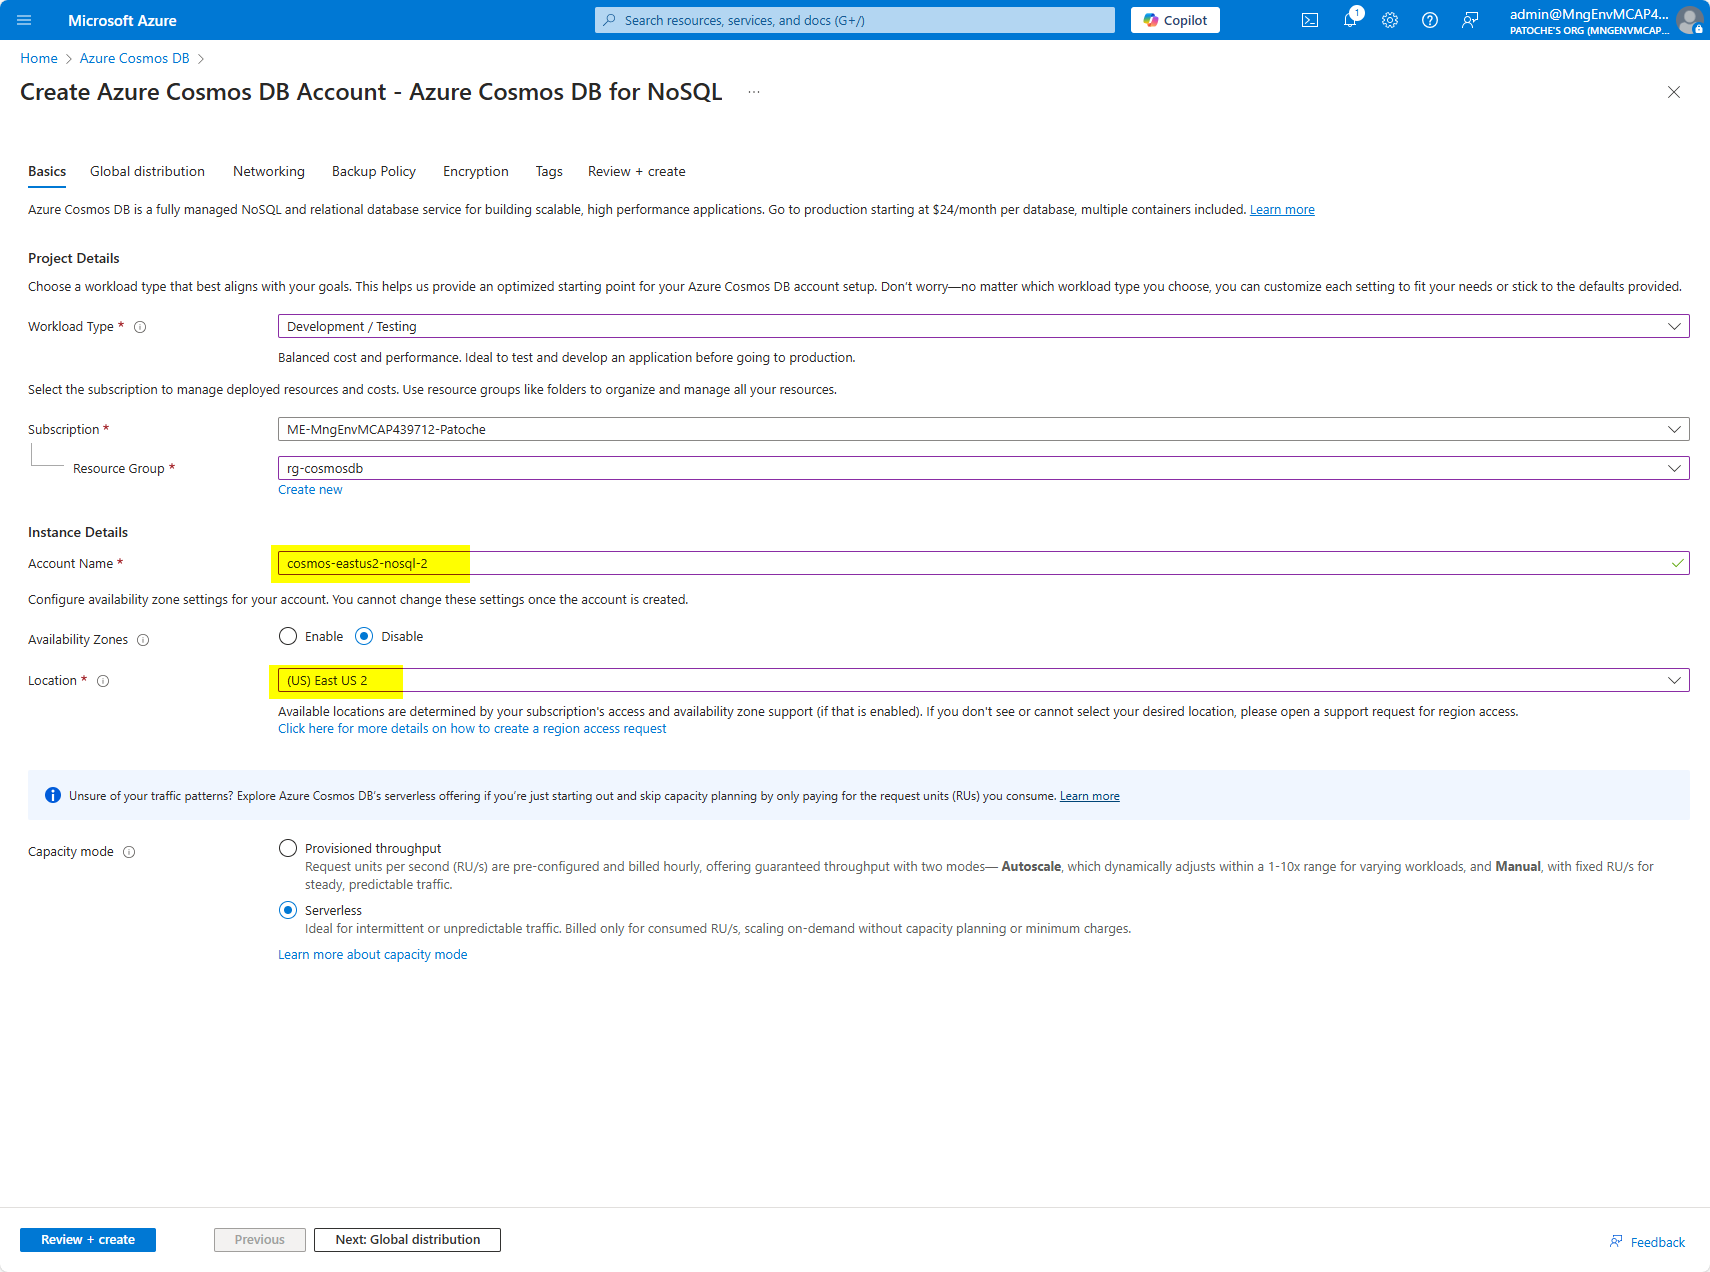
「次へ: グローバル配布」をクリックします
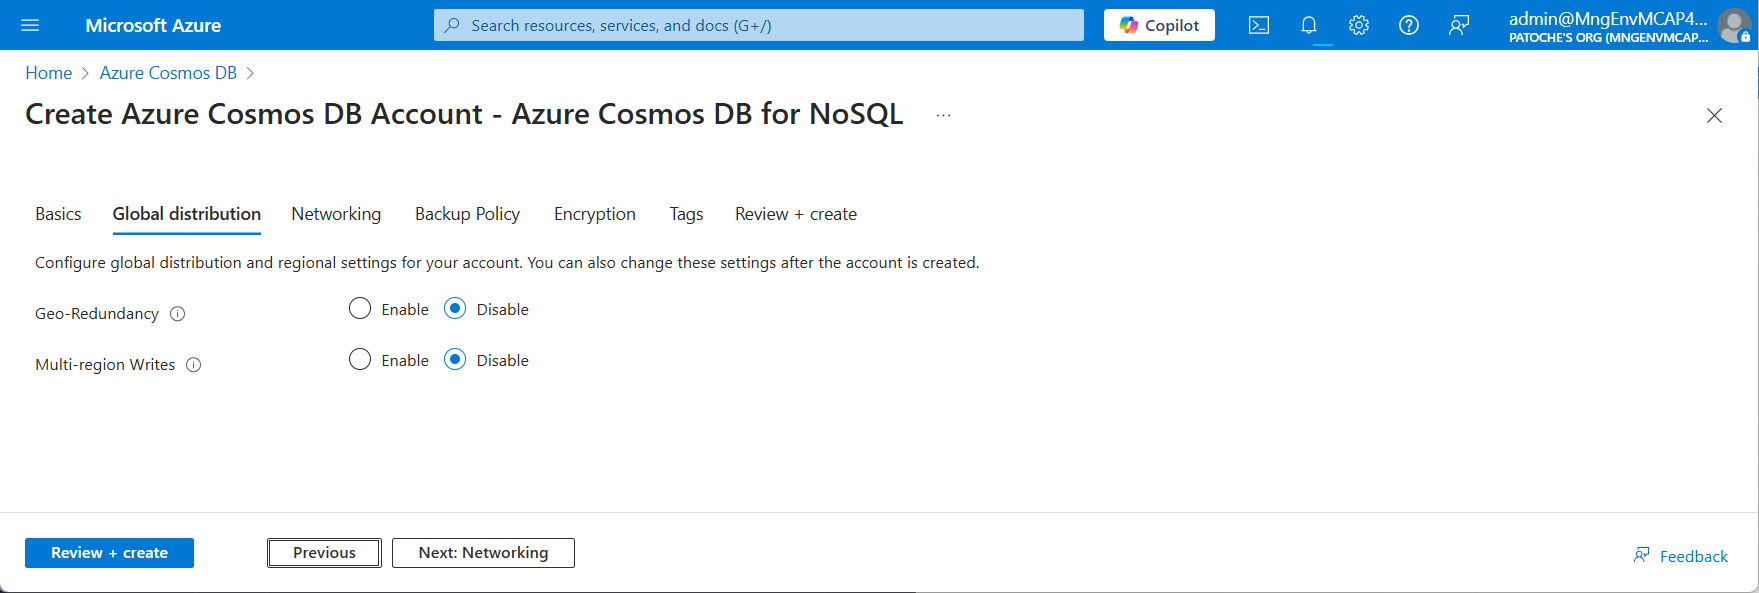
デフォルト値を受け入れて、「次へ: ネットワーク」をクリックします。
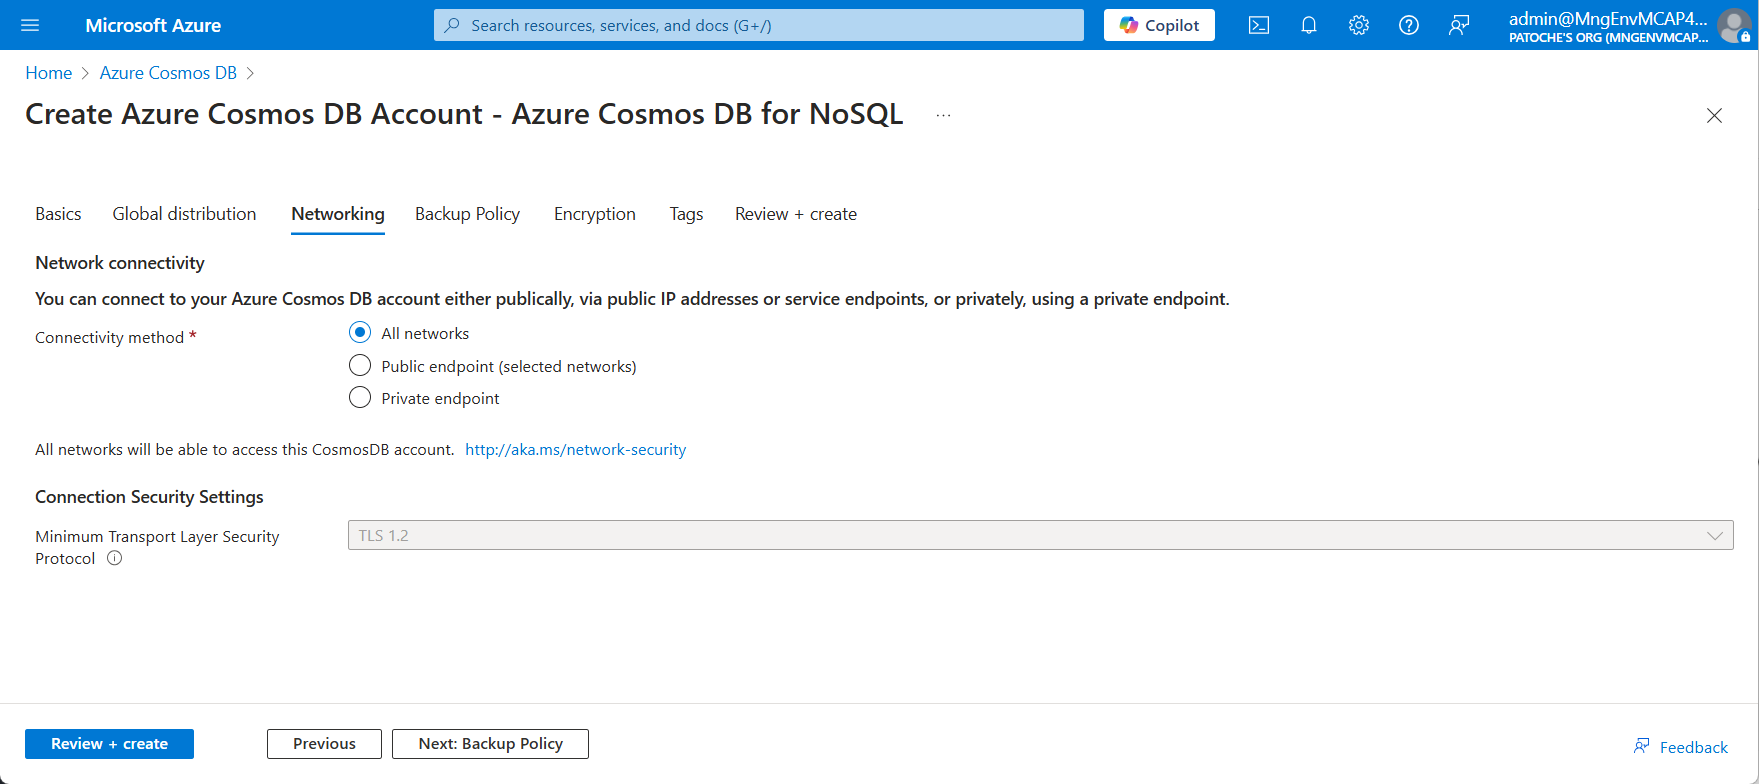
デフォルト値を受け入れて、「次へ: バックアップポリシー」をクリックします。
「定期」バックアップポリシーを選択する
「ローカル冗長バックアップストレージ」を選択します
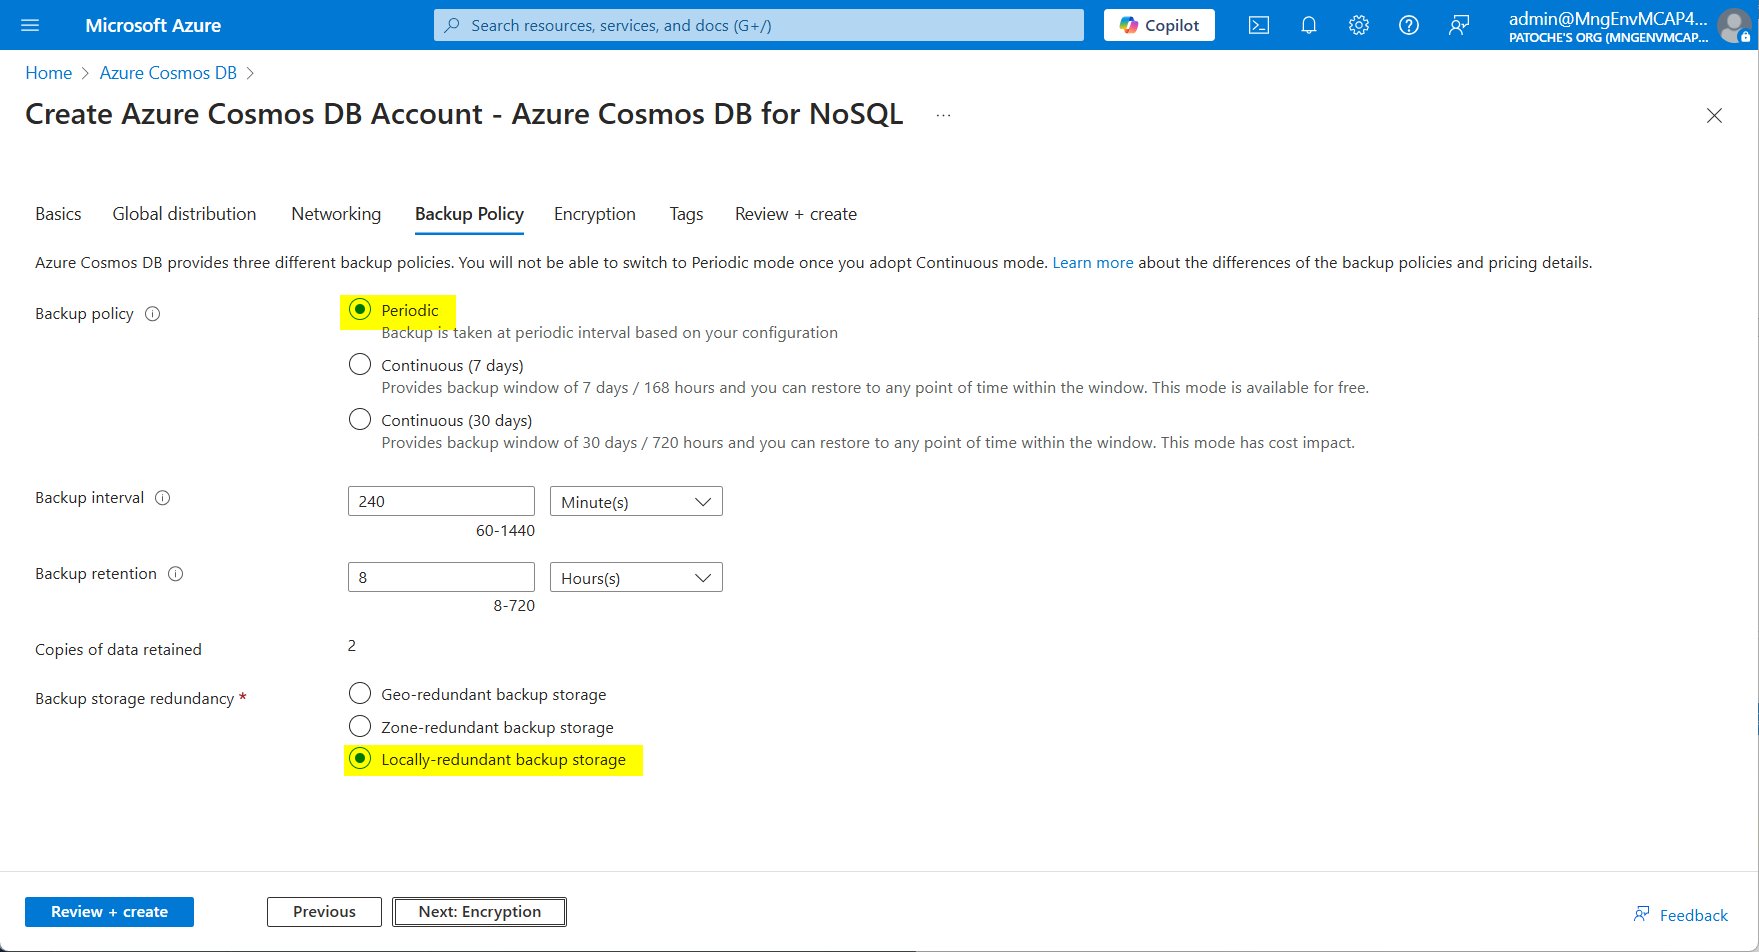
「次へ: 暗号化」をクリックします
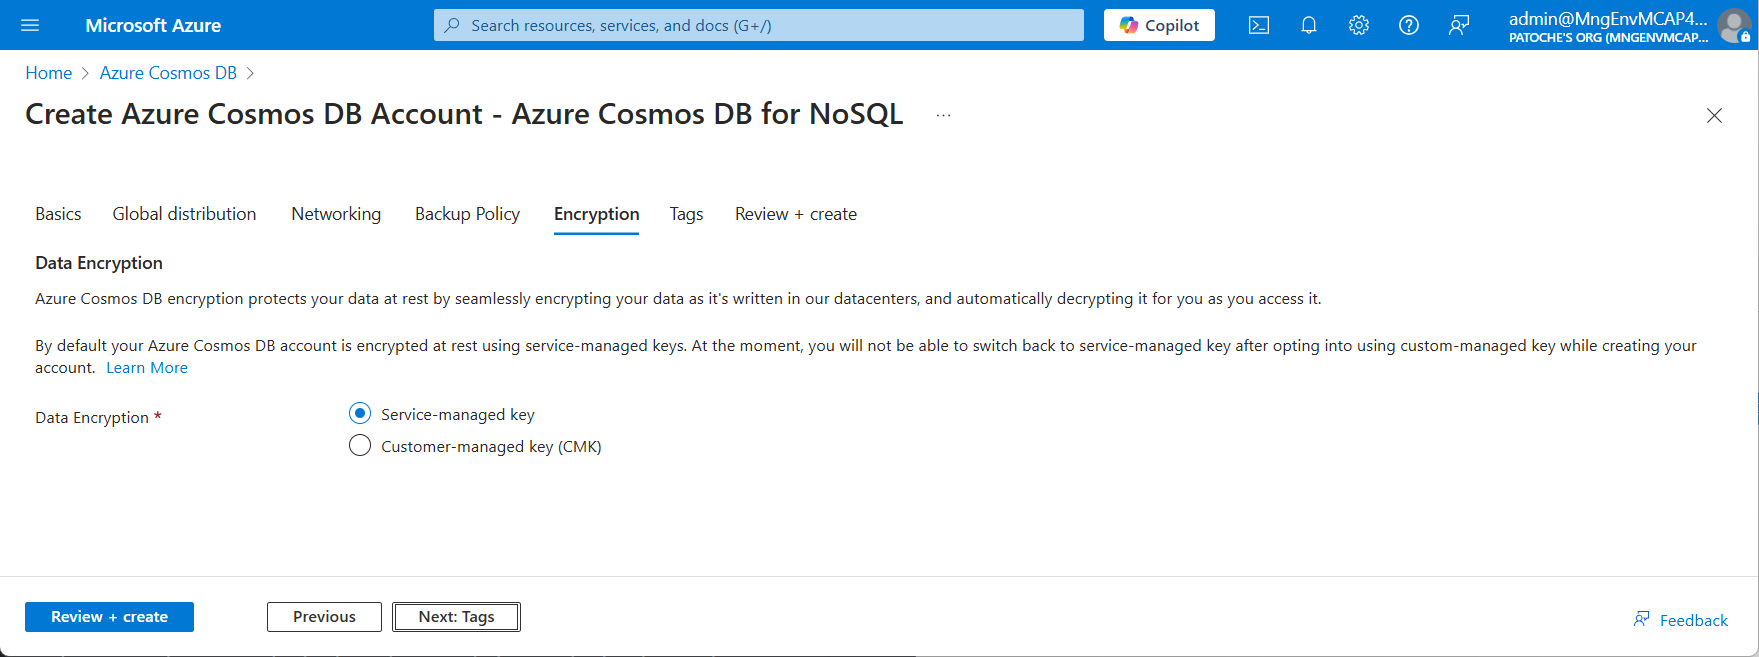
「確認と作成」をクリックして検証を開始します
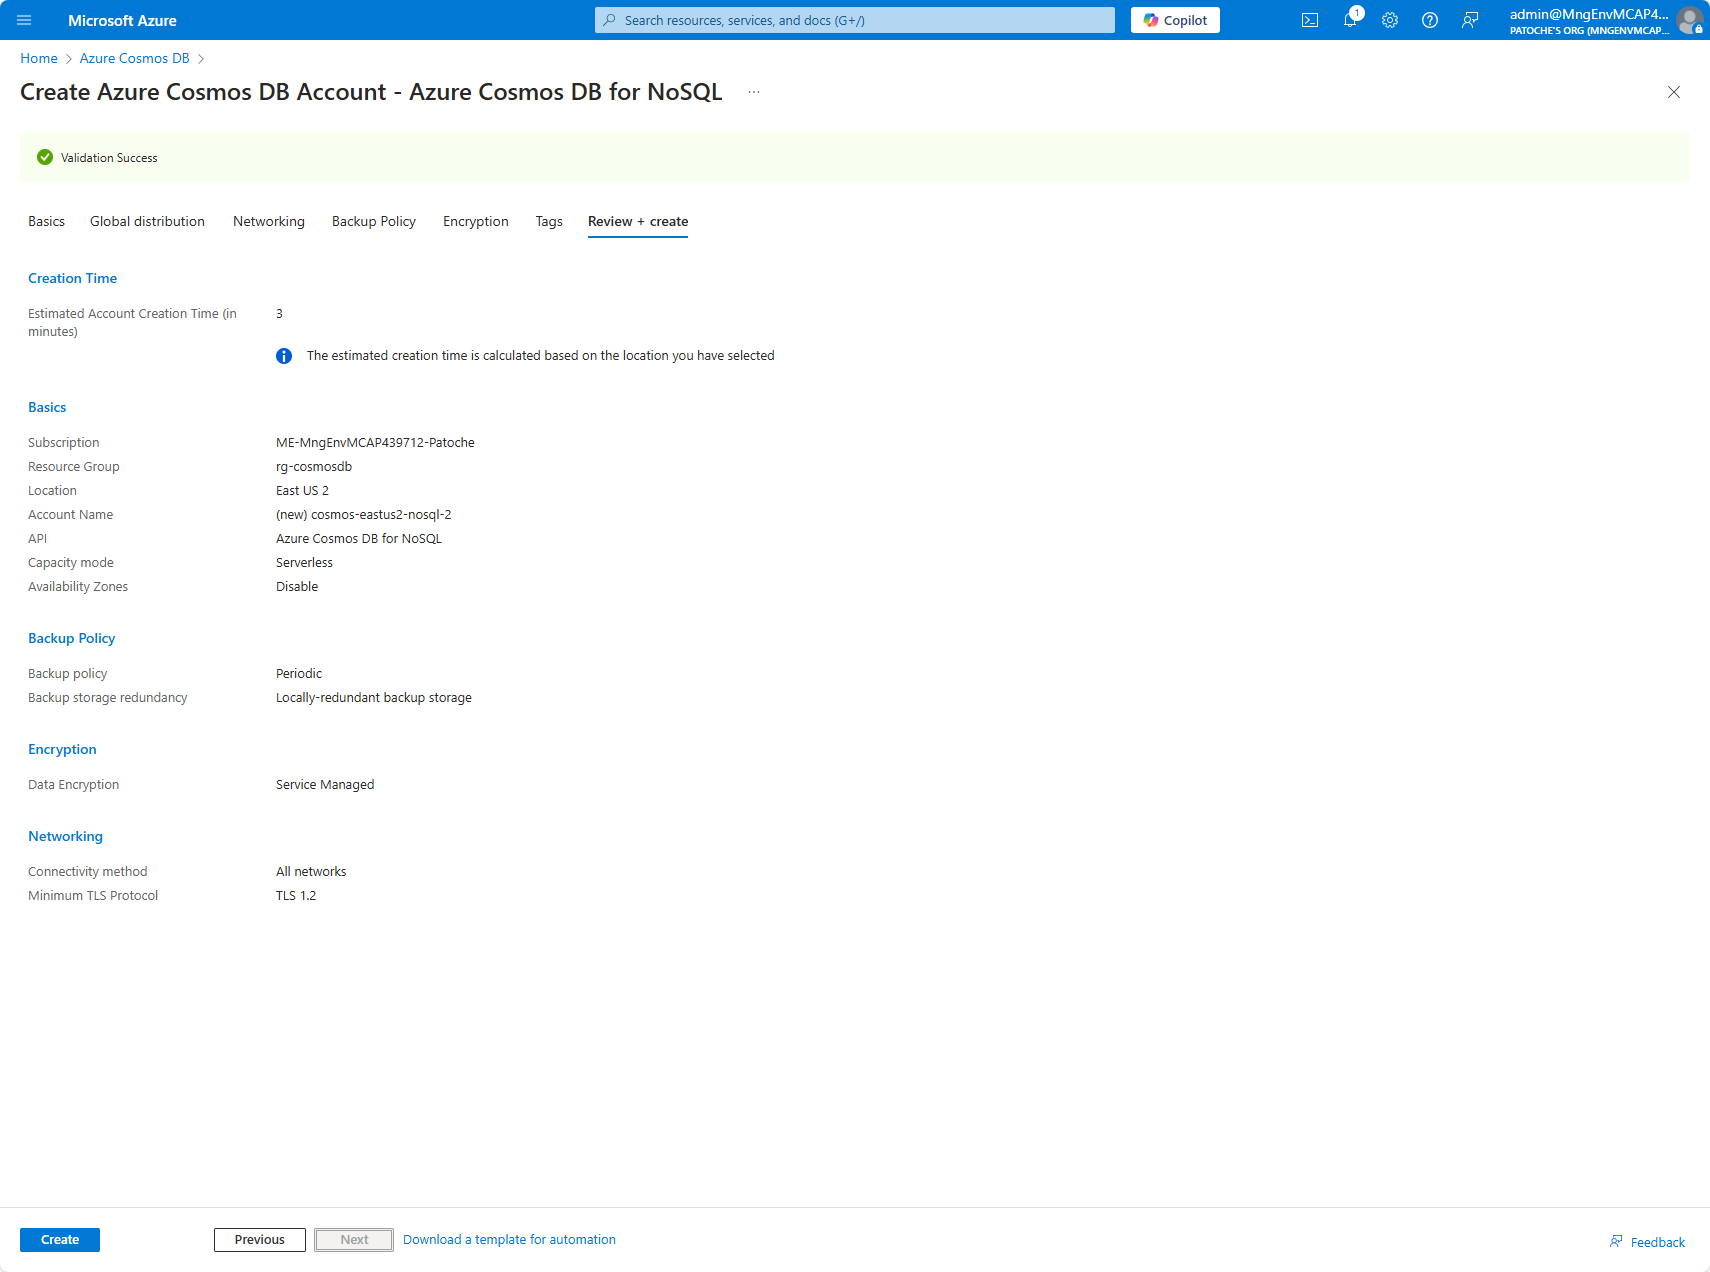
「作成」をクリックして、Azure Cosmos DB for NoSQL アカウントの作成を開始します。
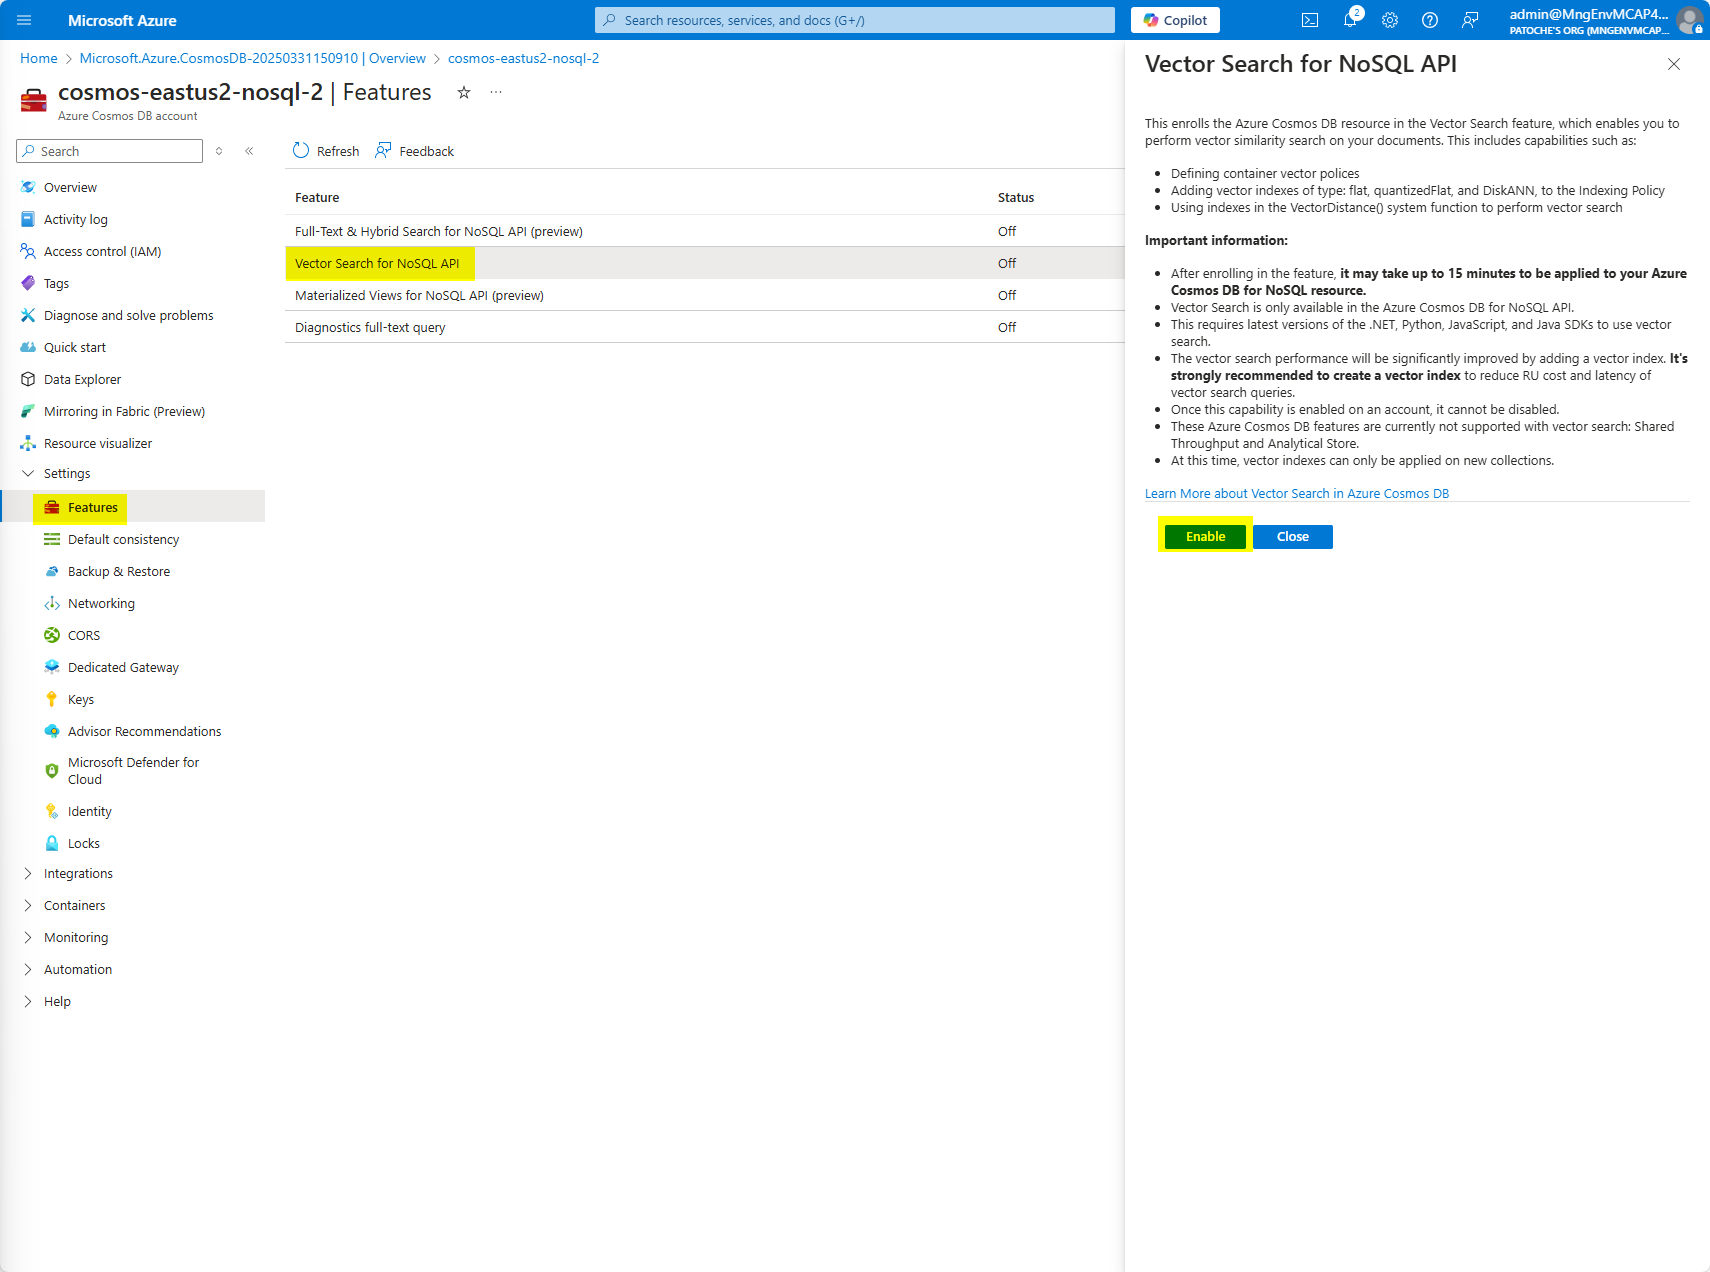
このプロジェクトでは、Azure Cosmos DB アカウントでベクター サポートを有効にする必要があります。
設定セクションで、「機能」を選択し、「Vector Search for NoSQL API」を選択します。
開いたパネルで、「有効にする」ボタンをクリックします。
Azure Cosmos DB eShop データベースと製品コンテナーを作成する
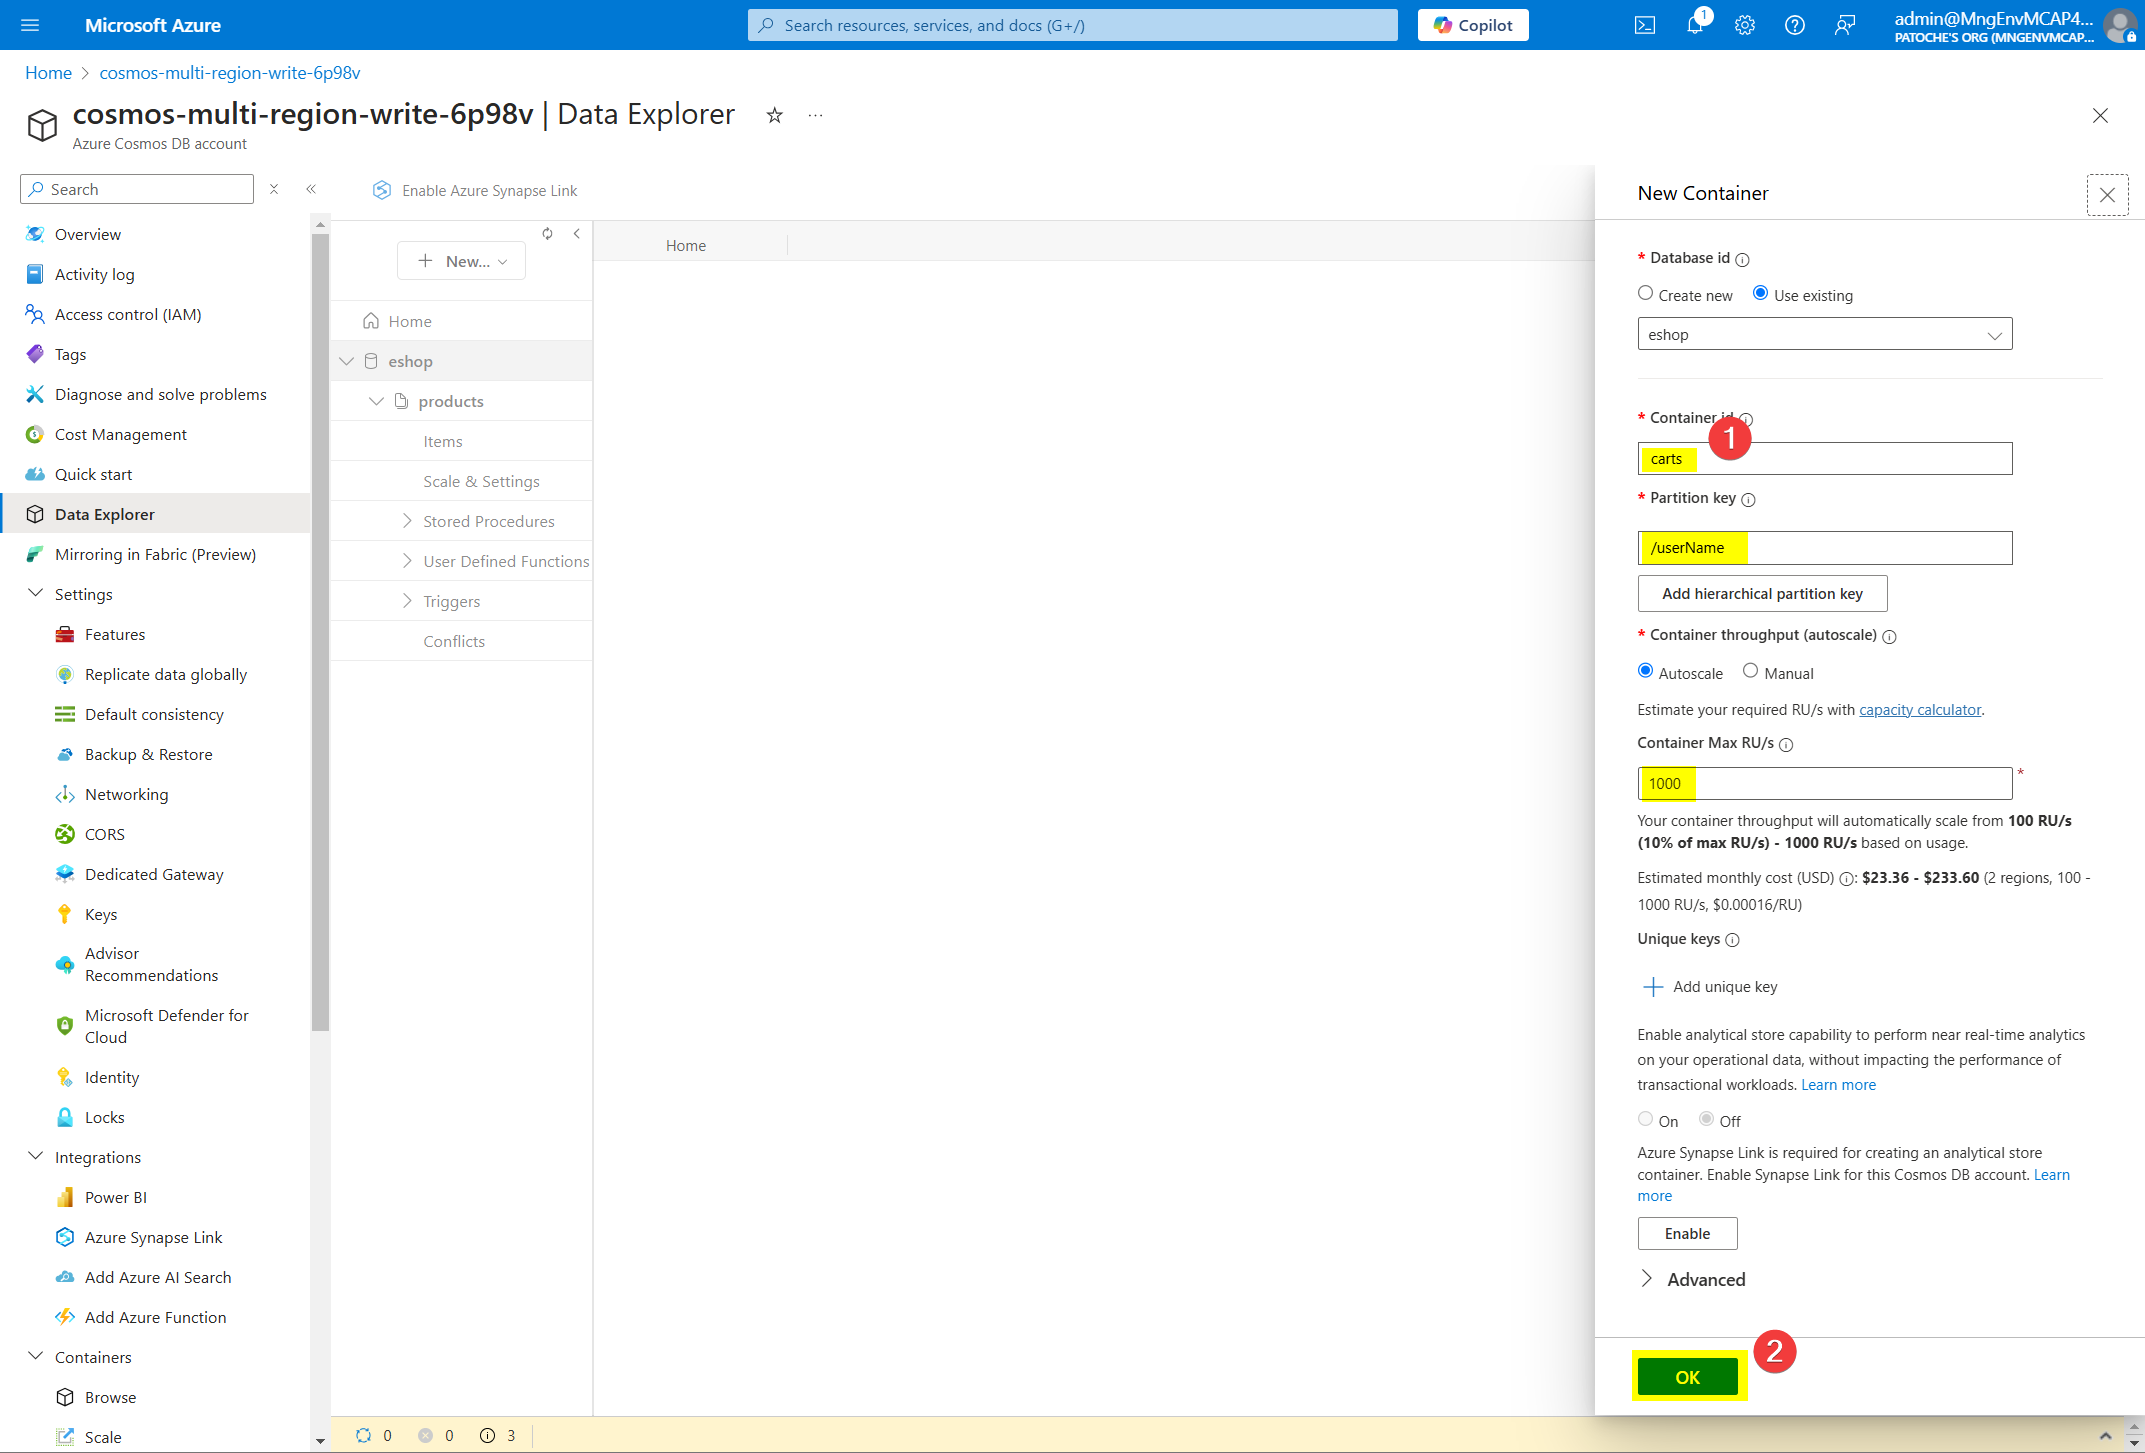
eShop の横にある「...」をクリックしてコンテキスト メニューを表示し、「新しいコンテナー」を選択して、eShop データベースに「カート」コンテナーを作成します。
パーティションキーが***「/id」***であることを確認してください(パーティションキーでは大文字と小文字が区別されます)
「コンテナベクターポリシー」を展開し、「ベクター埋め込みを追加」ボタンをクリックします。

カートコンテナを作成する
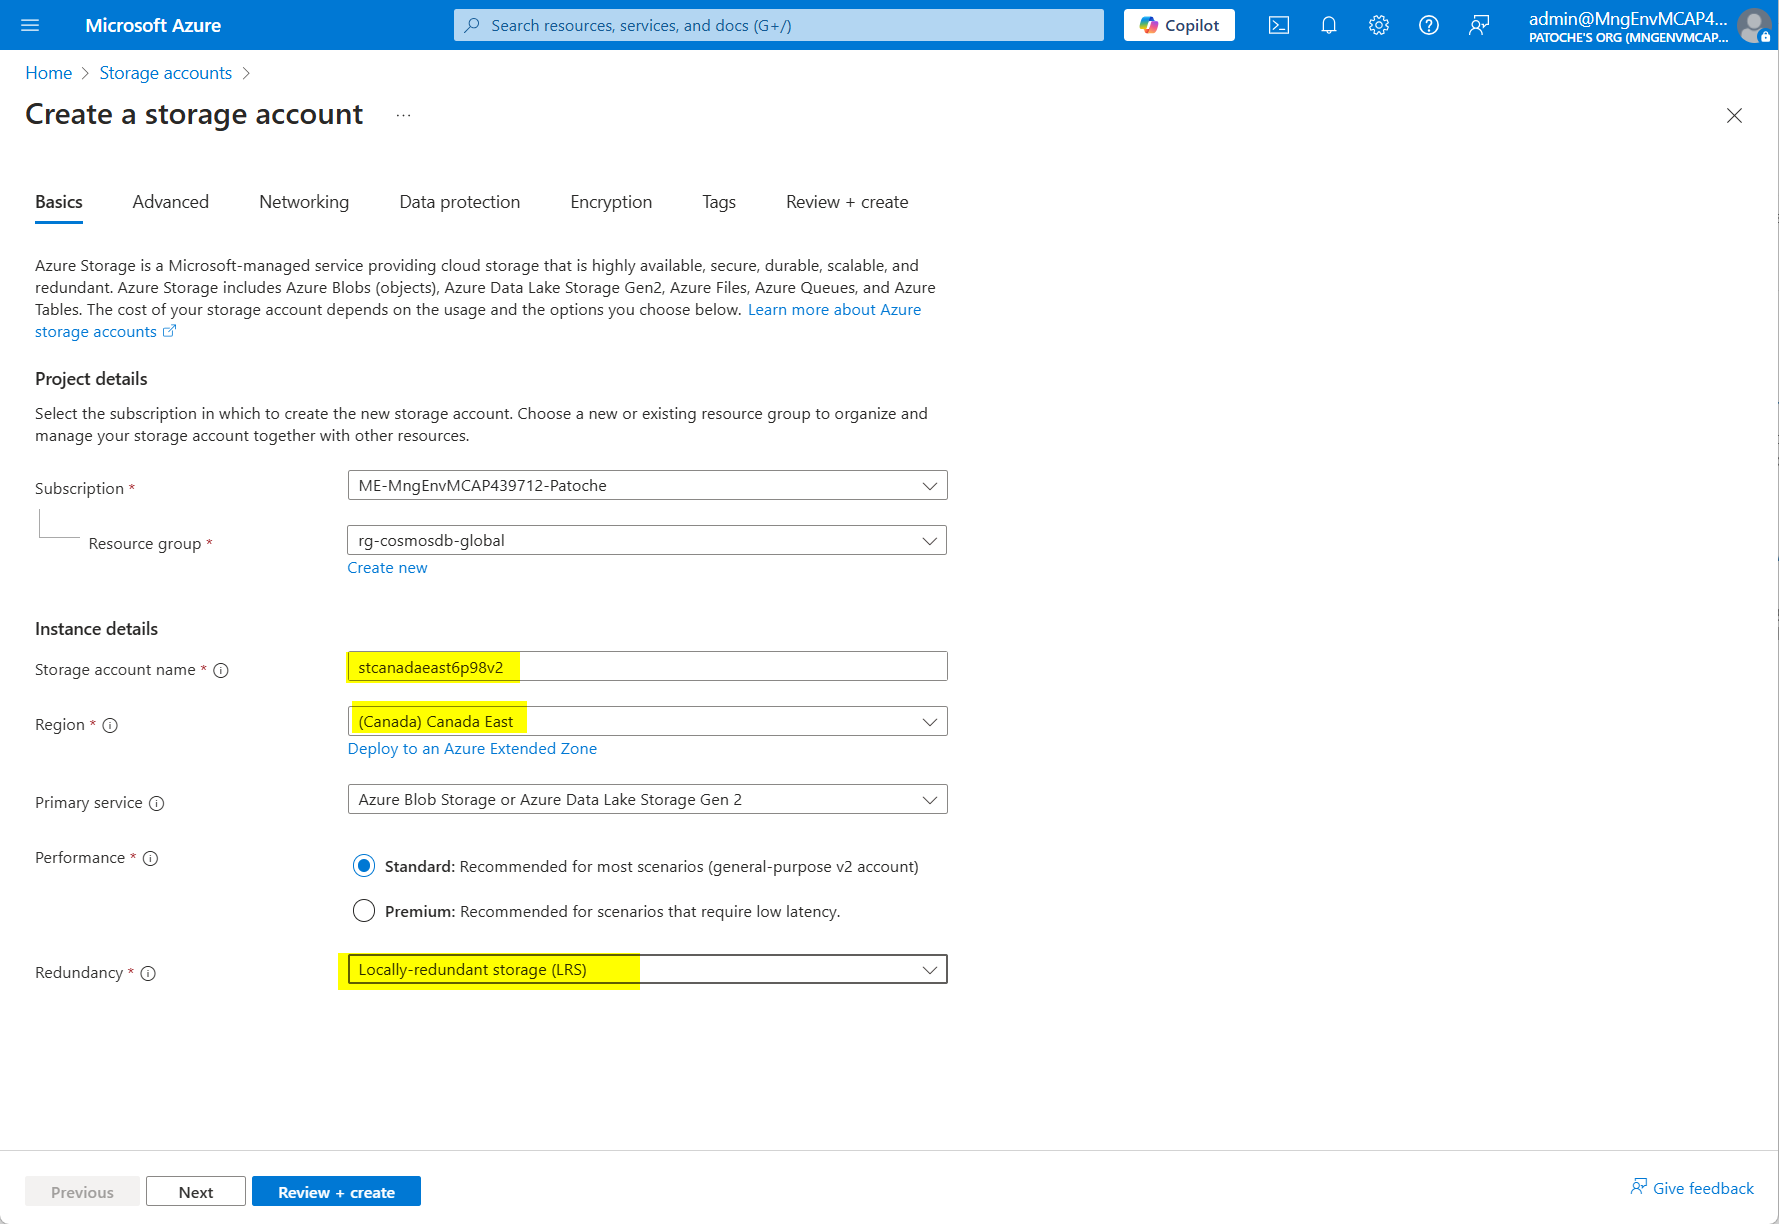
ストレージアカウント
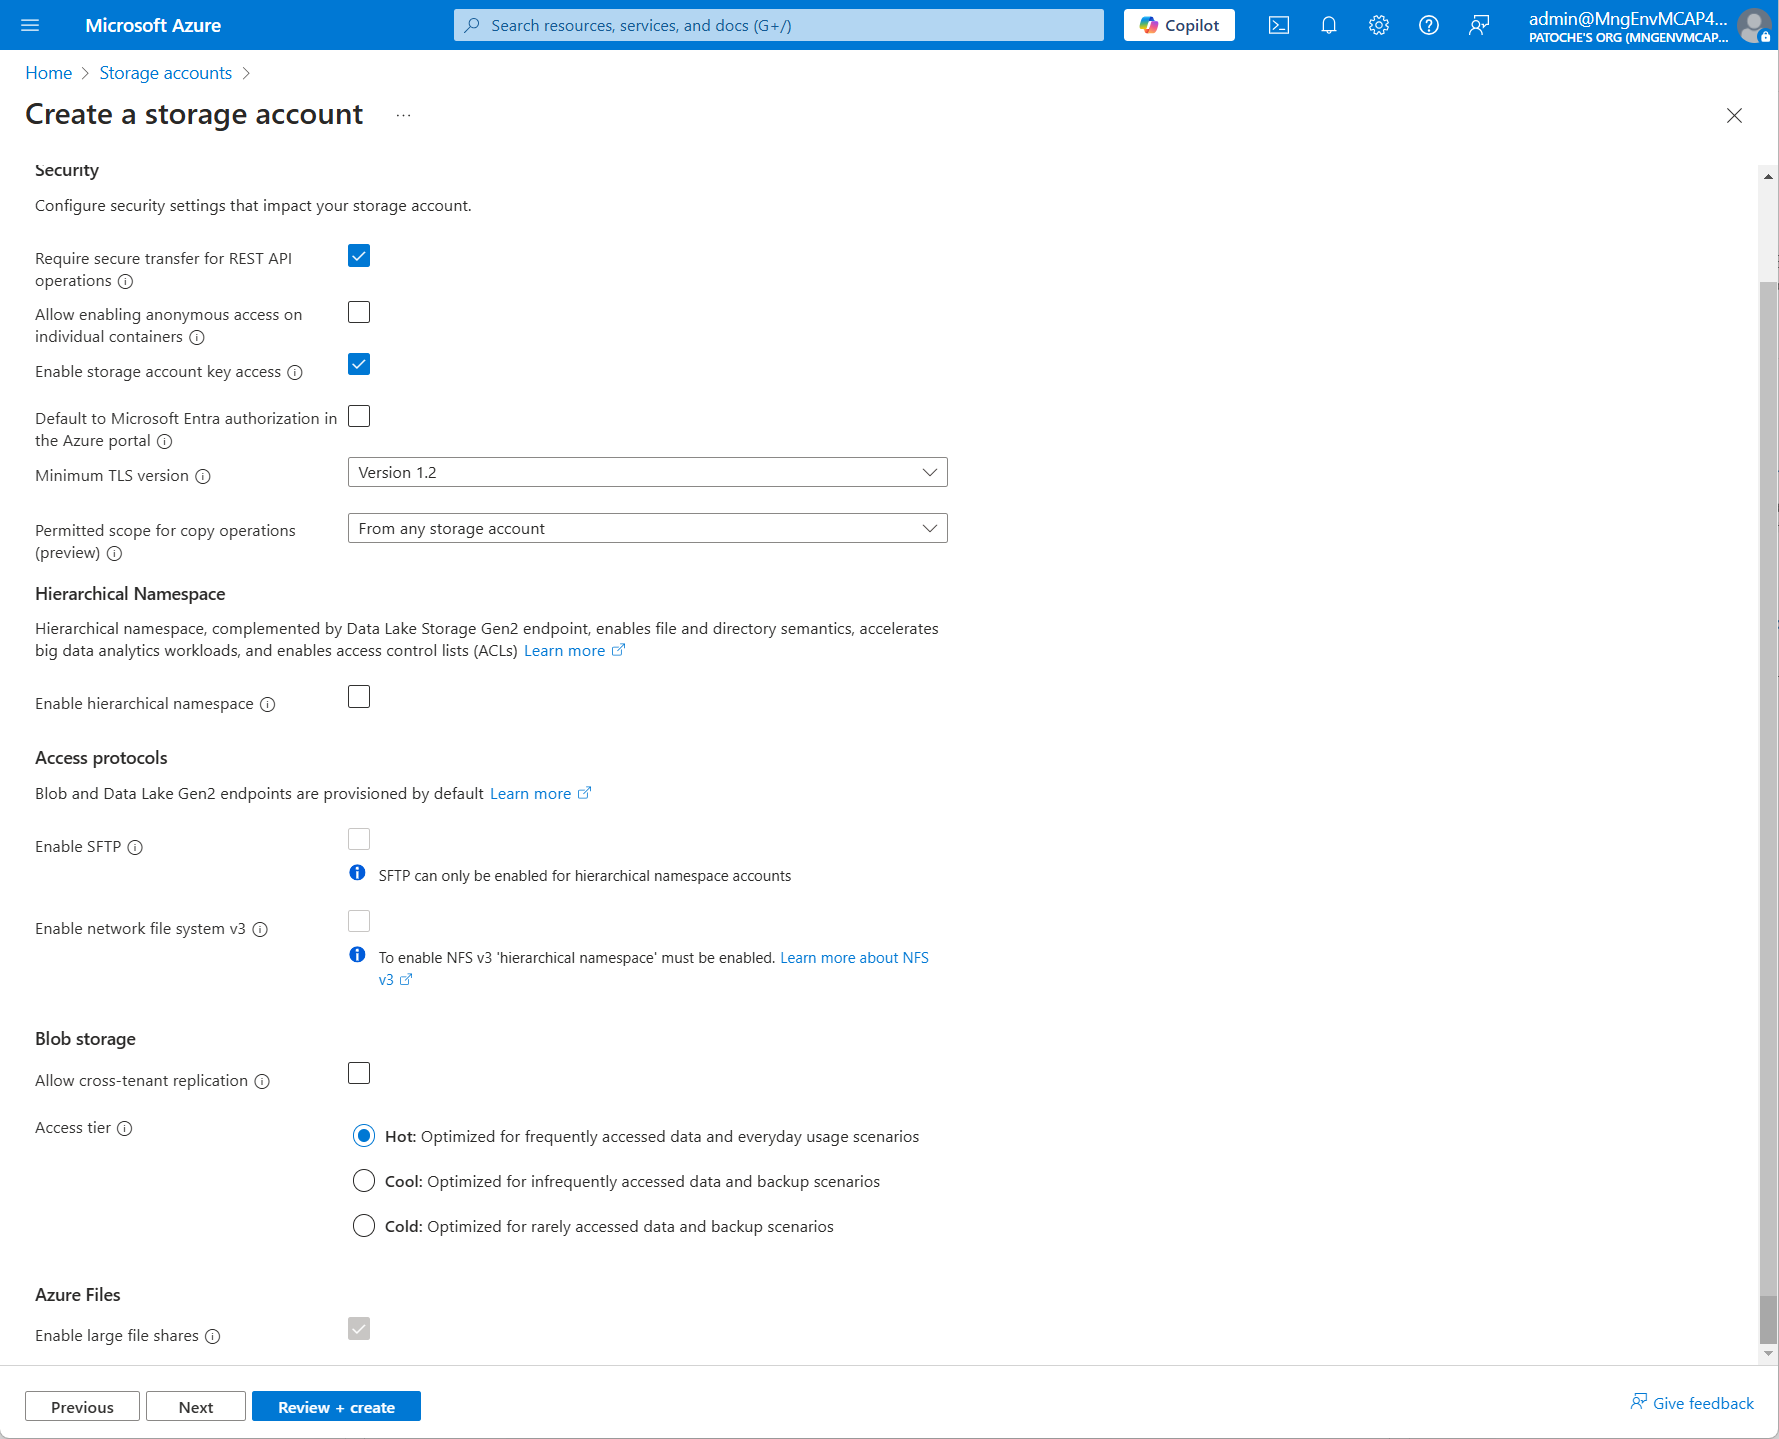
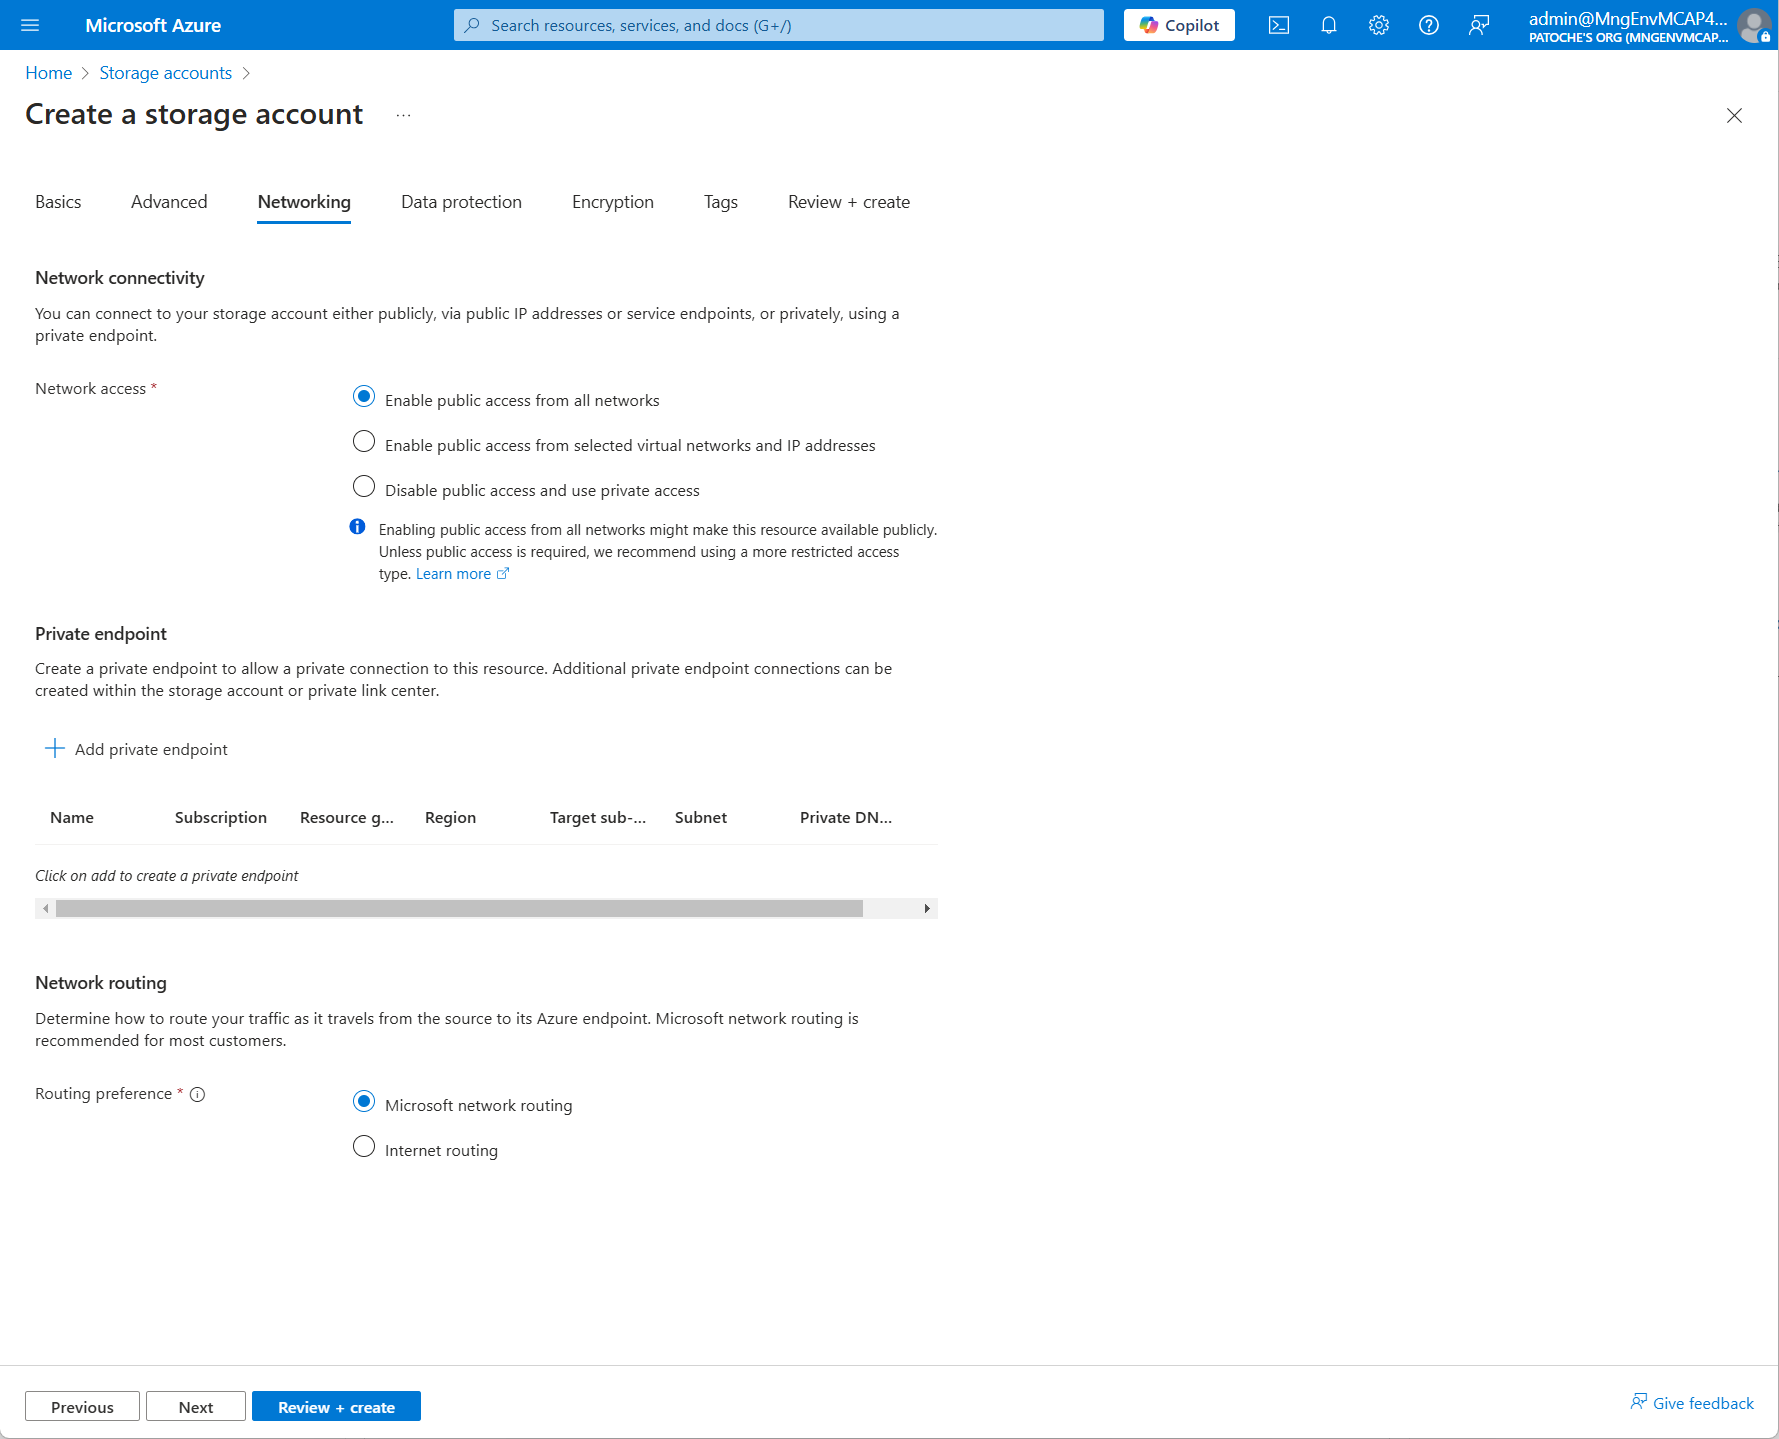
製品画像を保存するためのストレージアカウントを作成する
詳細については、次のドキュメントを参照してください: https://learn.microsoft.com/en-us/azure/storage/common/storage-account-create?tabs=azure-portal

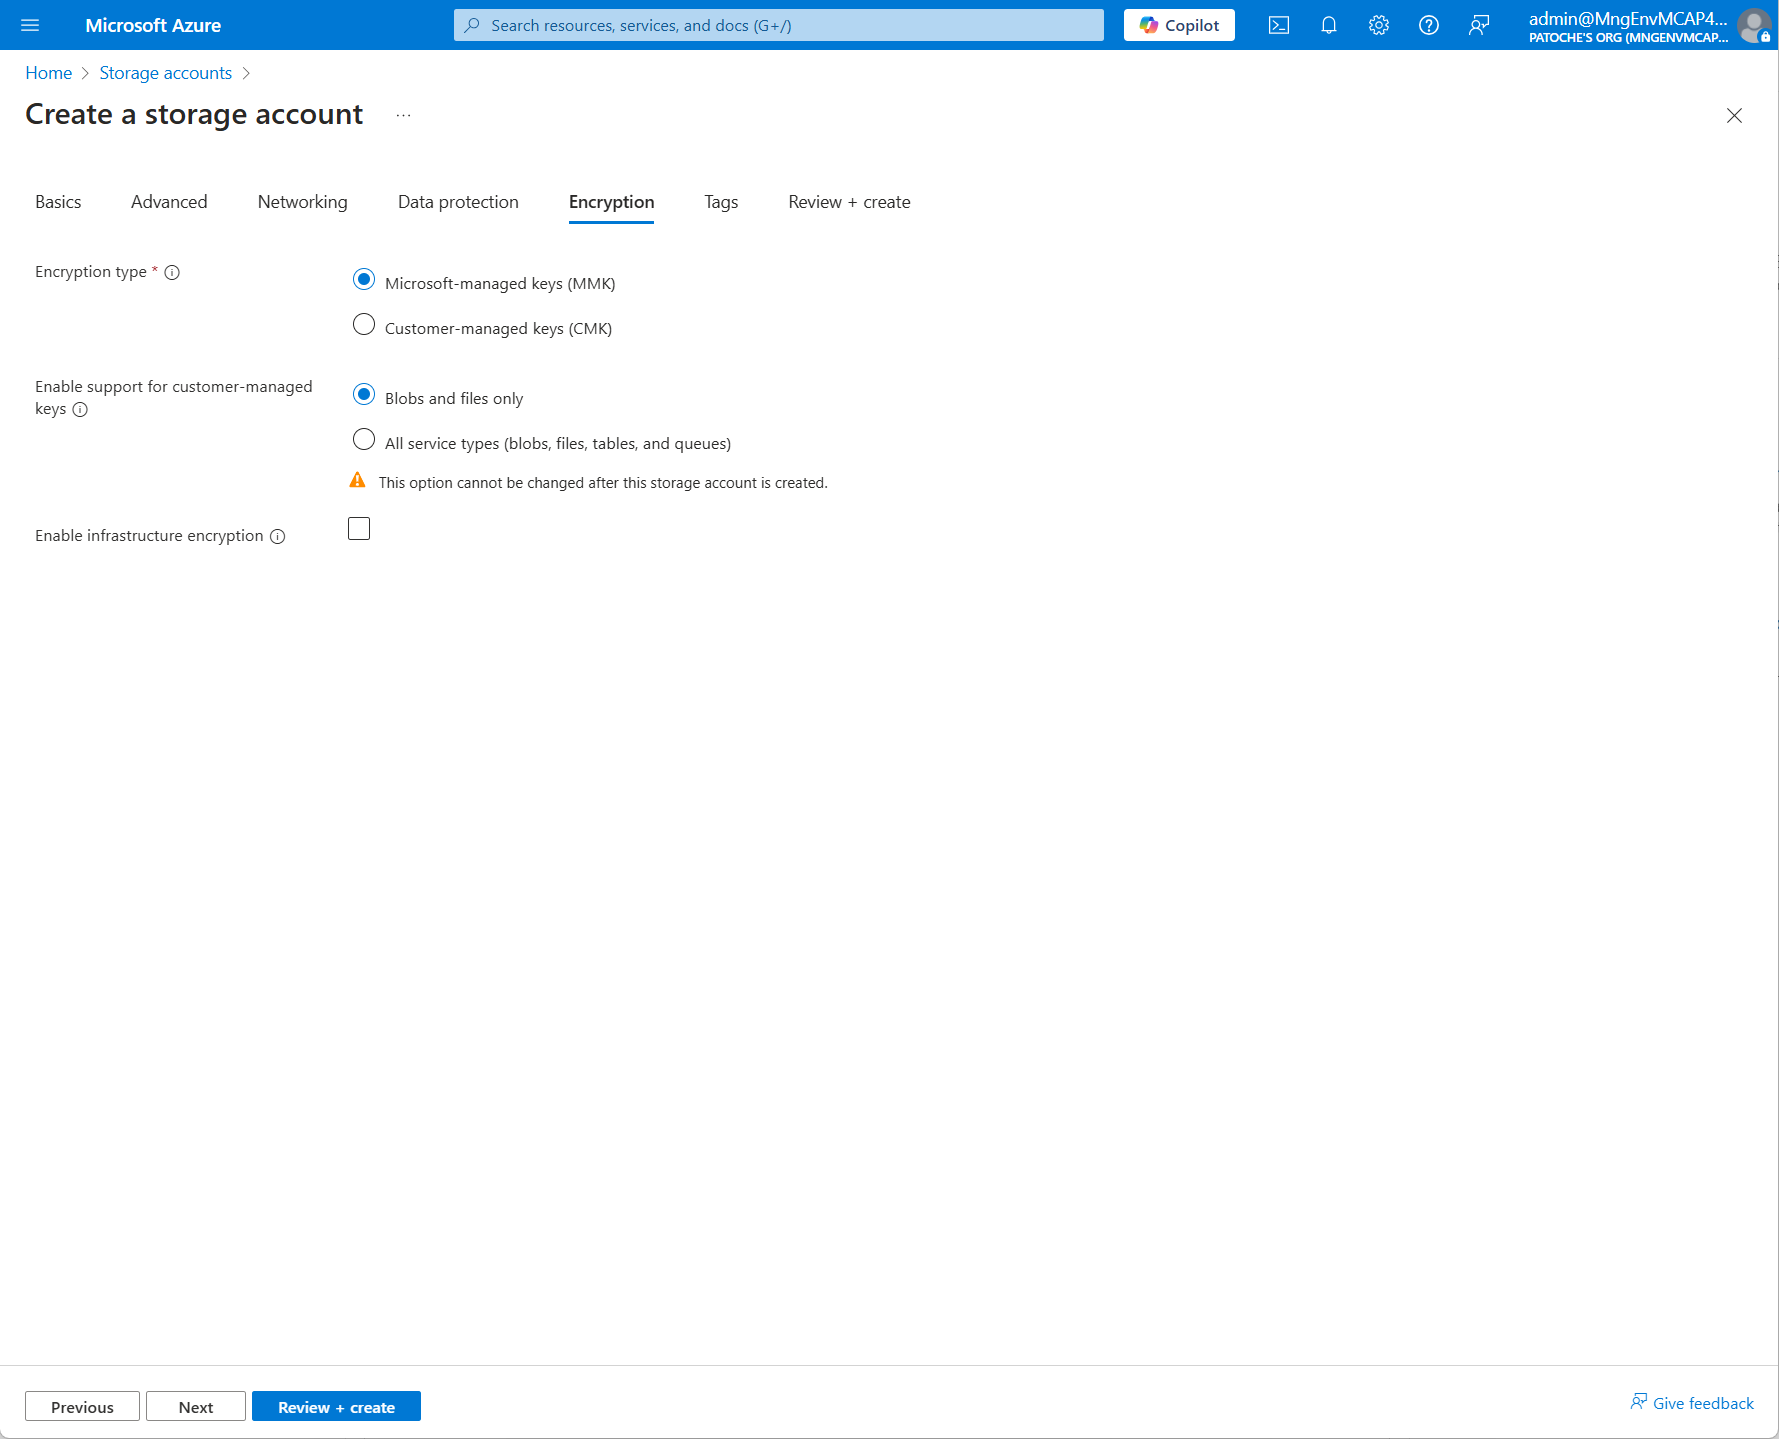
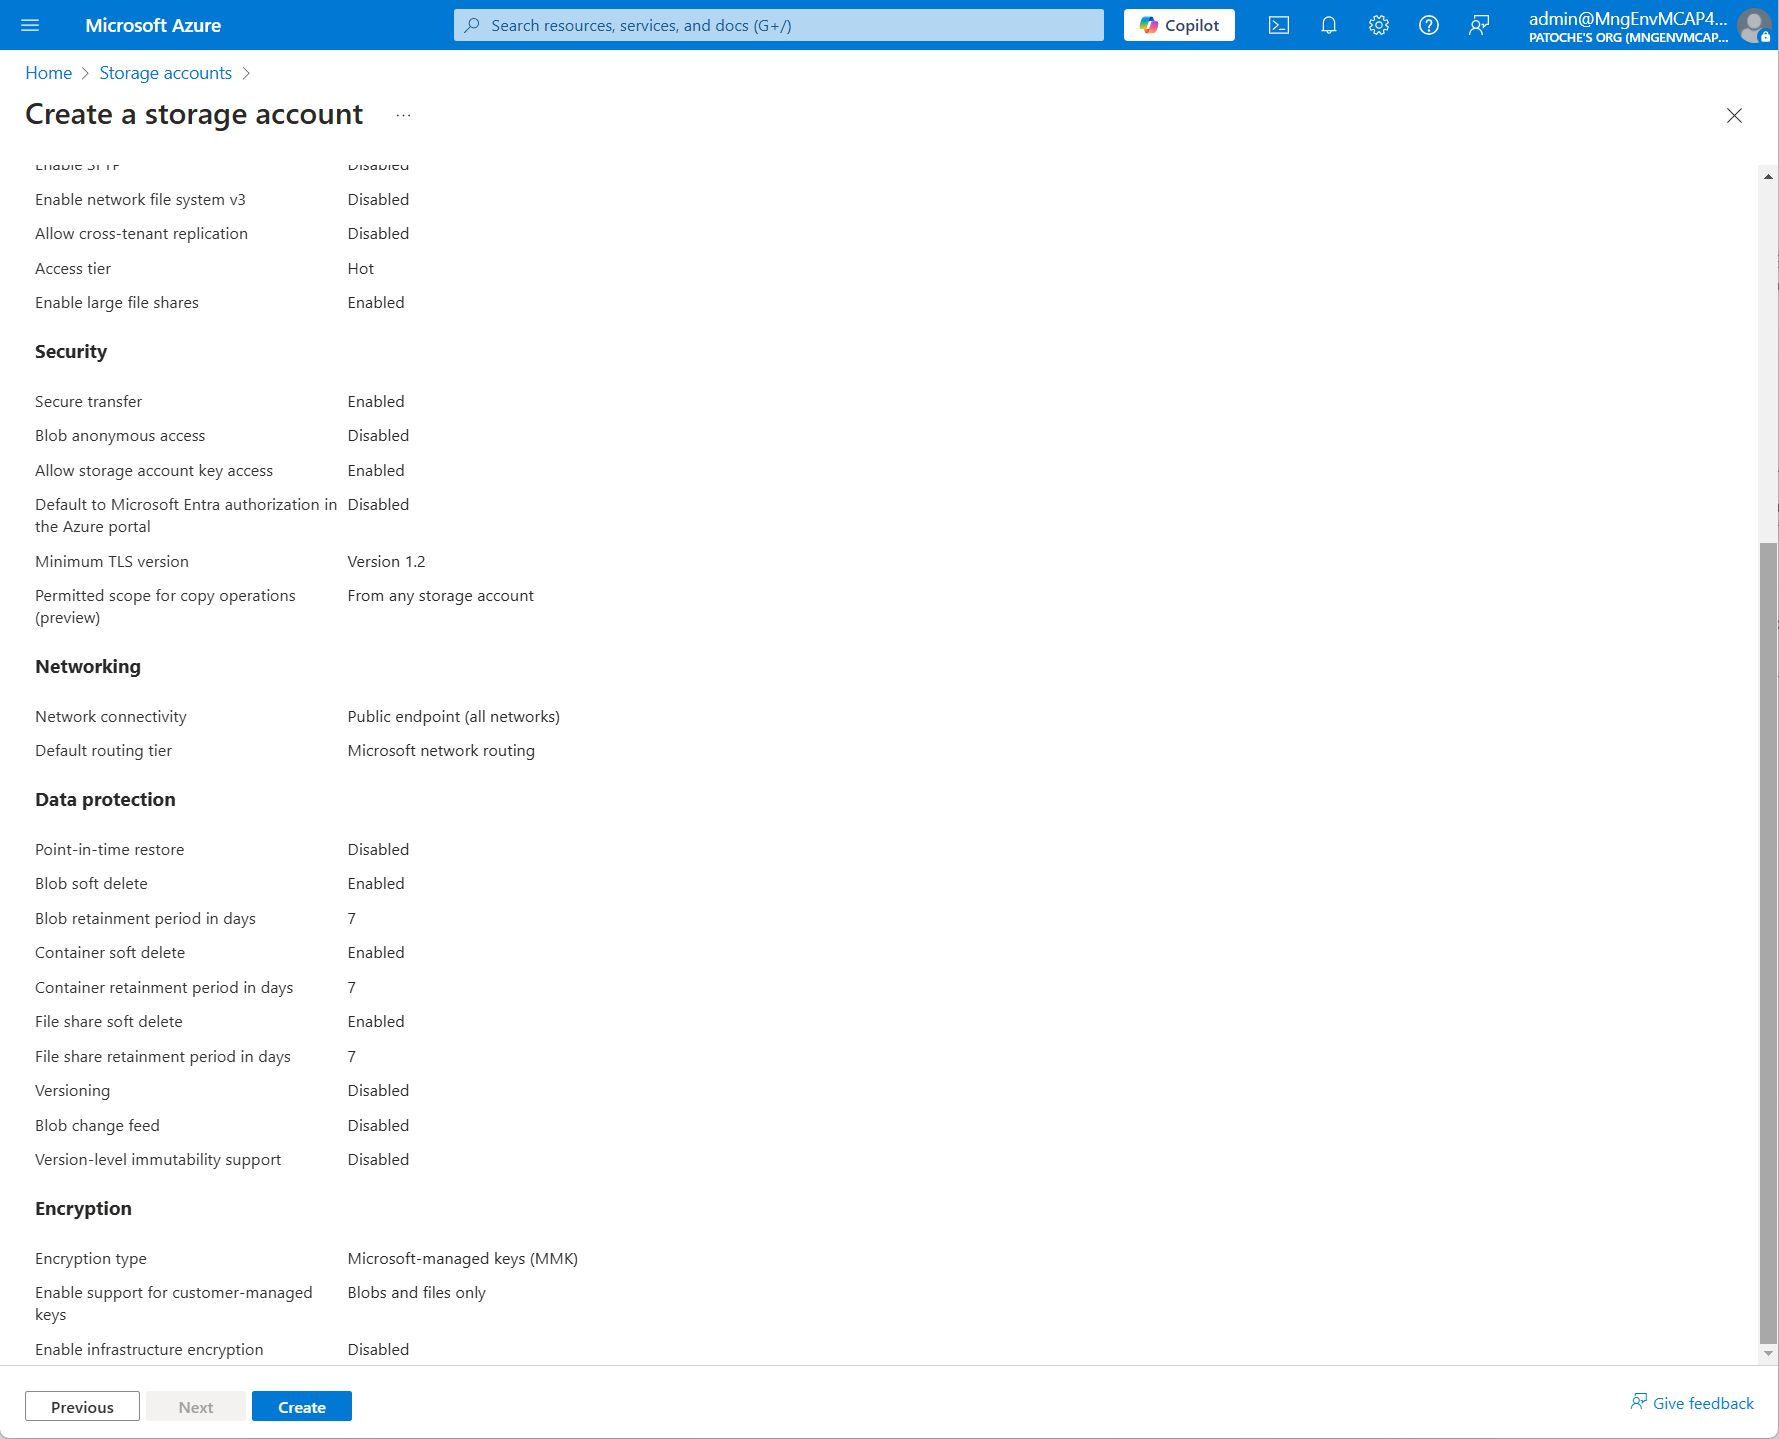
**ソフトウェアの前提条件をインストールする**
Azureで仮想マシンを作成するか、ローカルコンピューターを使用する
https://nodejs.org/en/downloadから node.js v22.13.1 (LTS) をインストールします。
https://code.visualstudio.com/downloadから Visual Studio Code x64 1.97.0 をインストールします。
https://git-scm.com/downloadsから Git 2.47.12 x64 をインストールします。
https://dotnet.microsoft.com/en-us/download/dotnet/thank-you/sdk-9.0.102-windows-x64-installerから .NET SDK x64 v9.0.102 をインストールします。
ターミナルウィンドウを開き、NuGetソースを追加します。
dotnet nuget add source https://api.nuget.org/v3/index.json -n nuget.org必要に応じて、WindowsコンピュータのPowerShell実行ポリシーを変更します。管理者モードでPowerShellウィンドウを開き、次のコマンドを実行します。
Set-ExecutionPolicy -ExecutionPolicy RemoteSigned -Scope CurrentUser必要に応じて、NuGet、PowerShell、az cli、azモジュールをインストールします。
# install az cli
winget install -e --id Microsoft.AzureCLI

# install nuget and reference nuget source
Install-PackageProvider -Name NuGet -MinimumVersion 2.8.5.201 -Force

# update to latest Powershell release (7.5 as of writing)
winget install --id Microsoft.PowerShell --source winget

# install az modules
Install-Module -Name Az -Repository PSGallery -Force -AllowClobber
ターミナル ウィンドウを開き、リポジトリのクローンを作成します。
git clone https://github.com/patrice-truong/cosmosdb-mcp.git
cd cosmosdb-mcp
nextjsフォルダに移動して依存関係をインストールします
cd cosmosdb-mcp/nextjs
npm install  --legacy-peer-deps
nextjs フォルダーで、次の値を持つ .env ファイルを作成して構成します。
AZURE_COSMOSDB_NOSQL_ENDPOINT=https://<cosmosdb_account_name>.documents.azure.com:443/
AZURE_COSMOSDB_NOSQL_DATABASE=eshop
AZURE_COSMOSDB_NOSQL_PRODUCTS_CONTAINER=products
AZURE_COSMOSDB_NOSQL_CARTS_CONTAINER=carts
AZURE_COSMOSDB_NOSQL_ORDERS_CONTAINER=orders
AZURE_STORAGE_ACCOUNT_NAME=<storage_account_name>
AZURE_STORAGE_CONTAINER_NAME=<container_name>
テナントIDを取得します。テナントIDは次のコマンドで取得できます。
az login
az account show --query tenantId -o tsv
webapi フォルダーで、appsettings.json ファイルを構成し、tenant_id を前の手順で取得した値に置き換えます。
{
  "CosmosDb": {
    "Endpoint": "https:/<cosmosdb_account_name>.documents.azure.com:443/",
    "TenantId": "<tenant_id>",
    "DatabaseName": "eshop",
    "ProductsContainerName": "products",
    "CartsContainerName": "carts",
    "OrdersContainerName": "orders"
  },
  "AzureBlobStorage": {
    "AccountName": "<storage_account_name>"
  }
}
Azure ポータルでアプリ登録を作成する
Azureポータルでアプリシークレットを作成する
アプリにAzure Cosmos DBへのアクセスを許可する必要があります。以下の4つのIDを取得し、「populate/set_rbac.ps1」ファイルを変更してください。
変数 | 参照 |
サブスクリプションID | Cosmos DB > 概要 > サブスクリプション ID |
Azure Cosmos DB アカウント名 | コスモス-eastus2-nosql-2 |
リソースグループ名 | Cosmos DB > 概要 > リソースグループ名 |
プリンシパルID | アプリ登録オブジェクトID |
$SubscriptionId = "<subscription-id>"   # Azure subscription id
$AccountName = "<cosmosdb-account-name>"    # cosmos db account name
$ResourceGroupName = "<resource-group-name>" # resource group name of the Cosmos DB account
$PrincipalId = "<principal-id>" # object id of the app registered in Entra IDPowershellプロンプトを開き、Connect-AzAccountを実行して、./set_rbac.ps1を実行します。
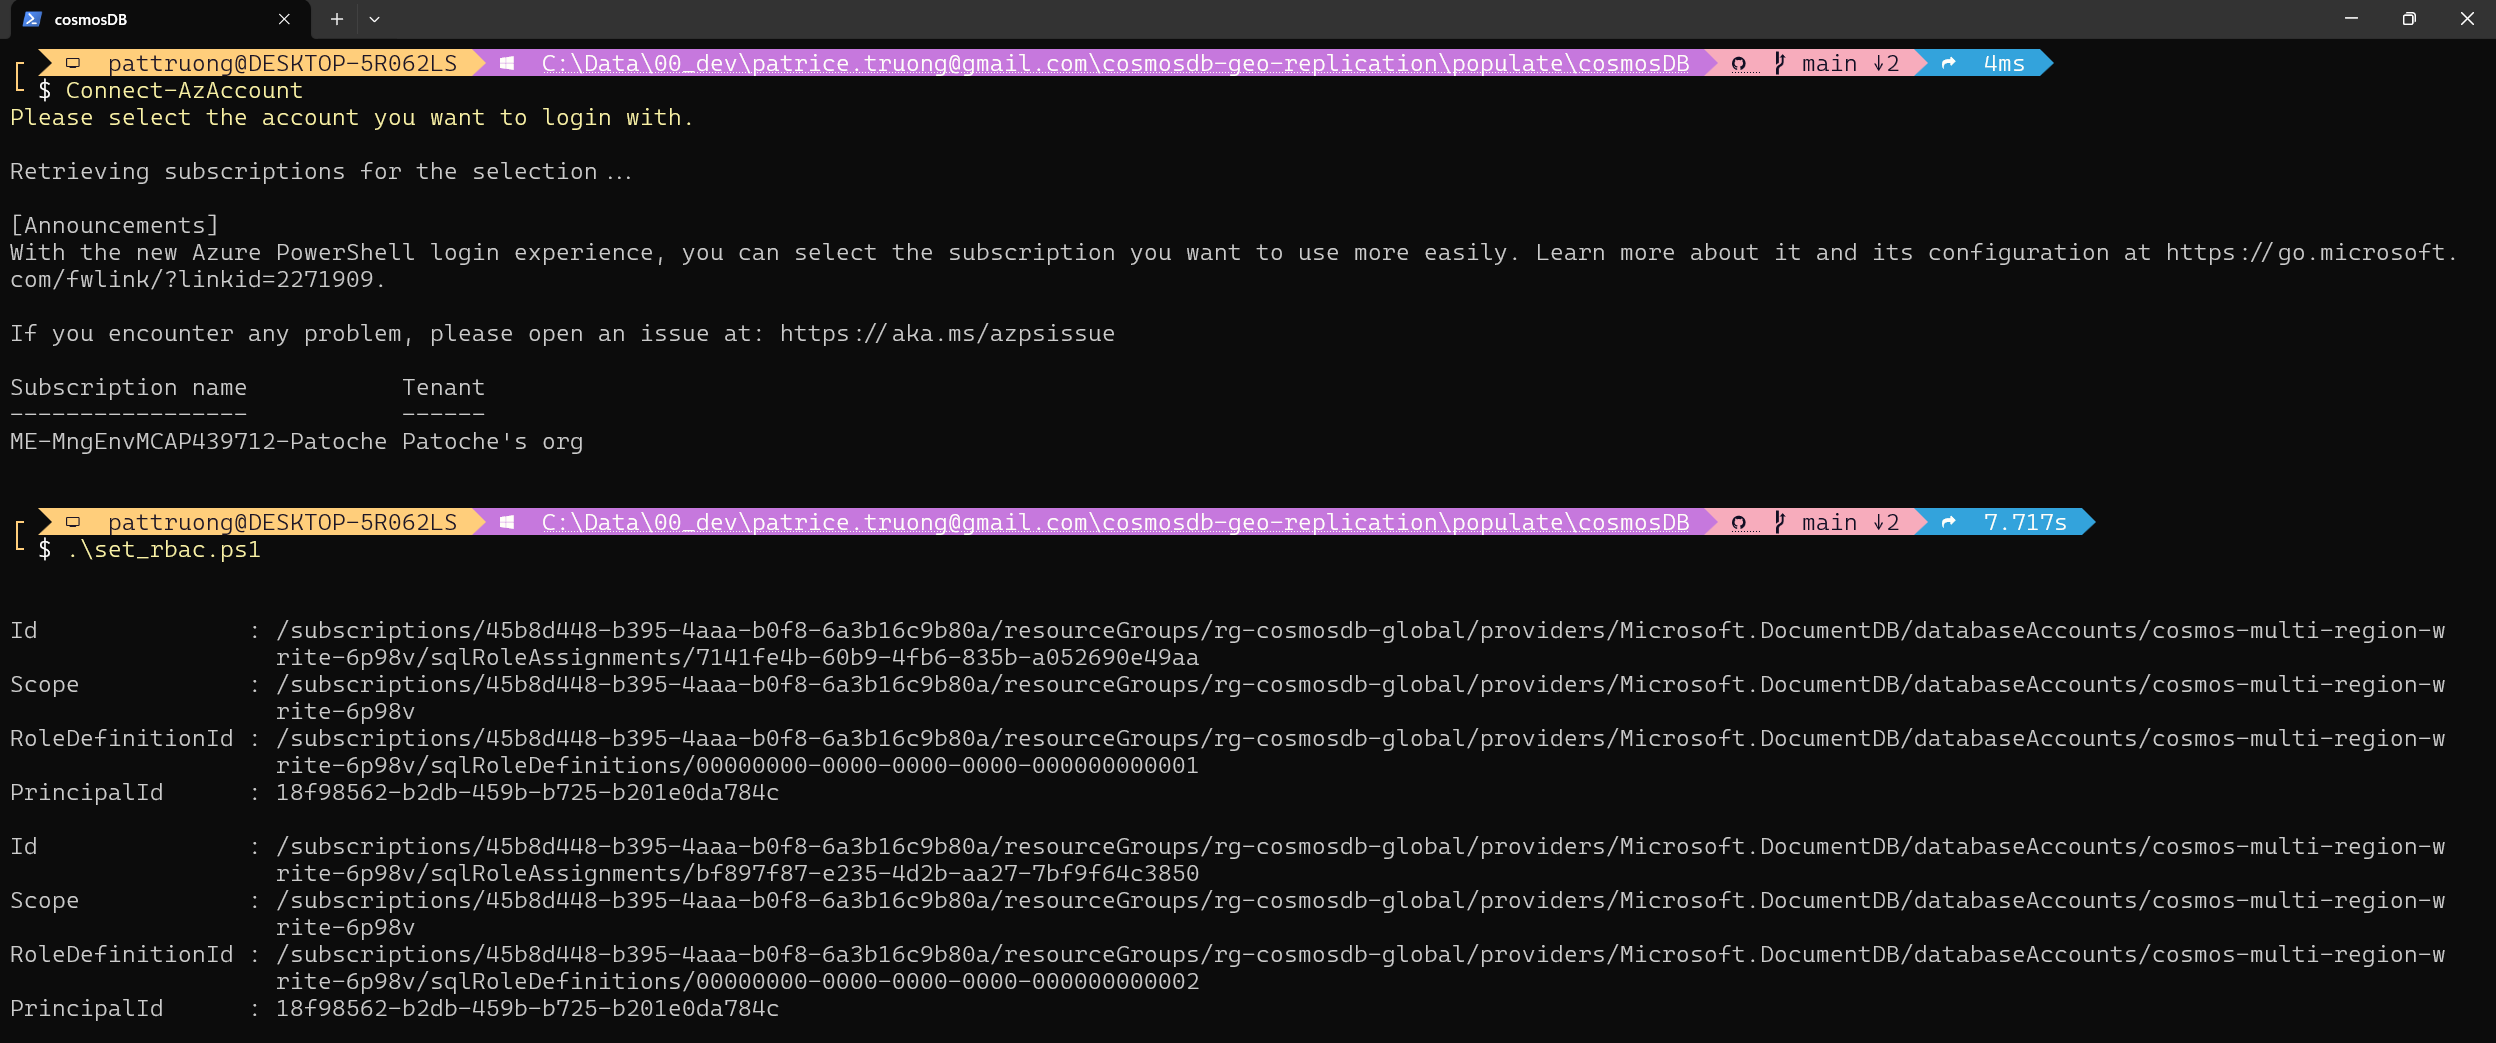
アプリ(または仮想マシン)がストレージ アカウントにアクセスできるようにします
Azureポータルでストレージアカウントに移動します
メニューでアクセス制御(IAM)を選択します

「役割の割り当てを追加」をクリックします
フィルターテキストボックスに「Storage Blob Data Contributor」と入力します
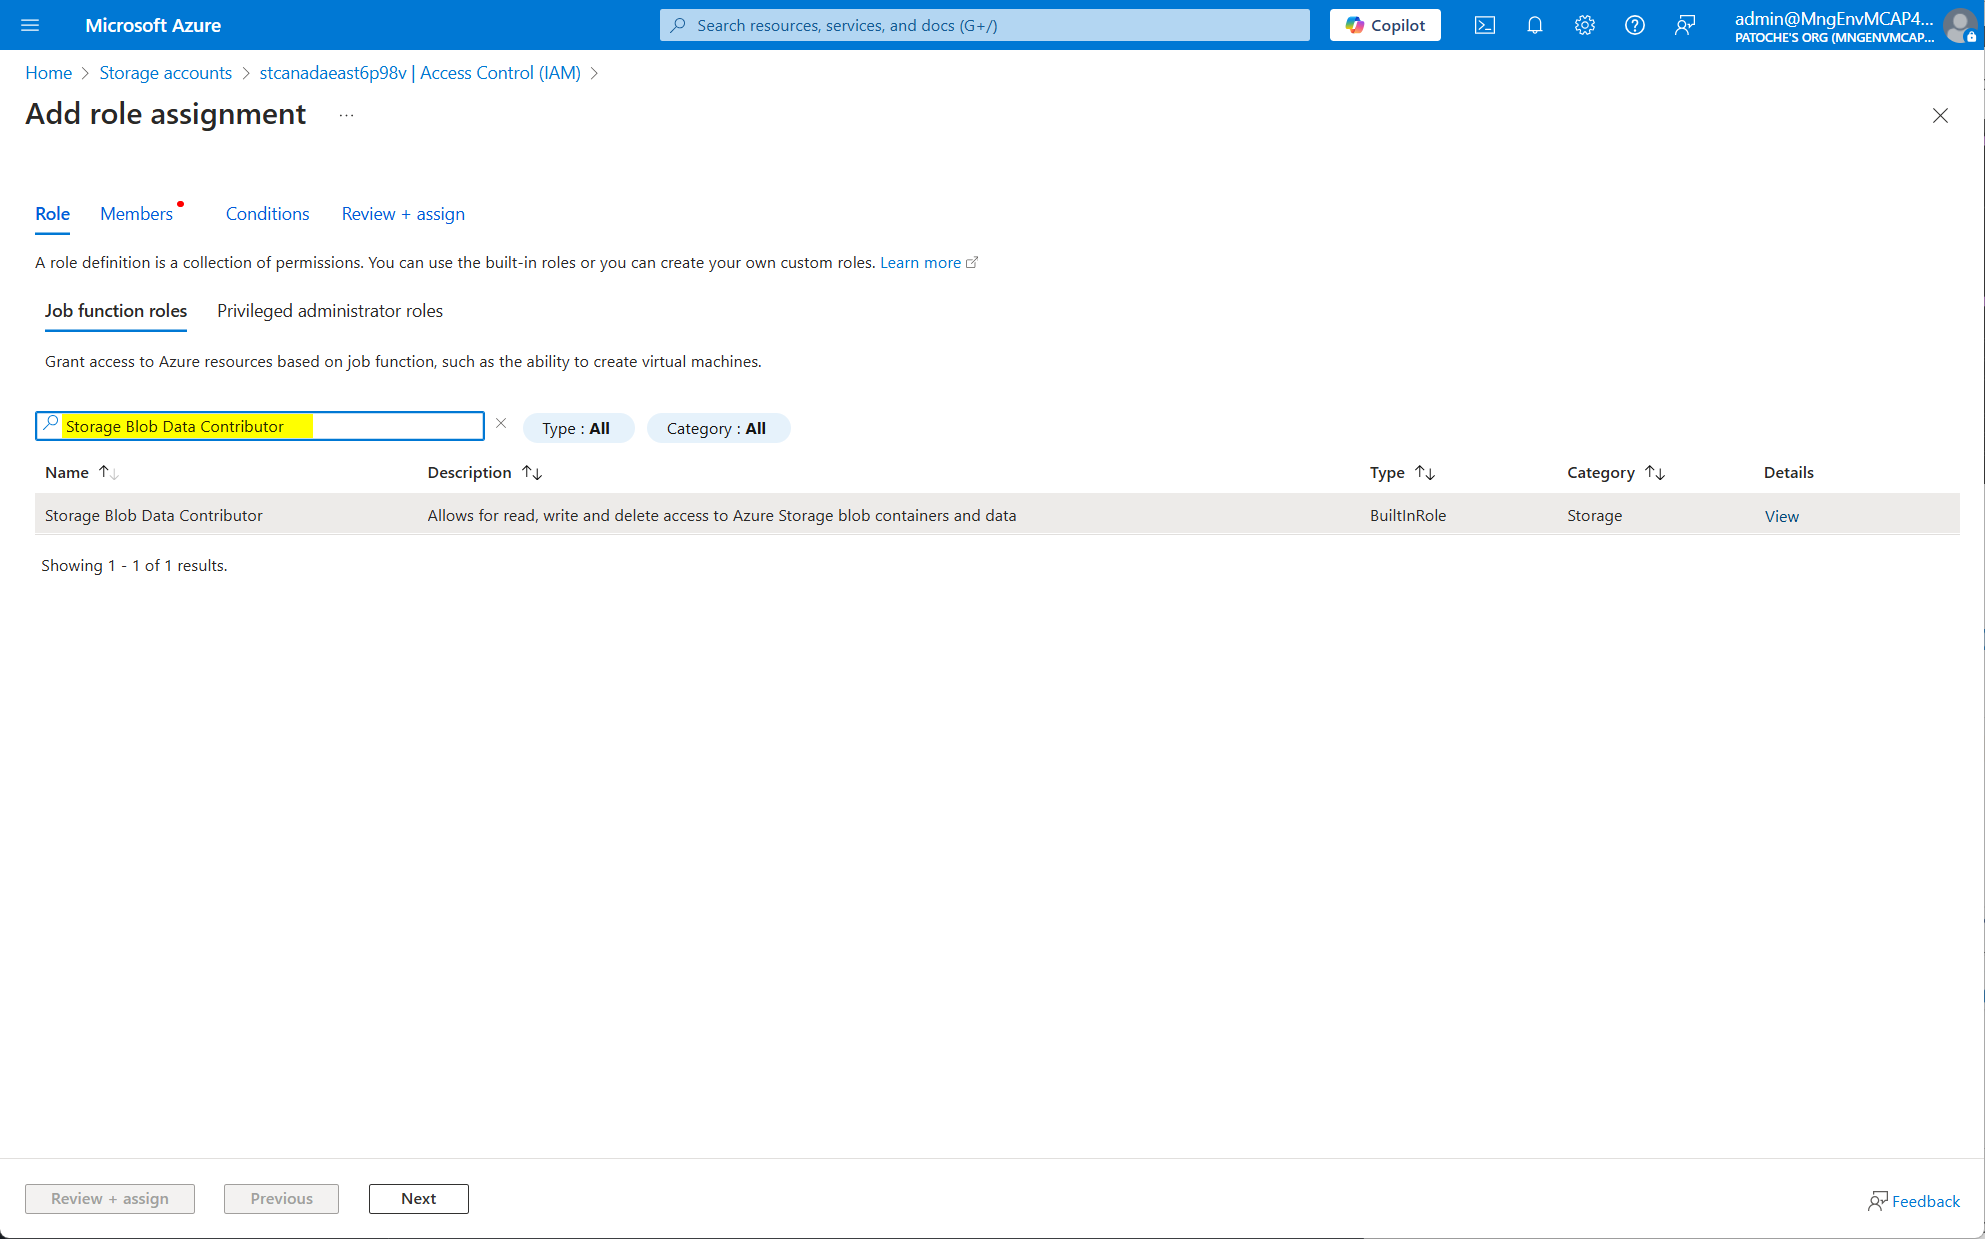
「メンバー」をクリック
アプリケーションの名前を選択してください
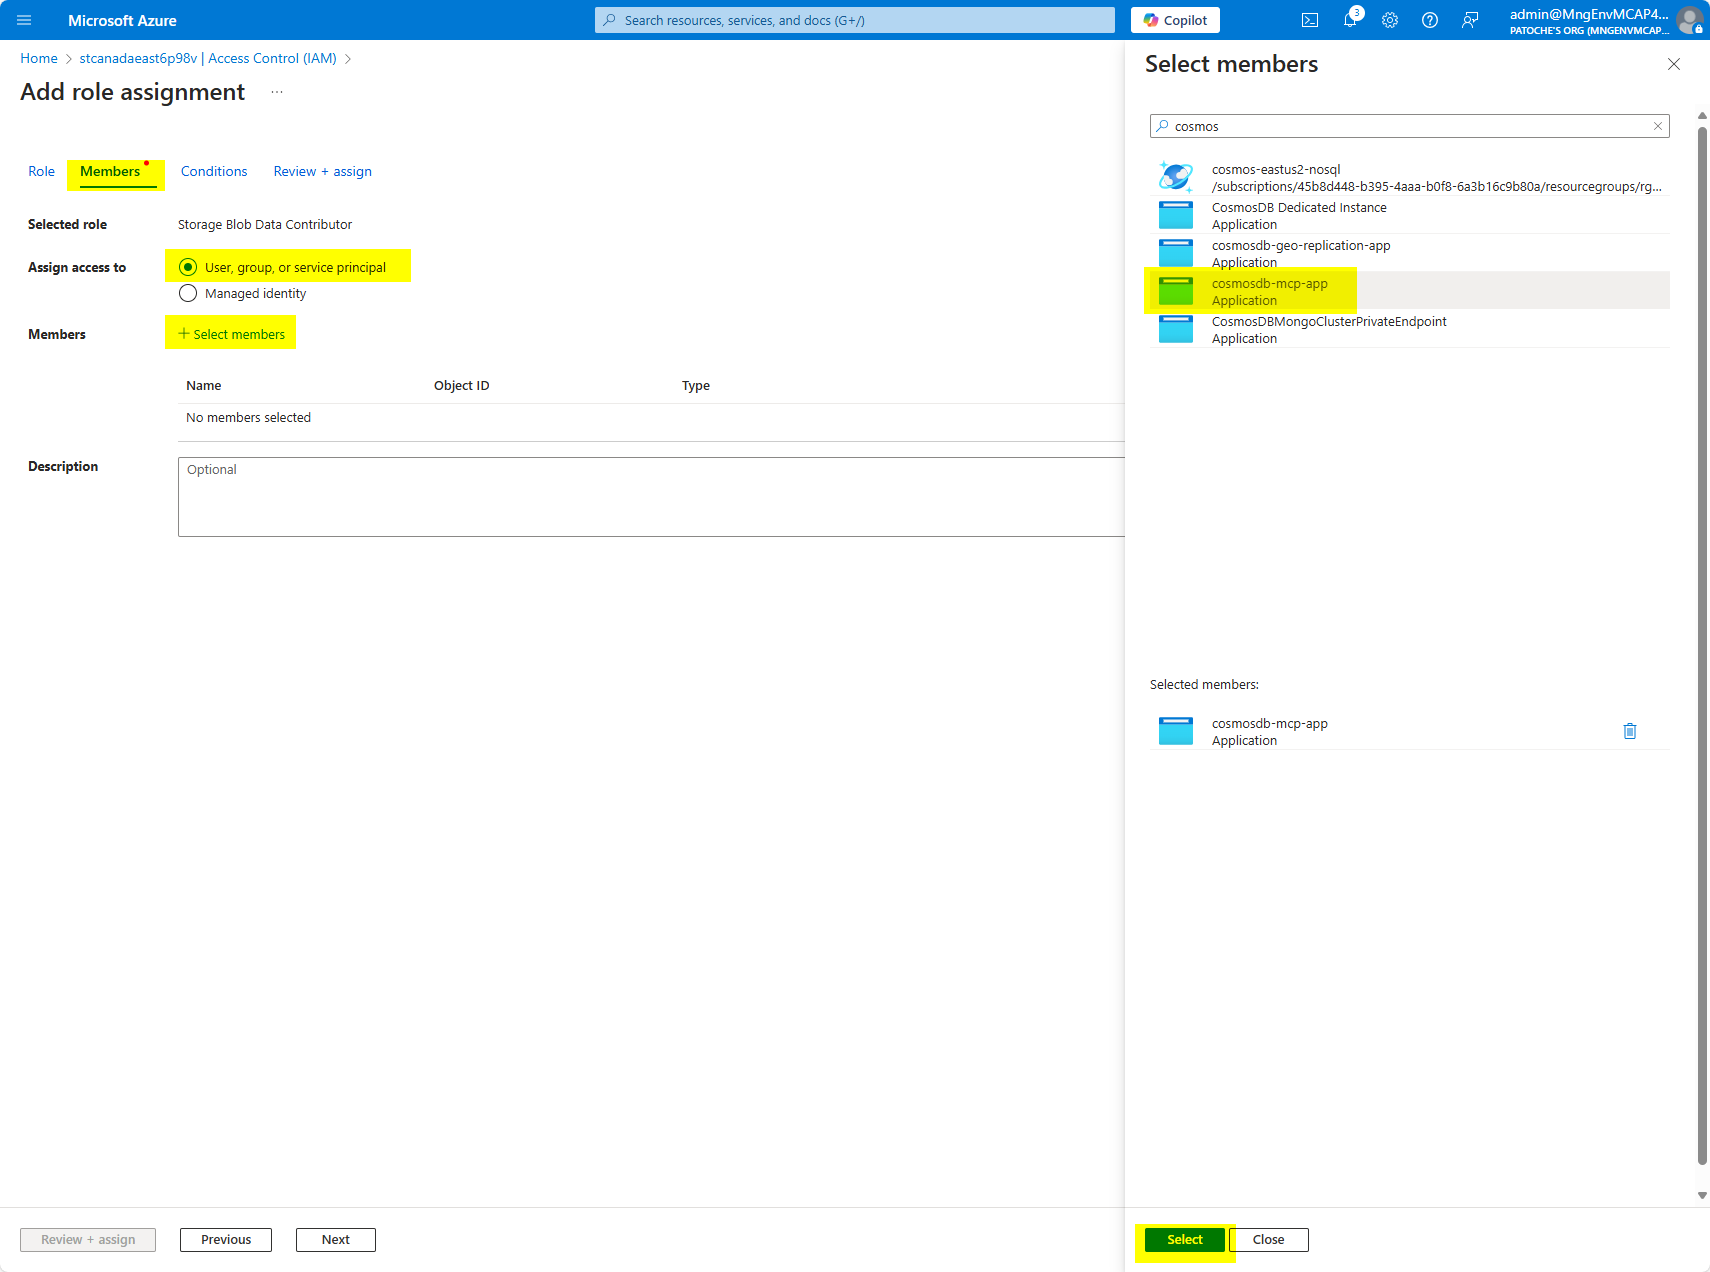
「選択」ボタンをクリックします
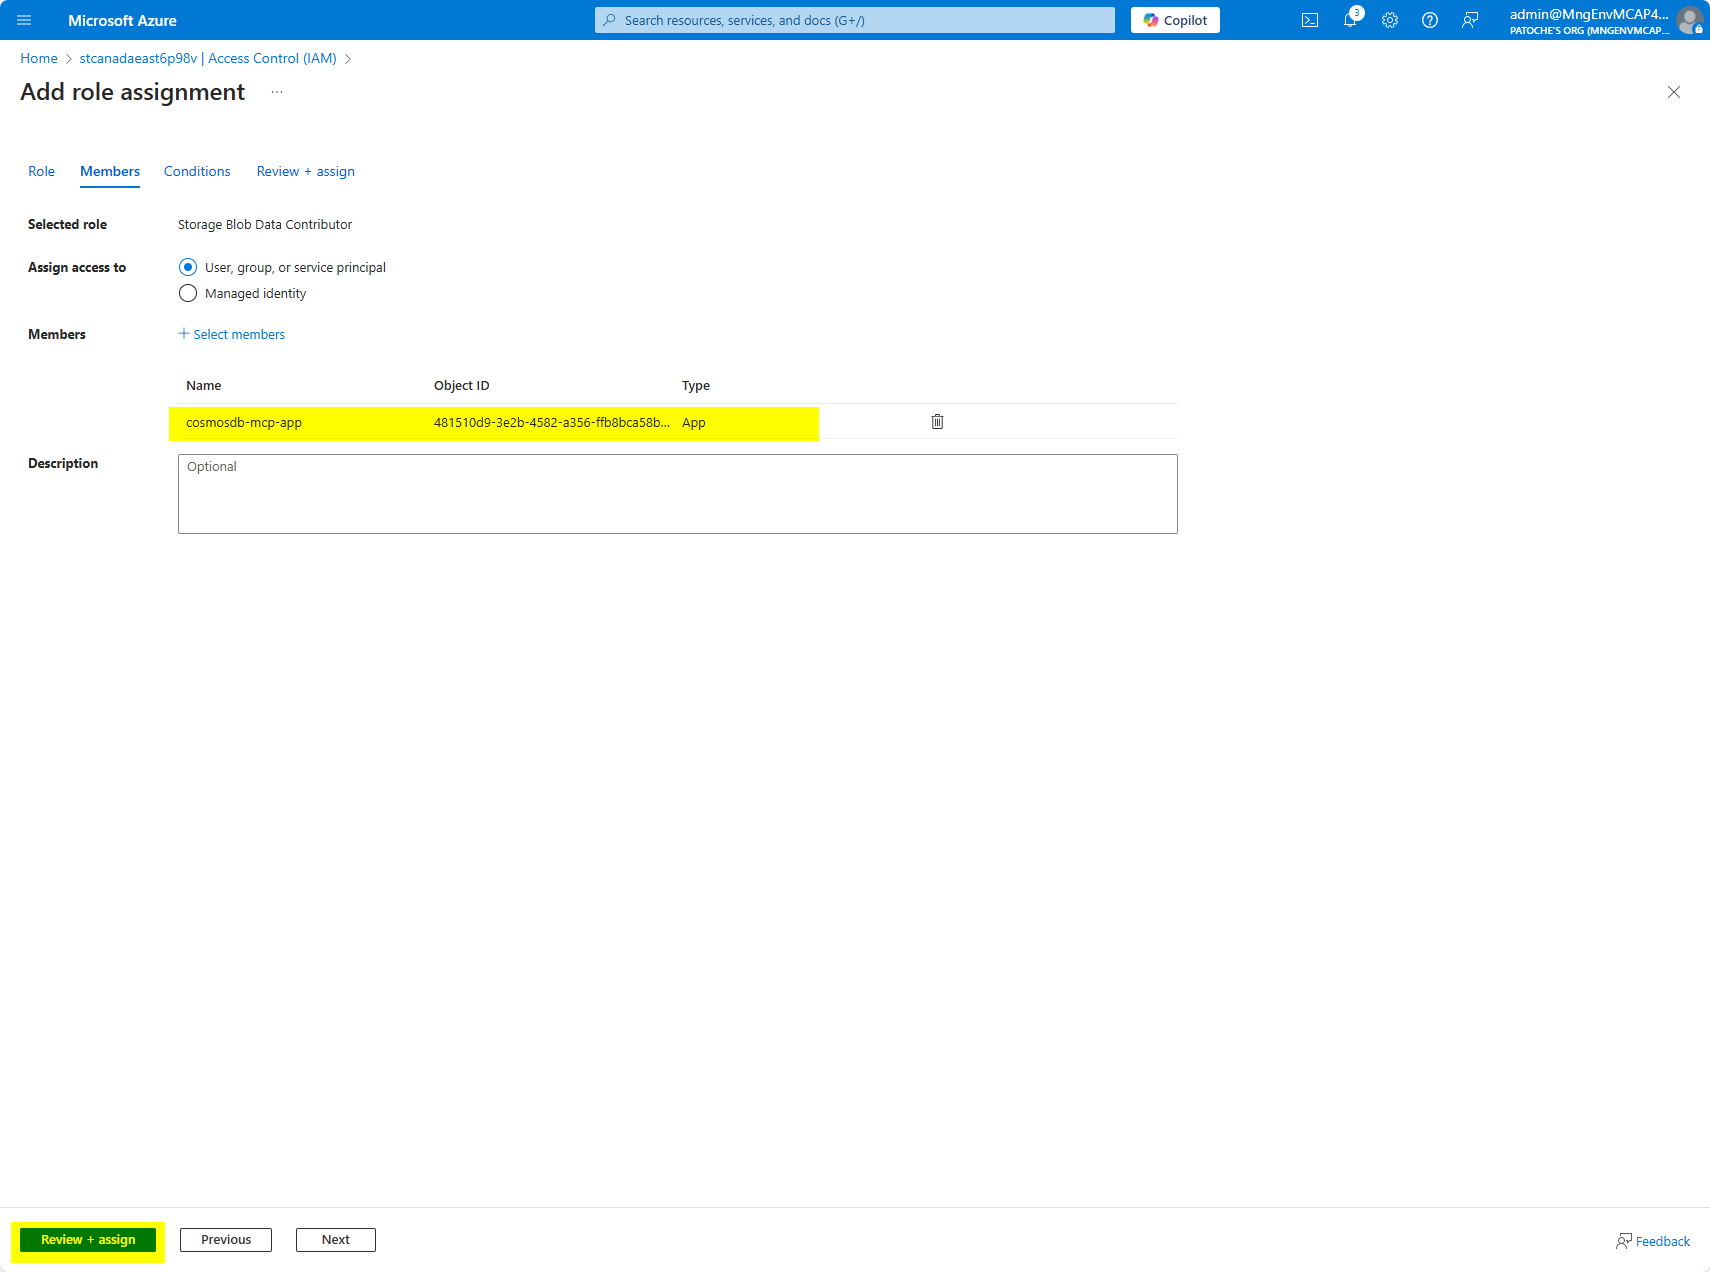
「確認して割り当てる」をクリックします
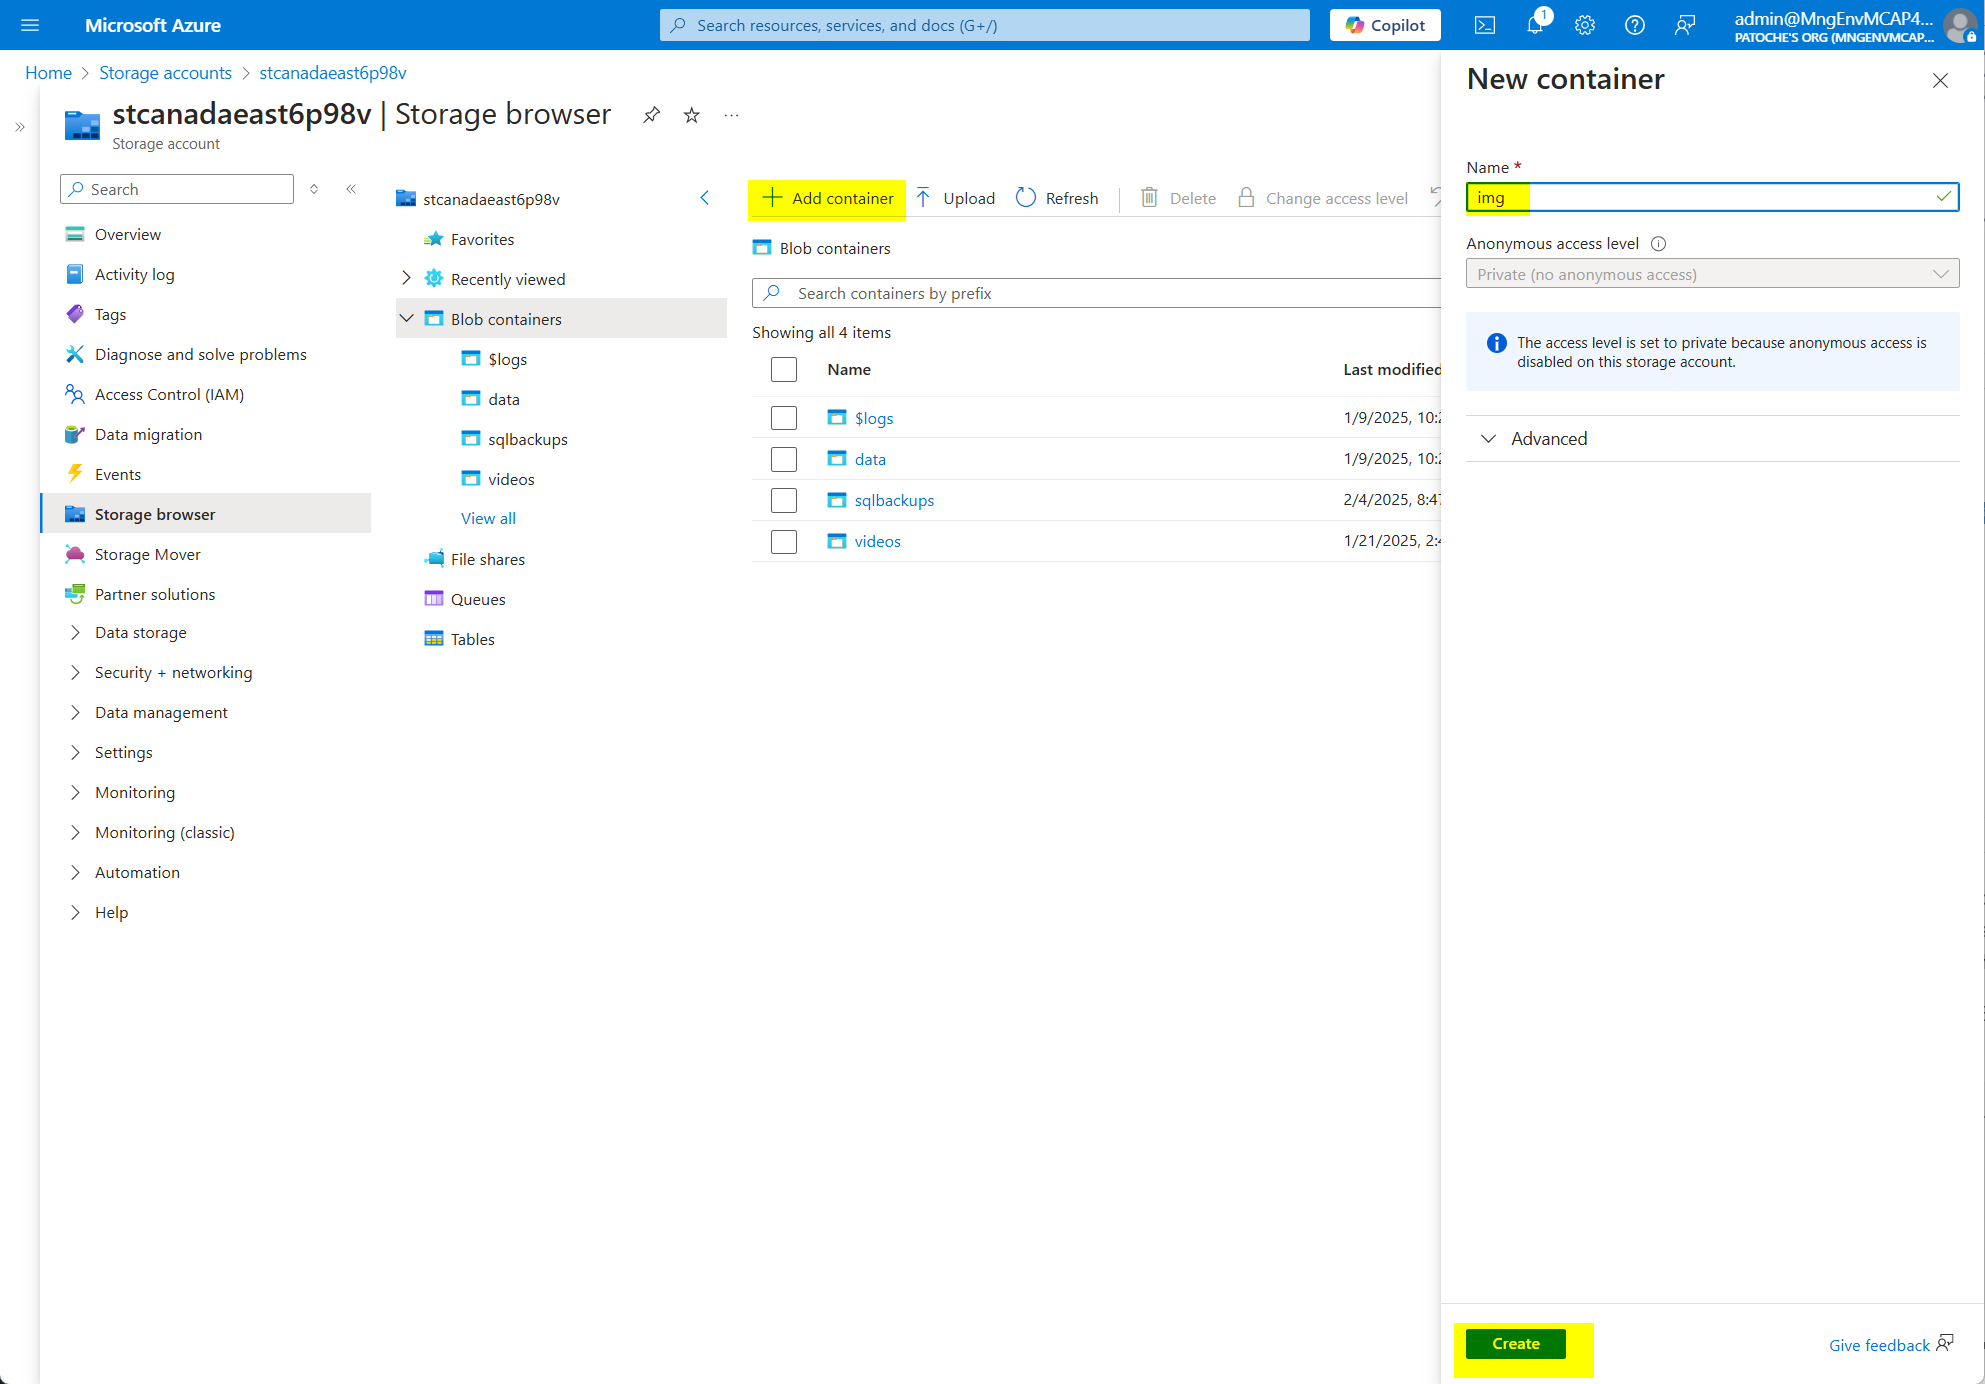
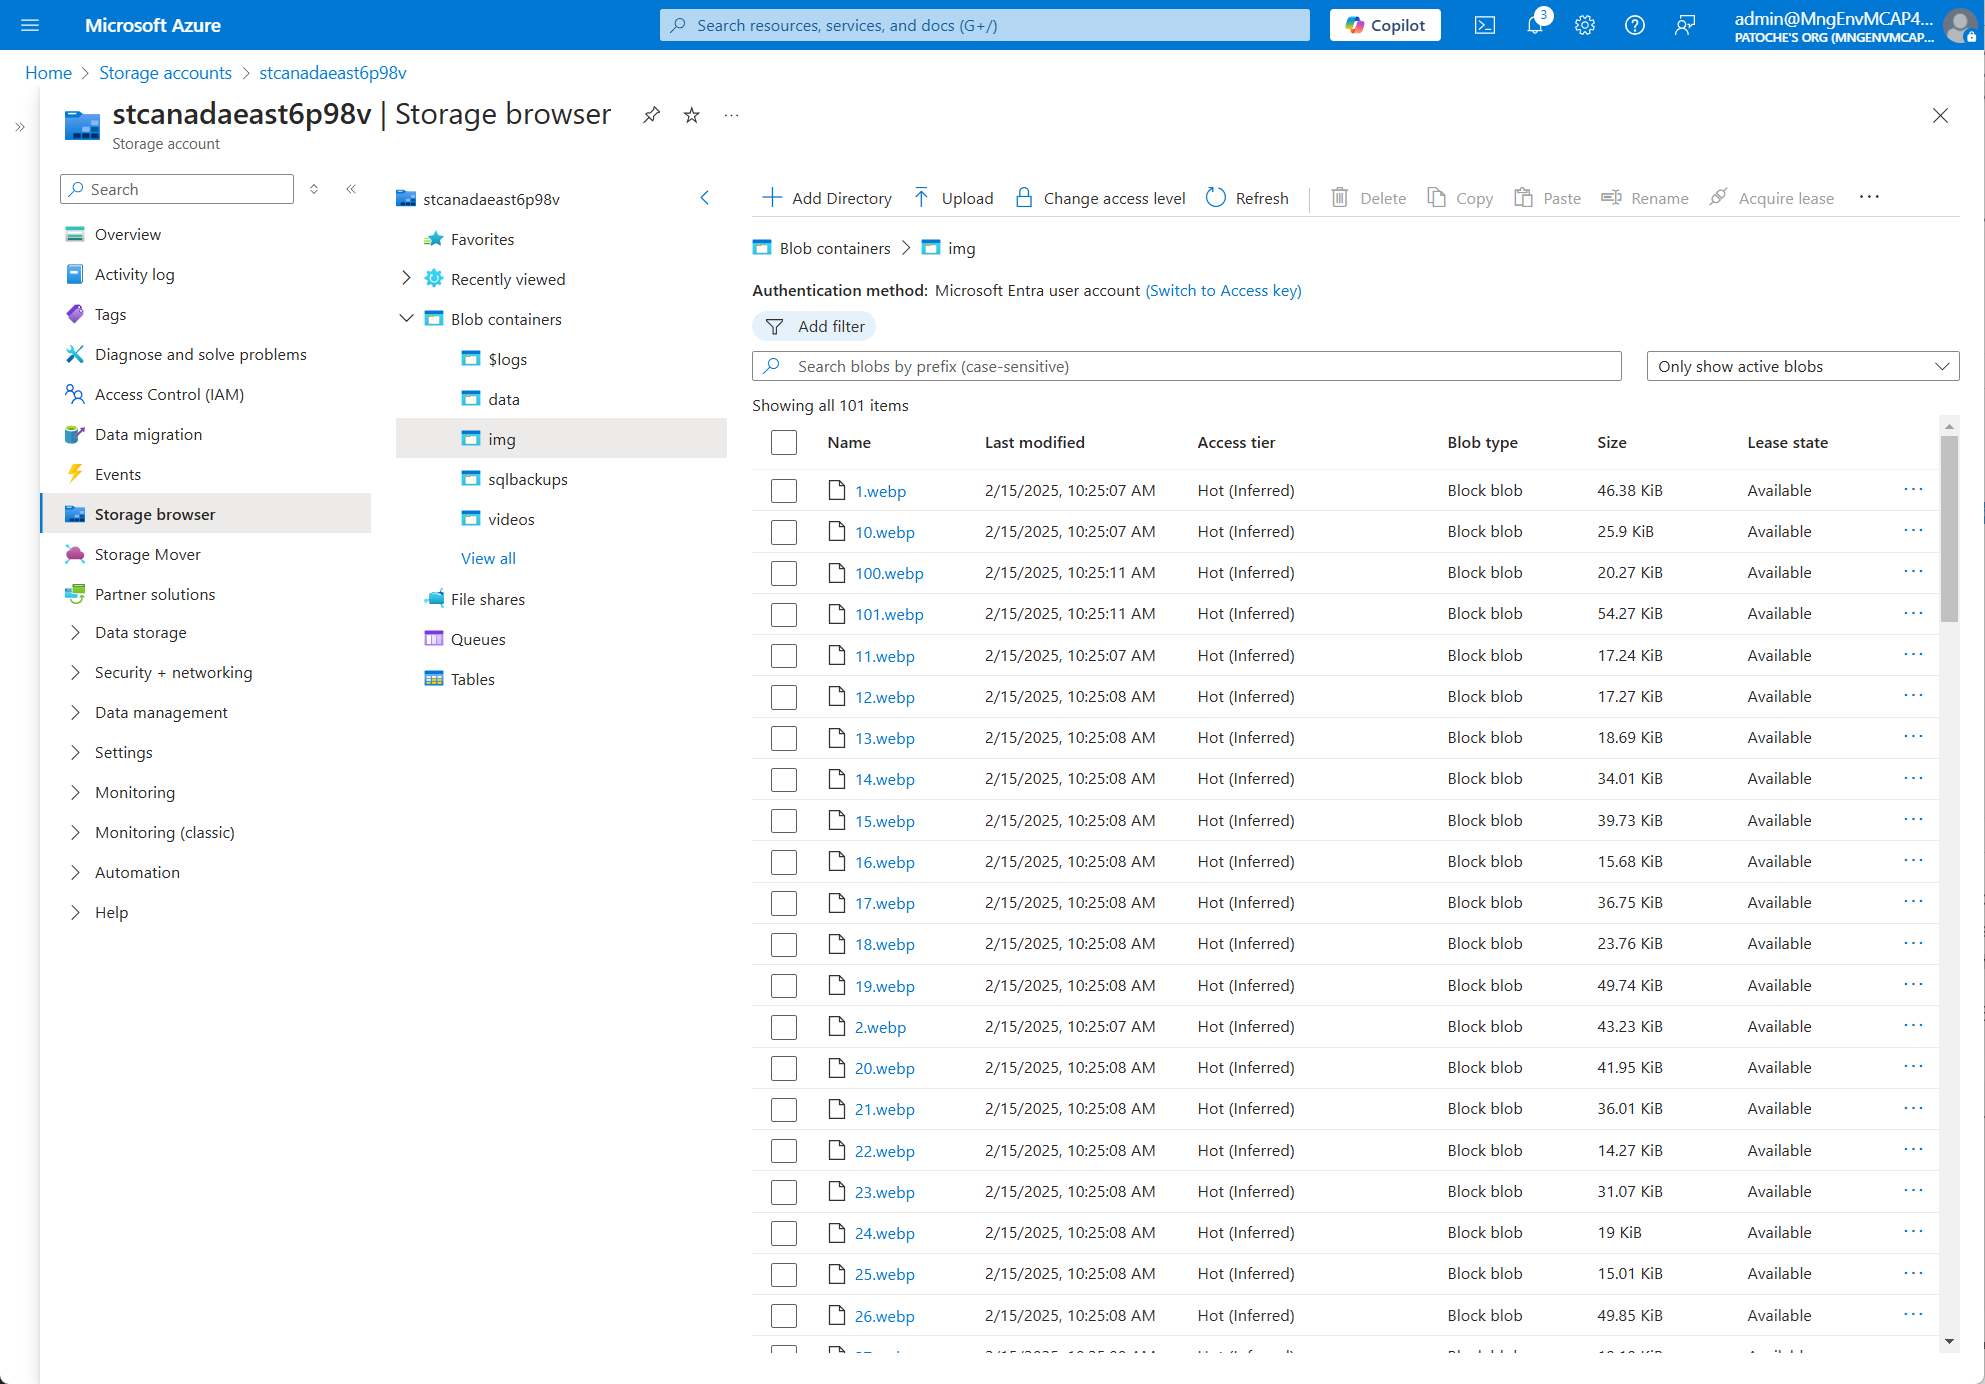
コンテナを作成し、「azure-storage」フォルダの内容をストレージアカウントにコピーします。

dotnet build で WebAPI バックエンド プロジェクトをビルドする
cd webapi
dotnet build 18. セカンダリリージョンVM(オーストラリア東部)で、プライマリリージョン(米国東部2)のソケットサーバーのIPアドレスを使用して.envファイルを変更します。
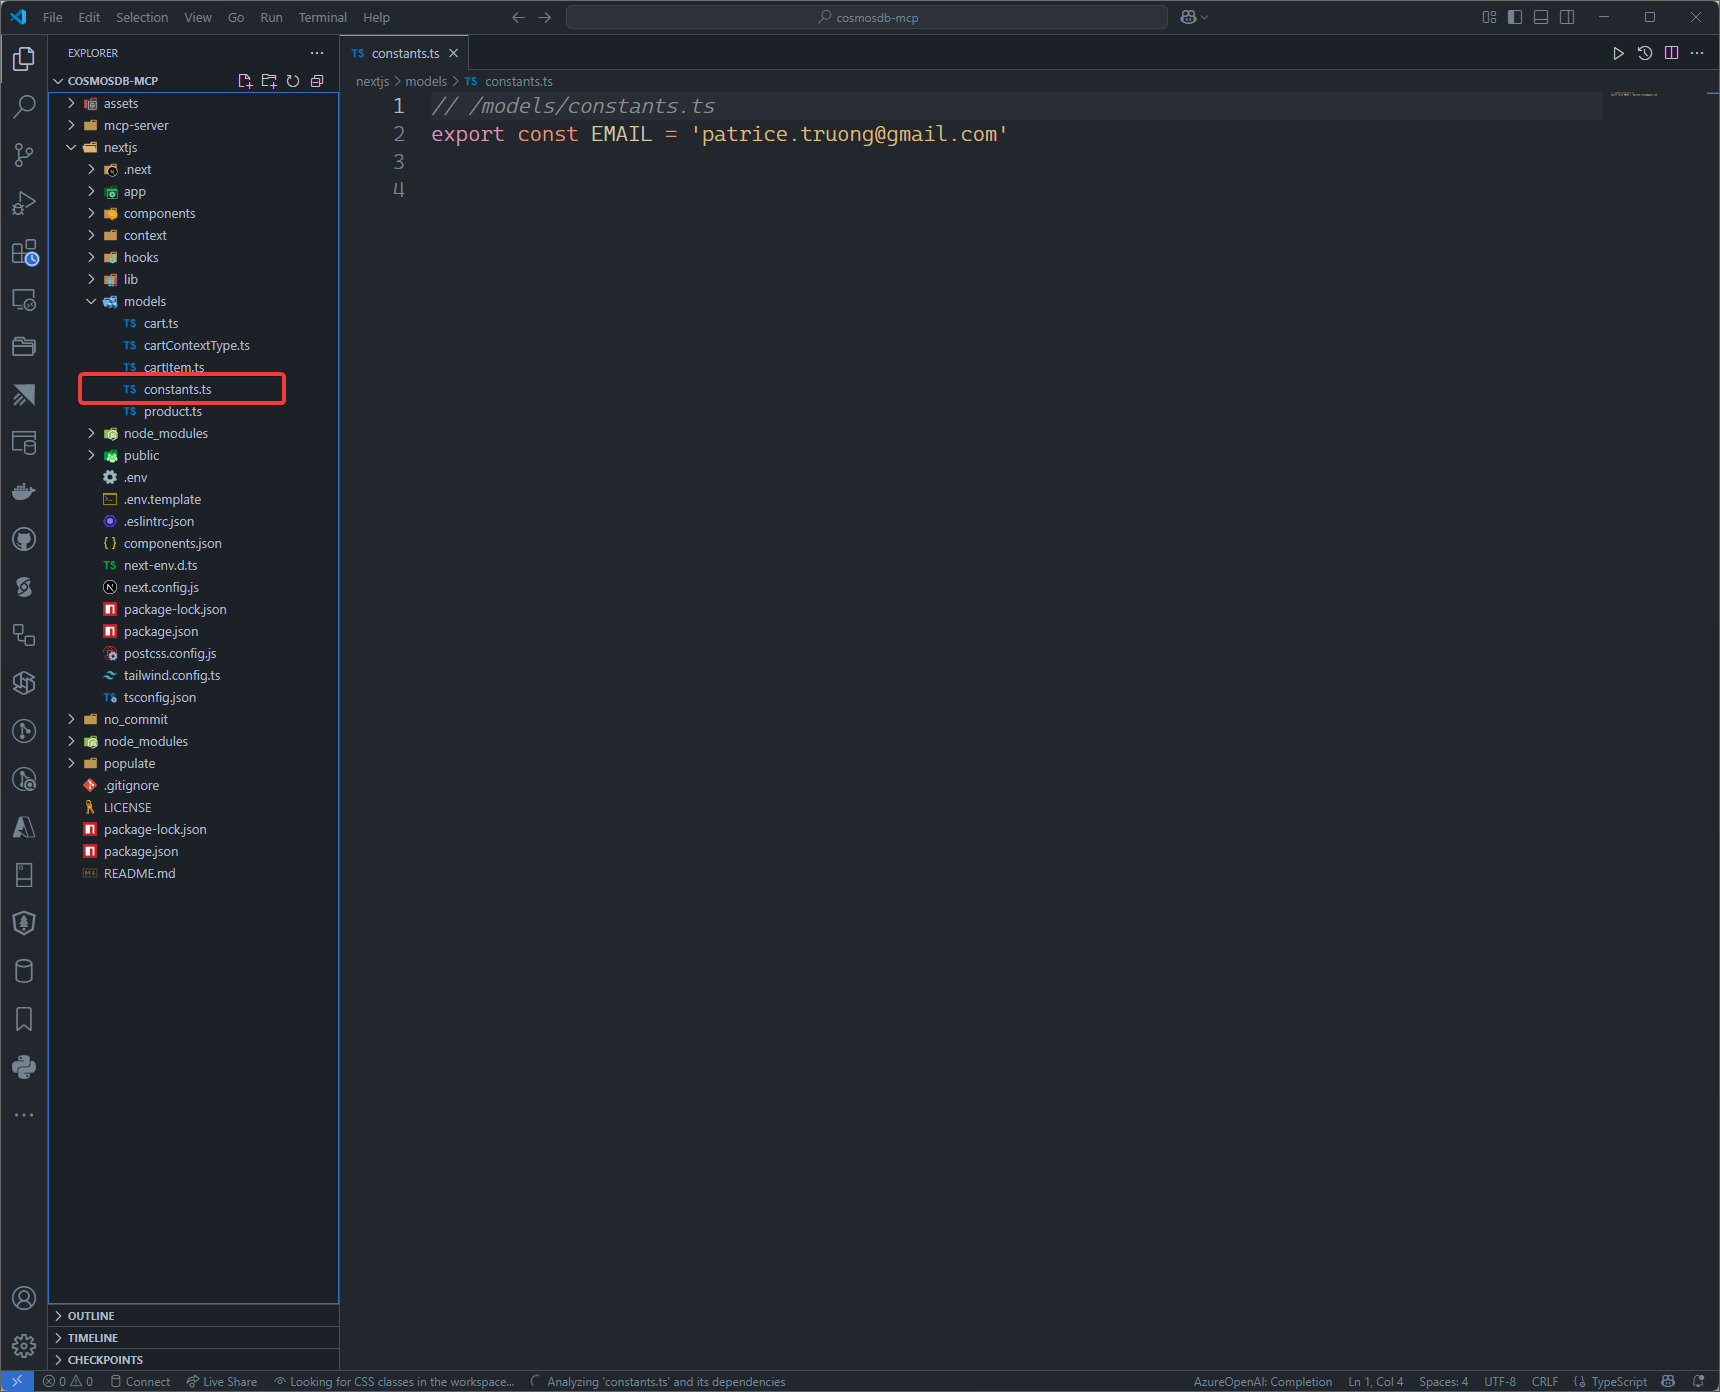
このプロジェクトには認証機能が組み込まれていません。ユーザーのメールアドレスは/nextjs/models/constants.tsにハードコードされています。デモのニーズに合わせて変更してください。
mcp-server と nextjs フォルダで、.env.template を .env にコピーし、デモのニーズに合わせて値を変更します。
AZURE_COSMOSDB_NOSQL_ENDPOINT=https://<cosmosdb_account>.documents.azure.com:443/
AZURE_COSMOSDB_NOSQL_DATABASE=eshop
AZURE_COSMOSDB_NOSQL_PRODUCTS_CONTAINER=products
AZURE_COSMOSDB_NOSQL_CARTS_CONTAINER=carts
AZURE_COSMOSDB_NOSQL_ORDERS_CONTAINER=orders

NEXT_PUBLIC_AZURE_TENANT_ID=<tenant_id>
NEXT_PUBLIC_AZURE_CLIENT_ID=<client_id>
NEXT_PUBLIC_AZURE_CLIENT_SECRET=<client_secret>

NEXT_PUBLIC_AZURE_STORAGE_ACCOUNT_NAME=<storage_account_name>
NEXT_PUBLIC_AZURE_STORAGE_CONTAINER_NAME=img

AZURE_OPENAI_ENDPOINT=https://<azure_openai_account>.openai.azure.com/
AZURE_OPENAI_API_KEY=<azure_openai_key>
AZURE_OPENAI_EMBEDDING_MODEL=text-embedding-3-small
AZURE_OPENAI_API_VERSION=2024-05-01-preview
Nextjsフロントエンドプロジェクトをビルドする
cd nextjs
npm run build
このセクションでは、populate/catalog.json ファイルから製品カタログを読み取り、Azure Cosmos DB for NoSQL データベースに入力します。
appsettings.jsonをcosmosdbアカウント名に変更し、
{
  "CosmosDb": {
    "Endpoint": "https://<cosmosdb_account_name>.documents.azure.com:443/",
    "TenantId": "<tenant_id>",
    "DatabaseName": "eshop",
    "ProductsContainerName": "products",
    "OrdersContainerName": "orders",
  }
}
ターミナルウィンドウを開き、populateフォルダに移動し、az loginを実行してからdotnet runを実行します。

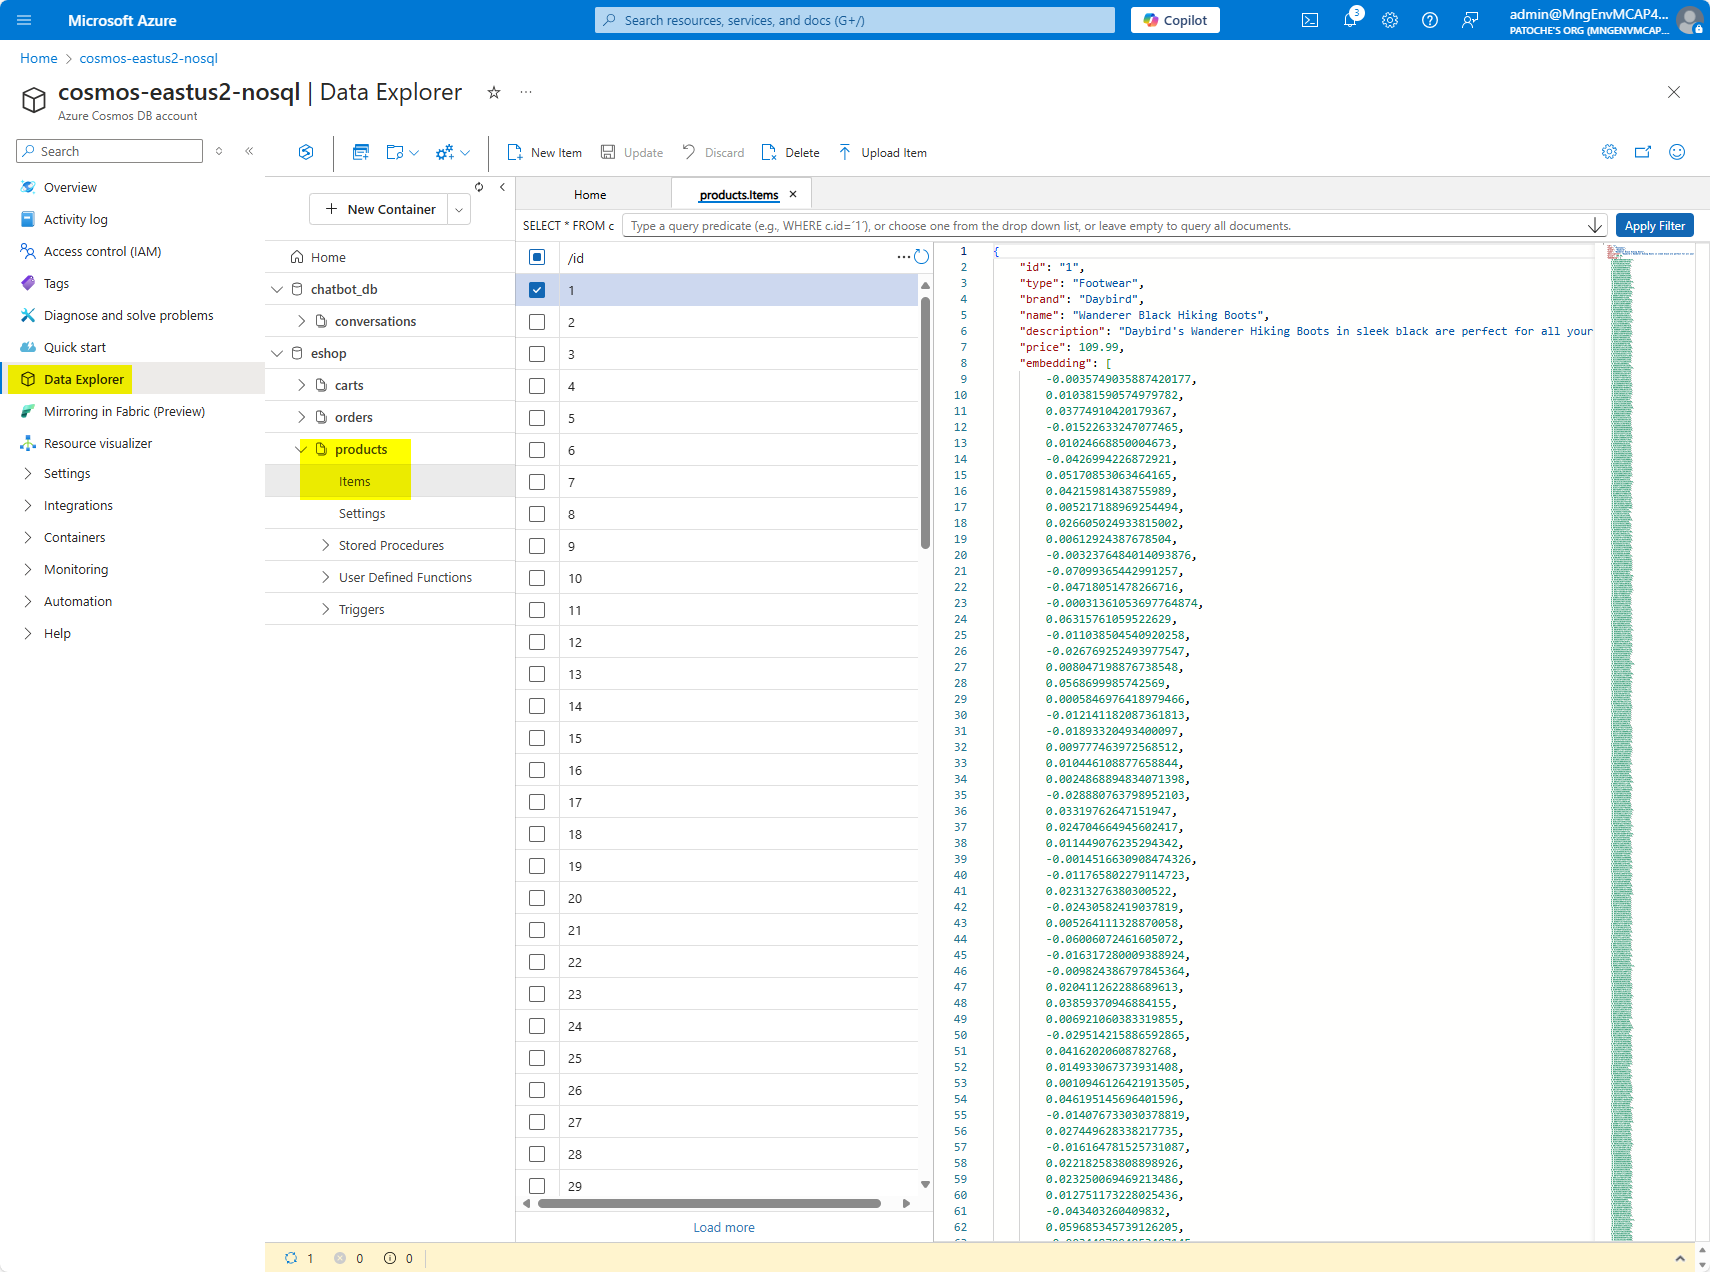
Azure Cosmos DB コンテナーが適切に設定されていることを確認します
デモの初期化:
開発用コンピュータで、mcpサーバーを起動します。
cd mcp-server
npx ts-node src/server.ts
フロントエンドプロジェクトを開始する
NextJS フロントエンド(ストアフロント)
cd nextjs
npm スタート
オプションとして、コマンドプロンプトを開き、次のコマンドでMCPインスペクターを起動します: npx -y @modelcontextprotocol/inspector
デモの手順:
http://localhost:3002に移動します。
右上隅のAIアシスタントアイコンをクリックします
「バックパックに興味があります」と入力します(商品リストが更新され、バックパックのリストが表示されます)
「注文を取得」と入力します(注文リストが更新されます)
This server cannot be deployed
GibsonAI MCP server: manage your databases with natural language
MCP server unifying ERPs, CRMs, APIs and knowledge base for Claude, ChatGPT and Gemini.
Text-to-SQL MCP server: read-only queries on PostgreSQL, MySQL and SQL Server with your real schema
Official Microsoft MCP Server to query Microsoft Entra data using natural language