
Allows for the monitoring and analysis of network traffic through Charles Proxy, enabling agents to capture real-time traffic, inspect historical recordings, filter requests by host or status, and view detailed request/response data.
Click on "Install Server".
Wait a few minutes for the server to deploy. Once ready, it will show a "Started" state.
In the chat, type
@followed by the MCP server name and your instructions, e.g., "@Charles MCP Servershow me a summary of the latest live network traffic"
That's it! The server will respond to your query, and you can continue using it as needed.
Here is a step-by-step guide with screenshots.
Charles MCP Server
English README | Tool Contract
Charles MCP Server 用于把 Charles Proxy 接入 MCP 客户端,让 agent 可以稳定地读取实时流量、分析历史录包,并在需要时再展开单条请求细节。
它解决的核心问题只有三个:
录制还在进行时,agent 也能持续读取当前 session 的增量流量
live 与 history 统一走结构化分析,不再让 agent 直接消费原始抓包字典
默认使用 summary-first 输出,先看热点与摘要,再 drill-down 到单条 detail
快速开始
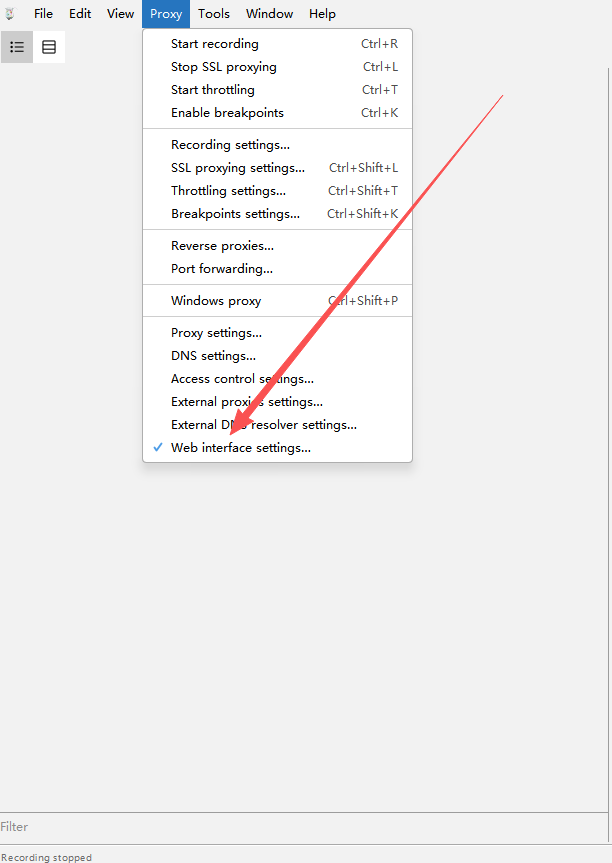
1. 开启 Charles Web Interface
在 Charles 中依次进入:Proxy -> Web Interface Settings
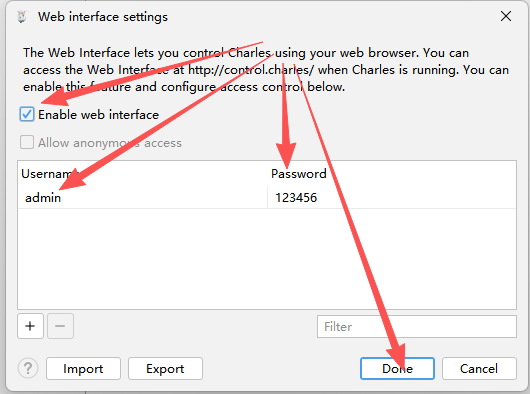
请确认:
勾选
Enable web interface用户名为
admin密码为
123456
菜单位置示意:
设置窗口示意:
2. 安装并配置到 MCP 客户端
无需 clone 仓库,无需手动创建虚拟环境。需要先安装 uv。
Claude Code CLI
claude mcp add-json charles '{
  "type": "stdio",
  "command": "uvx",
  "args": ["charles-mcp"],
  "env": {
    "CHARLES_USER": "admin",
    "CHARLES_PASS": "123456",
    "CHARLES_MANAGE_LIFECYCLE": "false"
  }
}'
Claude Desktop / Cursor / 通用 JSON 配置
{
  "mcpServers": {
    "charles": {
      "command": "uvx",
      "args": ["charles-mcp"],
      "env": {
        "CHARLES_USER": "admin",
        "CHARLES_PASS": "123456",
        "CHARLES_MANAGE_LIFECYCLE": "false"
      }
    }
  }
}
Codex CLI
[mcp_servers.charles]
command = "uvx"
args = ["charles-mcp"]

[mcp_servers.charles.env]
CHARLES_USER = "admin"
CHARLES_PASS = "123456"
CHARLES_MANAGE_LIFECYCLE = "false"
让 AI 自动安装
将以下提示词复制粘贴给任意 AI agent(Claude Code、ChatGPT、Gemini CLI、Cursor Agent 等),agent 会自动完成安装和配置:
Install the "charles-mcp" MCP server and configure it for my MCP client. Follow these steps exactly:

Step 1 — Detect OS:
  Determine if this machine runs Windows, macOS, or Linux.

Step 2 — Ensure uv is installed:
  Run: uv --version
  If the command fails (uv not found):
    - macOS/Linux: run: curl -LsSf https://astral.sh/uv/install.sh | sh
    - Windows: run: powershell -ExecutionPolicy ByPass -c "irm https://astral.sh/uv/install.ps1 | iex"
  After installing, verify uv works: uv --version

Step 3 — Detect which MCP client is installed:
  Check in this order and use the FIRST match:

  a) Claude Code — run: claude --version
     If it succeeds, run this command and skip to Step 5:
       claude mcp add-json charles '{"type":"stdio","command":"uvx","args":["charles-mcp"],"env":{"CHARLES_USER":"admin","CHARLES_PASS":"123456","CHARLES_MANAGE_LIFECYCLE":"false"}}'

  b) Claude Desktop — check if config file exists:
     - macOS:   ~/Library/Application Support/Claude/claude_desktop_config.json
     - Windows: %APPDATA%\Claude\claude_desktop_config.json
     - Linux:   ~/.config/Claude/claude_desktop_config.json

  c) Cursor — check if any of these exist:
     - ~/.cursor/mcp.json
     - .cursor/mcp.json (in current project)

  d) Windsurf — check if exists:
     - ~/.codeium/windsurf/mcp_config.json

  If none detected, ask the user which client they use.

Step 4 — Write config (for clients b/c/d):
  The config entry to add is:
    "charles": {
      "command": "uvx",
      "args": ["charles-mcp"],
      "env": {
        "CHARLES_USER": "admin",
        "CHARLES_PASS": "123456",
        "CHARLES_MANAGE_LIFECYCLE": "false"
      }
    }

  IMPORTANT: If the config file already exists, read it first, parse the JSON,
  add the "charles" key inside "mcpServers" (create "mcpServers" if absent),
  and write back. Do NOT overwrite other existing MCP server entries.
  If the file does not exist, create it with:
    { "mcpServers": { "charles": { ... } } }

Step 5 — Verify:
  Run: uvx charles-mcp
  Wait 3 seconds then terminate the process.
  If it starts without import errors, the installation is successful.

Step 6 — Report:
  Print: "charles-mcp installed successfully. Please restart your MCP client to load the new server."
  Also mention that Charles Proxy must be running with Web Interface enabled (Proxy → Web Interface Settings, username: admin, password: 123456).
前置条件
Python 3.10+
本机已启动 Charles Proxy
Charles Web Interface 已启用
Charles 代理默认监听
127.0.0.1:8888
推荐默认保持 CHARLES_MANAGE_LIFECYCLE=false。除非你明确希望 MCP server 接管 Charles 生命周期,否则不要让它在退出时关闭你的 Charles 进程。
环境变量
变量 | 默认值 | 说明 |
|
| Charles Web Interface 用户名 |
|
| Charles Web Interface 密码 |
|
| Charles 代理主机 |
|
| Charles 代理端口 |
| 自动探测 | Charles 配置文件路径 |
|
| 控制面 HTTP 超时秒数 |
|
| 有界录制最大时长 |
|
| 是否由 MCP server 管理 Charles 启停 |
推荐使用路径
实时分析
start_live_capturegroup_capture_analysisquery_live_capture_entriesget_traffic_entry_detailstop_live_capture
这条路径的目标是先用最少 token 找到热点,再按需展开单条请求。
历史分析
list_recordingsanalyze_recorded_trafficgroup_capture_analysis(source="history")get_traffic_entry_detail
这条路径适合先浏览录包,再对结构化 summary 做筛选和 drill-down。
当前版本重点变化
read_live_capture与peek_live_capture现在只返回路由级摘要字段,例如host、method、path、status,不再直接抛出完整原始 Charles entry,避免在实时轮询时快速打满上下文。query_live_capture_entries改为只读分析入口,不会推进 live cursor。你可以基于同一个capture_id反复换过滤条件查询,而不会把历史增量“消费掉”。analyze_recorded_traffic和query_live_capture_entries的 summary 项会显式返回matched_fields与match_reasons,便于 agent 解释“为什么这条流量被选中”。get_traffic_entry_detail默认include_full_body=false、max_body_chars=2048。如果 detail 估算输出超过约 12,000 字符,会在warnings中提示缩小范围或关闭 full body。detail / summary 输出会自动剥离
null值,并隐藏header_map、parsed_json、parsed_form、lower_name等内部字段;需要查看头信息时请使用headers列表。
工具总览
README 只覆盖推荐使用的主流程工具。兼容保留入口不在本文档中展开。
Live capture tools
工具 | 作用 | 何时使用 |
| 启动或接管当前 live capture,并返回 | 开始实时观察前 |
| 按 cursor 增量读取 live capture,并只返回紧凑路由摘要 | 连续消费新增流量、只想先看 host/path/status 时 |
| 预览新增流量但不推进 cursor,并只返回紧凑路由摘要 | 想先看一眼而不改变读取进度时 |
| 结束 capture,并在需要时持久化快照 | 收尾或导出本次实时抓包时 |
| 对 live capture 输出结构化 summary,且不推进 cursor | 想从实时流量里反复筛关键请求时 |
Analysis tools
工具 | 作用 | 何时使用 |
| 对 live 或 history 结果聚合分组 | 先看热点 host、path、status 时 |
| 返回分类统计结果 | 想快速知道 API、静态资源、错误流量占比时 |
| 读取单条 entry 的 detail,并在响应过大时给出 warnings | 已经拿到目标 |
| 对指定录包或最新录包输出结构化 summary,并附带匹配原因 | 想分析历史 |
History tools
工具 | 作用 | 何时使用 |
| 列出当前已保存的录包文件 | 想先知道有哪些历史录包时 |
| 读取某个录包的原始快照 | 需要完整查看某个保存快照时 |
| 直接对最新录包做轻量过滤 | 需要快速查找 host、method、regex 命中时 |
Status and control tools
工具 | 作用 | 何时使用 |
| 查看 Charles 连接状态与当前 live capture 状态 | 怀疑连接异常或想确认 capture 是否仍在活动时 |
| 设置 Charles 弱网预设 | 需要模拟 3G / 4G / 5G / off 等网络条件时 |
| 恢复 Charles 配置并清理当前环境 | 需要回到干净环境时 |
关键使用约定
1. 默认返回原始数据
所有工具默认返回完整原始内容,不做脱敏处理。如果上层需要 masking,应由 MCP 客户端或 agent 自行处理。
2. 先 summary,再 detail
推荐先用 group_capture_analysis、query_live_capture_entries 或 analyze_recorded_traffic 确认目标,再调用 get_traffic_entry_detail。
默认不要一开始就请求 include_full_body=true。
3. 输出已针对 token 预算优化
所有 summary 和 detail 输出都经过了序列化瘦身:
header_map、parsed_json、parsed_form、lower_name等内部字段不再出现在输出中值为
null的字段在序列化时自动剥离detail 视图中
full_text存在时,冗余的preview_text会被移除
默认参数已调低以保护上下文窗口:
参数 | 旧默认 | 新默认 |
| 20 | 10 |
| 256 | 128 |
| 8 | 6 |
| 4096 | 2048 |
如需更大范围查看,仍可手动传入更高的值。
4. history detail 需要稳定 source identity
history summary 会返回 recording_path,live summary 会返回 capture_id。
对 get_traffic_entry_detail:
history 场景优先传
recording_pathlive 场景优先传
capture_id
5. stop_live_capture 的失败是可恢复的
stop_live_capture 有两个稳定结束态:
status="stopped":真正关闭完成status="stop_failed":短重试后仍失败,但 capture 仍保留
当返回 stop_failed 时,应同时关注:
recoverableactive_capture_preserved
如果结果是:
{
  "status": "stop_failed",
  "recoverable": true,
  "active_capture_preserved": true
}
说明当前 capture 仍然可继续读取、诊断、再次 stop,而不是已经被关闭。
开发
运行测试:
python -m pytest -q常用本地检查:
python charles-mcp-server.py
python -c "from charles_mcp.main import main; main()"
感谢支持
如果这个项目对你有帮助,欢迎请我喝杯咖啡,支持后续维护与迭代。
微信赞赏码

USDT-TRC20
TCudxn9ByCxPZHXLtvqBjFmLWXywBoicRs
更新日志
2026-03-27 (v2.0.1)
限制历史录包路径读取:历史快照相关入口现在只允许访问受管目录中的
.chlsj文件,避免通过工具接口读取任意本地 JSON 文件修复 live 扫描窗口:
query_live_capture_entries与相关 live 分析路径现在真正遵循scan_limit,不再静默只扫描一个很小的固定窗口修复 body 过滤漏报:
request_body_contains与response_body_contains不再只匹配截断后的 preview 文本,能正确覆盖更完整的请求与响应体调整运行时数据目录:安装环境默认改用用户状态目录保存快照与备份,避免把运行时数据写进包安装目录
发布
2.0.1:同步了以上修复,并已更新 GitHub 与 PyPI 版本
2026-03-13 (v2)
修复
lower_name校验崩溃:HeaderKV.lower_name添加默认值与自动计算 validator,解决get_traffic_entry_detail输出校验报错'lower_name' is a required property导致工具完全不可用的问题修复游标逻辑陷阱:
query_live_capture_entries改为只读分析(不再推进内部 cursor),避免 agent 反复调用后历史数据被"消费"、始终返回空列表的问题防止 Context 爆炸:
read_live_capture和peek_live_capture返回前自动将原始 entry 压缩为路由摘要(host/method/path/status),不再把完整 HTTP 请求/响应原文直接抛给大模型打破 Agent 死循环:以上三个修复共同消除了 agent 在实时分析时因 detail 崩溃 → 回退查询 → 游标已过无数据 → 不断重试的死循环模式
改善工具描述:所有 live/history 工具补充了使用指引、副作用说明和推荐调用路径
2026-03-13
Token 预算优化:序列化输出瘦身约 50%,解决多次
get_traffic_entry_detail后触发 Context limit reached 的问题header_map、parsed_json、parsed_form、lower_name标记为内部字段,不再出现在工具输出中TrafficQueryResult和TrafficDetailResult自动剥离null值detail 视图中
full_text存在时自动去除冗余的preview_text
降低默认参数:
max_items20→10、max_preview_chars256→128、max_headers_per_side8→6、max_body_chars4096→2048大响应预警:
get_traffic_entry_detail输出超过 12,000 字符时,在warnings中提示 agent 缩小请求范围
2026-03-11
移除已废弃的 redaction 体系:删除
include_sensitive参数和全部redactions_applied/redacted/sensitive_included字段,减少工具签名噪音修复
errors_only预设语义:该预设现在会自动注入has_error=True,只返回真正出错的流量HTTP 连接复用:
LiveCaptureService在 start → read → stop 全生命周期复用同一 HTTP 连接,减少高频轮询时的 TCP 开销entry_id 计算轻量化:从 JSON 全序列化改为管道拼接关键字段后 SHA1,避免对大 body 做不必要的序列化
另见
Resources
Unclaimed servers have limited discoverability.
Looking for Admin?
If you are the server author, to access and configure the admin panel.