
Provides interactive 3D globe visualizations and geocoding capabilities within AI-generated widgets.
Enables real-time data visualization and performance monitoring through interactive charts and dashboards.
Supports the rendering of complex 3D visualizations and interactive scenes directly within the AI host interface.
Click on "Install Server".
Wait a few minutes for the server to deploy. Once ready, it will show a "Started" state.
In the chat, type
@followed by the MCP server name and your instructions, e.g., "@MCP App Templateshow me the interactive carousel widget"
That's it! The server will respond to your query, and you can continue using it as needed.
Here is a step-by-step guide with screenshots.
MCP App Template

The AI-agent-first MCP App template. Built so coding agents (Claude Code, Codex, Cursor, ...) can modify, test, and go as far as possible autonomously - without human in the loop.
Works with any MCP Apps host: Claude, ChatGPT, VS Code, Goose, and many more to come.
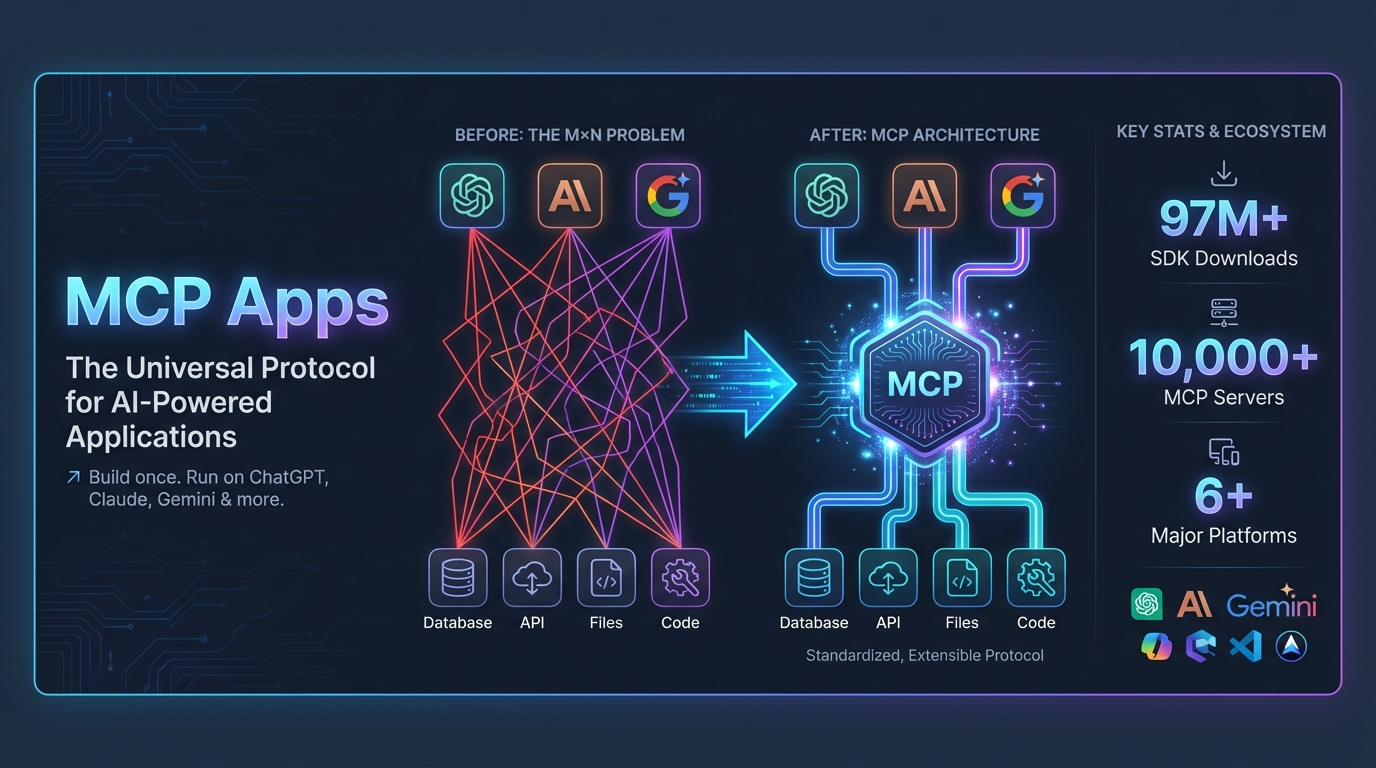
What are MCP Apps?
 credit: image generated using
MCP Apps are an extension to the Model Context Protocol that let MCP servers return interactive UIs -- React widgets rendered directly inside AI hosts like ChatGPT, Claude, VS Code, and so on... Instead of tools returning plain text, they return rich, interactive experiences displayed in sandboxed iframes within the conversation.
This is a platform shift. AI chatbots are becoming app platforms -- ChatGPT alone has 800M+ weekly users, and apps now run inside that distribution channel. One MCP server works across every host.
For more context, see the MCP Apps blog post and the protocol specification (SEP-1865).
Why This Template?
Most templates assume a human developer. This one is designed for AI agents to work as much as possible autonomously:
1. Orthogonal Test Suite
~450 tests verify infrastructure (MCP Apps compliance, protocol format, accessibility) plus 12 browser tests that render widgets in real Chromium. Tests are auto-discovered per widget (input validation, build output, browser rendering) — you never write them, they appear automatically when you add a widget. Modify widgets, change data, add features — tests still pass. Automated grading generates reports with actionable FIX: hints to steer coding agents.
2. Hierarchical Documentation
AGENTS.md for quick onboarding → docs/README.md for a step-by-step building guide → deep docs covering MCP best practices, widget patterns, and complete SDK reference (llms-full.txt).
3. Automated Visual Testing
AI agents can test widgets and capture screenshots - no API key required:
Agents read /tmp/ui-test/screenshot.png to verify their changes work.
4. Zero-Config App Tester
Local app tester for manual testing - works instantly without API key via Puter.js. Add an OpenAI key for AI-in-the-loop testing.
5. Working Examples
12 production-ready widgets demonstrating state management, theming, 3D visualization, drag-and-drop, real-time monitoring, and more.
Demos
Claude Code autonomously building an app end-to-end from the template
https://github.com/user-attachments/assets/407393de-c9d8-4da3-b541-54b8b9a2d7dc
Showcase of widgets within ChatGPT
https://github.com/user-attachments/assets/f5877544-0dce-4c31-979e-50b5533f9a16
Quick Start
Tip: If you have uv installed, you can use uv pip install -e ".[dev]" for faster package installation, or simply run uv sync in the server directory.
Open the app tester: http://localhost:8000/assets/apptester.html
That's it! The app tester uses Puter.js for free AI - no API key required for manual testing.
Creating Your Own App
The template includes 12 example widgets. To start fresh with only the widgets you need:
The script:
Deletes widget directories from
src/andserver/widgets/Removes unused dependencies (three.js, framer-motion, chart.js, etc.)
Updates the lockfile and runs build + tests to verify
After running, add your own widgets following the Adding Your Own Widget section.
Local App Tester
The app tester lets you test widgets without deploying to a real MCP host. It works in two modes:
Zero-Config Mode (No API Key)
Just start the server and open the app tester - it works immediately:
The app tester automatically detects when no API key is configured and uses Puter.js - a free, browser-based AI service. This is perfect for:
Quick prototyping sessions
Demos and presentations
Manual testing without credentials
Note: Puter.js is only used in the local app tester. In production, your app connects to real MCP hosts (Claude, ChatGPT, etc.) which provide the AI.
Full Mode (With OpenAI API Key)
For production-quality testing with your preferred model:
Add your OpenAI API key to
.env:OPENAI_API_KEY=sk-...Optionally configure the model in
server/simulator_config.json:{ "model": "gpt-4o-mini", "mcp_server_url": "http://localhost:8000/mcp" }Restart the server and open the app tester
The app tester shows which mode is active in the header.
App Tester Features
Feature | Description |
Zero-config mode | Works instantly without any API key |
Inline widgets | Widgets appear in chat just like real MCP hosts |
Expand to fullscreen | Click the expand icon to view widgets fullscreen |
Theme toggle | Test light/dark mode |
MCP protocol | Uses the same MCP Apps protocol as real hosts |
Try prompts like "Show me a carousel of restaurants" or "Display a dashboard"
Test with Real MCP Hosts
Claude (Desktop or Web)
Expose your local server via a tunnel:
npx cloudflared tunnel --url http://localhost:8000 # or: ngrok http 8000 --host-header=rewriteAdd the tunnel URL as a custom connector in Claude settings
Ask: "Show me the boilerplate widget"
ChatGPT
Enable Developer Mode
Expose your local server via a tunnel:
npx cloudflared tunnel --url http://localhost:8000 # or: ngrok http 8000 --host-header=rewriteAdd connector in ChatGPT Settings → Connectors (tunnel URL +
/mcp)Ask: "Show me the boilerplate widget"
Note: The server disables DNS rebinding protection by default to support tunneling with random hostnames. For production deployments with a fixed domain, re-enable it in
server/main.py(TransportSecuritySettings).
MCP Apps Basic Host
For testing with the reference implementation:
How It Works
Widgets (
src/) - React/TypeScript UIs that render inside MCP hostsServer (
server/main.py) - Python MCP server that handles tool callsApp Tester (
internal/apptester/) - Local development UI with Puter.js fallbackAssets (
assets/) - Built widget bundles (generated bypnpm run build)
Included Examples
Widget | Description |
| Basic interactive card with state management |
| Horizontal scrolling cards |
| Vertical list with thumbnails |
| Image grid with lightbox |
| Stats and metrics display |
| 3D visualization (Three.js) |
| Task manager with drag-and-drop |
| E-commerce cart flow |
| QR code generator with customization |
| Real-time CPU & memory monitoring (Chart.js) |
| SaaS financial projections with interactive sliders |
| Interactive 3D globe with geocoding (CesiumJS) |
These widgets are adapted from the OpenAI Apps SDK Examples and MCP Apps Examples.
Try them: "Show me the carousel", "Show me the dashboard", etc.
Adding Your Own Widget
Create
src/my-widget/index.tsxandsrc/my-widget/App.tsx(entry point must targetmy-widget-root)Create
server/widgets/my_widget.pywithWIDGET,INPUT_MODEL, andhandle()exports (auto-discovered)Run
pnpm run build && pnpm run testTest in the app tester:
http://localhost:8000/assets/apptester.html
When customizing this template for your own app, follow the guidelines in docs/mcp-development-guidelines.md for tool naming conventions, descriptions, and error handling best practices.
Testing
Tests are orthogonal to your app. They verify:
MCP Apps protocol compliance
SDK format requirements
Build output structure
React hooks work correctly
Widgets render without errors in real browsers
They don't verify your specific widgets, data, or business logic. Modify anything - tests still pass.
Browser Compliance Tests
Browser tests run each widget in a real Chromium browser to verify:
No JavaScript errors when rendering
Widget renders visible content
Works in both light and dark themes
No unhandled promise rejections
Images have alt text (accessibility)
No duplicate HTML IDs
All callTool invocations from widgets are callable on the server
Text contrast meets WCAG guidelines (warnings only)
Interactive elements are keyboard accessible (warnings only)
Setup (one-time):
Run:
Tests skip gracefully if browser dependencies aren't installed, so they won't break CI pipelines that lack browser support.
Automated Grading
The test suite includes automated grading against best practices. After running tests, check these reports:
MCP Best Practices (server/tests/mcp_best_practices_report.txt):
Grades against MCP server guidelines - tool naming, descriptions, error handling.
MCP App Guidelines (server/tests/mcp_app_guidelines_report.txt):
Grades against app design guidance - Know/Do/Show value, model-friendly outputs, ecosystem fit.
Output Quality (server/tests/output_quality_report.txt):
Grades tool output quality - response size limits, schema stability, null handling, ID consistency, boundary value handling.
Example report:
When a check fails, the report includes a FIX: hint explaining exactly how to resolve it - useful for AI agents improving the server.
Current limitation: The grading tests use heuristic checks (keyword matching, regex patterns, length thresholds) rather than LLM-based evaluation. This means some checks can produce false positives/negatives for edge cases. Upgrading to LLM-based test evaluation is on the roadmap — contributions welcome!
Automated UI Testing (for AI Agents)
AI coding agents can visually test widgets using the built-in UI test tool. This enables AI agents to verify their changes work correctly by examining screenshots.
Setup (One-time)
Two Testing Modes
1. Direct Mode (no API key) - Test specific tools directly:
This is the recommended mode for AI coding agents.
2. AI-in-the-loop Mode (requires OpenAI API key) - Full app tester with AI:
The AI receives your prompt, decides which widget to show, and the tool captures the result.
Output
Both modes save artifacts to /tmp/ui-test/:
screenshot.png- Visual capture of the rendered widgetdom.json- Structured data about what renderedconsole.log- Browser console output
AI agents can read the screenshot to verify widgets rendered correctly:
Example Workflow (Coding Agents)
Key APIs
Deployment
Local Development
No configuration needed - just run:
VPS / Remote Server
When running on a VPS or remote server, set the BASE_URL environment variable so widgets load correctly:
The server replaces the __BASE_URL__ placeholder at runtime, so you can rebuild once and deploy anywhere by just changing the environment variable.
Production
For production with a domain and HTTPS:
Deploy the Python server to any platform (Fly.io, Render, Railway, Cloud Run, etc.). Requirements: HTTPS, /mcp endpoint, SSE streaming support.
Roadmap
Planned features and improvements:
Authentication support - Apps that require user login and secure sessions
Agentic commerce - Enable purchases and transactions within AI conversations
LLM-based test evaluation - Use LLMs to determine test pass/fail for complex verifications
Interactive browser tests - Browser tests that simulate user interactions with widgets
Multi-step agentic workflows - Support agent loops chaining multiple tool calls
Have ideas? Open an issue or PR.
Resources
MCP Apps Protocol - Official MCP Apps specification (see also local copies:
docs/mcp-apps-docs.md,docs/mcp-apps-specs.mdx)MCP Protocol - Model Context Protocol
OpenAI Apps SDK - OpenAI's implementation
Puter.js - Powers the app tester's zero-config mode (free for dev/testing)
Acknowledgments
Based on OpenAI's Apps SDK Examples and the MCP Apps Examples.
The qr, system-monitor, scenario-modeler, and map widgets are ported from modelcontextprotocol/ext-apps (MIT License).
License
MIT