
QGISMCP - QGIS 모델 컨텍스트 프로토콜 통합
QGISMCP는 모델 컨텍스트 프로토콜(MCP)을 통해 QGIS 와 Claude AI를 연결하여 Claude가 QGIS와 직접 상호 작용하고 제어할 수 있도록 합니다. 이러한 통합을 통해 신속한 프로젝트 생성, 레이어 로딩, 코드 실행 등이 가능합니다.
이 프로젝트는 Siddharth Ahuja 의 BlenderMCP 프로젝트를 기반으로 합니다.
특징
양방향 통신 : 소켓 기반 서버를 통해 Claude AI를 QGIS에 연결합니다.
프로젝트 조작 : QGIS에서 프로젝트를 생성, 로드, 저장합니다.
레이어 조작 : 프로젝트에 벡터 또는 래스터 레이어를 추가하거나 제거합니다.
처리 실행 : 처리 알고리즘을 실행합니다( Processing Toolbox ).
코드 실행 : Claude를 사용하여 QGIS에서 임의의 Python 코드를 실행합니다. 매우 강력하지만, 이 도구를 사용할 때는 매우 주의해야 합니다.
Related MCP server: QGISMCP
구성 요소
이 시스템은 두 가지 주요 구성 요소로 구성됩니다.
QGIS 플러그인 : QGIS 내에 소켓 서버를 생성하여 명령을 수신하고 실행하는 QGIS 플러그인입니다.
MCP 서버 : 모델 컨텍스트 프로토콜을 구현하고 QGIS 플러그인에 연결하는 Python 서버입니다.
설치
필수 조건
QGIS 3.X(3.22에서만 테스트됨)
클라우드 데스크톱
Python 3.10 이상
uv 패키지 관리자:
Mac을 사용 중이라면 uv를 설치하세요.
지엑스피1
Windows PowerShell에서
그렇지 않은 경우 설치 지침은 해당 웹사이트에 있습니다: uv 설치
⚠️ UV 설치 전 진행하지 마세요
다운로드 코드
이 저장소를 컴퓨터에 다운로드하세요. 다음을 사용하여 복제할 수 있습니다.
QGIS 플러그인
qgis_mcp_plugin 폴더와 그 내용을 QGIS 프로필 플러그인 폴더에 복사해야 합니다.
QGIS에서 Settings -> User profiles -> Open active profile folder 로 가서 프로필 폴더를 가져올 수 있습니다. 그런 다음 Python/plugins 로 가서 qgis_mcp_plugin 폴더를 붙여넣습니다.
Windows 컴퓨터에서 플러그인 폴더는 일반적으로
C:\Users\USER\AppData\Roaming\QGIS\QGIS3\profiles\default\python\plugins에 있고 MacOS에서는~/Library/Application\ Support/QGIS/QGIS3/profiles/default/python/plugins
QGIS를 닫았다가 다시 엽니다. 메뉴 옵션 Plugins -> Installing and Managing Plugins 에서 " All " 탭을 선택하고 "QGIS MCP"를 검색한 후 "QGIS MCP" 체크박스를 선택합니다.
데스크톱 통합을 위한 Claude
Claude > Settings > Developer > Edit Config > claude_desktop_config.json 으로 이동하여 다음을 포함합니다.
"개발자 탭"이나
claude_desktop_config.json찾을 수 없는 경우 이 문서 를 살펴보세요.
용법
연결 시작
QGIS에서
plugins->QGIS MCP->QGIS MCP로 이동합니다.
"서버 시작"을 클릭하세요

Claude와 함께 사용
Claude에서 구성 파일을 설정하고 서버가 QGIS에서 실행되면 QGIS MCP에 대한 도구가 있는 망치 아이콘이 표시됩니다.
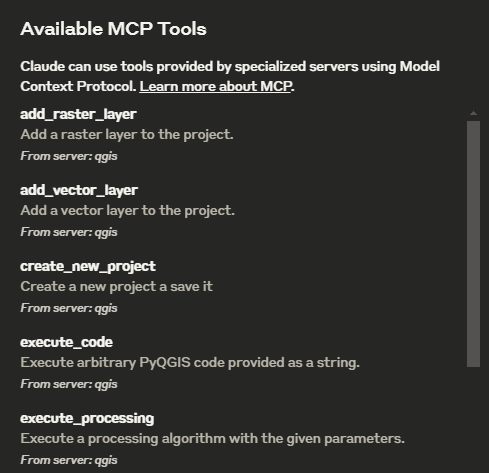
도구
ping- 서버 연결을 확인하는 간단한 ping 명령어get_qgis_info- 현재 설치에 대한 QGIS 정보를 가져옵니다.load_project- 지정된 경로에서 QGIS 프로젝트를 로드합니다.create_new_project- 새 프로젝트를 생성하고 저장합니다.get_project_info- 현재 프로젝트 정보 가져오기add_vector_layer- 프로젝트에 벡터 레이어를 추가합니다.add_raster_layer- 프로젝트에 래스터 레이어를 추가합니다.get_layers- 현재 프로젝트의 모든 레이어를 검색합니다.remove_layer- ID로 프로젝트에서 레이어를 제거합니다.zoom_to_layer- 지정된 레이어의 범위까지 확대get_layer_features- 선택적 제한을 사용하여 벡터 레이어에서 피처를 검색합니다.execute_processing- 주어진 매개변수로 처리 알고리즘을 실행합니다.save_project- 현재 프로젝트를 지정된 경로에 저장합니다.render_map- 현재 맵 뷰를 이미지 파일로 렌더링합니다.execute_code- 문자열로 제공된 임의의 PyQGIS 코드를 실행합니다.
예제 명령
데모 에 사용한 예는 다음과 같습니다.