---
url: "https://docs.portone.cloud/docs/admin-console"
title: "Create Payment Link via Dashboard"
---
## Payment Link Creation Documentation [Skip link to Payment Link Creation Documentation](https://docs.portone.cloud/docs/admin-console\#payment-link-creation-documentation)
Creating payment links on PortOne is a straightforward and flexible process. Payment links can be created manually through the Merchant Portal Dashboard or automatically via APIs. This document provides detailed instructions for both methods.
Payment-Link-Configuration

[Payment-Link-Configuration](https://www.loom.com/share/677718d2e4794ea5bc9dbc2842c2d6de?source=embed_watch_on_loom_cta "Payment-Link-Configuration")
3 min
17 views
0
[Open video in Loom](https://www.loom.com/share/677718d2e4794ea5bc9dbc2842c2d6de?source=embed_watch_on_loom_cta "Open video in Loom")
1.2×
3 min⚡️3 min 45 sec3 min2 min 30 sec2 min1 min 46 sec1 min 30 sec1 min 12 sec
Your user agent does not support the HTML5 Video element.

[Payment-Link-Configuration](https://www.loom.com/share/677718d2e4794ea5bc9dbc2842c2d6de?source=embed_watch_on_loom_cta "Payment-Link-Configuration")
## Steps to Create and Manage a Payment Link [Skip link to Steps to Create and Manage a Payment Link](https://docs.portone.cloud/docs/admin-console\#steps-to-create-and-manage-a-payment-link)
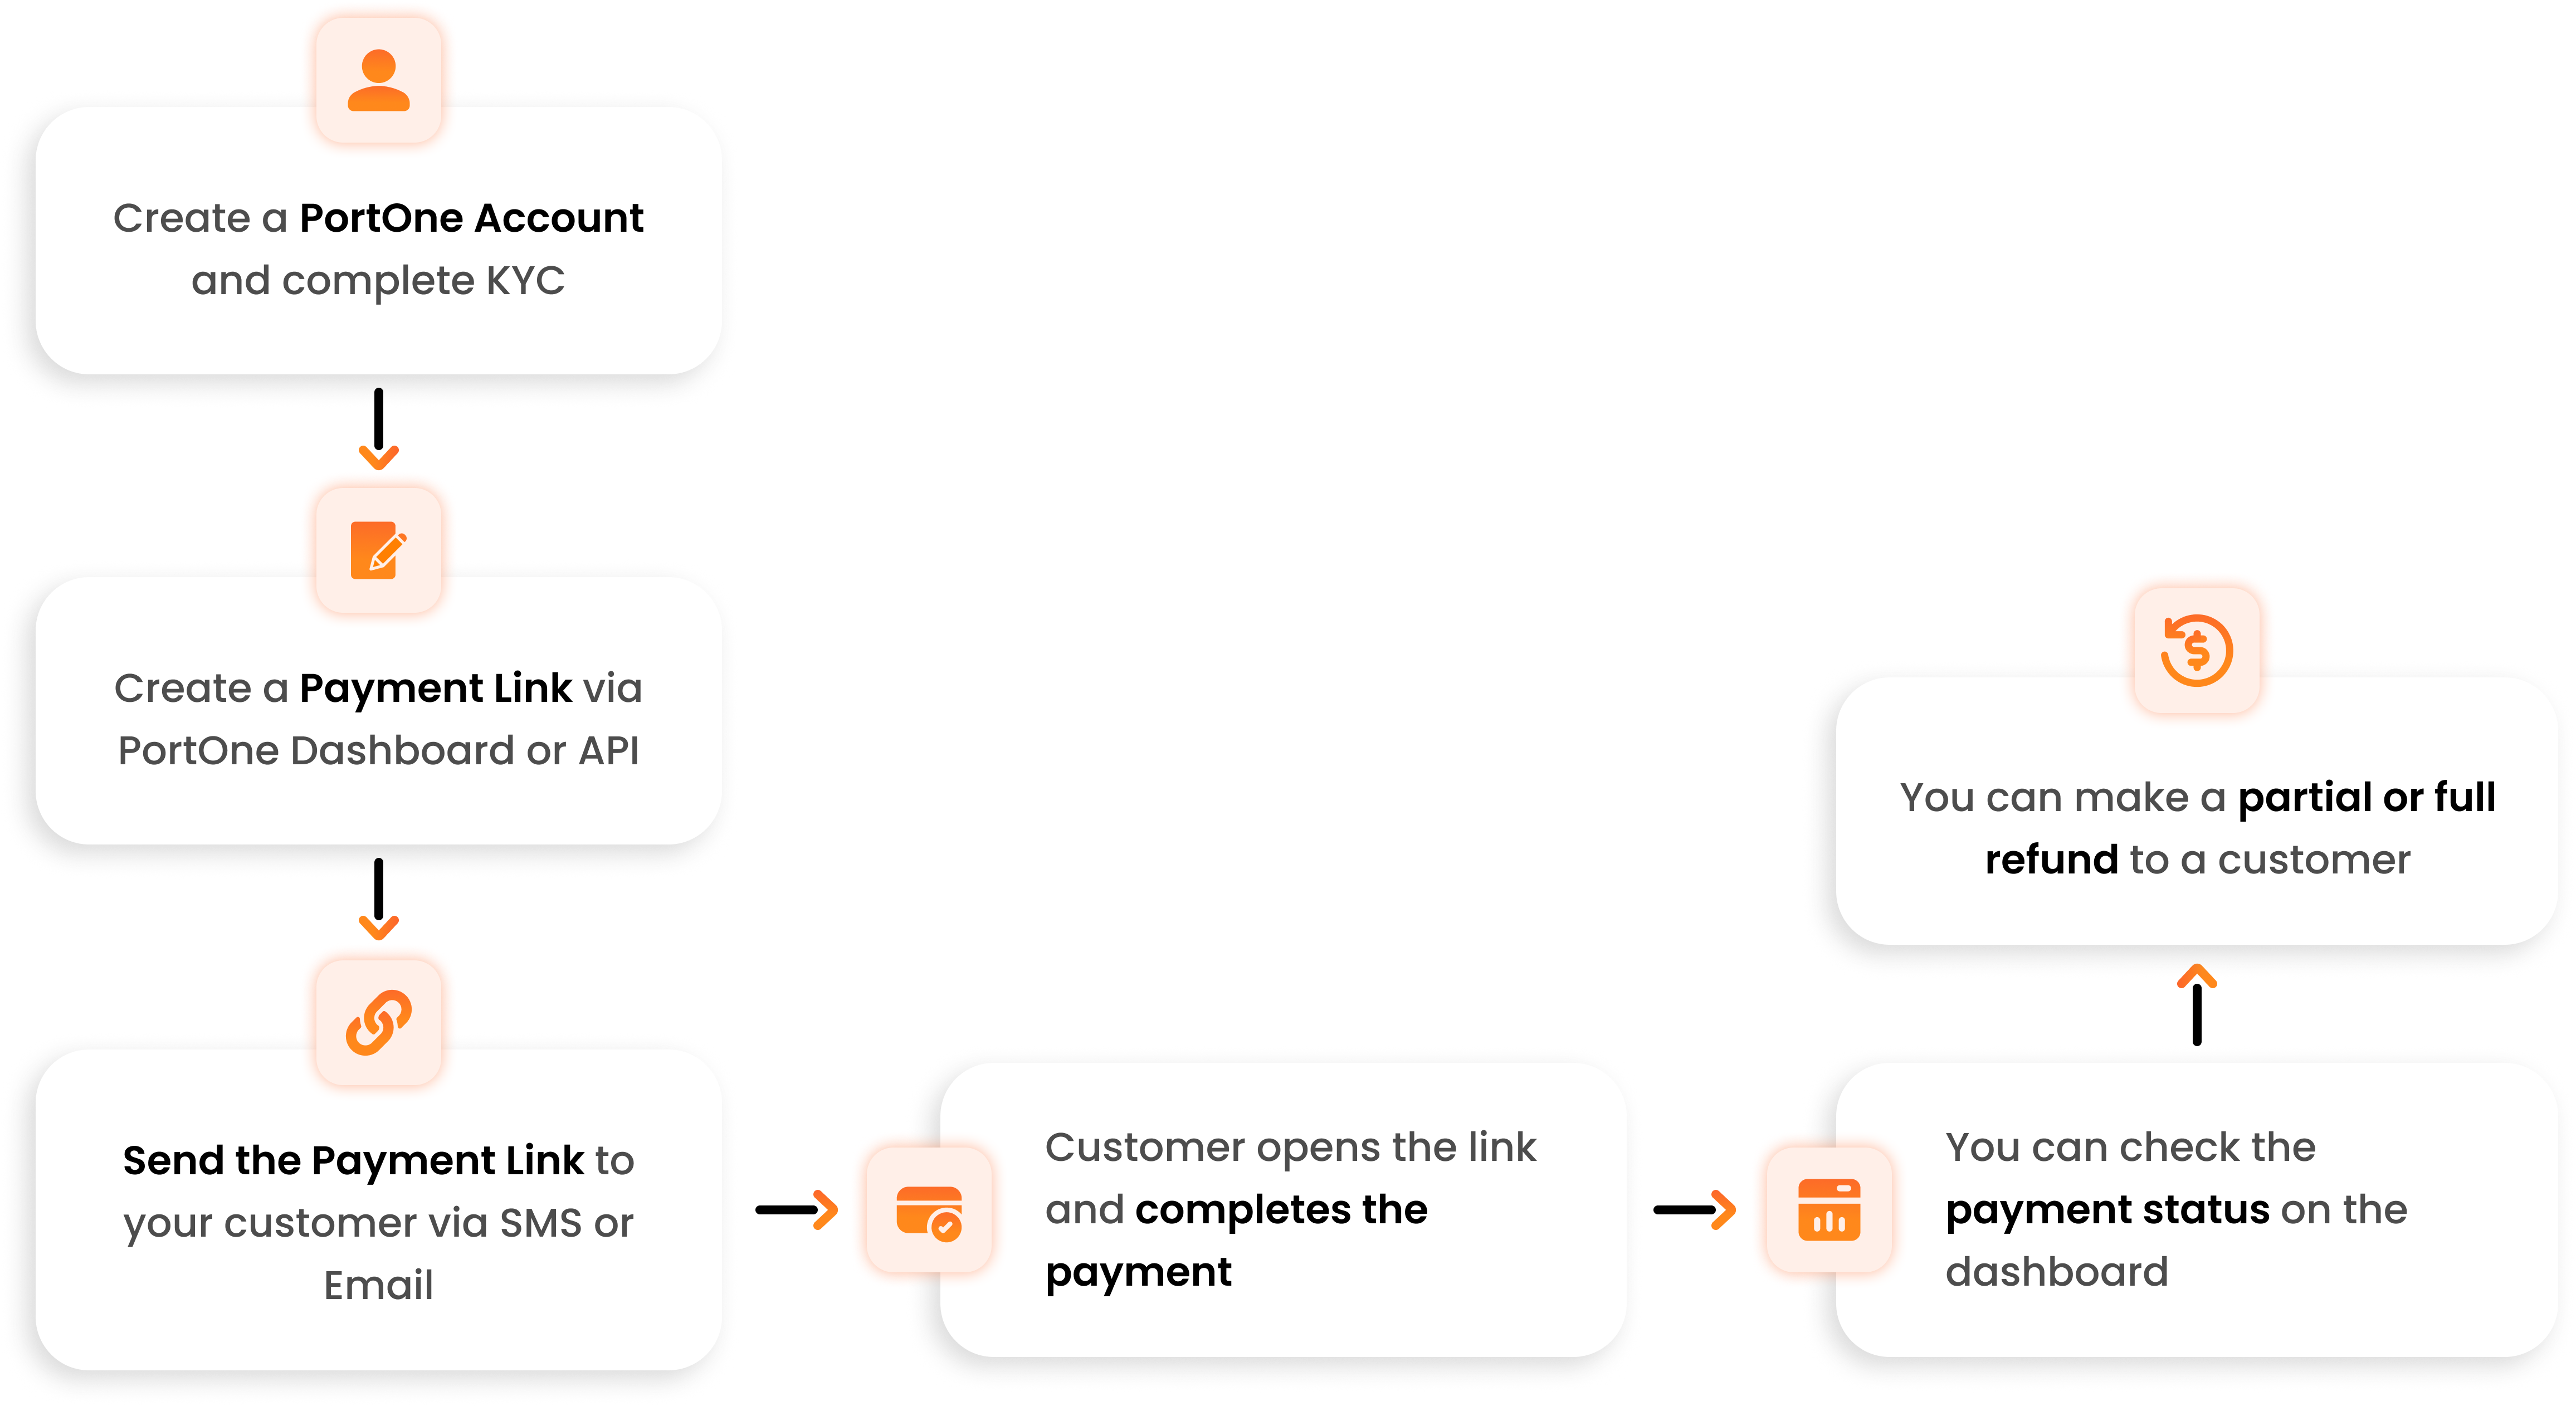
### 1\. Create a PortOne Account and Complete KYC [Skip link to 1. Create a PortOne Account and Complete KYC](https://docs.portone.cloud/docs/admin-console\#1-create-a-portone-account-and-complete-kyc)
Before you can create a payment link, you need to:
- Sign up for a PortOne account.
- Complete the KYC (Know Your Customer) process.
Completing KYC is mandatory to enable financial transactions on the platform.
### 2\. Create a Payment Link [Skip link to 2. Create a Payment Link](https://docs.portone.cloud/docs/admin-console\#2-create-a-payment-link)
Once your account is set up, you can create a payment link:
- Log in to the PortOne Dashboard, or use the API to generate a payment link.
- Specify the payment details (such as amount, currency, and description) when creating the link.
The payment link serves as a URL that directs customers to a secure payment page.
### 3\. Send the Payment Link to Customers [Skip link to 3. Send the Payment Link to Customers](https://docs.portone.cloud/docs/admin-console\#3-send-the-payment-link-to-customers)
After creating the payment link, you can share it with your customers:
- Send the payment link to the customer via SMS or Email.
This step ensures that customers receive the payment link in a convenient way, allowing them to complete their payment.
### 4\. Customer Completes the Payment [Skip link to 4. Customer Completes the Payment](https://docs.portone.cloud/docs/admin-console\#4-customer-completes-the-payment)
The customer opens the payment link, which directs them to the payment page:
- On this page, the customer can review the payment details and complete the transaction.
Upon successful payment, you’ll be able to see the transaction status on the dashboard.
### 5\. Check Payment Status [Skip link to 5. Check Payment Status](https://docs.portone.cloud/docs/admin-console\#5-check-payment-status)
Once the payment is completed, you can check the status directly on the PortOne dashboard. The payment status provides insight into whether the payment was successful, pending, or failed.
### 6\. Process Refunds (Partial or Full) [Skip link to 6. Process Refunds (Partial or Full)](https://docs.portone.cloud/docs/admin-console\#6-process-refunds-partial-or-full)
If necessary, you can issue refunds for completed payments:
- You have the option to issue either a partial or full refund to the customer.
Refund management can also be done from the PortOne Dashboard, allowing you to handle customer requests efficiently.
## Creating a Payment Link via PortOne Console (Manual) [Skip link to Creating a Payment Link via PortOne Console (Manual)](https://docs.portone.cloud/docs/admin-console\#creating-a-payment-link-via-portone-console-manual)
To create a Payment Link in the PortOne Dashboard, follow these steps:
1. Log in to the PortOne Dashboard.
2. Navigate to the PAYMENT LINKS section via the Left Navigation bar.
3. Click on + Create Payment Link.
#### Enter Payment Link Details [Skip link to Enter Payment Link Details](https://docs.portone.cloud/docs/admin-console\#enter-payment-link-details)
In the Payment Link modal, fill in the required details:
- **Amount (Mandatory)** : Enter the amount.
- **Currency (Mandatory)**: Select the currency for the Payment Link. Note: Payments can be accepted in international currencies.
- **Description (Optional)** : Provide a description for the payment. Example: "School fees for Nyugen Phan - Class XII B".
- **Customer Email ID (Optional)**: Enter the customer's email. Example: [nyugen.phan@example.com](mailto:nyugen.phan@example.com).
- **Customer Phone Number (Optional)**: Enter the customer's phone number. Example: 9876543210.
- **Notify via Email** (Optional): Select this option to send the Payment Link to the customer via email. (Available only if the customer's email is provided).
- **Notify via SMS** (Optional): Select this option to send the Payment Link to the customer via SMS. (Available only if the customer's phone number is provided).
- **Send Immediately** (Optional): Select this option to send the Payment Link to the customer via SMS. (Available only if the customer's phone number is provided).
- **Schedule Link** (Optional) Set Set the date and time when the Payment Link should be sent to the customer through configured email or SMS.
- **Custom Link Reference** (Optional): Provide a unique reference number for the link. Example: mypaylink\_Adbb001.
- **Link Expiry** (Optional) Set the date and time when the Payment Link should expire, By default link does not expire.
- **Notes** (Optional): Provide multiple internal notes for the Payment Link—example: Title (key) - Acme Corp.
#### Review all the entered details. [Skip link to Review all the entered details.](https://docs.portone.cloud/docs/admin-console\#review-all-the-entered-details)
Click the Create Payment Link to finalize the process.
#### Copy and Share [Skip link to Copy and Share](https://docs.portone.cloud/docs/admin-console\#copy-and-share)
Copy the generated payment link and send it to your customers through their preferred communication channels.
Scribe \| Embed Creating\_a\_Payment\_Link\_in\_Portone\_Cloud\_\_OKMEoGj6ROynYCsfVCqRWg


# Creating a Payment Link
Step 0 of 26
Get Started
Made with

[open scrolling step version in new tab for improved accessibility](https://scribehow.com/shared/Creating_a_Payment_Link__OKMEoGj6ROynYCsfVCqRWg)
By following these steps, you can easily create a Payment Link in the PortOne Dashboard. For additional support or queries, please refer to the PortOne support resources or contact customer support.
