# Vapor - Resources/Databases
*Source: https://docs.vapor.build/resources/databases*
---
- [Community](https://discord.com/invite/laravel)
- [Blog](https://blog.laravel.com)
##### Get Started
- [Introduction](/introduction)
##### Projects
- [The Basics](/projects/the-basics)
- [Environments](/projects/environments)
- [Deployments](/projects/deployments)
- [Development](/projects/development)
- [Domains](/projects/domains)
##### Resources
- [Queues](/resources/queues)
- [Storage](/resources/storage)
- [Networks](/resources/networks)
- [Databases](/resources/databases)
- [Caches](/resources/caches)
- [Logs](/resources/logs)
##### Integrations
- [Sentry](/integrations/sentry)
##### Other
- [Abuse](/abuse)
On this page
- [Introduction](#introduction)
- [Creating Databases](#creating-databases)
- [The Default Database](#the-default-database)
- [Database Types](#database-types)
- [Fixed Size Databases](#fixed-size-databases)
- [Serverless Databases](#serverless-databases)
- [Quick Development Databases](#quick-development-databases)
- [Using Databases](#using-databases)
- [Connecting To Private Databases Locally](#connecting-to-private-databases-locally)
- [Jumpboxes + GUI Tool](#jumpboxes-%2B-gui-tool)
- [Shell Command](#shell-command)
- [Existing Databases](#existing-databases)
- [Database Proxies](#database-proxies)
- [Database Users](#database-users)
- [Scaling Databases](#scaling-databases)
- [Restoring Databases](#restoring-databases)
- [Upgrading Databases](#upgrading-databases)
- [Metrics](#metrics)
- [Alarms](#alarms)
- [Deleting Databases](#deleting-databases)
Resources
# Databases
Managing databases within Laravel Vapor.
## [](#introduction) Introduction
Vapor allows you to easily create and manage RDS and Aurora Serverless databases directly from the Vapor UI or using the Vapor CLI. **Database backups are automatically performed and you may restore a database to any point in time (down to the second) within the backup retention window.**
## [](#creating-databases) Creating Databases
You may create databases using the Vapor UI or using the `database` CLI command. When using the CLI command, the command will prompt you for more details about the database such as its desired performance class and maximum storage space.
Copy
Ask AI
```
vapor database my-application-db
```
### [](#the-default-database) The Default Database
Vapor will automatically create a “vapor” database within each database instance that you create. You are free to create additional databases using the database management tool of your choice.
### [](#database-types) Database Types
When creating Vapor databases, you may choose from two different types of databases: fixed size and auto-scaling serverless databases.
#### [](#fixed-size-databases) Fixed Size Databases
Fixed sized databases are RDS MySQL 5.7 / RDS MySQL 8 / Postgres 17 databases that have a fixed amount of RAM and disk space. These databases may be scaled up or down after creation, but not without incurring downtime.
In addition, these databases may be publicly accessible (with a long, random password automatically assigned by Vapor) or private. Private databases may not typically be accessed from the public Internet. To access them from your local machine, you will need to create a Vapor jumpbox.
Vapor will place any application that uses a private database in a network with a [NAT Gateway](/resources/networks#nat-gateways). Later, if you no longer plan to use the database and are using no other private resources from your application, you may remove the NAT Gateway from your network via the network’s management screen.
#### [](#serverless-databases) Serverless Databases
Serverless databases are auto-scaling Aurora MySQL 5.7 / MySQL 8.0 / Postgres 11 / Postgres 16 databases which do not have a fixed amount of RAM or disk space. Instead, these databases automatically scale based on the needs of your application. At their smallest scale, they are allocated 1GB of RAM.
AWS requires all serverless databases to be private, meaning Vapor will place any application that uses them in a network with a [NAT Gateway](/resources/networks#nat-gateways). If you no longer plan to use a serverless database and are using no other private resources from your application, you may remove the NAT Gateway from your network via the network’s management screen.
### [](#quick-development-databases) Quick Development Databases
To quickly create a publicly accessible database of the smallest performance class, you may use the `--dev` flag when creating your database. These small, affordable databases are perfect for testing or staging environments:
Copy
Ask AI
```
vapor database my-test-database --dev
```
## [](#using-databases) Using Databases
To attach a database to an environment, add a `database` key to the environment’s configuration in your `vapor.yml` file and deploy your application. The value of this key should be the name of the database. **When the environment is deployed, Vapor will automatically inject the necessary Laravel environment variables for connecting to the database, allowing your application to start using it immediately:**
vapor.yml
Copy
Ask AI
```
id: 3
name: vapor-app
environments:
production:
database: my-application-db
build:
- 'composer install --no-dev'
deploy:
- 'php artisan migrate --force'
```
### [](#connecting-to-private-databases-locally) Connecting To Private Databases Locally
If you would like to connect to your private database from your local machine, you can either use a Vapor [jumpbox](/resources/networks#jumpboxes) in combination with a GUI database management tool or the `database:shell` CLI command. Jumpboxes are very small, SSH accessible servers that are placed within your private network.
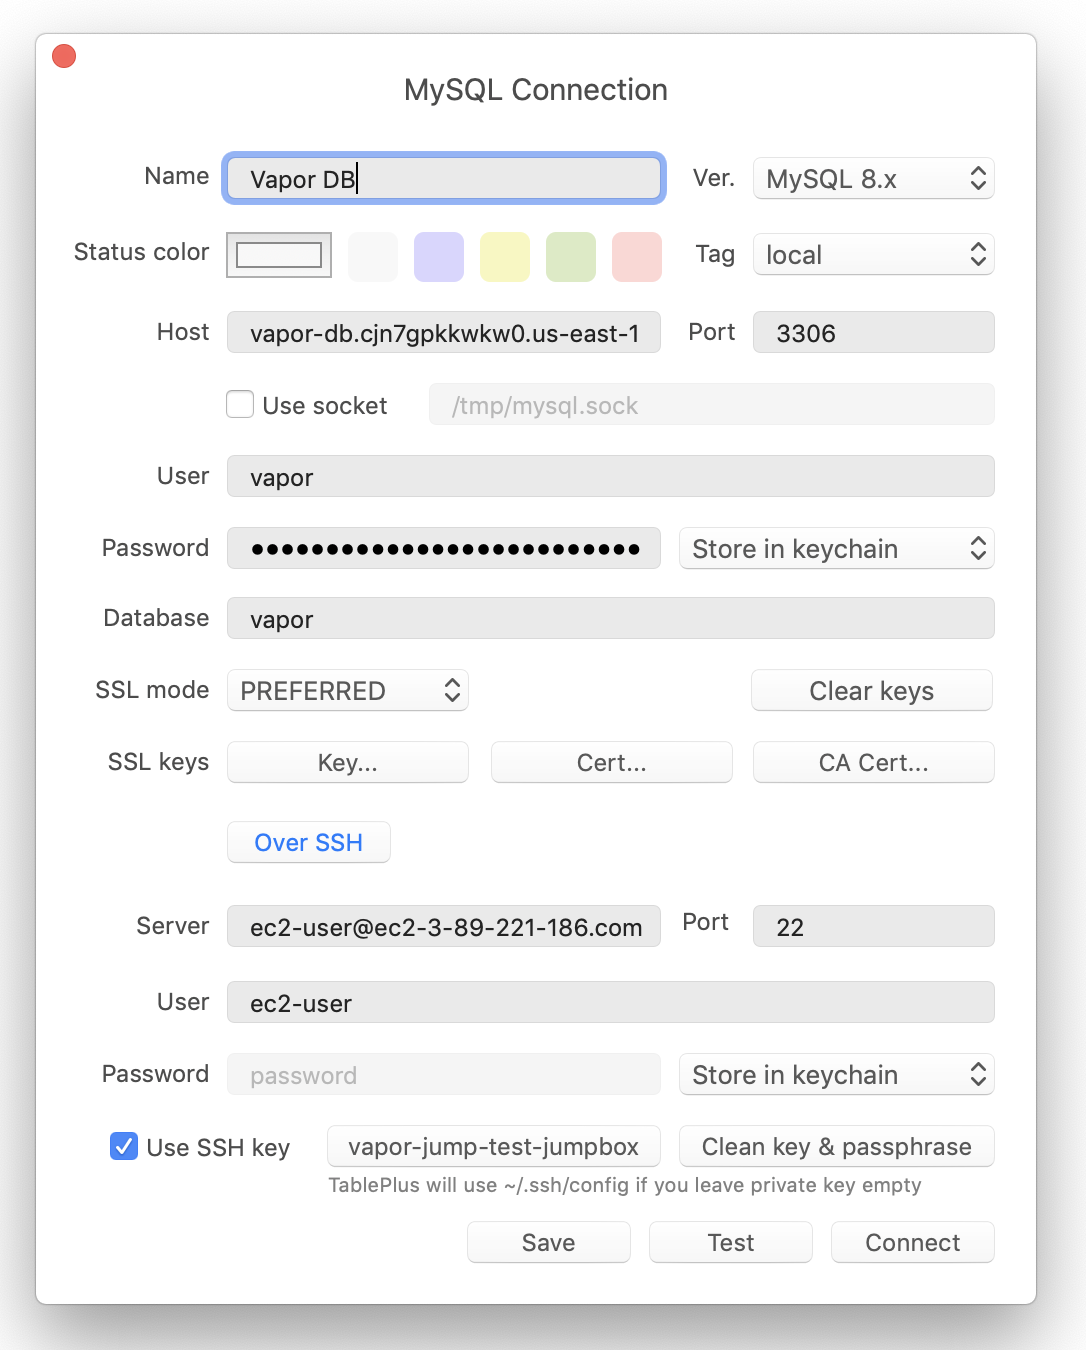
#### [](#jumpboxes-+-gui-tool) Jumpboxes + GUI Tool
Once a jumpbox has been created, you may configure your database management tool to connect to your database through the jumpbox SSH connection:
#### [](#shell-command) Shell Command
After provisioning a jumpbox, you may use the `database:shell` command to quickly access a command line database shell that lets you interact with your database:
Copy
Ask AI
```
vapor database:shell my-application-db
```
## [](#existing-databases) Existing Databases
If you wish to use an RDS database that was not created by Vapor, you have two options:
1. Exporting and importing the contents of your existing database into a new database created by Vapor. We recommend this approach as it allows you to use your existing data within a database and network managed by Vapor.
2. Connecting your existing database to a Vapor environment.
If your existing database is publicly accessible, make sure your Vapor project is created in the same region as the database. If the existing database is private, you will need to connect your Vapor environment to the VPC your existing database belongs to. You can find instructions on how to do this in our documentation about connecting to [Custom VPCs](/projects/environments#custom-vpcs).
After connecting your existing database, you will need to configure the appropriate environment variables:
Copy
Ask AI
```
DB_HOST=
DB_PORT=
DB_DATABASE=
DB_USERNAME=
DB_PASSWORD=
```
When working with an AWS RDS MySQL Fixed Size databases, an additional environment variable specifying the SSL certificate authority is required:
Copy
Ask AI
```
MYSQL_ATTR_SSL_CA=/var/task/rds-combined-ca-bundle.pem
```
If your database is hosted by [PlanetScale](https://planetscale.com/), the SSL certificate authority is as follows:
Copy
Ask AI
```
MYSQL_ATTR_SSL_CA=/opt/lib/curl/cert.pem
```
## [](#database-proxies) Database Proxies
Even though your serverless Laravel applications running on Vapor can handle extreme amounts of web traffic, traditional relational databases such as MySQL can become overwhelmed and crash due to connection limit restrictions. To solve this, you may use an RDS proxy to efficiently manage your database connections and allow many more connections than would typically be possible.
The database proxy can be added via the Vapor UI or the `database:proxy` CLI command:
Copy
Ask AI
```
vapor database:proxy my-application-db
```
Next, you may instruct an environment to use the proxy associated with the database using the `database-proxy` configuration option within your `vapor.yml` file:
vapor.yml
Copy
Ask AI
```
id: 3
name: vapor-app
environments:
production:
database: my-application-db
database-proxy: true
build:
- 'composer install --no-dev'
deploy:
- 'php artisan migrate --force'
```
You can delete the proxy at any time using the Vapor UI or the `database:delete-proxy` CLI command. Before deleting a proxy, make sure none of your applications are using the associated proxy:
Copy
Ask AI
```
vapor database:delete-proxy my-application-db
```
Before considering the usage of database proxies in Vapor, please consult Amazon’s [list of limitations](https://docs.aws.amazon.com/AmazonRDS/latest/AuroraUserGuide/rds-proxy.html#rds-proxy.limitations).
## [](#database-users) Database Users
When a database is created, Vapor creates a “vapor” master user. You may create additional database users, which will automatically be assigned a secure, random password, using the Vapor UI or the `database:user` CLI command:
Copy
Ask AI
```
vapor database:user my-application-db user-2
```
You may instruct an environment to connect to a database as a given user using the `database-user` configuration option within your `vapor.yml` file:
vapor.yml
Copy
Ask AI
```
id: 3
name: vapor-app
environments:
production:
database: my-application-db
database-user: user-2
build:
- 'composer install -
*[Content truncated for length]*
