
Hello3DMCP Server
Click on "Install Server".
Wait a few minutes for the server to deploy. Once ready, it will show a "Started" state.
In the chat, type
@followed by the MCP server name and your instructions, e.g., "@Hello3DMCP ServerMake the model bright blue and rotate it 45 degrees"
That's it! The server will respond to your query, and you can continue using it as needed.
Here is a step-by-step guide with screenshots.
Hello3DMCP Server - MCP Server for 3D Model Control
MCP server that provides Model Context Protocol (MCP) tools for controlling a 3D model visualization application via WebSocket. This server bridges MCP clients (like ChatGPT, Claude Desktop, Cursor) with the frontend 3D application.
Features
MCP Protocol Support: Works with any MCP-compatible client (ChatGPT, Claude Desktop, Cursor, etc.)
Dual Transport Modes: Supports both STDIO (subprocess) and HTTP/SSE (remote) modes
WebSocket Bridge: Real-time bidirectional communication with frontend applications
Session Management: Multi-user support with isolated sessions
State Management: Query and cache application state for accurate relative operations
Quick Start
Prerequisites
Node.js (v18 or higher)
npm
Frontend application running (see hello3dmcp-frontend)
Installation
Install dependencies:
npm installConfigure environment (optional):
cp .env.example .env
# Edit .env with your settings
Start the server:
npm startOr:
node server.js
The server starts on:
MCP endpoint:
http://localhost:3000/mcp(HTTP mode)WebSocket server:
ws://localhost:3001
Configuration
Environment Variables
Create a .env file (or use environment variables):
# MCP server port (default: 3000)
MCP_PORT=3000

# WebSocket server port (default: 3001)
WS_PORT=3001

# Browser URL for the 3D app frontend
# Used when generating connection URLs for MCP clients
# Default: http://localhost:5173
BROWSER_URL=http://localhost:5173
Command-Line Arguments
You can override environment variables via command-line:
# Set browser URL
node server.js --browser-url https://your-app.netlify.app

# Or using short form
node server.js -u https://your-app.netlify.app

# Show help
node server.js --help
Configuration Priority:
Command-line argument (
--browser-urlor-u) - highest priorityEnvironment variable (
BROWSER_URL).envfile (BROWSER_URL)Default (
http://localhost:5173) - lowest priority
Connecting MCP Clients
Quick Comparison: MCP Client Options
Client | Cost | Works with Localhost | Requires Public URL | Best For |
MCP Inspector | Free | ✅ Yes | ❌ No | Testing & debugging tools |
Cursor | Free | ✅ Yes | ❌ No | Full IDE with AI assistant |
VS Code + MCP | Free | ✅ Yes | ❌ No | VS Code users |
Claude Code | Free | ✅ Yes | ❌ No | CLI-based testing |
Continue.dev | Free | ✅ Yes | ❌ No | VS Code extension users |
Claude Desktop | Free | ✅ Yes | ❌ No | Desktop app with Claude |
ChatGPT | Paid (Plus) | ❌ No | ✅ Yes (tunnel needed) | OpenAI integration |
Claude Desktop Installation
Install the MCP package (.mcpb) file:
Build the package:
npm run buildThis creates
hello3dmcp-server.mcpbin your project root.Install in Claude Desktop:
Open Claude Desktop → Settings → Extensions → Advanced Settings
Click "Install Extension"
Select the
hello3dmcp-server.mcpbfileRestart Claude Desktop
Get connection URL:
Ask Claude: "How do I connect to the 3D app?" or "Get browser URL"
Claude will provide a URL with your unique session ID
Open that URL in your browser
Benefits: No manual configuration needed, self-contained package, easy updates.
ChatGPT Setup
ChatGPT requires a publicly accessible server.
Start server:
node server.js --browser-url https://your-frontend.netlify.appCreate tunnel:
ngrok http 3000
# or
lt --port 3000 --subdomain hello3dmcp-server
Configure ChatGPT:
Open ChatGPT → Settings → Personalization → Model Context Protocol
Add server:
Name:
hello3dmcp-serverURL:
https://your-tunnel-url/mcp⚠️ Include/mcpat the end!Transport: HTTP or Streamable HTTP
Cursor
Option 1: Deeplink (macOS)
open 'cursor://anysphere.cursor-deeplink/mcp/install?name=hello3dmcp-server&config=eyJ1cmwiOiJodHRwOi8vbG9jYWxob3N0OjMwMDAvbWNwIn0='Option 2: Manual Configuration
Open Cursor Settings → Features → Model Context Protocol
Add server:
{
  "mcpServers": {
    "hello3dmcp-server": {
      "url": "http://localhost:3000/mcp"
    }
  }
}
MCP Inspector
The MCP Inspector is a developer tool for testing and debugging MCP servers. It provides an interactive web interface to explore server capabilities, test tools, and view resources.
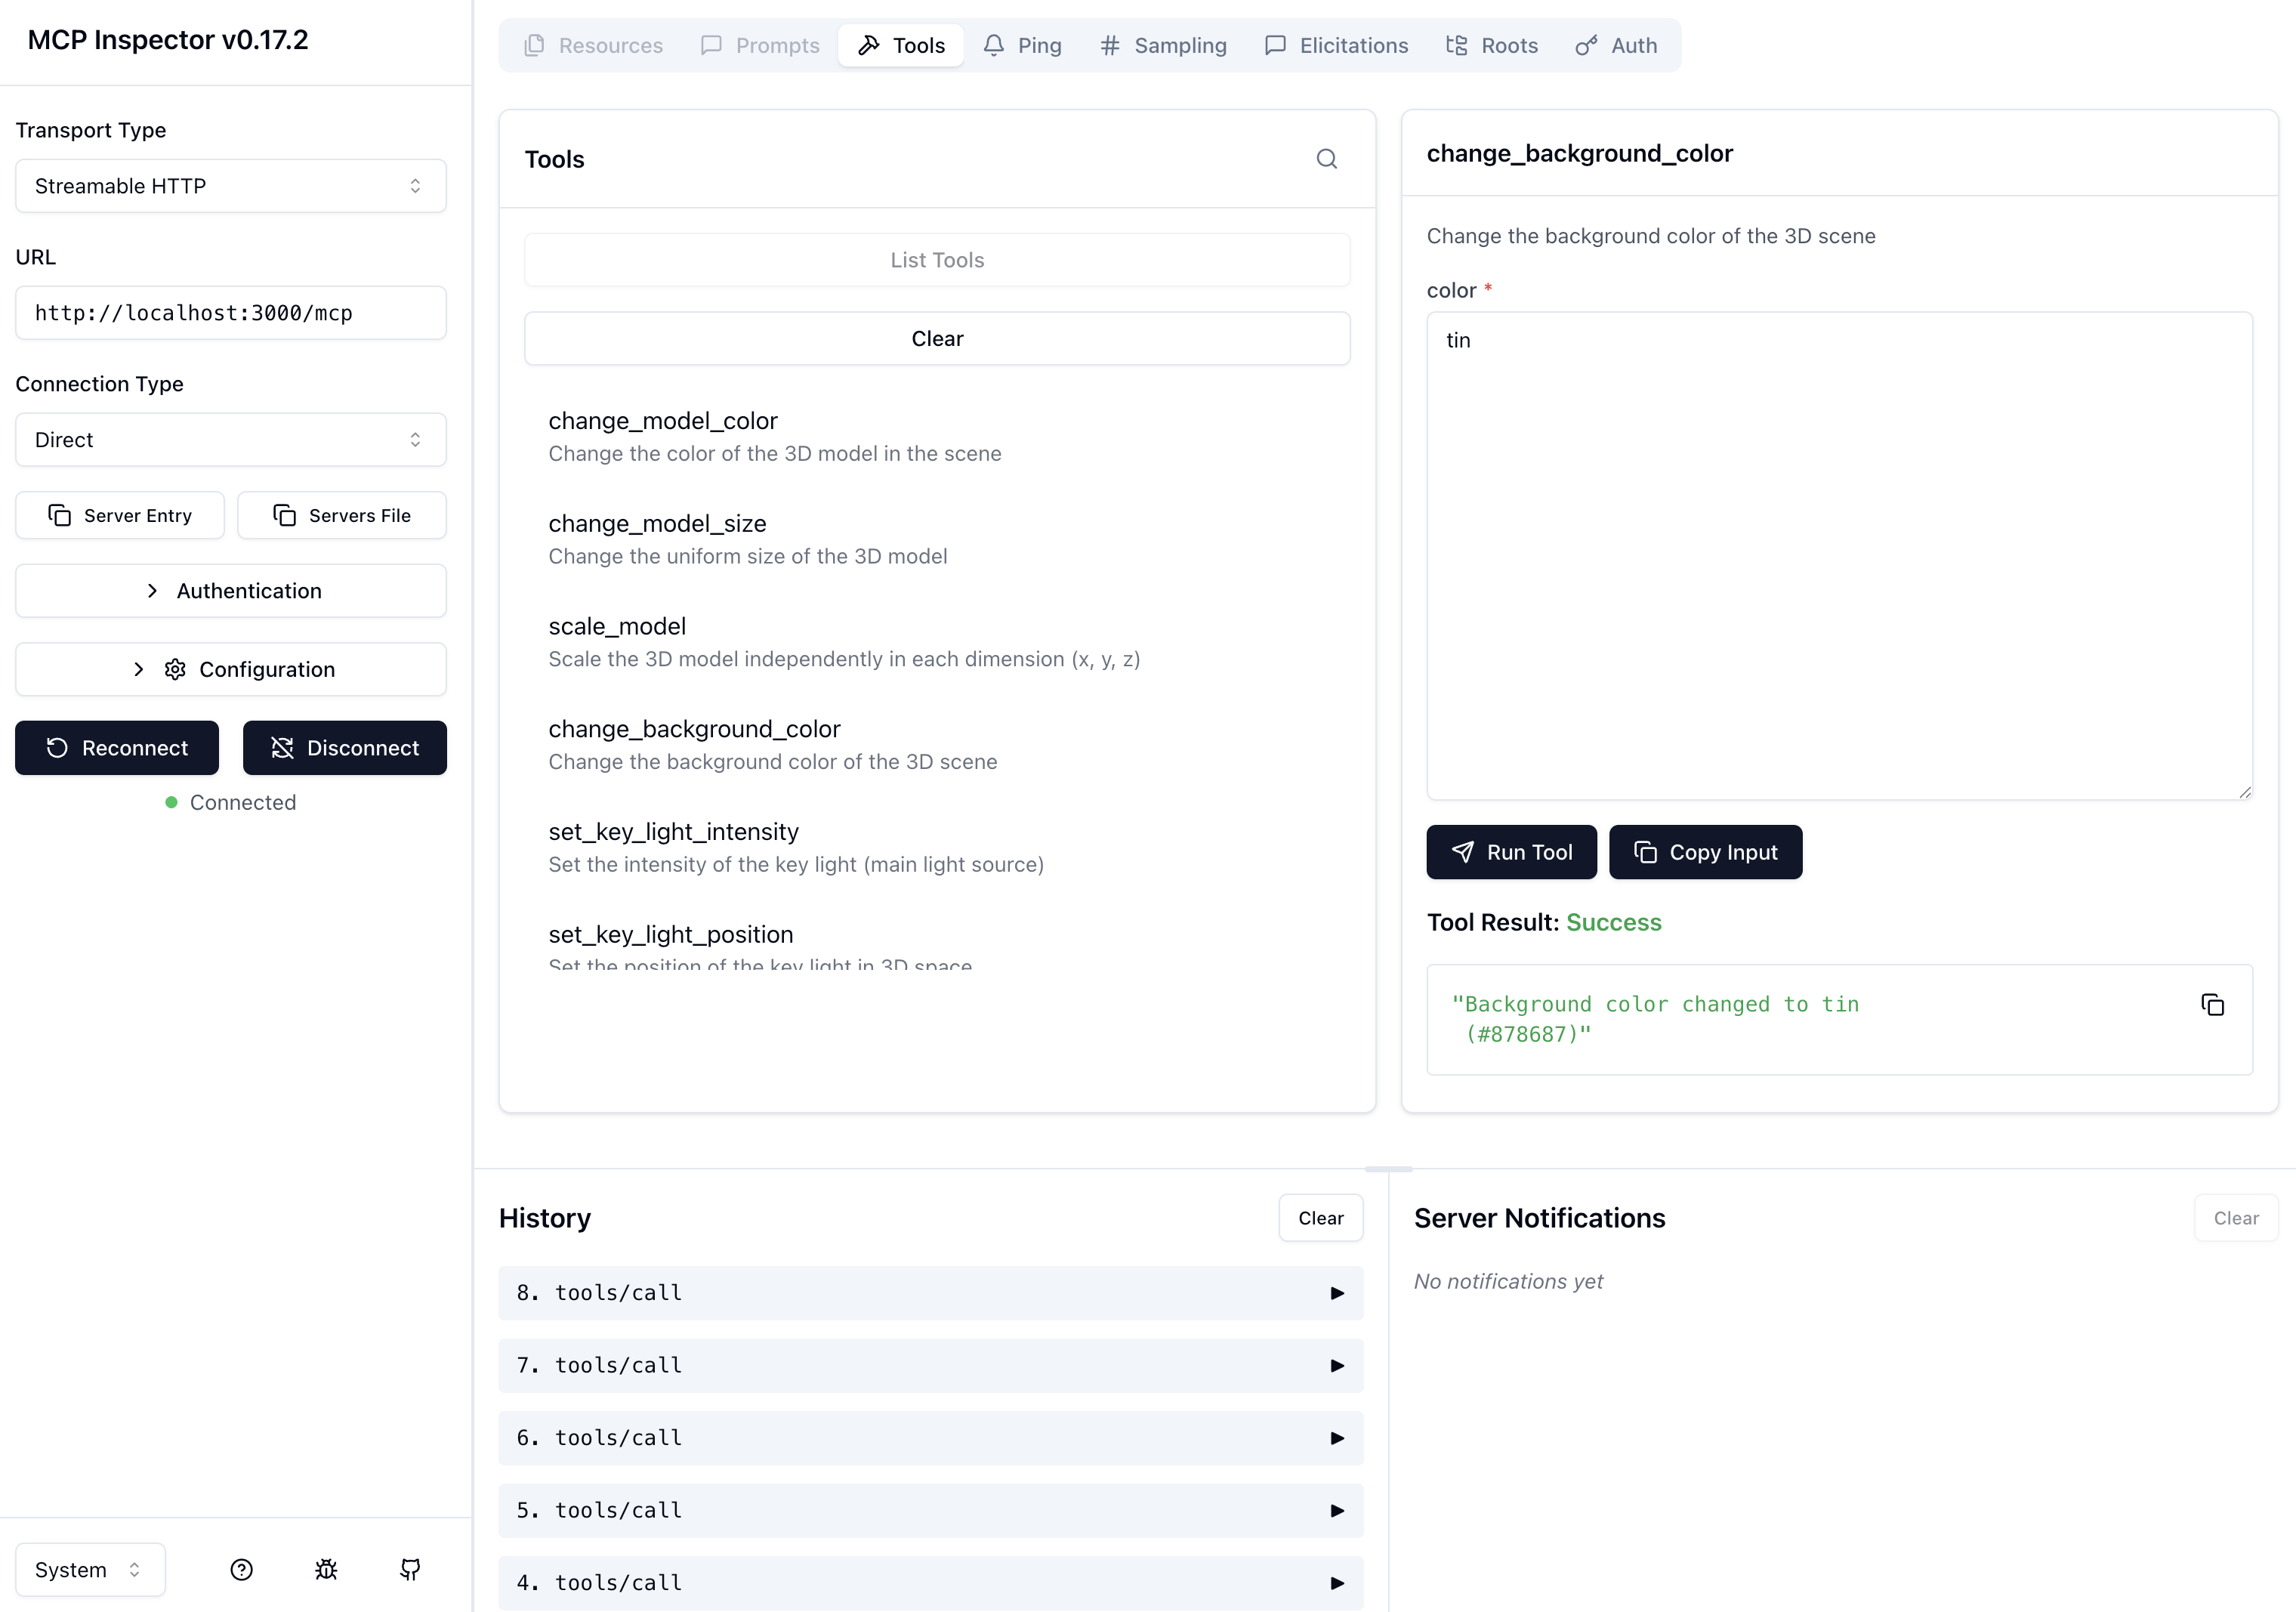
Example: MCP Inspector connected to the server, showing tools being tested.
Testing Options:
You can test either the source code (development) or the bundled version (production):
Option 1: Test Source Code (Development)
Start the server from source:
npm start
# or
node server.js
Server should be running on
http://localhost:3000/mcpStart the MCP Inspector:
npx @modelcontextprotocol/inspector http://localhost:3000/mcp
Option 2: Test Bundled Version (Production)
Build the bundle:
npm run build:bundleThis creates
dist/hello3dmcp-server.jsStart the bundled server:
npm run start:prod
# or
node dist/hello3dmcp-server.js
Server should be running on
http://localhost:3000/mcpStart the MCP Inspector:
npx @modelcontextprotocol/inspector http://localhost:3000/mcp
Using the Inspector:
Open the Inspector UI:
The inspector will start a web interface (usually on
http://localhost:5173)Open your browser and navigate to the URL shown in the terminal
Configure the connection:
Transport Type: Select "Streamable HTTP" (this matches your server's transport)
URL: Enter
http://localhost:3000/mcp(note: port 3000, not 3001)Connection Type: Select "Direct"
Click the "Connect" button
You should see a green dot and "Connected" status when successful
Browse and test tools:
Click on the "Tools" tab in the top navigation bar
You'll see a list of all available tools in the middle pane:
change_model_color- Change the color of the 3D modelchange_model_size- Change the uniform size of the modelscale_model- Scale the model independently in each dimensionchange_background_color- Change the background color of the sceneset_key_light_intensity- Set the intensity of the key lightset_key_light_position- Set the position of the key lightAnd more...
Call a tool:
Click on any tool name in the tools list to select it
The right pane will show the tool's description and parameters
Enter the required parameter value(s) in the input field(s):
For
change_background_color: Enter a color name (e.g.,"tin") or hex code (e.g.,"#878687")For
change_model_size: Enter a number (e.g.,2.5)For
scale_model: Enter values for x, y, z axes
Click the "Run Tool" button (paper airplane icon)
The result will appear below, showing "Success" and the response message
If your 3D app is running and connected, you'll see the changes reflected immediately
View history:
The bottom-left "History" pane shows all your previous tool calls
Click on any history entry to see its details
Use "Clear" to remove history entries
Example: To change the background color to tin:
Select
change_background_colorfrom the tools listEnter
tinin the "color" parameter fieldClick "Run Tool"
You'll see:
"Background color changed to tin (#878687)"The background in your 3D app will update to the new color
Note: The Inspector connects directly to your MCP HTTP endpoint. Make sure your server is running before starting the Inspector. If you're using a tunneled server (for remote access), you can also connect to the tunneled URL:
npx @modelcontextprotocol/inspector https://your-tunnel-url.ngrok-free.app/mcpAvailable MCP Tools
The server provides extensive tools for controlling the 3D model:
Model Control
change_model_color- Change model color (hex or Apple crayon color name)change_model_size- Change uniform model sizescale_model- Scale model independently in x, y, z dimensionsset_model_rotation- Set model rotation (Euler angles)rotate_model_clockwise- Rotate model clockwise (relative)rotate_model_counterclockwise- Rotate model counterclockwise (relative)nudge_model_pitch_up- Adjust model pitch up (relative)nudge_model_pitch_down- Adjust model pitch down (relative)nudge_model_roll- Adjust model roll (relative)get_model_color- Get current model colorget_model_scale- Get current model scaleget_model_rotation- Get current model rotation
Lighting Control
set_key_light_intensity- Set key light intensityset_key_light_color- Set key light colorset_key_light_position_spherical- Set key light position (spherical coordinates)set_key_light_distance- Set key light distanceswing_key_light_up/down/left/right- Swing key light in directionswalk_key_light_in/out- Move key light closer/fartherrotate_key_light_clockwise/counterclockwise- Rotate key lightnudge_key_light_elevation_up/down- Adjust key light elevationmove_key_light_toward_direction- Move key light toward directionSimilar tools for fill light
get_key_light_*/get_fill_light_*- Query light properties
Camera Control
dolly_camera- Set camera distancedolly_camera_in/out- Move camera closer/fartherset_camera_fov- Set camera field of viewincrease_camera_fov/decrease_camera_fov- Adjust FOVget_camera_distance- Get camera distanceget_camera_fov- Get camera FOV
Scene Control
change_background_color- Change scene background colorget_background_color- Get background color
Connection
get_browser_connection_url- Get URL to connect browser to 3D app
Architecture
The server supports two transport modes:
STDIO Mode (Subprocess - Claude Desktop)
┌─────────────────┐         ┌──────────────┐         ┌─────────────┐
│ Claude Desktop  │──stdin▶│  MCP Server   │────────▶│  WebSocket  │
│  (Subprocess)   │◀─stdout│  (server.js)  │         │   Server    │
└─────────────────┘         └──────────────┘         └─────────────┘
                                      │                       │
                                      │              ┌────────▼────────┐
                                      └──────────────▶│  Frontend App   │
                                                     │  (WebSocket)     │
                                                     └─────────────────┘
HTTP/SSE Mode (ChatGPT, Manual)
┌─────────────────┐         ┌──────────────┐         ┌─────────────┐
│   MCP Client    │──HTTP──▶│  MCP Server   │────────▶│  WebSocket  │
│  (AI Assistant) │──SSE───▶│  (server.js)  │         │   Server    │
└─────────────────┘         └──────────────┘         └─────────────┘
                                      │                       │
                                      │              ┌────────▼────────┐
                                      └──────────────▶│  Frontend App   │
                                                     │  (WebSocket)     │
                                                     └─────────────────┘
How it works:
MCP Client sends tool call requests to the MCP Server (via STDIO or HTTP/SSE)
MCP Server auto-detects the transport mode and processes requests accordingly
MCP Server routes commands via WebSocket to connected browser clients (by session ID)
Frontend App receives WebSocket messages and updates the 3D model
Changes are immediately visible in the browser
Transport Detection:
STDIO Mode: Automatically detected when
stdinis not a TTY (subprocess)HTTP Mode: Automatically detected when
stdinis a TTY (manual execution)
WebSocket Protocol
The server communicates with frontend applications via WebSocket:
Session Registration
Frontend sends on connection:
{
  "type": "registerSession",
  "sessionId": "<session-id>"
}
Sending Commands
Server sends commands to frontend:
{
  "type": "changeColor",
  "color": "#ff0000"
}
State Queries
Server can request current state:
{
  "type": "requestState",
  "requestId": "<unique-id>",
  "forceRefresh": false
}
Frontend responds:
{
  "type": "stateResponse",
  "requestId": "<unique-id>",
  "state": { /* current state object */ }
}
Deployment
Railway
Connect repository to Railway
Set environment variables:
MCP_PORT: 3000 (or Railway's assigned port)WS_PORT: 3001 (or use same port as MCP_PORT)BROWSER_URL: Your frontend URL
Deploy
Render
Create new Web Service
Set environment variables:
MCP_PORT: 3000WS_PORT: 3001BROWSER_URL: Your frontend URL
Deploy
Fly.io
Create
fly.tomlconfigurationSet environment variables via
fly secretsDeploy:
fly deploy
Important Notes
WebSocket Support: Ensure your hosting platform supports WebSocket connections
Port Configuration: Some platforms assign a single port - you may need to use the same port for both MCP and WebSocket
HTTPS/WSS: Use
wss://(secure WebSocket) for production deployments
Development
Adding New Tools
Register tool in
server.js:mcpServer.registerTool( 'your_tool_name', { title: 'Your Tool Title', description: 'Description', inputSchema: { param: z.string().describe('Parameter') } }, async ({ param }) => { routeToCurrentSession({ type: 'yourCommandType', param: param }); return { content: [{ type: 'text', text: 'Success' }] }; } );Frontend handles command in
Application.jsWebSocket message handlerUpdate documentation in README.md
Troubleshooting
Port Already in Use
# Check what's using the ports
lsof -i :3000 -i :3001

# Kill processes
lsof -ti :3000 -ti :3001 | xargs kill -9
WebSocket Connection Issues
Verify WebSocket server is running on port 3001
Check firewall/security groups allow WebSocket connections
Ensure frontend is connecting with correct session ID
MCP Client Can't Connect
Verify MCP endpoint is accessible:
http://localhost:3000/mcpCheck CORS settings (server allows all origins by default)
For remote clients, ensure tunnel is running and URL is correct
Tools Not Appearing
Restart MCP client after server changes
Check server logs for errors
Verify server started successfully
Related Projects
hello3dmcp-frontend - 3D visualization frontend application
License
MIT
Contributing
Contributions welcome! Please feel free to submit a Pull Request.
Resources
Unclaimed servers have limited discoverability.
Looking for Admin?
If you are the server author, to access and configure the admin panel.
Latest Blog Posts
MCP directory API
We provide all the information about MCP servers via our MCP API.
curl -X GET 'https://glama.ai/api/mcp/v1/servers/aidenlab/hello3dmcp-server'
If you have feedback or need assistance with the MCP directory API, please join our Discord server