
Enables natural language interaction with Metabase business intelligence assets, including creating and managing dashboards, charts, collections, executing SQL queries, administering databases, users, and groups.
Click on "Install Server".
Wait a few minutes for the server to deploy. Once ready, it will show a "Started" state.
In the chat, type
@followed by the MCP server name and your instructions, e.g., "@Metabase MCP Servershow me last month's sales by region"
That's it! The server will respond to your query, and you can continue using it as needed.
Here is a step-by-step guide with screenshots.
📊 Metabase MCP Server
📚 Table of Contents
😊 What is this tool about?
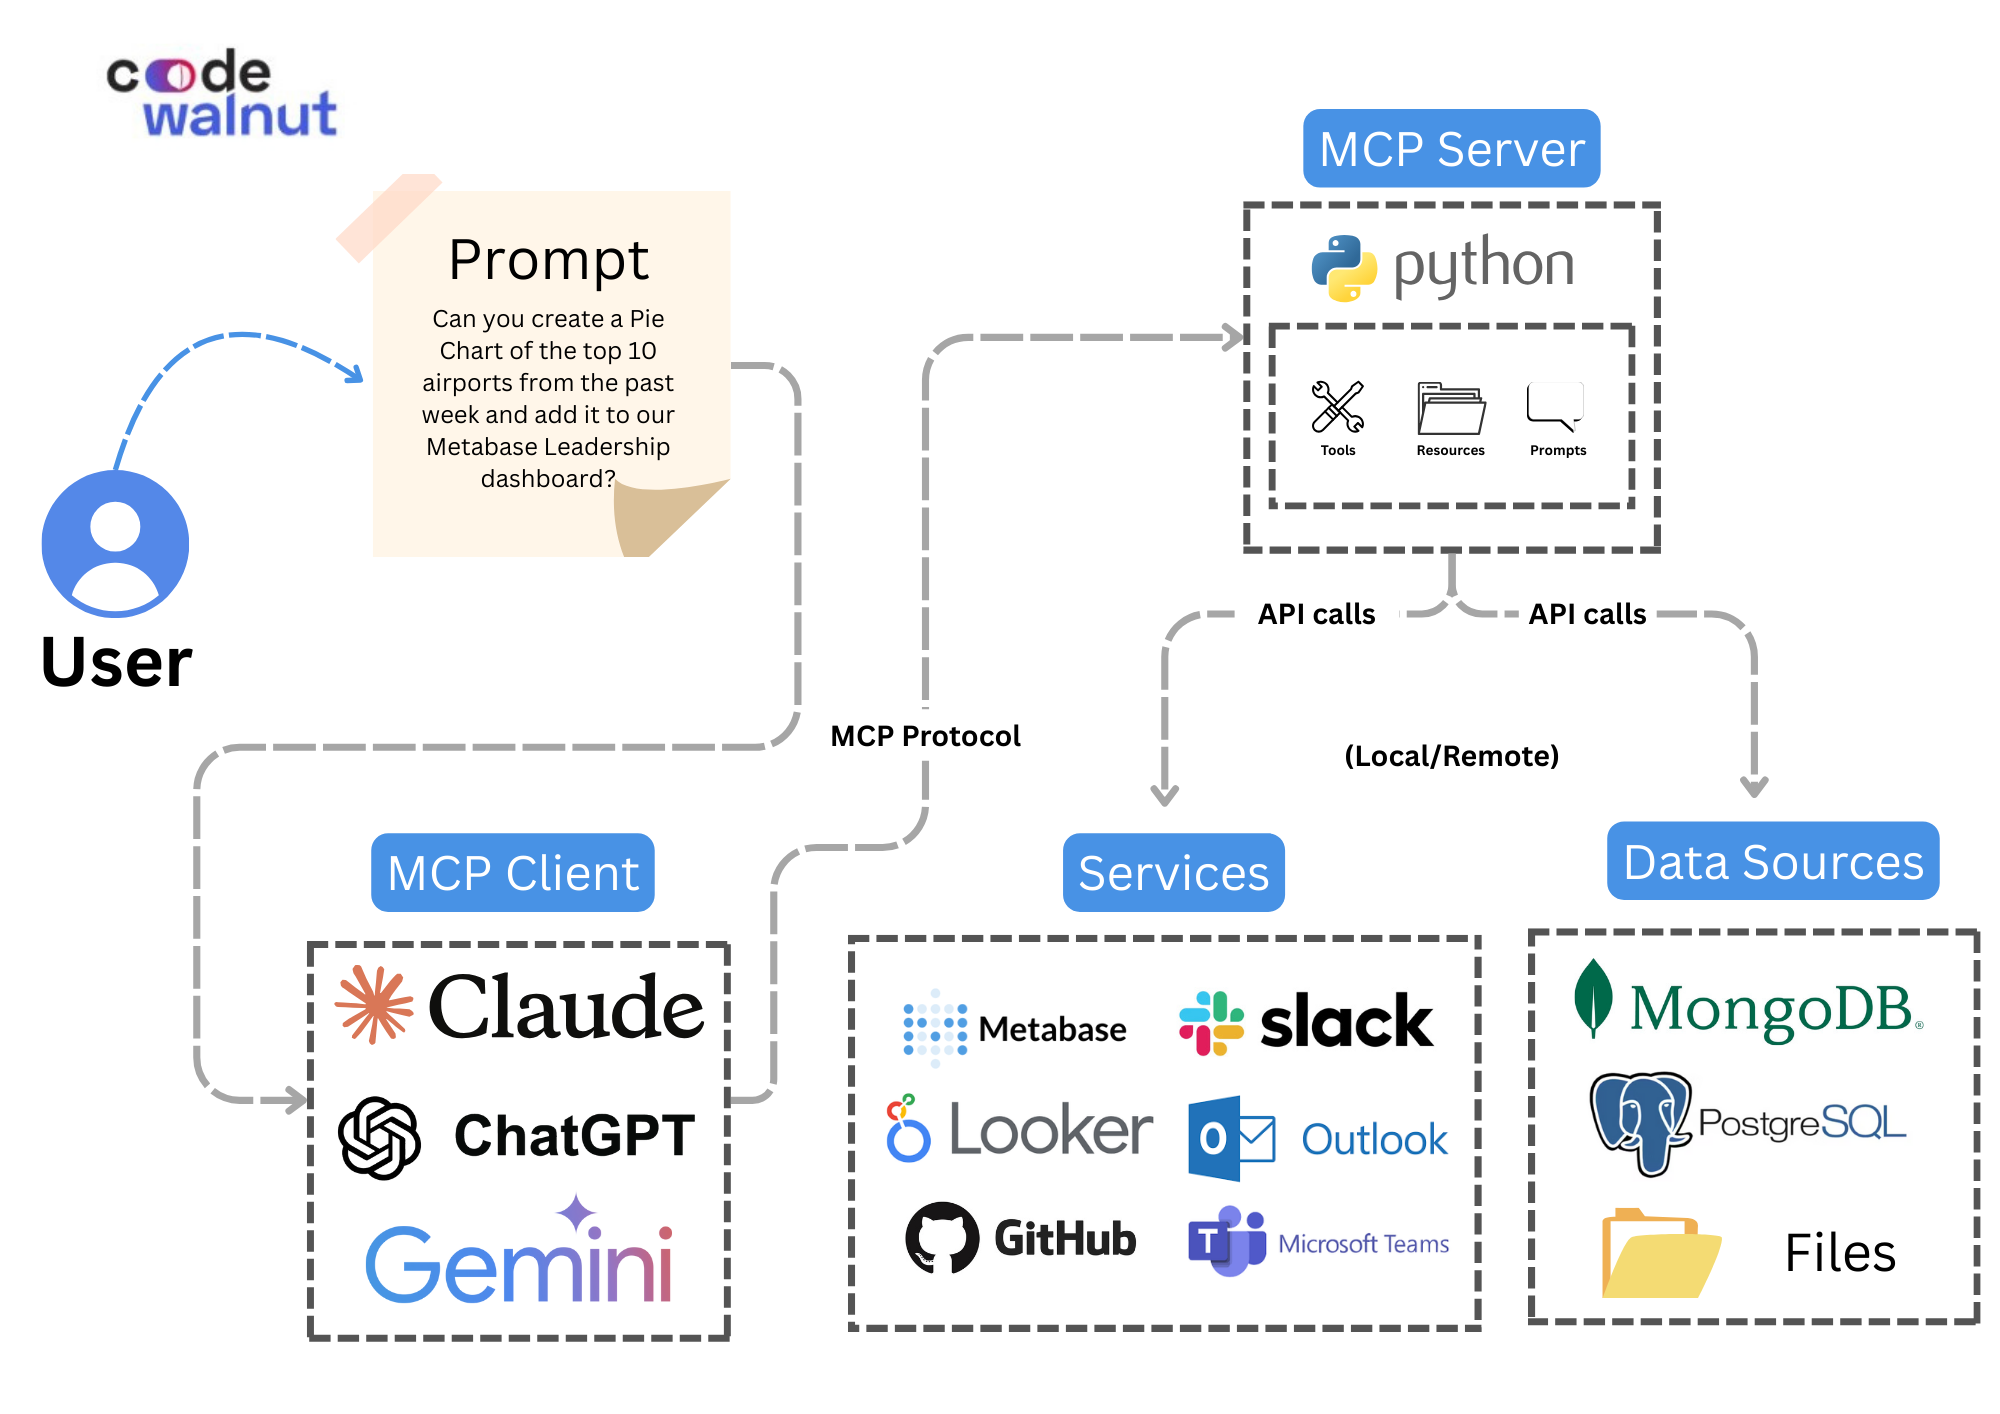
Metabase MCP Server is a backend integration layer that connects your Metabase instance with AI assistants using the Model Context Protocol (MCP). This allows business leaders, product managers and analysts to interact with business intelligence assets like dashboards and charts using natural language—through any MCP client (e.g., Claude Desktop).
Instead of navigating through menus or constructing SQL queries manually, you can:
You can ask a question and get an instant insight.
Generate dashboards and charts by describing what you want.
Manage user access and database connections through simple instructions.
This project makes Metabase not just a dashboarding tool—but a conversational, intelligent business assistant.
🎥 Video Walkthrough
Watch this video to see the Metabase MCP Server in action:
📐 Architecture Diagram
🚀 Getting Started
1. Set Up Metabase (If you haven't already)
Follow the official Metabase installation guide: Metabase Docs
2. Install uv Package Manager
Install uv which includes Python and package management:
Windows:
macOS/Linux:
Or install via package managers:
For more information about uv installation and usage, please visit the official documentation: https://docs.astral.sh/uv/getting-started/installation/
3. Clone or Download the Repository
You need to get this tool onto your computer. You can either download it manually or use Git. Open your computer's Terminal (Mac) or Command Prompt (Windows). Navigate to the folder where you unzipped the files or want to clone the project:
Option 1: Download ZIP
Go to the GitHub repository
Click the green "Code" button
Select "Download ZIP"
Unzip the downloaded file to a location like your Documents folder
Option 2: Use Git If you're familiar with Git, run this in your terminal:
4. Install dependencies
This command will automatically:
Install the required Python version (if not already available)
Create a virtual environment for the project
Install all necessary packages and dependencies
5. Configure Your Credentials
You have three options to configure your Metabase credentials for the MCP Server:
Option 1: Using a
Create a .env file in the project root:
Option 2: Using command-line arguments Pass configuration directly via command line:
Option 3: Using environment variables in MCP client config
Configure directly in your MCP client without a .env file (see examples below).
6. Connect to Your MCP client
Choose your preferred MCP clients like Claude Desktop app, Claude Code, Cursor, Windsurf etc., and add the Metabase MCP server in their respective configuration files. All MCP clients follow a similar configuration pattern.
Configuration Examples
For stdio transport (recommended for local MCP server):
Windows:
Mac:
Key Differences:
Windows uses backslashes
\\in pathsmacOS/Linux uses forward slashes
/in pathsMake sure to match the correct format based on your OS to avoid errors
Important Notes:
Replace
FULL_PATHwith the actual absolute path to your project directoryAfter saving configuration changes, restart your MCP client to apply the new settings
For project-specific tools in Cursor, create a
.cursor/mcp.jsonfile in your project directoryFor global tools in Cursor, create a
~/.cursor/mcp.jsonfile in your home directory
For streamable-http transport (recommended for remote MCP server):
Compatible MCP clients
Click on any client to visit their official MCP setup documentation:
Client | Official MCP Documentation |
Anthropic's official MCP guide for Claude Desktop | |
Official Claude Code MCP setup documentation | |
Cursor's official MCP configuration guide | |
Windsurf official MCP setup documentation | |
Cline's official MCP quickstart guide | |
VS Code Copilot MCP server configuration |
Once you have added the configuration, the MCP server should be visible in your MCP client.
🔧 Configuration Options
The Metabase MCP Server supports flexible configuration through environment variables, command-line arguments, or a combination of both.
Environment Variables
Variable | Description | Default Value | Example |
| Your Metabase instance URL | Required |
|
| Your Metabase API key | Required |
|
| Transport protocol |
|
|
| Host for HTTP transports |
|
|
| Port for HTTP transports |
|
|
| Logging level |
|
|
Command-line Arguments
Argument | Description | Default Value |
| Metabase instance URL | Required |
| Metabase API key | Required |
| Transport protocol |
|
| Host for HTTP transports |
|
| Port for HTTP transports |
|
| Logging verbosity level |
|
Transport Protocols
Protocol | Description | Use Case |
stdio | Standard input/output communication | Best for local integrations (Claude Desktop, Cursor, etc.) |
streamable-http | HTTP-based streaming protocol | Ideal for remote deployments and web-based integrations |
sse | Server-Sent Events over HTTP | ⚠️ Deprecated - Not recommended for new setups |
Configuration Priority
Configuration values are applied in the following priority order (highest to lowest):
Command-line arguments (overrides everything)
Environment variables (overrides defaults)
Default values
Complete Command Examples
Note: You don't need to pass every parameter when running the server. However, you must provide the Metabase URL and API key. Any parameters not specified will use their default values as shown above.
🔑 Getting Your Metabase API Key
To get your Metabase API key:
Log into your Metabase instance
Click on your profile picture (top-right corner)
Select "Account settings"
Navigate to the "API Keys" tab
Click "Create API Key"
Give your key a descriptive name (e.g., "MCP Server Key")
Copy the generated key (starts with
mb_)
⚠️ Important: Store your API key securely and never commit it to version control. The key provides full access to your Metabase instance.
📂 DXT File Support
You no longer need to go through the steps of cloning the repository and setting up the environment. Simply follow the steps below to install the Metabase MCP Server in your Cloude Desktop App:
Download the DXT File
Check the link below to download the latest DXT file directly:
Download DXT FileOpen the Cloude Desktop App
Once you have the file, open the Cloude Desktop App on your system.Navigate to Extensions Settings
In the Cloude Desktop App:Go to Files → Settings → Extensions
Then click on Advanced Settings.
Select the DXT File
In the Advanced Settings section, click on Choose File, select the downloaded DXT file.Enter the Required Details
After slecting the DXT file, a prompt will appear asking you to fill in the required details:Metabase URL: Enter your Metabase server URL.
API Key: Add the relevant API key for authentication.
Complete the Setup
After entering the necessary details, click Save to apply the configuration.
That's it! The Metabase MCP Server is now installed and ready to use in your Cloude Desktop App.
How to Create Your Own DXT File
If you want to create your own DXT file, please visit the Official Guide:
Creating Your Own DXT File
🚀 Remote Deployment
For production use or team collaboration, you can deploy the Metabase MCP Server remotely. We use this approach internally at Codewalnut.
Docker Deployment
We've included Docker configuration files to make remote deployment straightforward.
Quick Start with Docker
Docker Compose (Recommended)
Connecting to Remote MCP Server
Once deployed, configure your MCP clients to connect to the remote server:
Deployment Options
Cloud Providers: AWS ECS, Google Cloud Run, Azure Container Instances
VPS/Dedicated Servers: DigitalOcean, Linode, Vultr
Container Platforms: Kubernetes, Docker Swarm
Platform-as-a-Service: Railway, Render, Fly.io
Security Considerations
Use HTTPS in production environments
Implement proper firewall rules
Consider VPN access for sensitive business data
Regularly rotate API keys
Monitor access logs
Need Help with Deployment?
Our team at CodeWalnut offers deployment and consulting services. Contact us for enterprise-grade setup and support.
🔍 Debugging with MCP Inspector
To debug and test your Metabase MCP Server setup, you can use the official MCP Inspector tool.
Prerequisites
First, install Node.js if you haven't already:
Download from: nodejs.org
Or install via package manager:
# macOS brew install node # Windows (via Chocolatey) choco install nodejs # Windows (via Scoop) scoop install nodejs
Install and Run MCP Inspector
Using MCP Inspector
The MCP Inspector provides:
Real-time tool testing - Execute MCP tools directly from the web interface
Request/Response monitoring - See exactly what data is being sent and received
Error debugging - Identify configuration or API issues quickly
Schema validation - Verify that your tools are properly defined
Once running, open your browser to http://localhost:5173 to access the inspector interface.
Common Debugging Scenarios
Connection issues - Verify your Metabase URL and API key
Permission errors - Check if your API key has the required permissions
🔧 Available Tools
Function | Description |
Collection Operations | |
| Get a collection by ID |
| Create a new collection |
| Update collection metadata |
| Delete a collection |
Chart (Card) Operations | |
| List all charts |
| Get results from a chart query |
| Create a new chart |
| Update an existing chart |
| Delete a chart |
Dashboard Operations | |
| List all dashboards |
| Get a dashboard by ID |
| Get cards in a dashboard |
| Get all dashboard items |
| Create a dashboard |
| Update a dashboard |
| Delete a dashboard |
| Create a copy of an existing dashboard |
Database Operations | |
| List databases |
| Create a new database connection |
| Update a database connection |
| Delete a database connection |
User Operations | |
| List all users |
| Get current user details |
| Create a new user |
| Update user info |
| Delete a user |
Group Operations | |
| List user groups |
| Create a user group |
| Delete a user group |
SQL Operations | |
| Execute a native SQL query |
🧪 Example Prompts to Try
Create a dashboard called 'Flight Overview' with a bar chart showing flights by destination city.
Run SQL:
SELECT origin, destination, COUNT(*) FROM flights GROUP BY origin, destination LIMIT 10.Create a card displaying total bookings last month grouped by region.
Delete the chart named 'Abandoned Queries'.
Update the dashboard 'Sales KPIs' to include a new revenue card.
Show all users in the 'Admin' group.
Create a new group called 'Finance Analysts'.
Connect to a Supabase database and list all tables.
🌐 Connect with Us
Stay connected and get support through our community channels:
🏢 Official Links
🌍 Website: codewalnut.com
📧 Email: nattu@codewalnut.com
📖 Blogs:
insights: codewalnut.com/insights
learn: codewalnut.com/learn
📱 Social Media
💼 LinkedIn: CodeWalnut
📺 YouTube: CodeWalnut Channel
🐦 Twitter/X: @codewalnut
📷 Instagram: @codewalnut
💬 Community Support
📧 Newsletter: Subscribe to CodeWalnut Newsletter (scroll down to find the email subscription option)
🐙 GitHub: codewalnut
🤝 Professional Services
Consulting: Custom Metabase integrations and AI solutions
Training: MCP and business intelligence workshops
Support: Enterprise-grade support and maintenance
📢 Follow us for updates on new MCP servers, AI integrations, and business intelligence tools!
📜 License
This project is licensed under the Apache License 2.0.
You can find the full license text in the LICENSE file.