
Weather Alerts MCP Server
Click on "Install Server".
Wait a few minutes for the server to deploy. Once ready, it will show a "Started" state.
In the chat, type
@followed by the MCP server name and your instructions, e.g., "@Weather Alerts MCP Servershow me active weather alerts for Texas"
That's it! The server will respond to your query, and you can continue using it as needed.
Here is a step-by-step guide with screenshots.
MCP Server Beginner example
Project Overview
It is a Python application that provides real-time weather alerts for US states using the National Weather Service (NWS) API. It leverages the mcp framework (with FastMCP) and is designed for modern async Python workflows. The project is fully managed with uv for dependency management and task running.
Related MCP server: Weather Alerts MCP Server
Features
Weather Alerts Tool: Fetches and formats active weather alerts for any US state.
Echo Resource: Simple echo endpoint for testing.
Async & Modern: Uses Python 3.12+ and async/await patterns.
MCP Inspector: Visual tool to inspect and test your MCP tools and resources.
Project Structure
.
├── main.py                # Simple entry point (prints a message)
├── pyproject.toml         # Project metadata and dependencies
├── uv.lock                # Locked dependencies for reproducible installs
├── server/
│   └── weather.py         # Main server logic and weather tool/resource
├── .venv/                 # (optional) Virtual environment
├── .python-version        # Python version pin (3.12)
├── .gitignore             # Standard Python ignores
└── README.md              # Project documentation
Prerequisites
Python 3.12+
uv (install with
pip install uvif not already installed)
Setup & Installation
Clone the repository:
git clone <your-repo-url>
cd mcpproject
Install dependencies using uv:
uv pip install -r uv.lockOr, if you want to install from
pyproject.toml:uv pip install
Running the Project
1. Run the Main Script
To run the basic entry point:
uv run python main.py2. Develop & Test the Weather Tool
To start the MCP development server for the weather tool:
uv run mcp dev server/weather.pyThis will also open MCP Inspector in your browser—a visual tool to explore and test your MCP tools and resources interactively.
3. Install the Weather Tool
To install the weather tool for use as an MCP tool:
uv run mcp install server/weather.pyUsage Example
With the dev server running, you can use the MCP Inspector or an MCP-compatible client to call the get_alerts tool:
Tool name:
get_alertsArgument: Two-letter US state code (e.g.,
CA,NY)
Example (from CLI):
mcp call get_alerts --state=CAUsing with Claude Desktop
You can also use the weather alerts tool in Claude Desktop, as shown below:
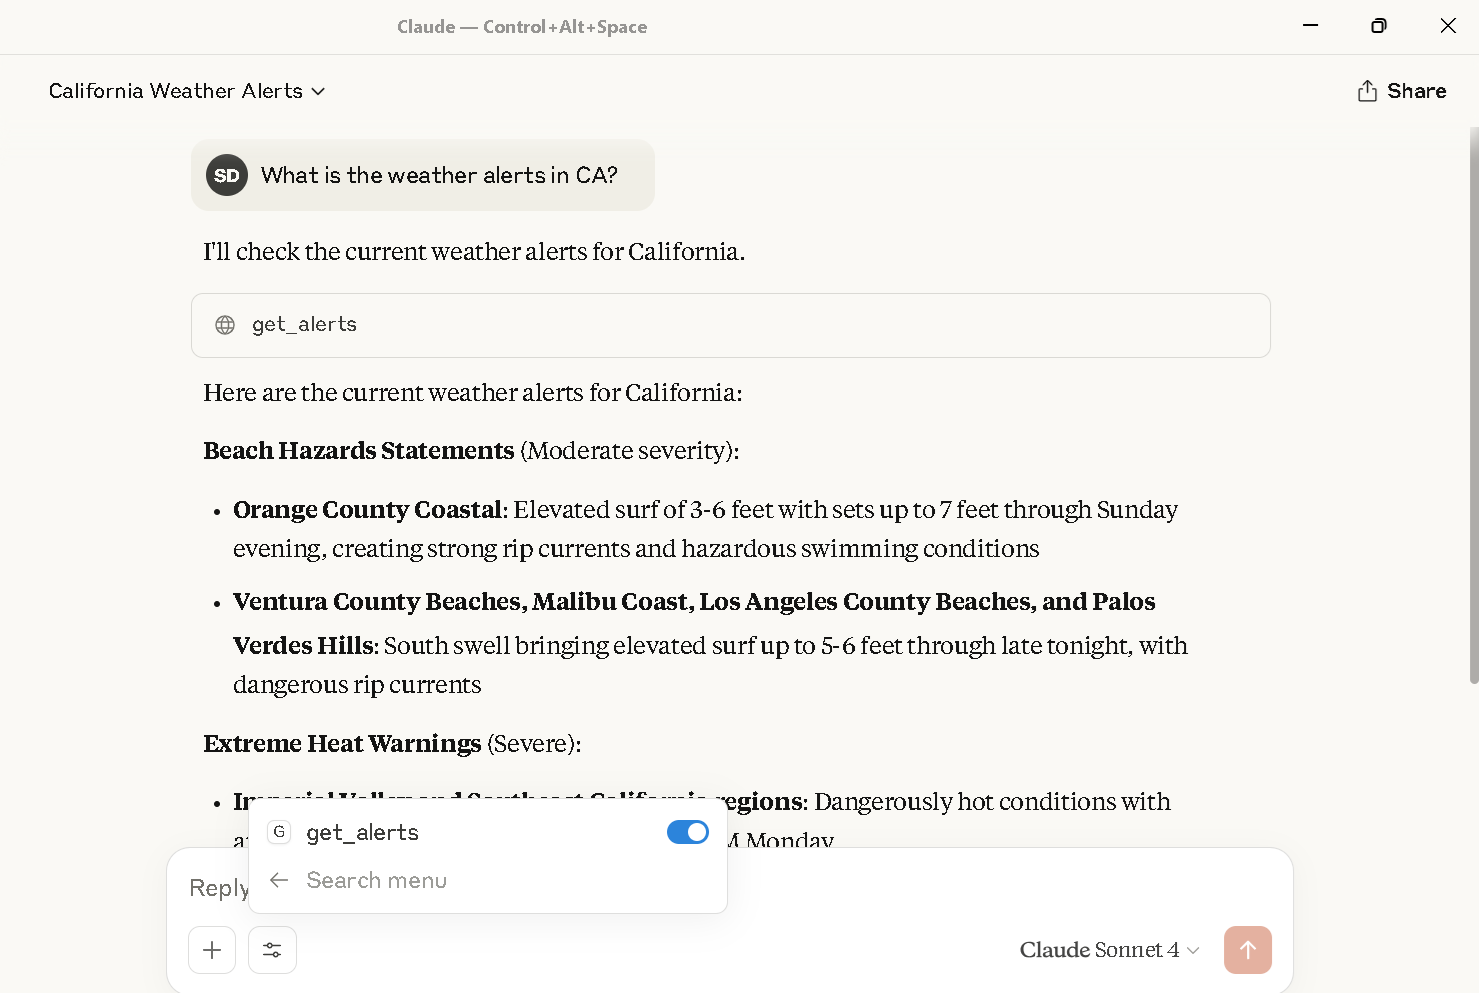
Weather alerts for California displayed in Claude Desktop using the get_alerts tool.
Claude Desktop Configuration
To call this MCP server from Claude Desktop, you need to update your claude_desktop_config.json file to include the server
For example:
{
  {
  "mcpServers": {
    "weather": {
      "command": "C:\\Users\\shubhechhadey\\.local\\bin\\uv.EXE",
      "args": [
        "run",
        "--with",
        "mcp[cli]",
        "mcp",
        "run",
        "C:\\Users\\shubhechhadey\\projects\\mcpproject\\server\\weather.py"
      ]
    }
  }
}
}
Attached is the screenshot: 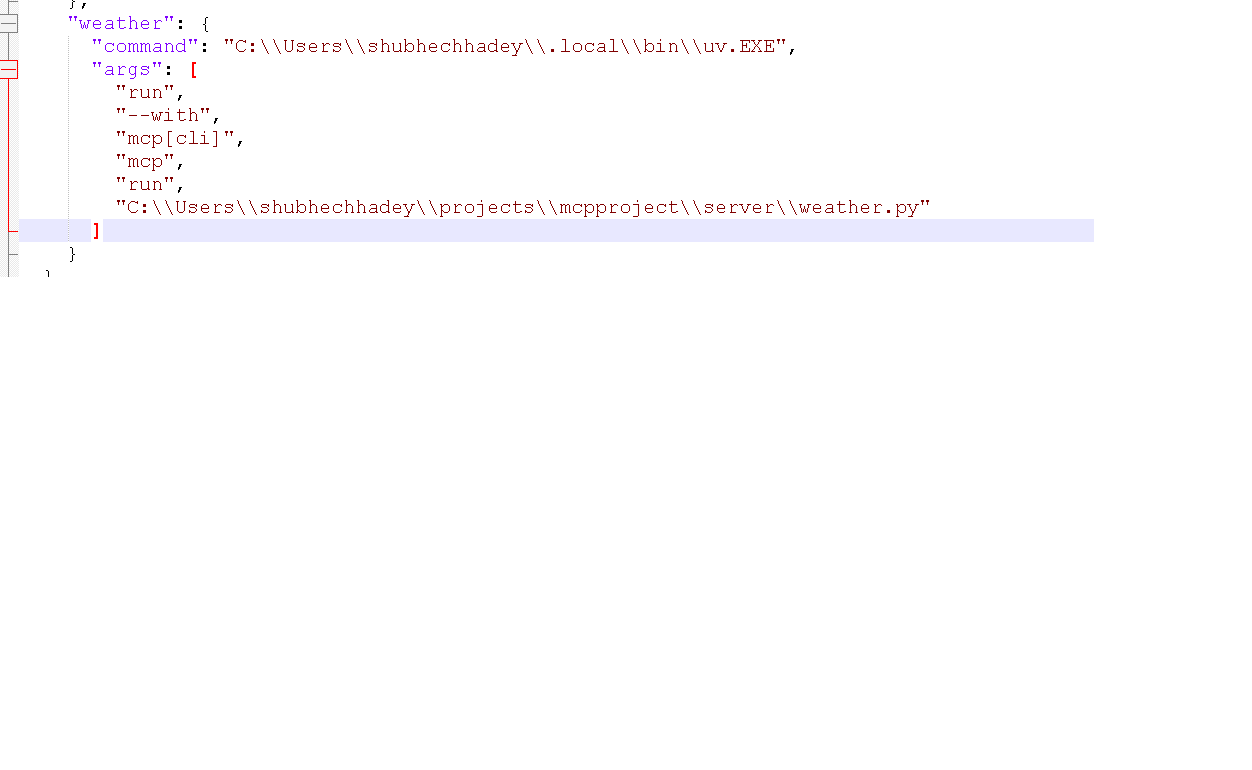
Notes
All commands use
uv
This server cannot be installed
Maintenance
Resources
Unclaimed servers have limited discoverability.
Looking for Admin?
If you are the server author, to access and configure the admin panel.
Latest Blog Posts
- Your AI Chatbot Just Exposed Your CEO's Salary to an InternBy Om-Shree-0709 on .Agent IdentityMCP SecurityOAuth Delegation
- Why MCP Servers Need Execution Sandboxing (And Why Your Current Stack Isn't Enough)By Om-Shree-0709 on .Agentic AiPrompt InjectionWebAssembly
MCP directory API
We provide all the information about MCP servers via our MCP API.
curl -X GET 'https://glama.ai/api/mcp/v1/servers/shubhechhadey/mcpproject'
If you have feedback or need assistance with the MCP directory API, please join our Discord server