# OpenGraph MCP Server (og-mcp)
og‑mcp is a Model‑Context‑Protocol (MCP) server that makes every OpenGraph.io ( https://opengraph.io ) API endpoint available to AI agents (e.g. Anthropic Claude, Cursor, LangGraph) through the standard MCP interface.
Why? If you already use OpenGraph.io to unfurl links, scrape HTML, extract article text, or capture screenshots, you can now give the same capabilities to your autonomous agents without exposing raw API keys.
## Global Installation
You can install this package globally via npm:
```
npm install -g opengraph-io-mcp
```
## Quick Install
### CLI Installer (Recommended)
The easiest way to configure OpenGraph MCP for any supported client:
```bash
# Interactive mode - guides you through setup
npx opengraph-io-mcp-install
# Direct mode - specify client and app ID
npx opengraph-io-mcp-install --client cursor --app-id YOUR_APP_ID
```
Supported clients: `cursor`, `claude-desktop`, `windsurf`, `vscode`, `zed`, `jetbrains`
### Claude Desktop Extension
For Claude Desktop users, you can also download the `.mcpb` extension for one-click installation from the [Releases page](https://github.com/securecoders/og-mcp/releases).
## Client Configuration
All configurations below use stdio transport (recommended). Replace `YOUR_OPENGRAPH_APP_ID` with your [OpenGraph.io App ID](https://www.opengraph.io/).
### Claude Desktop
Config location:
- **macOS**: `~/Library/Application Support/Claude/claude_desktop_config.json`
- **Windows**: `%APPDATA%\Claude\claude_desktop_config.json`
```json
{
"mcpServers": {
"opengraph": {
"command": "npx",
"args": ["-y", "opengraph-io-mcp"],
"env": {
"APP_ID": "YOUR_OPENGRAPH_APP_ID"
}
}
}
}
```
### Claude Code
One-command installation:
```bash
# macOS/Linux
claude mcp add --transport stdio --env APP_ID=YOUR_OPENGRAPH_APP_ID opengraph -- npx -y opengraph-io-mcp
# Windows (requires cmd /c wrapper)
claude mcp add --transport stdio --env APP_ID=YOUR_OPENGRAPH_APP_ID opengraph -- cmd /c npx -y opengraph-io-mcp
```
### Cursor
Config location: `~/.cursor/mcp.json`
```json
{
"mcpServers": {
"opengraph": {
"command": "npx",
"args": ["-y", "opengraph-io-mcp"],
"env": {
"APP_ID": "YOUR_OPENGRAPH_APP_ID"
}
}
}
}
```
### VS Code
Config location: `.vscode/mcp.json` (in your project directory)
VS Code supports input prompts for secure credential handling:
```json
{
"inputs": [
{
"type": "promptString",
"id": "opengraph-app-id",
"description": "OpenGraph App ID",
"password": true
}
],
"servers": {
"opengraph": {
"type": "stdio",
"command": "npx",
"args": ["-y", "opengraph-io-mcp"],
"env": {
"APP_ID": "${input:opengraph-app-id}"
}
}
}
}
```
### Windsurf
Config location: `~/.codeium/windsurf/mcp_config.json`
```json
{
"mcpServers": {
"opengraph": {
"command": "npx",
"args": ["-y", "opengraph-io-mcp"],
"env": {
"APP_ID": "YOUR_OPENGRAPH_APP_ID"
}
}
}
}
```
### JetBrains AI Assistant
Add to your JetBrains AI Assistant MCP configuration:
```json
{
"mcpServers": {
"opengraph": {
"command": "npx",
"args": ["-y", "opengraph-io-mcp"],
"env": {
"APP_ID": "YOUR_OPENGRAPH_APP_ID"
}
}
}
}
```
### Zed
Config location: `~/.config/zed/settings.json`
Note: Zed uses `context_servers` instead of `mcpServers`:
```json
{
"context_servers": {
"opengraph": {
"command": "npx",
"args": ["-y", "opengraph-io-mcp"],
"env": {
"APP_ID": "YOUR_OPENGRAPH_APP_ID"
}
}
}
}
```
## Available Tools
### OpenGraph.io Data Tools
| Tool Name | OpenGraph.io API Endpoint | Description | Documentation |
|-----------|---------------------------|-------------|---------------|
| **Get OG Data** | `/api/1.1/site/<URL>` | Extracts Open Graph data from a URL | [OpenGraph.io Docs](https://www.opengraph.io/documentation#get-open-graph) |
| **Get OG Scrape Data** | `/api/1.1/scrape/<URL>` | Scrapes data from a URL using OpenGraph's scrape endpoint | [OpenGraph.io Docs](https://www.opengraph.io/documentation#scrape-site) |
| **Get OG Screenshot** | `/api/1.1/screenshot/<URL>` | Gets a screenshot of a webpage using OpenGraph's screenshot endpoint | [OpenGraph.io Docs](https://www.opengraph.io/documentation#screenshot-site) |
| **Get OG Query** | `/api/1.1/query/<URL>` | Query a site with a custom question and optional response structure | [OpenGraph.io Docs](https://www.opengraph.io/documentation#query-site) |
| **Get OG Extract** | `/api/1.1/extract/<URL>` | Extract specific HTML elements (h1, p, etc.) from a webpage | [OpenGraph.io Docs](https://www.opengraph.io/documentation#extract-site) |
### Image Generation Tools
| Tool Name | Description |
|-----------|-------------|
| **Generate Image** | Create professional images: illustrations, diagrams (Mermaid/D2/Vega), icons, social cards, or QR codes |
| **Iterate Image** | Refine, modify, or create variations of existing generated images |
| **Inspect Image Session** | Retrieve session metadata and asset history for image generation sessions |
| **Export Image Asset** | Export generated image assets as inline base64, with optional disk write when running locally |
## Image Generation
The og-mcp server includes powerful AI-driven image generation capabilities, perfect for creating social media cards, architecture diagrams, icons, and more.
### Generate Image
Create images from natural language prompts or diagram code.
**Supported Image Types (`kind`):**
- `illustration` - General-purpose AI-generated images
- `diagram` - Technical diagrams from Mermaid, D2, or Vega syntax
- `icon` - App icons and logos
- `social-card` - OG images optimized for social sharing
- `qr-code` - QR codes with optional styling
**Preset Aspect Ratios:**
- Social: `og-image`, `twitter-card`, `twitter-post`, `linkedin-post`, `facebook-post`, `instagram-square`, `instagram-portrait`, `instagram-story`, `youtube-thumbnail`
- Standard: `wide`, `square`, `portrait`
- Icons: `icon-small`, `icon-medium`, `icon-large`
**Style Presets:**
`github-dark`, `github-light`, `notion`, `vercel`, `linear`, `stripe`, `neon-cyber`, `pastel`, `minimal-mono`, `corporate`, `startup`, `documentation`, `technical`
**Diagram Templates:**
`auth-flow`, `oauth2-flow`, `crud-api`, `microservices`, `ci-cd`, `gitflow`, `database-schema`, `state-machine`, `user-journey`, `cloud-architecture`, `system-context`
**Example Usage:**
```
// Generate a social card
generateImage({
prompt: "A modern tech startup hero image with abstract geometric shapes",
kind: "social-card",
aspectRatio: "og-image",
stylePreset: "vercel",
brandColors: ["#0070F3", "#000000"]
})
// Generate a diagram from Mermaid syntax
generateImage({
prompt: "graph TD; A[User] --> B[API]; B --> C[Database]",
kind: "diagram",
diagramSyntax: "mermaid",
stylePreset: "github-dark"
})
```
### Iterate Image
Refine or modify an existing generated image.
**Use cases:**
- Edit specific parts: "change the background to blue"
- Apply style changes: "make it more minimalist"
- Fix issues: "remove the text", "make the icon larger"
- Crop to specific coordinates
**Example:**
```
iterateImage({
sessionId: "uuid-from-generate",
assetId: "uuid-from-generate",
prompt: "Change the primary color to #0033A0 and add a subtle drop shadow"
})
```
### Inspect Image Session
Review session details and find asset IDs for iteration.
**Returns:**
- Session metadata (creation time, name, status)
- List of all assets with prompts, toolchains, and status
- Parent-child relationships showing iteration history
**Example:**
```
inspectImageSession({
sessionId: "uuid-from-generate"
})
```
### Export Image Asset
Export a generated image asset by session and asset ID. Returns the image inline as base64 along with metadata (format, dimensions, size).
When running locally (stdio transport), you can optionally provide a `destinationPath` to save the image to disk. On hosted/HTTP transport, the path is ignored and the image is returned inline only.
**Examples:**
```
// Inline only (works everywhere)
exportImageAsset({
sessionId: "uuid-from-generate",
assetId: "uuid-from-generate"
})
// Save to disk (stdio/local only)
exportImageAsset({
sessionId: "uuid-from-generate",
assetId: "uuid-from-generate",
destinationPath: "/Users/me/project/images/hero.png"
})
```
## How it works
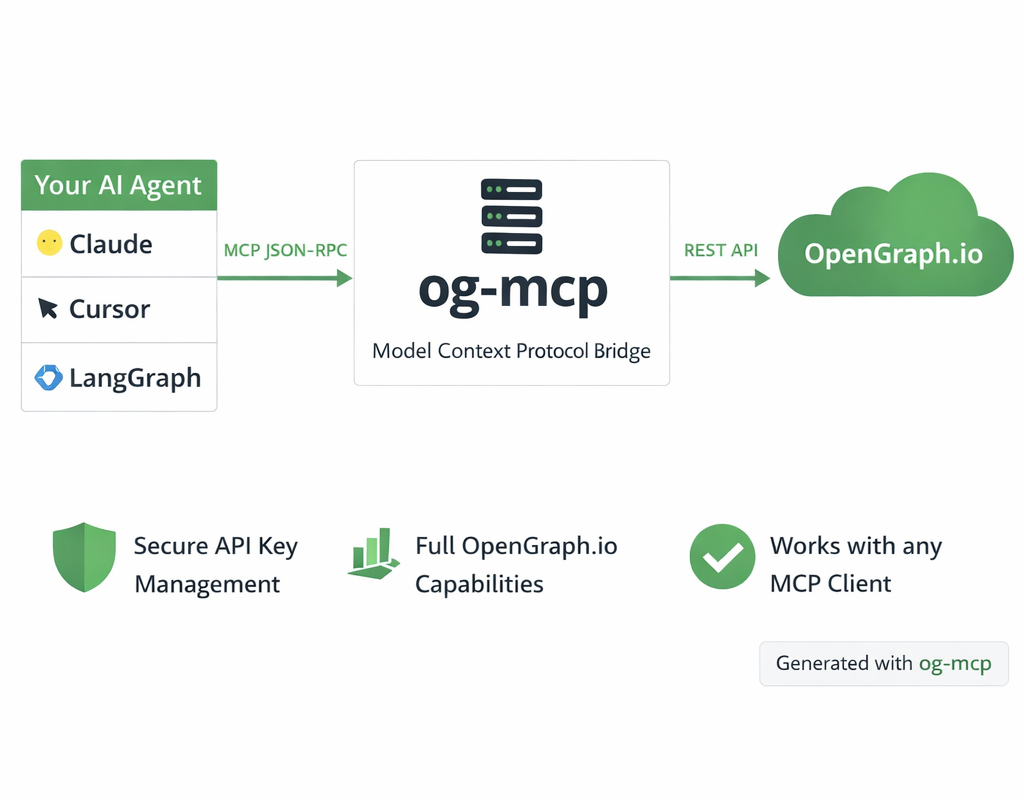
*<sup>Diagram generated with og-mcp's image generation tools</sup>*
The og-mcp server acts as a bridge between AI clients (like Claude or other LLMs) and the OpenGraph.io API:
1. AI client makes a tool call to one of the available MCP functions
2. og-mcp server receives the request and formats it for the OpenGraph.io API
3. OpenGraph.io processes the request and returns data
4. og-mcp transforms the response into a format suitable for the AI client
5. AI client receives the structured data ready for use
This abstraction prevents exposing API keys directly to the AI while providing full access to OpenGraph.io capabilities.
## Setup and Running
1. Clone this repository
2. Install dependencies:
```
npm install
```
3. Build the TypeScript code:
```
npm run build
```
4. Start the server:
```
npm start
```
The server will run on port 3010 by default (configurable via PORT environment variable).
## Configuration
The server requires an OpenGraph.io App ID to function properly. You can provide this in several ways:
1. Using environment variables: Set `OPENGRAPH_APP_ID` or `APP_ID` in a `.env` file or as an environment variable
2. Using command-line arguments with stdio transport: `--app-id YOUR_APP_ID`
3. When using SSE transport: Include it in the URL as a query parameter (`?app_id=YOUR_APP_ID`)
Example `.env` file:
```
OPENGRAPH_APP_ID=your_app_id_here
# or
APP_ID=your_app_id_here
```
## Transport Options
### Stdio Transport (Recommended)
For command-line usage and npm global installation, the server can be run with stdio transport:
```
npm run start:stdio
```
You can pass the OpenGraph API key directly via command-line argument:
```
npm run start:stdio -- --app-id YOUR_APP_ID
```
When installed globally:
```
opengraph-io-mcp --app-id YOUR_APP_ID
```
This mode allows the server to be invoked directly by other applications that use MCP.
### HTTP/SSE Transport
This method runs a web server that can be accessed over HTTP and uses SSE for streaming:
```
npm start
```
### HTTP/SSE Transport (Alternative)
If you prefer running a persistent server instead of stdio:
```bash
npm start
```
Then configure your client to connect to:
```
http://localhost:3010/sse?app_id=YOUR_OPENGRAPH_APP_ID
```
## Troubleshooting
- If tools aren't showing up, check that the server is running and the URL is correctly configured in Cursor
- Check the server logs for any connection or authorization issues
- Verify that Claude has been instructed to use the specific tools by name
