
The IBM Content Services MCP Server provides AI models with standardized access to IBM FileNet Content Manager (FNCM) for comprehensive document and content management through natural language interaction.
Document Management
Create, update, check-in/check-out, cancel checkout, and delete documents (specific versions or entire version series)
Retrieve document properties, version history, and class-specific property names
Extract text content from documents
Change a document's class (with warning about potential property loss)
Folder Management
Create, update, and delete folders
File and unfile documents within folder hierarchies
Retrieve folder details and documents contained within a folder
Class & Metadata Management
List root classes available in the repository
Determine appropriate document classes based on keywords/context
Retrieve detailed property descriptions (data types, valid search operators) for any class
Search & Discovery
Search repository objects by class and property conditions (supports
=,>,<,>=,<=,!=,CONTAINS,STARTS,ENDS)Look up documents by name (with confidence scores) or by folder path
Retrieve searchable property descriptions for building queries
Annotations
Retrieve all annotations associated with a document or a specific annotation by ID
Custom Objects
Retrieve custom objects from the repository by ID or path
Resources
Automatically expose documents in configured folders as read-only resources for LLM context reference
AI-Powered Property Extraction & Classification (Preview)
Automatically extract document class, properties, and text for AI-based property value extraction
Support document reclassification workflows
Legal Hold & Compliance (Preview)
Create, manage, and delete legal holds
Add/remove documents or objects from a hold and list held objects
Authentication & Integration
Supports Basic, OAuth, and Zen/IAM authentication
Compatible with MCP clients like Claude Desktop and Watsonx Orchestrate
Connects to IBM FileNet Content Platform Engine via Content Services GraphQL API, enabling document management, version control, folder operations, search, and metadata management for enterprise content stored in FileNet Content Manager.
Click on "Install Server".
Wait a few minutes for the server to deploy. Once ready, it will show a "Started" state.
In the chat, type
@followed by the MCP server name and your instructions, e.g., "@Core Content Services MCP Serverfind documents about Q3 financial reports in the accounting folder"
That's it! The server will respond to your query, and you can continue using it as needed.
Here is a step-by-step guide with screenshots.
IBM Content Services MCP Server
Overview
The IBM Content Services MCP Server provides a standardized interface that enables IBM FileNet Content Manager (FNCM) capabilities to be used by AI models. The server is available in three specialized configurations to support different workflows:
Core Server: Comprehensive document and content management operations
Property Extraction and Classification Server (Preview): AI-powered document analysis and classification
Legal Hold Server (Preview): Legal hold and compliance management
Each server can be deployed independently or in combination to support your specific use cases.
Server Types and Capabilities
Core Server (core-cs-mcp-server)
Purpose: Comprehensive document and content management operations
Use Cases:
General document lifecycle management (create, update, check-in, check-out, delete)
Folder operations and document filing
Search and retrieval across the repository
Metadata and class management
Document annotations
Resources support for exposing documents as LLM context
Property Extraction and Classification Server (property-extraction-and-classification-cs-mcp-server) - Preview
Purpose: AI-powered document analysis and classification
Dependencies: Requires Core Server for document update operations (e.g., update_document_properties)
Use Cases:
Automated property extraction from document content
Document classification and reclassification workflows
Content-based metadata enrichment
Legal Hold Server (legal-hold-cs-mcp-server) - Preview
Purpose: Legal hold and compliance management
Use Cases:
Creating and managing legal holds
Placing documents and objects under hold
Tracking held objects
Compliance and litigation support workflows
Tools List
Core Server Tools
The Core Server provides 28 tools organized into the following categories:
Document Management (11 tools)
get_document_versions: Retrieves a document's version history, including major and minor version numbers and document IDs for each version.
get_document_text_extract: Extracts text content from a document by retrieving its text extract annotations. If multiple text extracts are found, they are concatenated. Note: This functionality requires the Persistent Text Extract add-on to be installed in your object store. See the Prerequisites section for more details.
create_document: Creates a new document in the content repository with specified properties. Can upload files as the document's content if file paths are provided. Requires first calling determine_class and get_class_property_descriptions.
update_document_properties: Updates an existing document's properties without changing its class. Requires first calling get_class_property_descriptions to get valid properties for the document's current class.
update_document_class: Changes a document's class in the content repository. WARNING: Changing a document's class can result in loss of properties if the new class does not have the same properties as the old class. Requires first calling determine_class to get the new class_identifier.
checkin_document: Checks in a document that was previously checked out. Can upload new content files during check-in if file paths are provided.
checkout_document: Checks out a document for editing. Can download the document content to a specified folder path if provided.
cancel_document_checkout: Cancels a document checkout in the content repository, releasing the reservation.
get_document_properties: Retrieves a document from the content repository by ID or path, returning the document object with its properties.
delete_document_version: Deletes a specific document version in the content repository using its document ID.
delete_version_series: Deletes an entire version series (all versions of a document) in the content repository using the version series ID.
Folder Management (7 tools)
create_folder: Creates a new folder in the content repository with specified name, parent folder, and optional class identifier.
delete_folder: Deletes a folder from the repository using its ID or path.
unfile_document: Removes a document from a folder without deleting the document itself.
file_document: Files a document into a folder.
update_folder: Updates an existing folder's properties. Requires first calling determine_class and get_class_property_descriptions.
get_folder_documents: Get documents contained in a folder.
get_folder_detail: Retrieves detailed information about a folder.
Class/Metadata Management (3 tools)
list_root_classes: Lists root classes.
determine_class: Determines the appropriate class based on the available classes and the content of the user's message or context document.
get_class_property_descriptions: Retrieves detailed descriptions of all properties for a specified class.
Search (4 tools)
get_searchable_property_descriptions: Retrieves descriptions of properties that can be used in search operations.
repository_object_search: Searches for repository objects based on specified criteria.
lookup_documents_by_name: Searches for documents by matching keywords against document names. Returns a ranked list of matching documents with confidence scores. Useful when you know part of a document's name but not its exact ID or path.
lookup_documents_by_path: Searches for documents based on their location in the folder hierarchy. Matches keywords against folder names and document containment names at each path level. Particularly useful when the user describes a document using path separators (e.g., "/Folder1/Subfolder/document").
Annotations (2 tools)
get_document_annotations: Retrieves all annotations associated with a document, including their IDs, names, descriptive text, and content elements.
get_annotation: Retrieves a specific annotation by its ID.
Custom Objects (1 tool)
get_custom_object: Retrieves a custom object from the repository by ID or path.
Property Extraction and Classification Server Tools (Preview)
The Property Extraction and Classification Server provides 2 specialized tools for AI-powered document workflows:
property_extraction: Extracts document class, properties metadata, and text content for AI-based property value extraction. This tool determines the document's class, fetches class metadata to identify all available properties (filtering out system and hidden properties), and retrieves the document's text extract content.
list_all_classes: Lists all available classes for a specific root class type. Essential for document reclassification workflows where you need to match document content to the most appropriate class.
Legal Hold Server Tools (Preview)
The Legal Hold Server provides 6 tools for legal compliance management:
create_hold: Creates a new legal hold with a specified display name.
delete_hold: Removes a legal hold and releases all held objects.
add_object_to_hold: Places an object (document, folder, etc.) under a legal hold.
delete_object_from_hold: Removes an object from a legal hold without deleting the hold itself.
get_held_objects_for_hold: Lists all objects currently under a specific legal hold.
get_holds_by_name: Searches for legal holds by their display name.
Resources (Core Server Only)
What are Resources?
Resources provide read-only access to document content for LLM context. Documents in a configured folder are automatically exposed as MCP resources, allowing AI models to reference them during conversations without explicit tool calls.
Note: Resources functionality requires the Persistent Text Extract Add-on to be installed in your object store to retrieve document content. See the Prerequisites section for installation details.
Configuration
Set the RESOURCES_FOLDER environment variable to specify the folder path in your object store where resource documents should be uploaded:
The RESOURCES_FOLDER value is the path of the folder in your FileNet object store where you should upload your resource documents. The server will automatically discover and register all documents in this folder.
Documents in this folder will be:
Automatically registered as resources when the Core server starts
Available to the LLM with URIs following the pattern:
ibm-cs://{object_store}/documents/{folder_path}/{document_name}Displayed with names in the format:
[IBM CS] {document_name}
Security Guidelines
Access Control: The resources folder should only be modifiable by administrative users to prevent tampering with content that will be used by AI models. Configure appropriate folder permissions in your FileNet object store to:
Restrict write/modify access to administrators only
Allow read access for the MCP server business user
Prevent unauthorized users from adding, modifying, or deleting resource documents
Use Cases
Resources are ideal for providing AI models with reference documentation:
Policy documents for compliance guidance
Classification guidelines for document categorization
Standard operating procedures
Regulatory requirements
Best practices documentation
Example
If you set RESOURCES_FOLDER=/policies and have documents in that folder:
/policies/data_classification_policy.txt/policies/retention_policy.txt
These documents will be available as resources that the AI can reference when answering questions or making decisions.
Tested Environments
The Content Services MCP Servers have been tested with the following MCP client and LLM combinations:
Claude Desktop: Sonnet 4.5, 4, 3.5 and Haiku 4.5
Watsonx Orchestrate: Llama-3-2-90b-vision-instruct
While other MCP client and LLM combinations have not been tested, they may work with this server. We encourage you to experiment and validate for yourself.
For setup instructions with additional MCP clients, see:
MCP Client Limitations
Some MCP clients have limitations that affect which tools can be used. The following table shows known compatibility issues:
MCP Client | Limitation | Affected Tools |
Watson Orchestrate | Does not support complex Pydantic classes as input | • • • • • • |
Watson Orchestrate | Sporadic 'Invalid tool call object' error when agent tries to invoke MCP tools | • • • • • |
Note: These limitations are due to the MCP client's input handling capabilities, not the MCP server itself.
Setup and Configuration
Prerequisites
on macOS:
brew install uvon Windows: see link above
Access to a FileNet CPE server with Content Services GraphQL API (CS-GQL) installed
Persistent Text Extract Add-on must be installed in your object store if you want to use document content retrieval functionality
This add-on enables the extraction and storage of text content from documents
Required for: Core Server's
get_document_text_extracttool, Resources functionality, and Property Extraction Server'sproperty_extractiontoolWithout this add-on, these features will not return document content
For installation instructions, refer to the IBM Documentation on Installing the Persistent Text Add-on
Configuration
The Content Services MCP Servers require several environment variables to connect to your FileNet CPE server:
Required Environment Variables
Environment Variable | Description | Default |
| Content Services GraphQL API endpoint URL (required) | - |
| Authentication username (required) | - |
| Authentication password (required) | - |
| Object store identifier (required) | - |
Optional Environment Variables
Environment Variable | Description | Default |
| Whether SSL is enabled. Can be set to |
|
| Whether SSL is enabled for token endpoint. Can be set to |
|
| Token refresh interval in seconds |
|
| OAuth token URL | - |
| OAuth grant type | - |
| OAuth scope | - |
| OAuth client ID | - |
| OAuth client secret | - |
| Request timeout in seconds |
|
| Number of connection pool connections |
|
| Maximum pool size |
|
| Logging level for the server. Valid values: |
|
| Core Server only. Folder path in the repository containing documents to expose as MCP resources. Documents in this folder will be automatically registered as resources with URIs following the pattern |
|
Cloud Pak for Business Automation Environment Variables
Environment Variable | Description | Default |
| Zen url to send IAM token for exchange to Zen token, for example: <zen_host_route>/v1/preauth/validateAuth | - |
| Whether SSL is enabled for Zen exchange route. Can be set to |
|
| IAM url to send user/pwd or client_id/client_secret to IAM to get back IAM token, for example: <iam_host_route>/idprovider/v1/auth/identitytoken | - |
| Whether SSL is enabled for IAM route. Can be set to |
|
| IAM grant type | - |
| IAM scope | - |
| if grant type is password, specify the IAM user | - |
| if grant type is password, specify the IAM password | - |
| if grant type is client_credentials, specify the IAM client id | - |
| if grant type is client_credentials, specify the IAM client secret | - |
SSL Configuration Best Practices
For SSL configuration (SSL_ENABLED, TOKEN_SSL_ENABLED, ZENIAM_ZEN_SSL_ENABLED, and ZENIAM_IAM_SSL_ENABLED), you have three options:
Use System Certificates (Recommended for Production): Set to
trueto use your system's certificate store.Provide Custom Certificate Path: Set to the file path of your certificate (e.g.,
/path/to/certificate.pem).Disable SSL Verification (Not Recommended for Production): Set to
falseto disable SSL verification.
Security Warning: Disabling SSL verification (
false) should only be used in testing environments. For production deployments, always use proper certificate validation to ensure secure communications.
Authentication Methods
The server supports three authentication methods:
Basic Authentication
Set the following environment variables:
OAuth Authentication
Set the following environment variables:
Zen/IAM Authentication
An example of ZEN/IAM environment variables when using USER/PASSWORD and SSL to all external servers
Integration with MCP Clients/Agent Frameworks
Claude Desktop Configuration
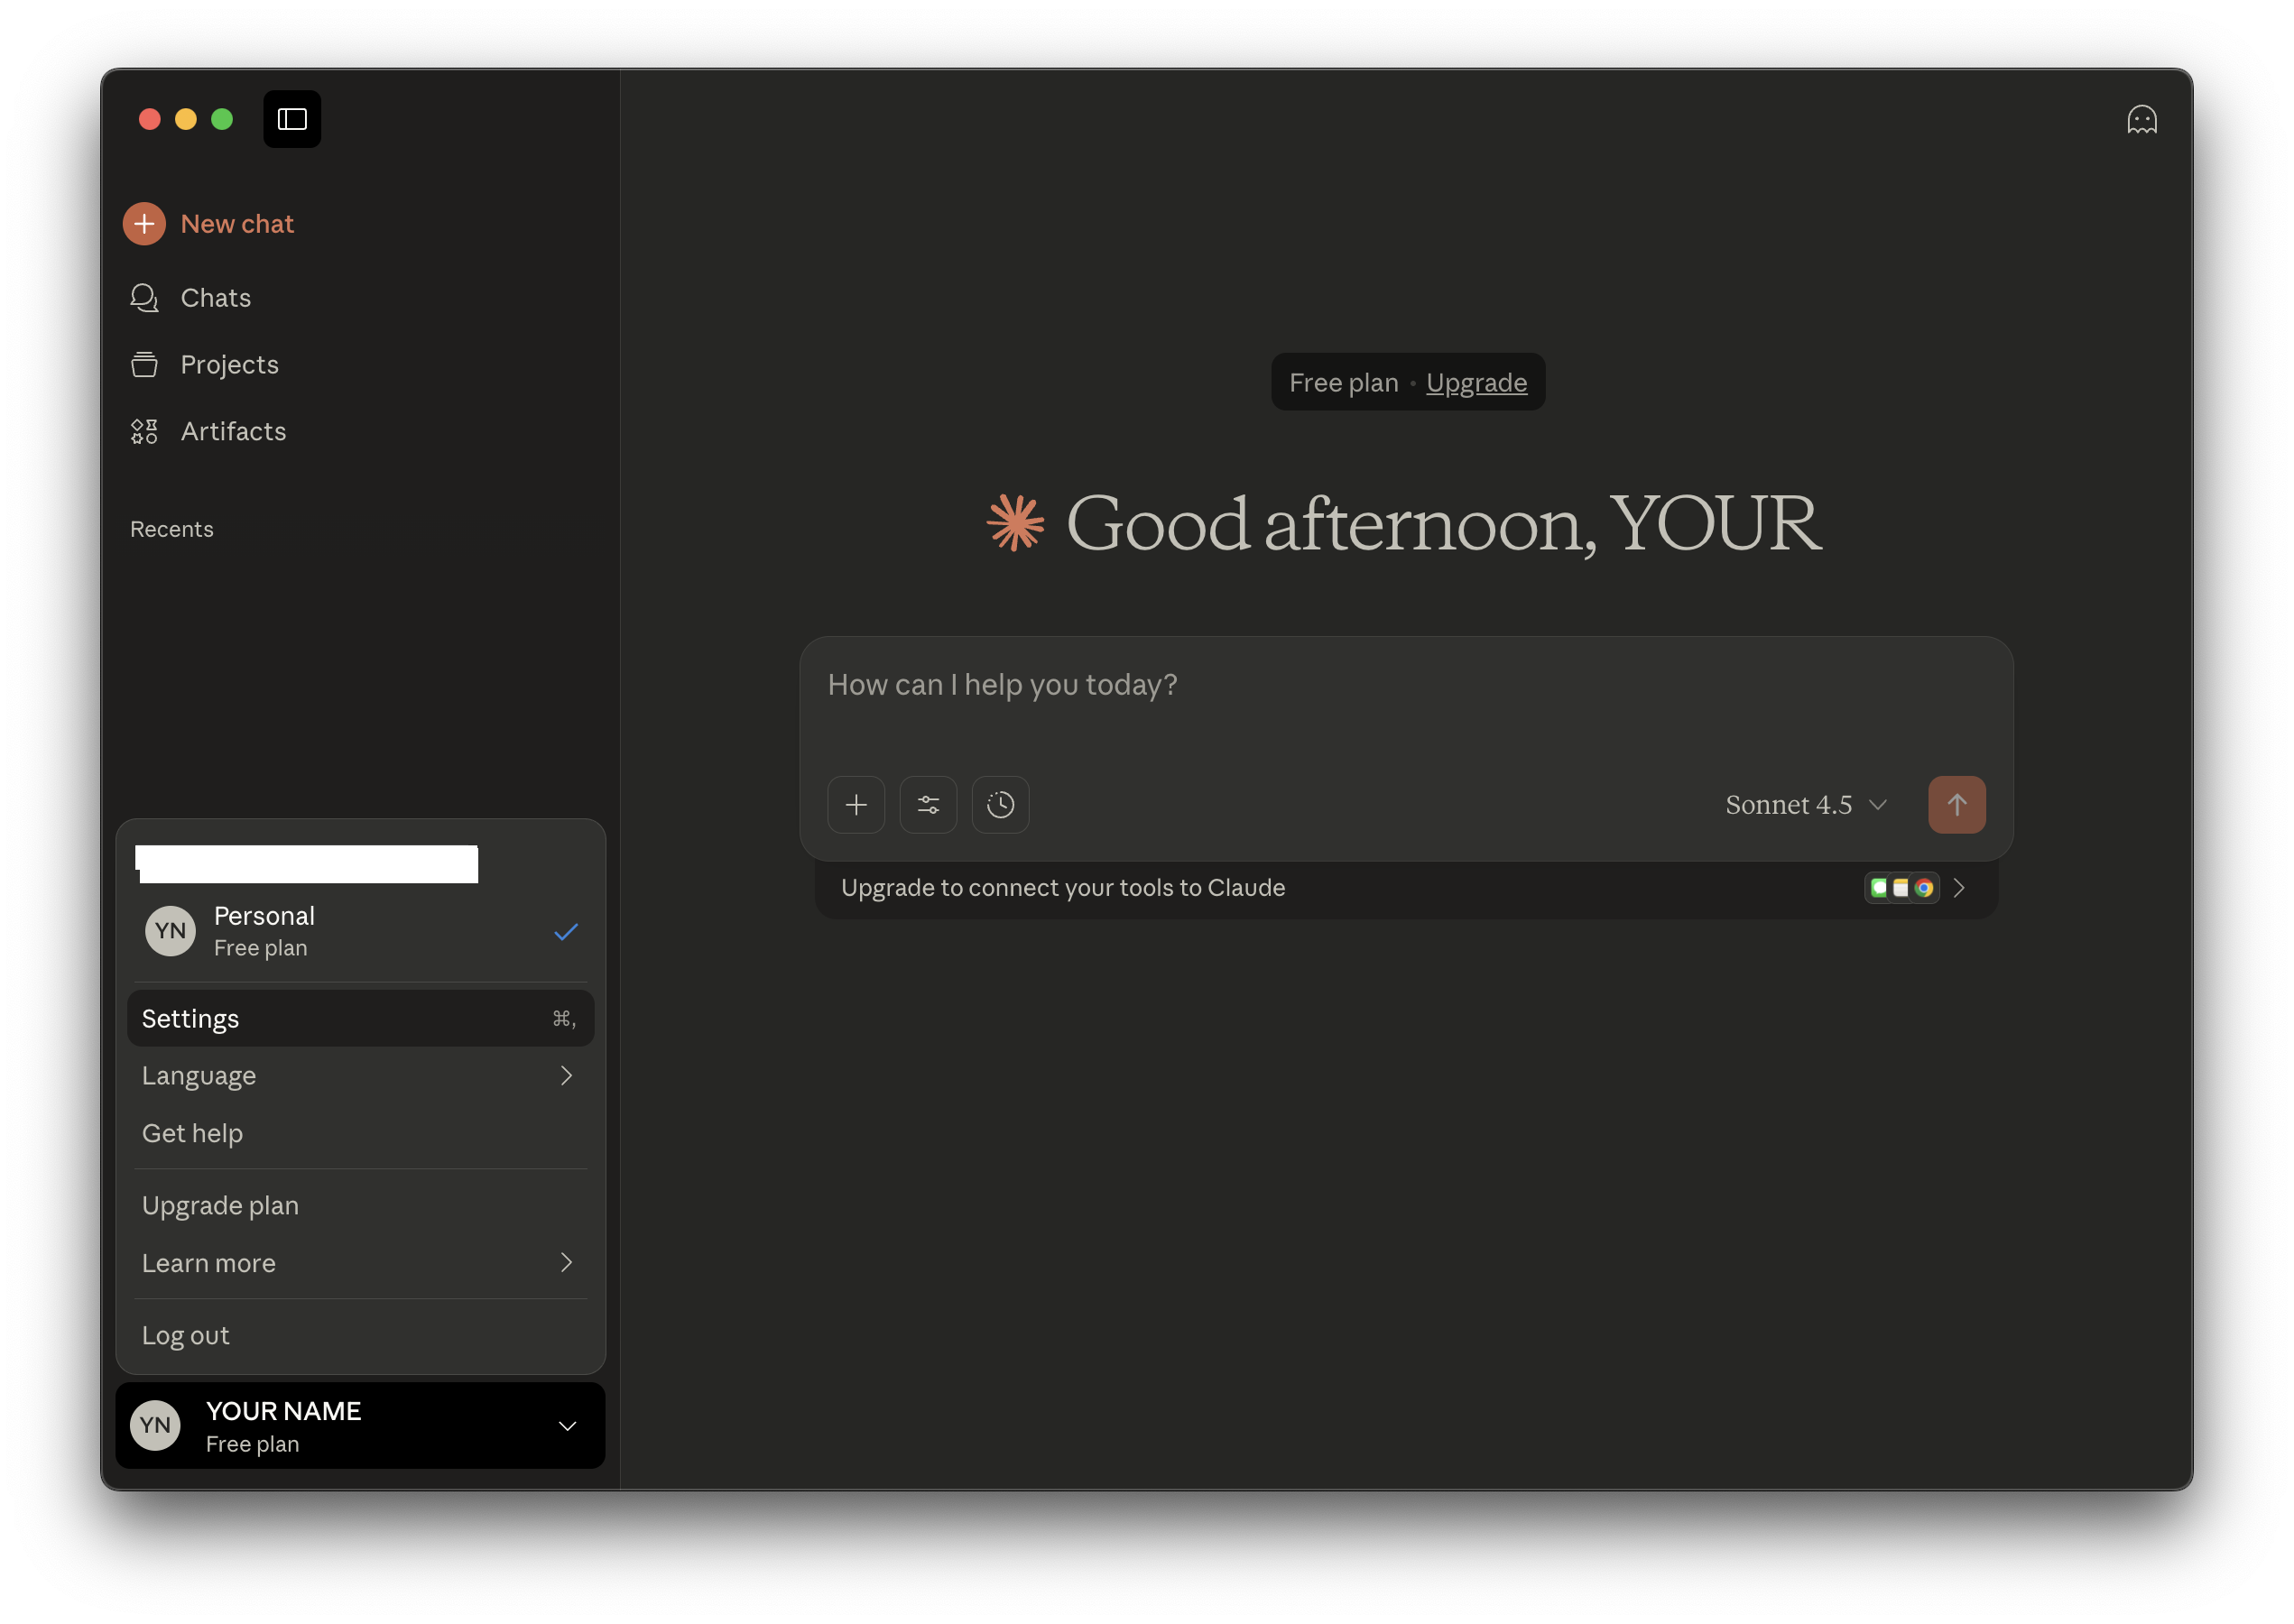
Open Claude Desktop Settings:
On macOS, click the Claude menu in the top menu bar and select Settings.
On Windows, access Settings from the Claude application.
Navigate to the Developer tab and click Edit Config:
macOS:
~/Library/Application Support/Claude/claude_desktop_config.jsonWindows:
%APPDATA%\Claude\claude_desktop_config.json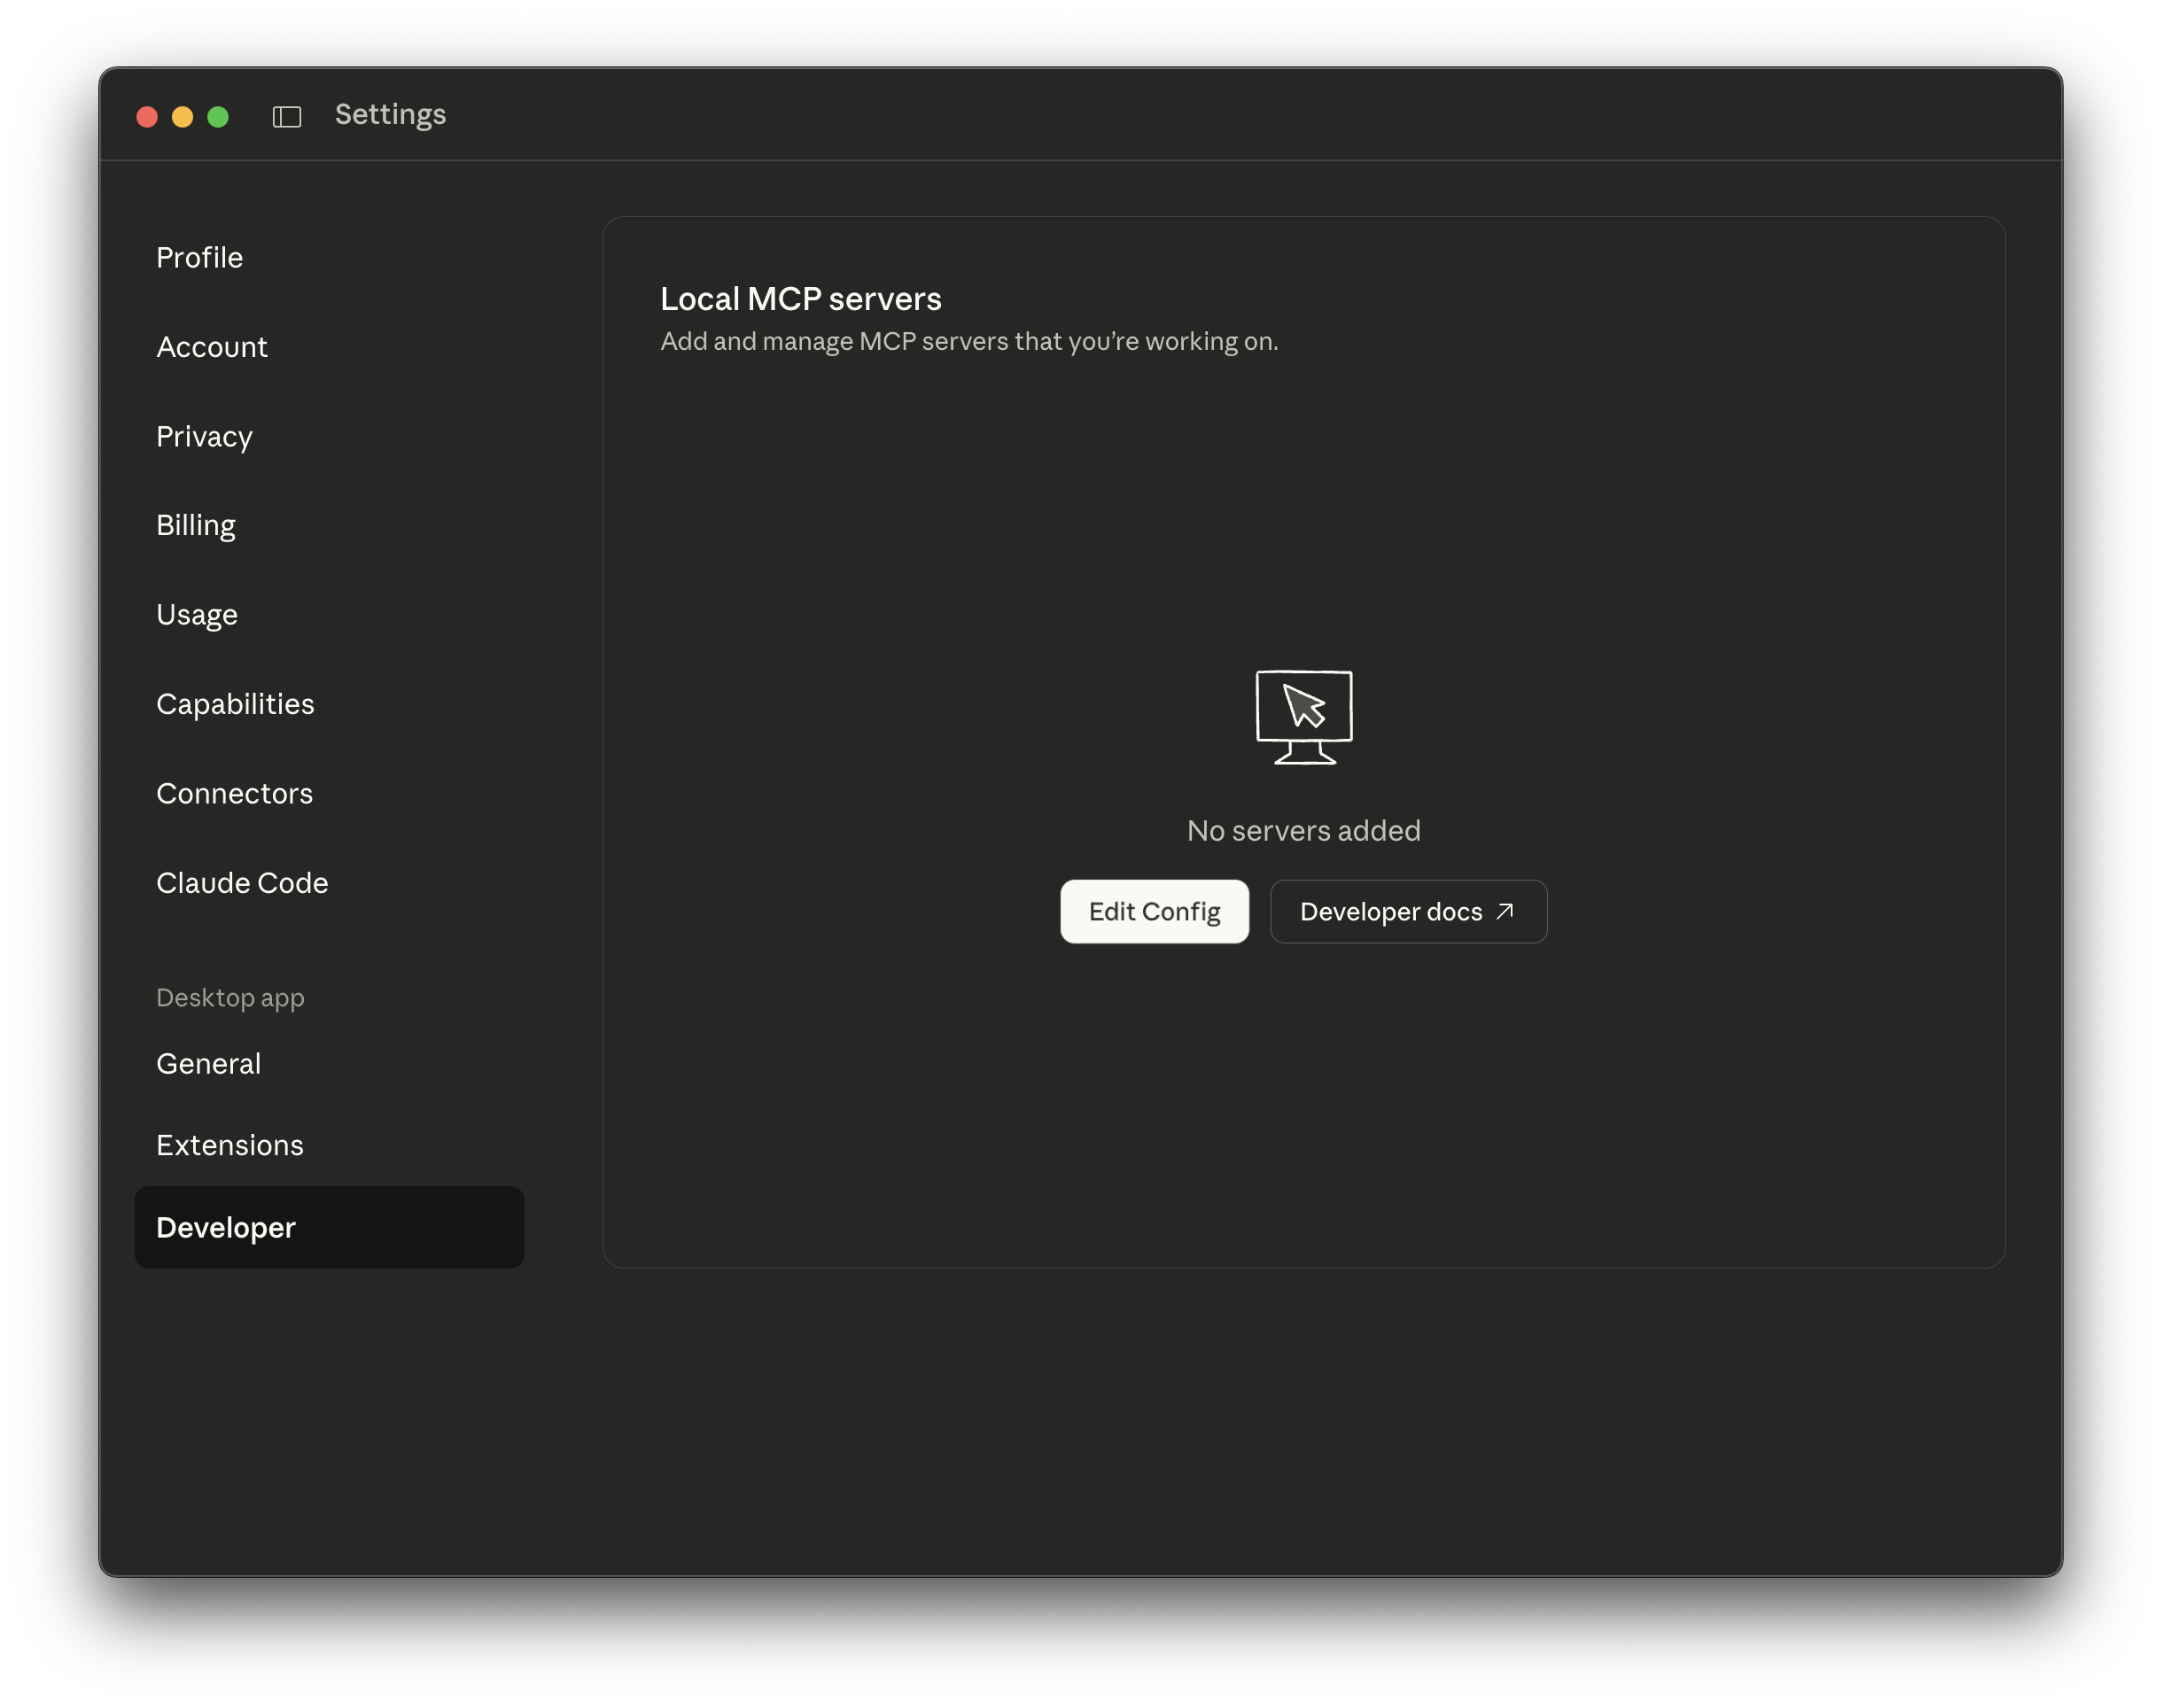
Add one of the following configuration examples to the claude_desktop_config.json file:
Option 1: Using local installation (if you've cloned the repository)
{ "mcpServers": { "core-cs-mcp-server": { "command": "/path/to/your/uvx", "args": [ "--from", "/path/to/your/cs-mcp-server", "core-cs-mcp-server" ], "env": { "USERNAME": "your_username", "PASSWORD": "your_password", "SERVER_URL": "https://your-graphql-server/content-services-graphql/graphql", "OBJECT_STORE": "your_object_store" } } } }Option 2: Installing directly from GitHub (recommended)
{ "mcpServers": { "core-cs-mcp-server": { "command": "uvx", "args": [ "--from", "git+https://github.com/ibm-ecm/ibm-content-services-mcp-server", "core-cs-mcp-server" ], "env": { "USERNAME": "your_username", "PASSWORD": "your_password", "SERVER_URL": "https://your-graphql-server/content-services-graphql/graphql", "OBJECT_STORE": "your_object_store" } } } }Option 3: Multi-Server Setup (Core + Property Extraction + Legal Hold)
{ "mcpServers": { "core-cs-mcp-server": { "command": "uvx", "args": [ "--from", "git+https://github.com/ibm-ecm/ibm-content-services-mcp-server", "core-cs-mcp-server" ], "env": { "USERNAME": "your_username", "PASSWORD": "your_password", "SERVER_URL": "https://your-graphql-server/content-services-graphql/graphql", "OBJECT_STORE": "your_object_store" } }, "property-extraction-cs-mcp-server": { "command": "uvx", "args": [ "--from", "git+https://github.com/ibm-ecm/ibm-content-services-mcp-server", "property-extraction-and-classification-cs-mcp-server" ], "env": { "USERNAME": "your_username", "PASSWORD": "your_password", "SERVER_URL": "https://your-graphql-server/content-services-graphql/graphql", "OBJECT_STORE": "your_object_store" } }, "legal-hold-cs-mcp-server": { "command": "uvx", "args": [ "--from", "git+https://github.com/ibm-ecm/ibm-content-services-mcp-server", "legal-hold-cs-mcp-server" ], "env": { "USERNAME": "your_username", "PASSWORD": "your_password", "SERVER_URL": "https://your-graphql-server/content-services-graphql/graphql", "OBJECT_STORE": "your_object_store" } } } }Restart Claude Desktop:
Simply closing the window is not enough, Claude Desktop must be stopped and restarted:
on macOS: Claude > Quit
on Windows: File > Exit
Check Available Tools:
To see all the available tools in Claude Desktop, proceed as follows:
first click the settings icon, and you should see:

then click
core-cs-mcp-server, and you should see all your tools: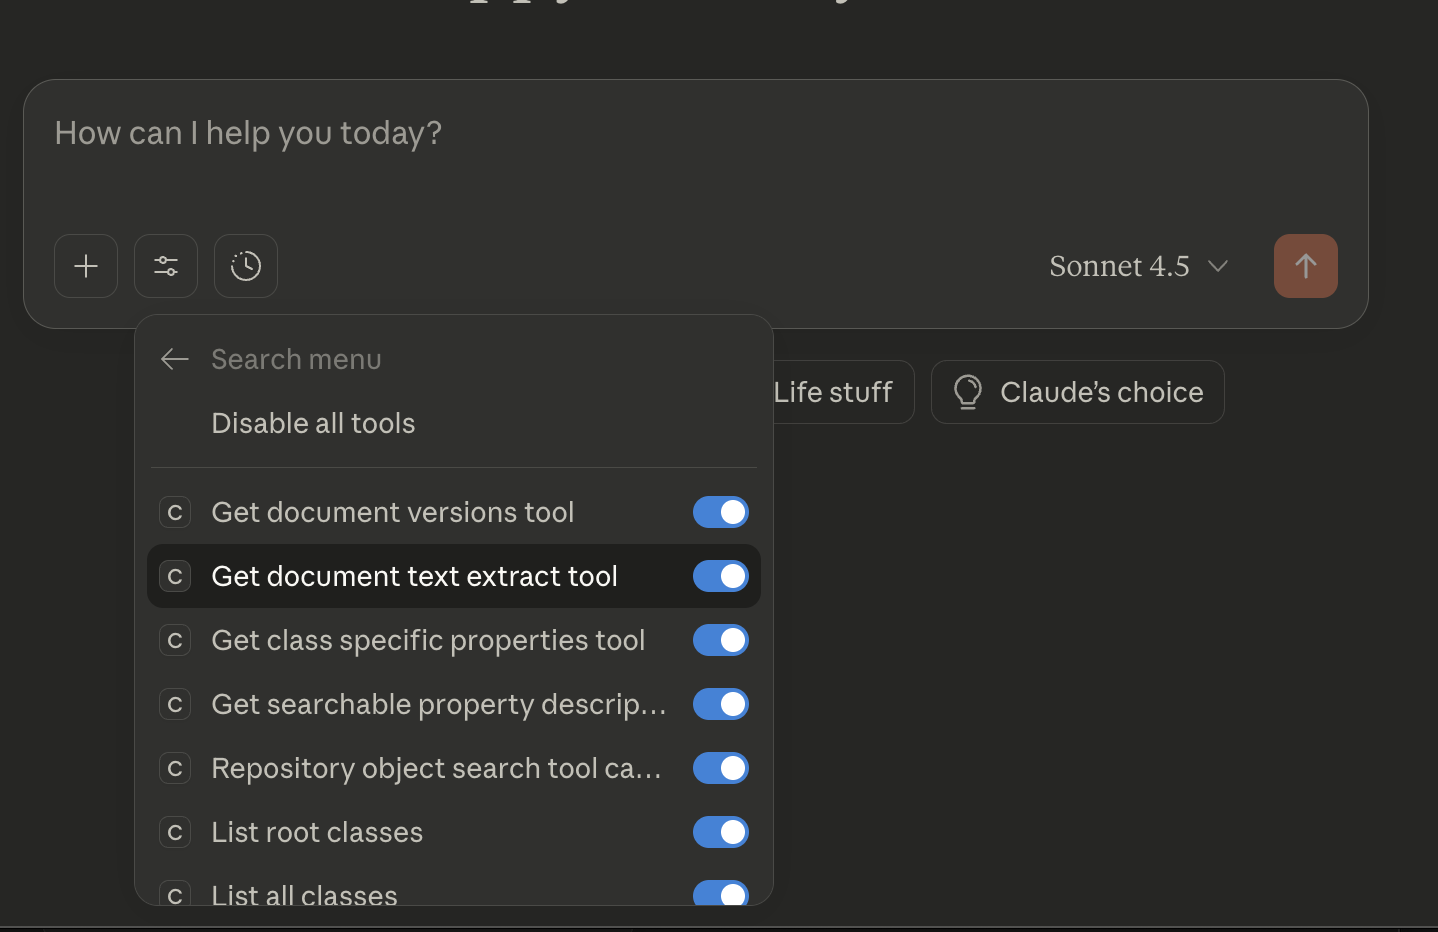
Note: The JSON configuration examples above show only the minimum required environment variables. For a complete list of all possible configuration options, refer to the Environment Variables tables above.
Watson Orchestrate (WxO) Configuration
This section explains how to augment IBM watsonx Orchestrate with the Content Services MCP Servers, enabling watsonx Orchestrate to interact with IBM FileNet Content Management during user interactions in a chat.
You can configure one or multiple servers depending on your needs:
Core Server: For general document management operations
Property Extraction and Classification Server: For AI-powered document analysis (requires Core Server for document updates)
Legal Hold Server: For legal compliance workflows
The configuration steps below use the Core Server as an example, but the same process applies to other servers by changing the server name and install command.
Configuration
1. Configure Connection Variables
For SaaS or on-premises offering (UI):
Click the main menu icon
Navigate to Manage > Connections
Click Add New Connection
Enter connection ID and display name
Click Next
You will now configure draft connection details (test environment)
Select authentication type dropdown to be Key value pair
Enter each required variable:
SERVER_URL: Your Content Services GraphQL API endpoint URLUSERNAME: Authentication usernamePASSWORD: Authentication passwordOBJECT_STORE: Object store identifier
Enter any optional variables as needed (e.g.,
SSL_ENABLED,TOKEN_REFRESH, etc.)Click Next when done
Now you will enter your live connection environment variables
Select authentication type dropdown to be Key value pair
Enter the same required variables as above
Enter any optional variables as needed
Select the preferred credential type
Click Add Connection
For ADK (Application Development Kit):
For creating connections using the ADK CLI, please refer to the official documentation.
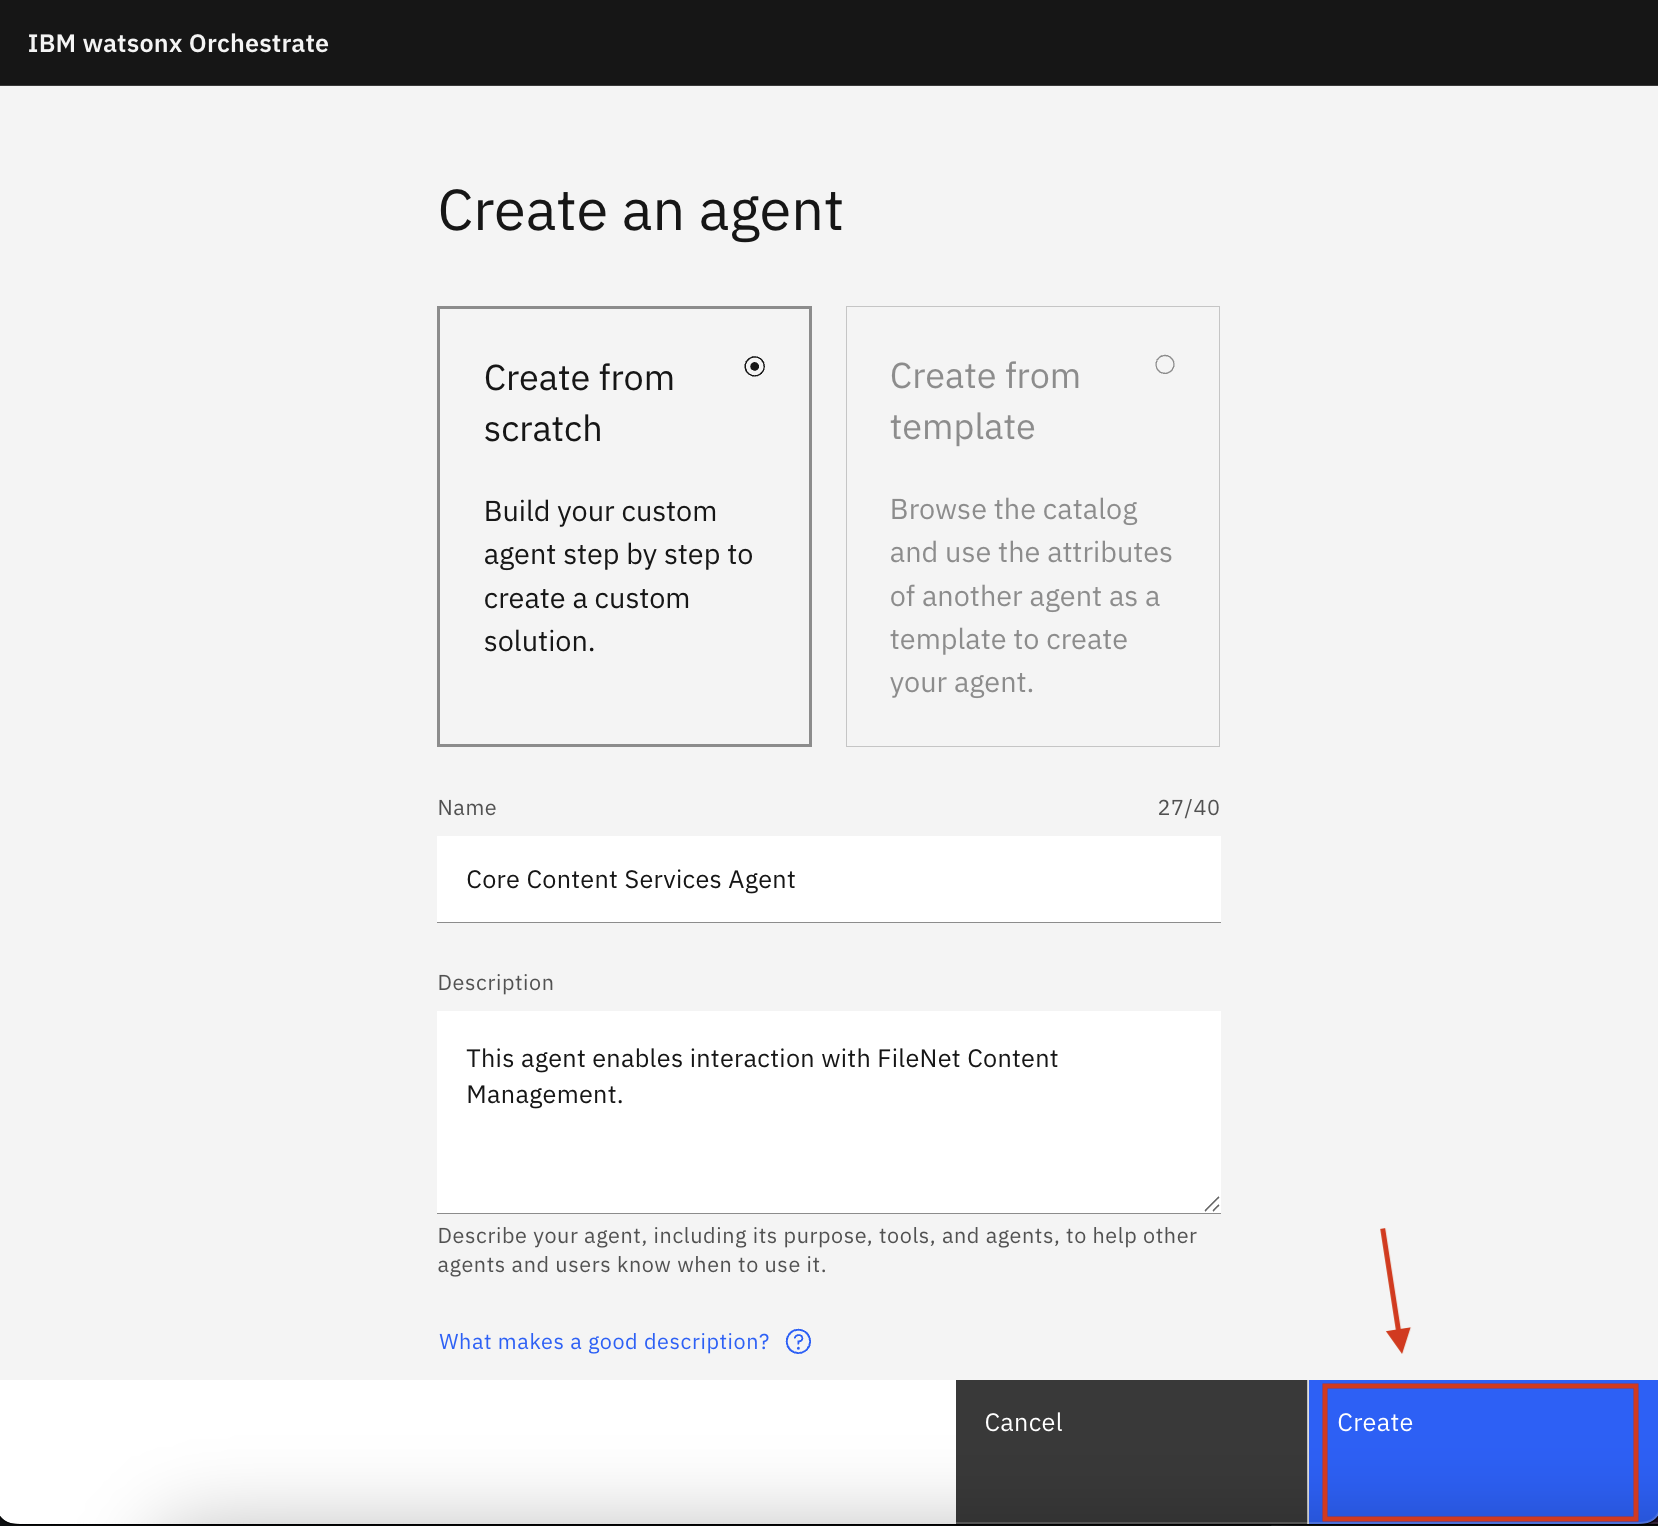
2. Create an agent
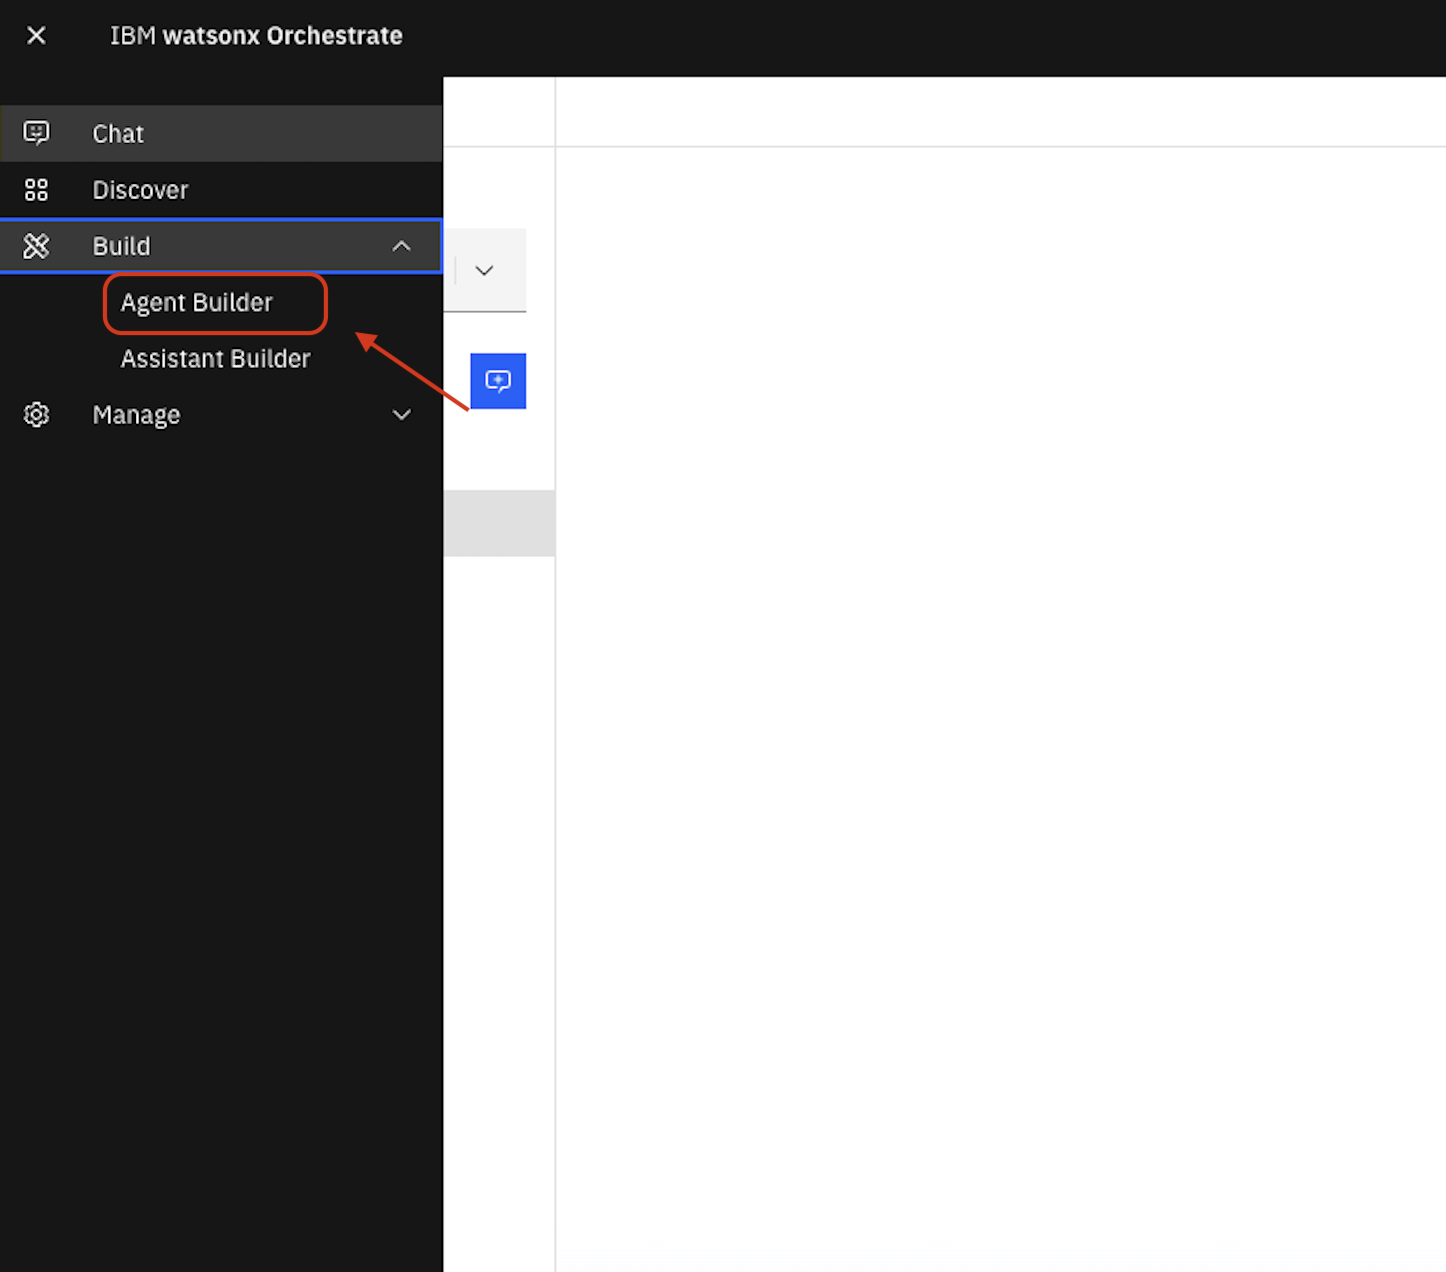
Click the main menu icon
Navigate to Build > Agent Builder
Navigate to All agents
Click Create agent + to add a new agent

Choose Create from scratch
Enter a Name (e.g.,
Core Content Services Agent)Enter a Description (e.g.,
This agent enables interaction with FileNet Content Management.)Click Create
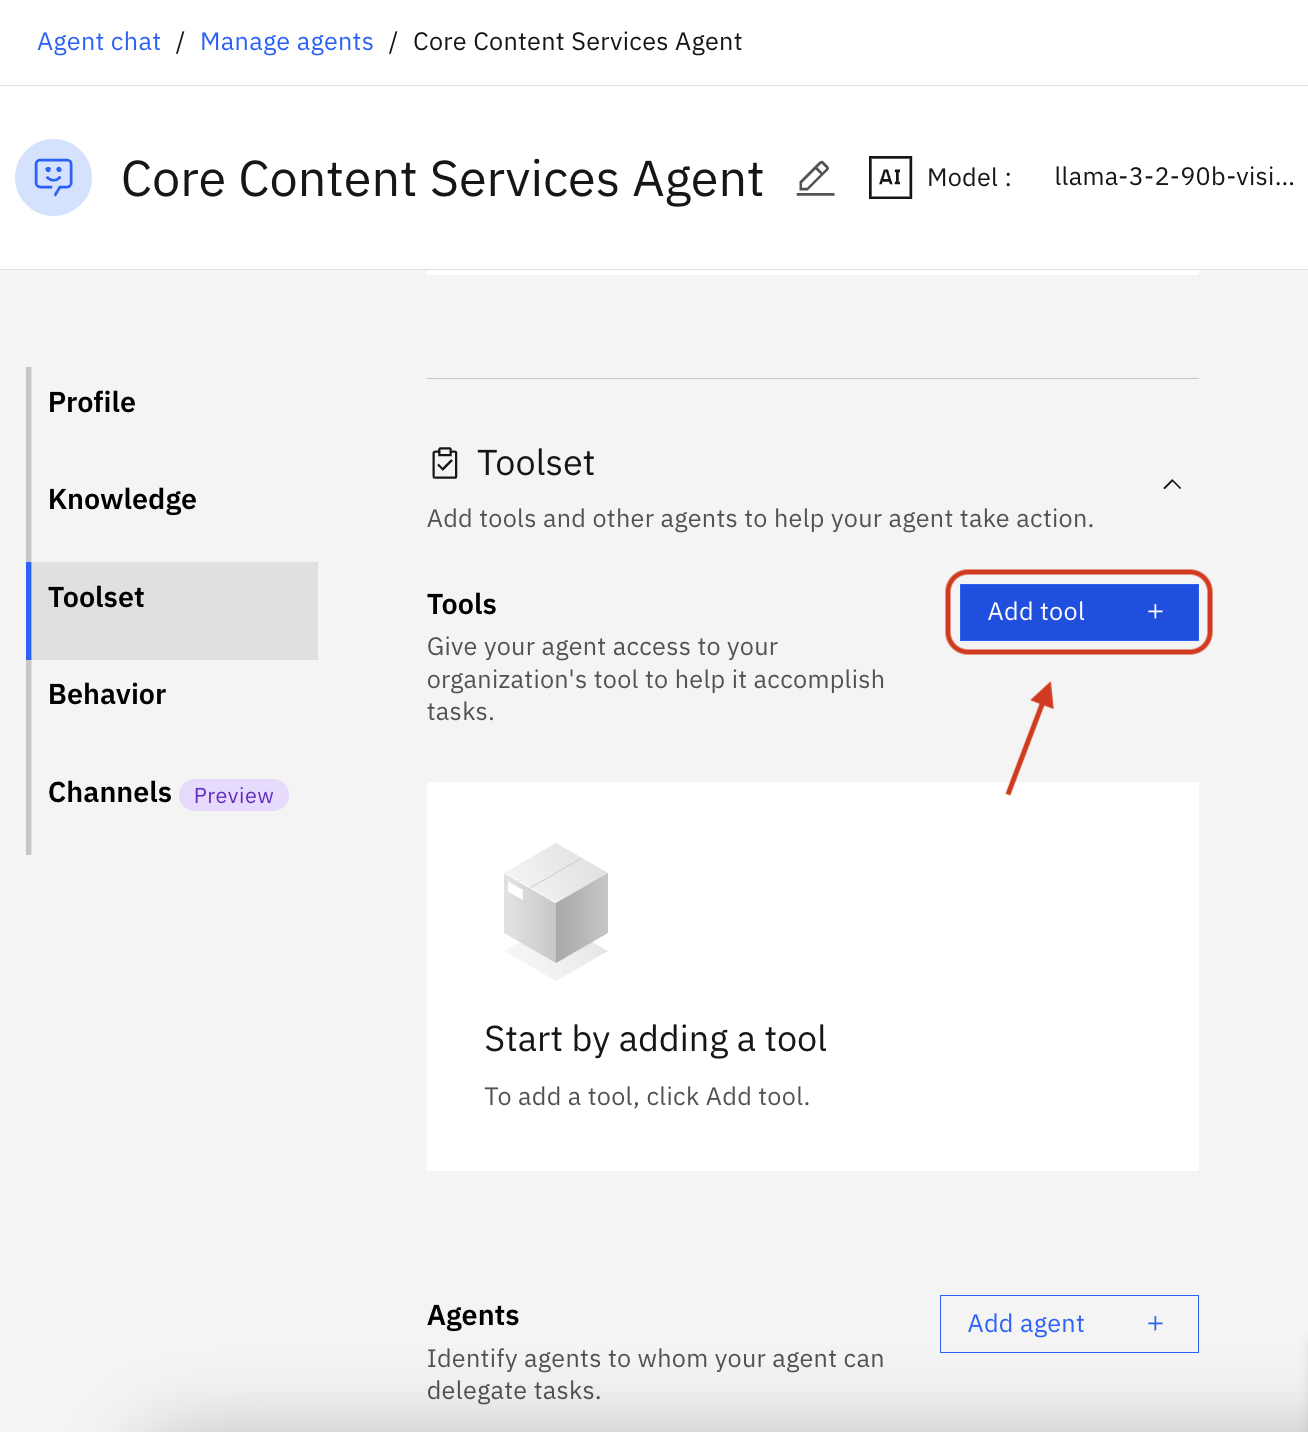
3. Augment the agent with the Core Content Services MCP Server
Navigate to the Toolset section, click Add tool +
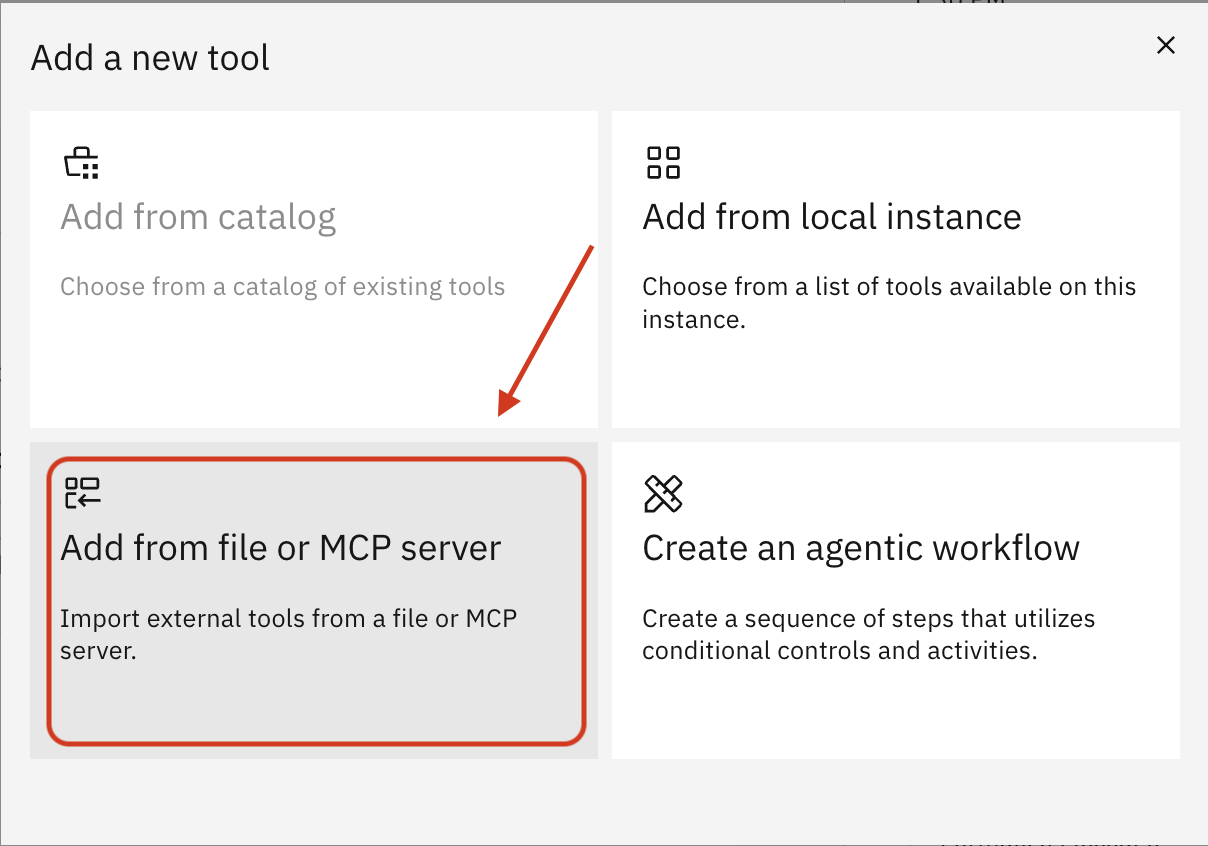
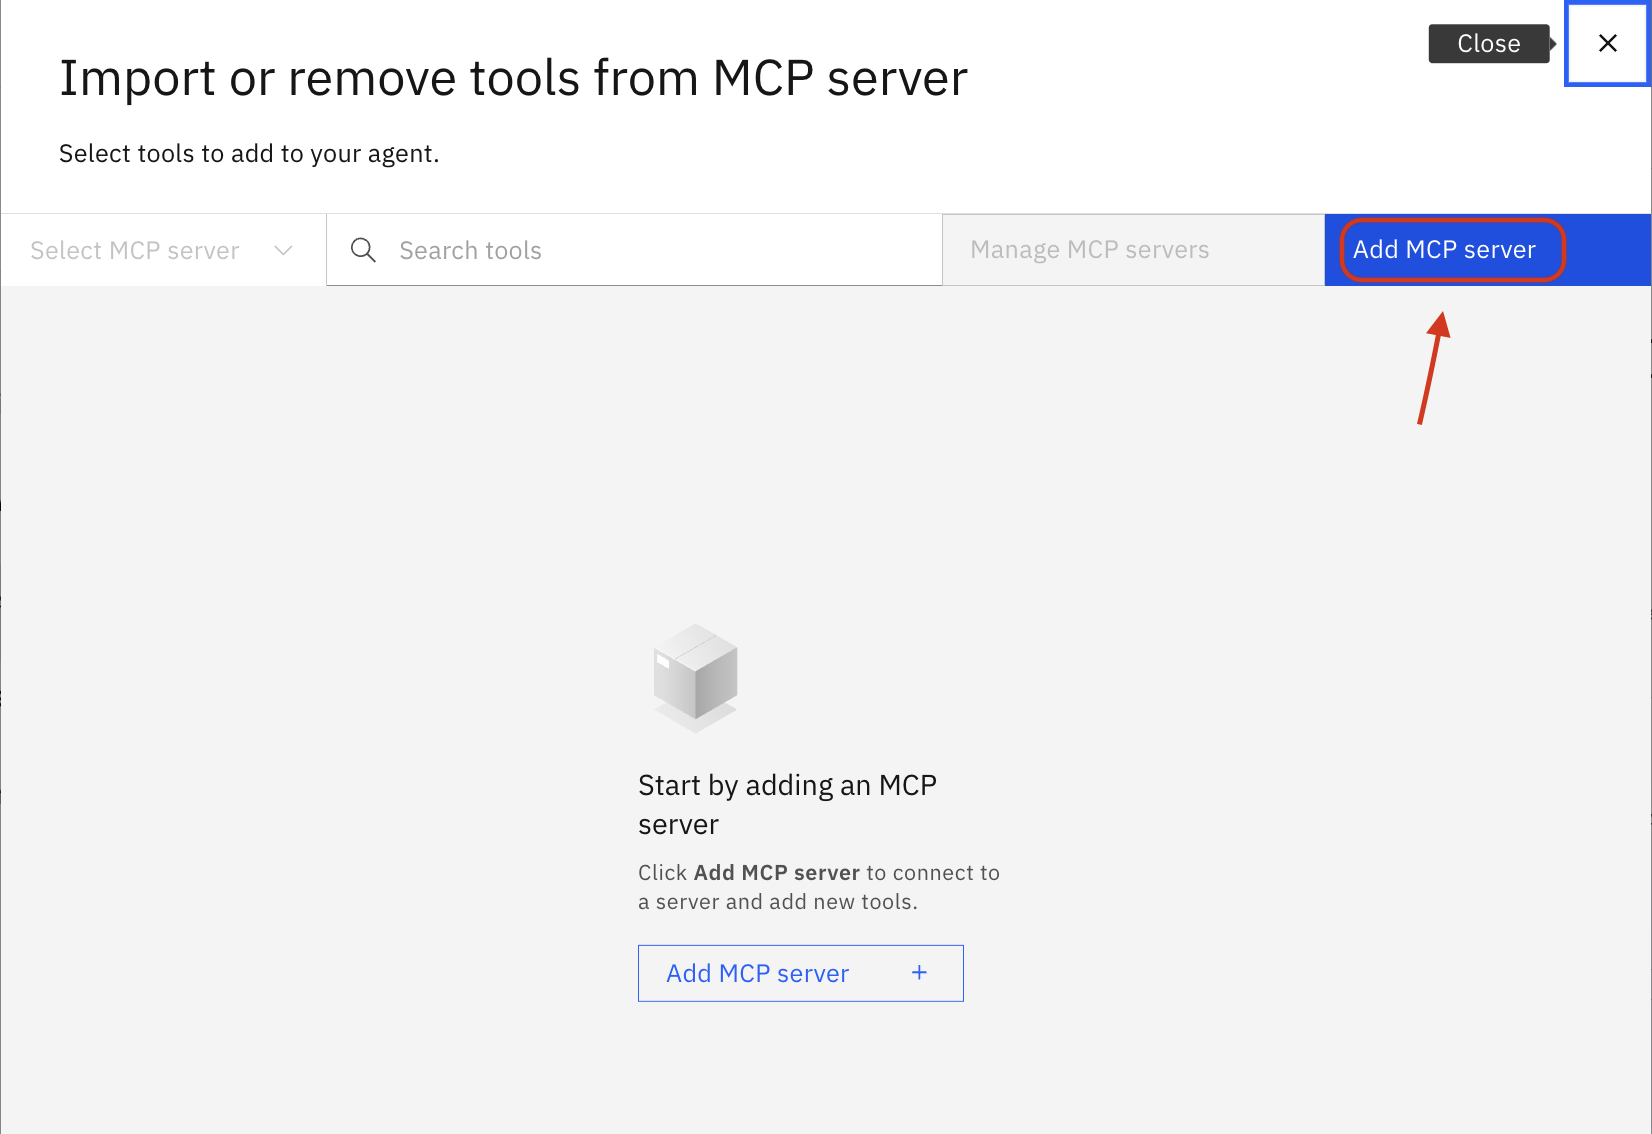
Click Import
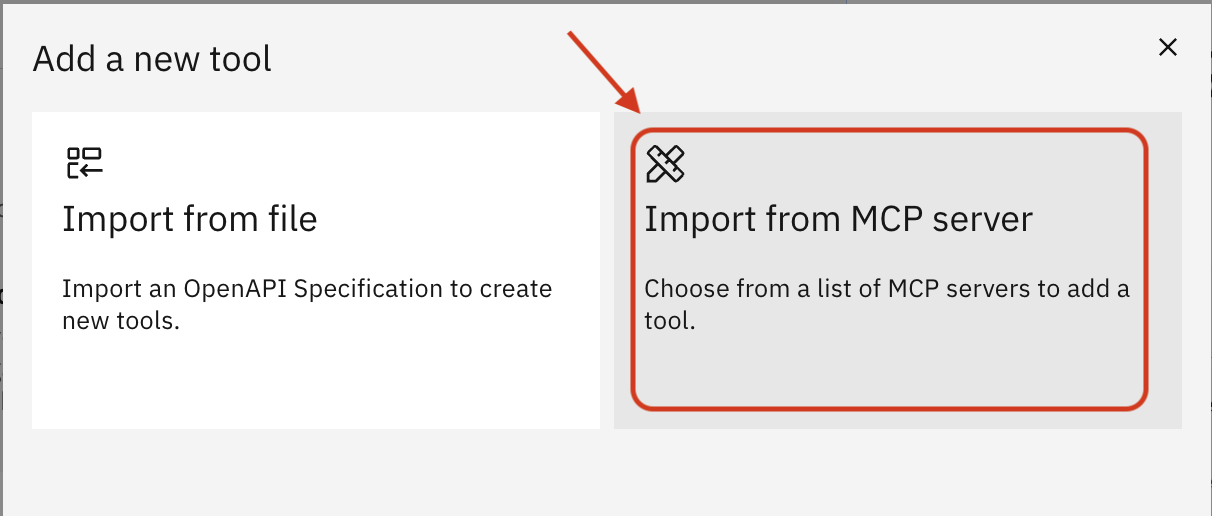
Click Import from MCP server
Click Add MCP server
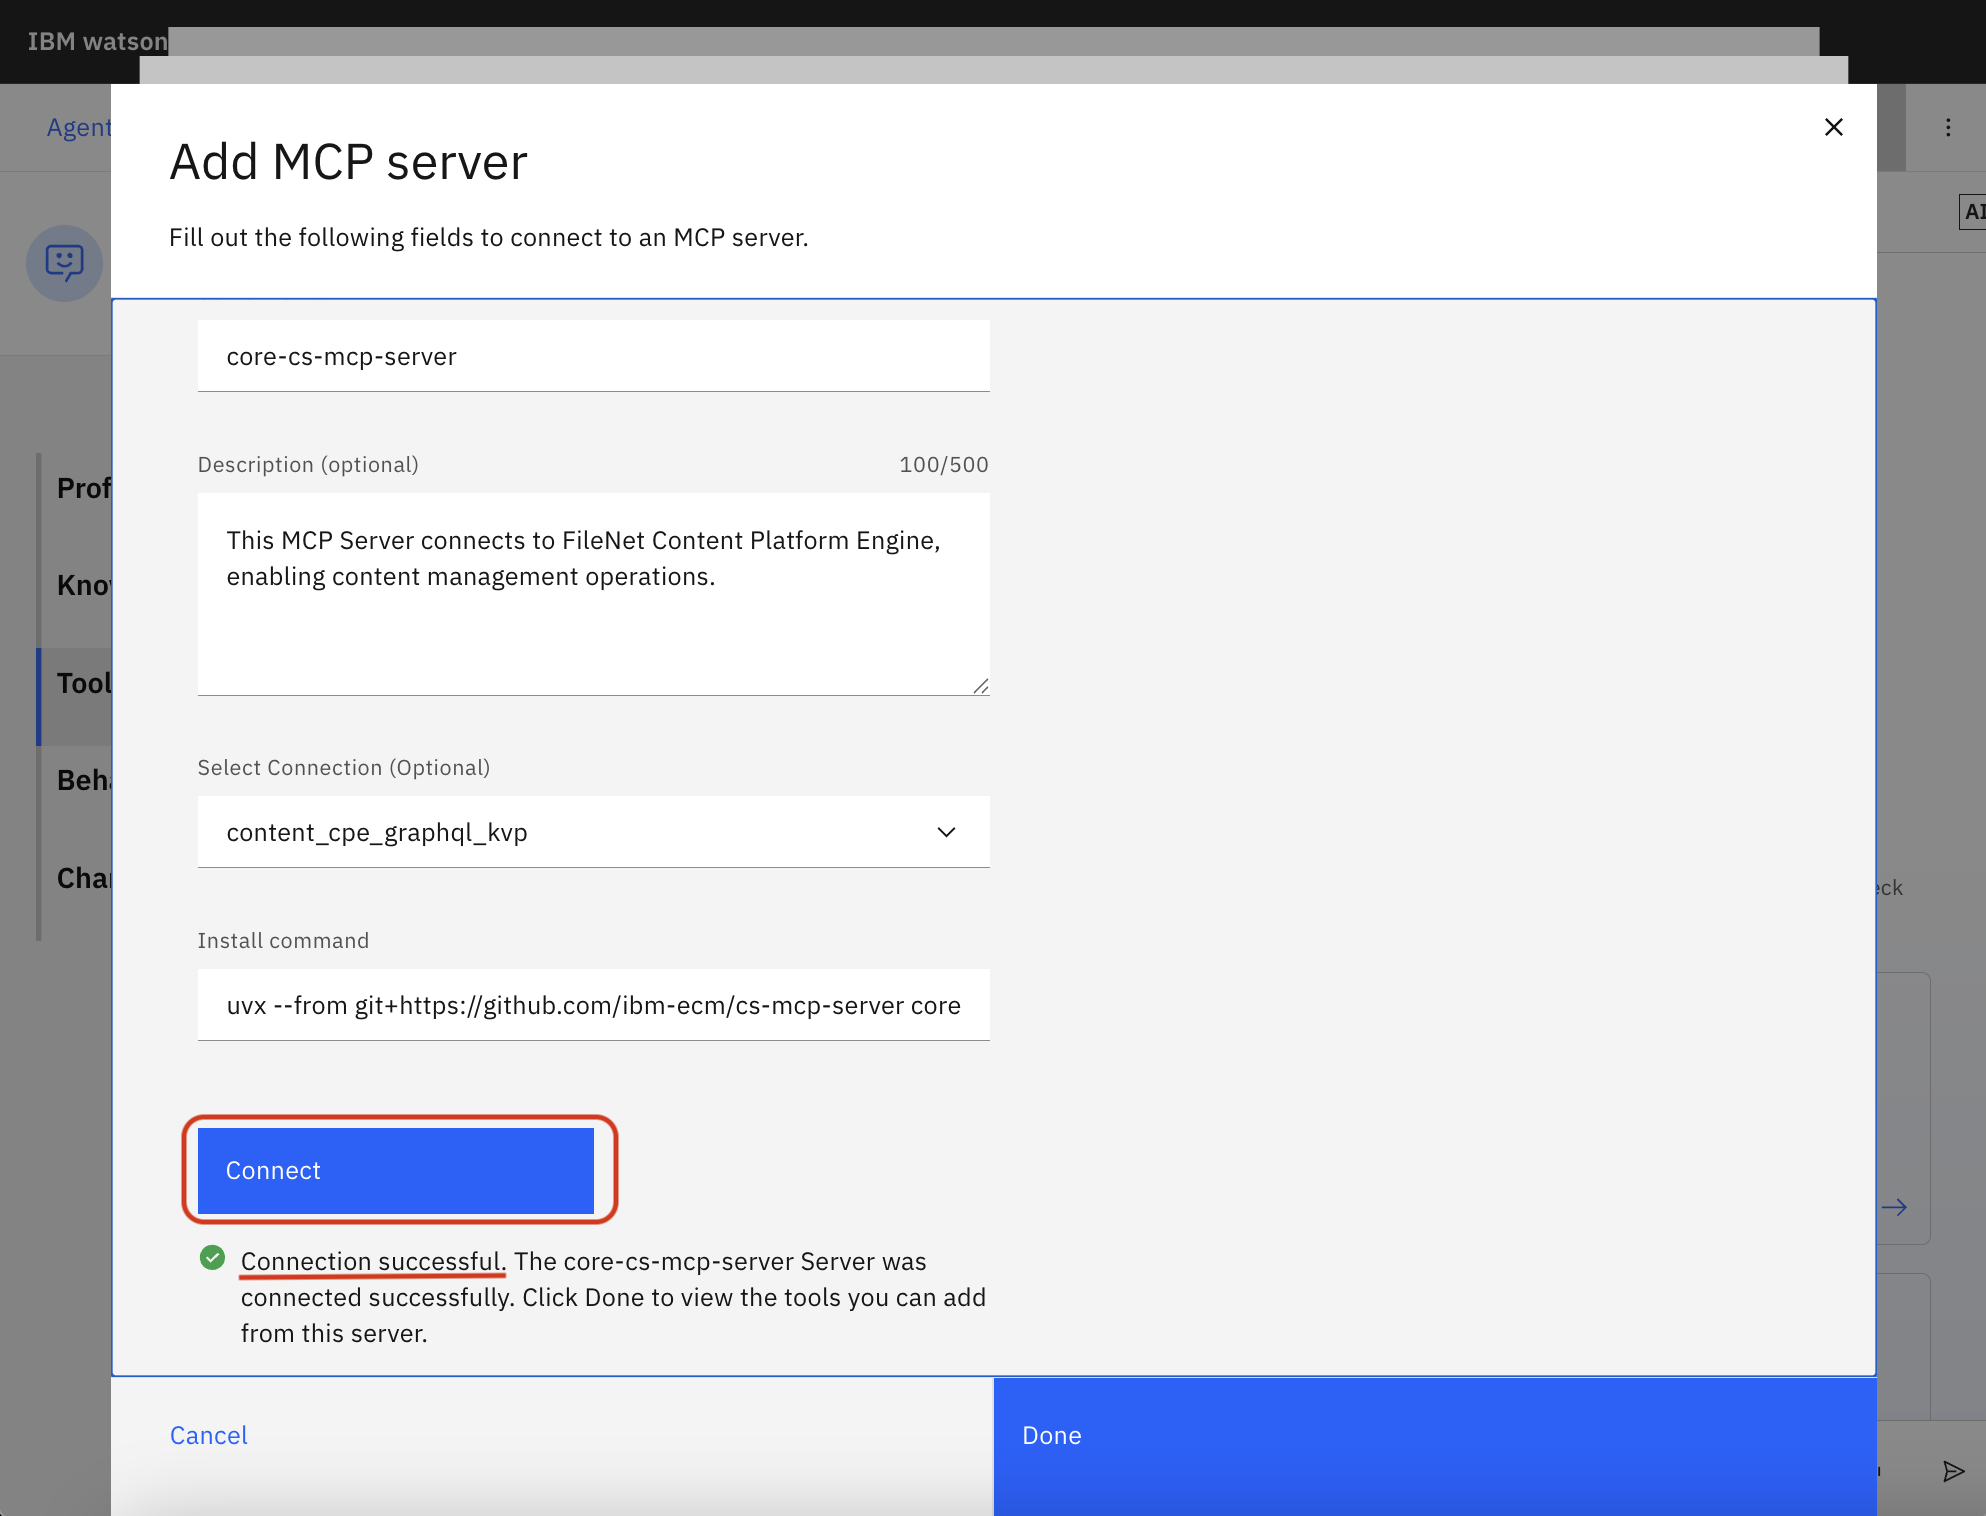
Enter a Server name without any space characters (e.g.,
core-cs-mcp-server)Optionally enter a Description (e.g.,
This MCP Server connects to FileNet Content Platform Engine, enabling content management operations.)Enter an Install command:
uvx --from git+https://github.com/ibm-ecm/ibm-content-services-mcp-server core-cs-mcp-serverFor other servers, use these install commands:
Property Extraction and Classification Server:
uvx --from git+https://github.com/ibm-ecm/ibm-content-services-mcp-server property-extraction-and-classification-cs-mcp-serverLegal Hold Server:
uvx --from git+https://github.com/ibm-ecm/ibm-content-services-mcp-server legal-hold-cs-mcp-server
Click Connect
If you see "Connection successful", click Done
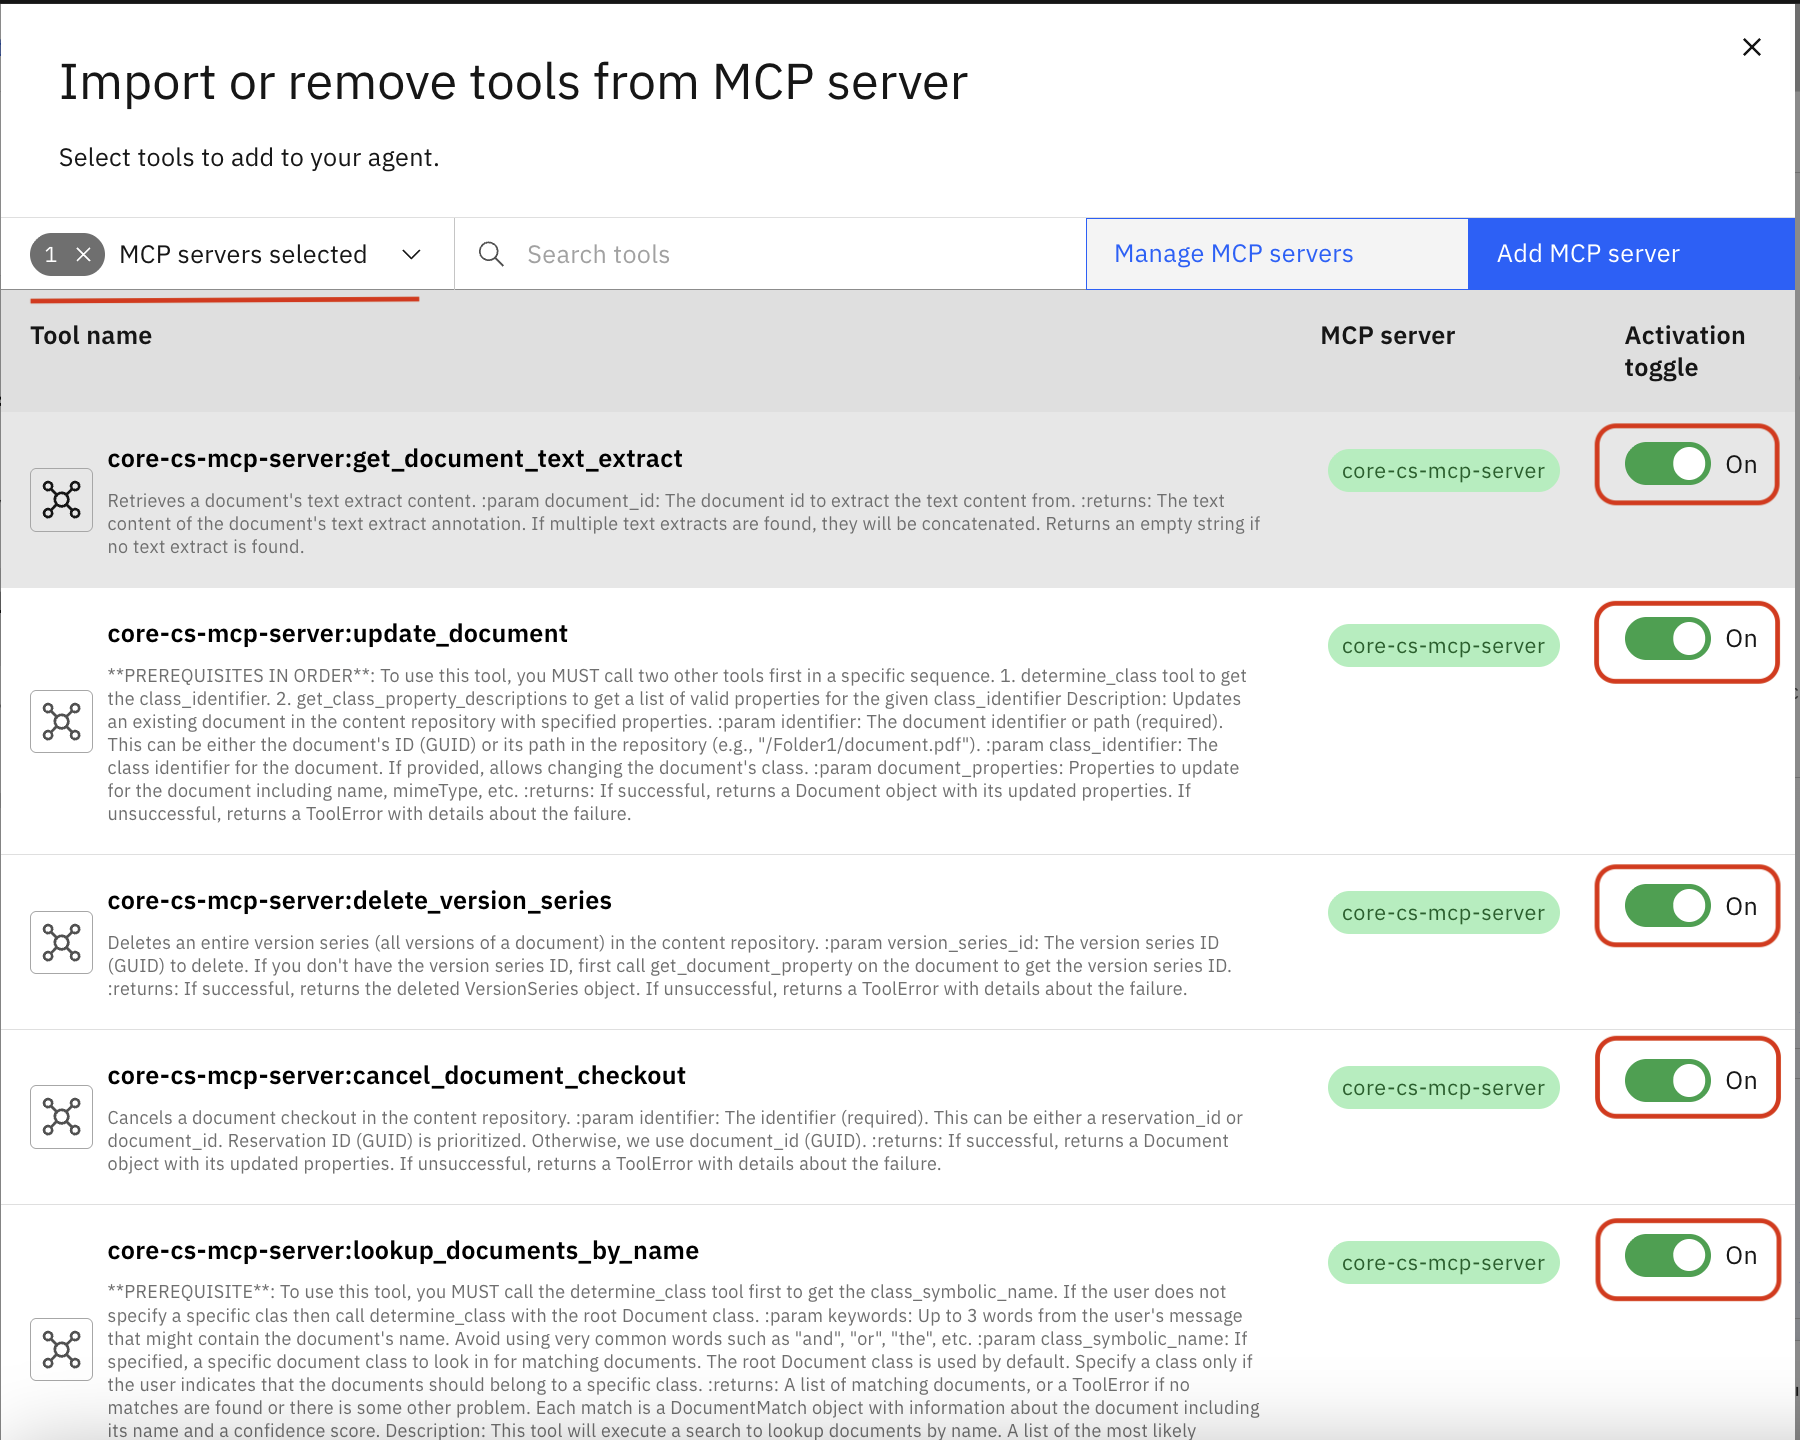
Set the Activation toggle to On for the tools you want to enable
Associate your previously created connection with this agent
4. Deploy the agent
Click Deploy
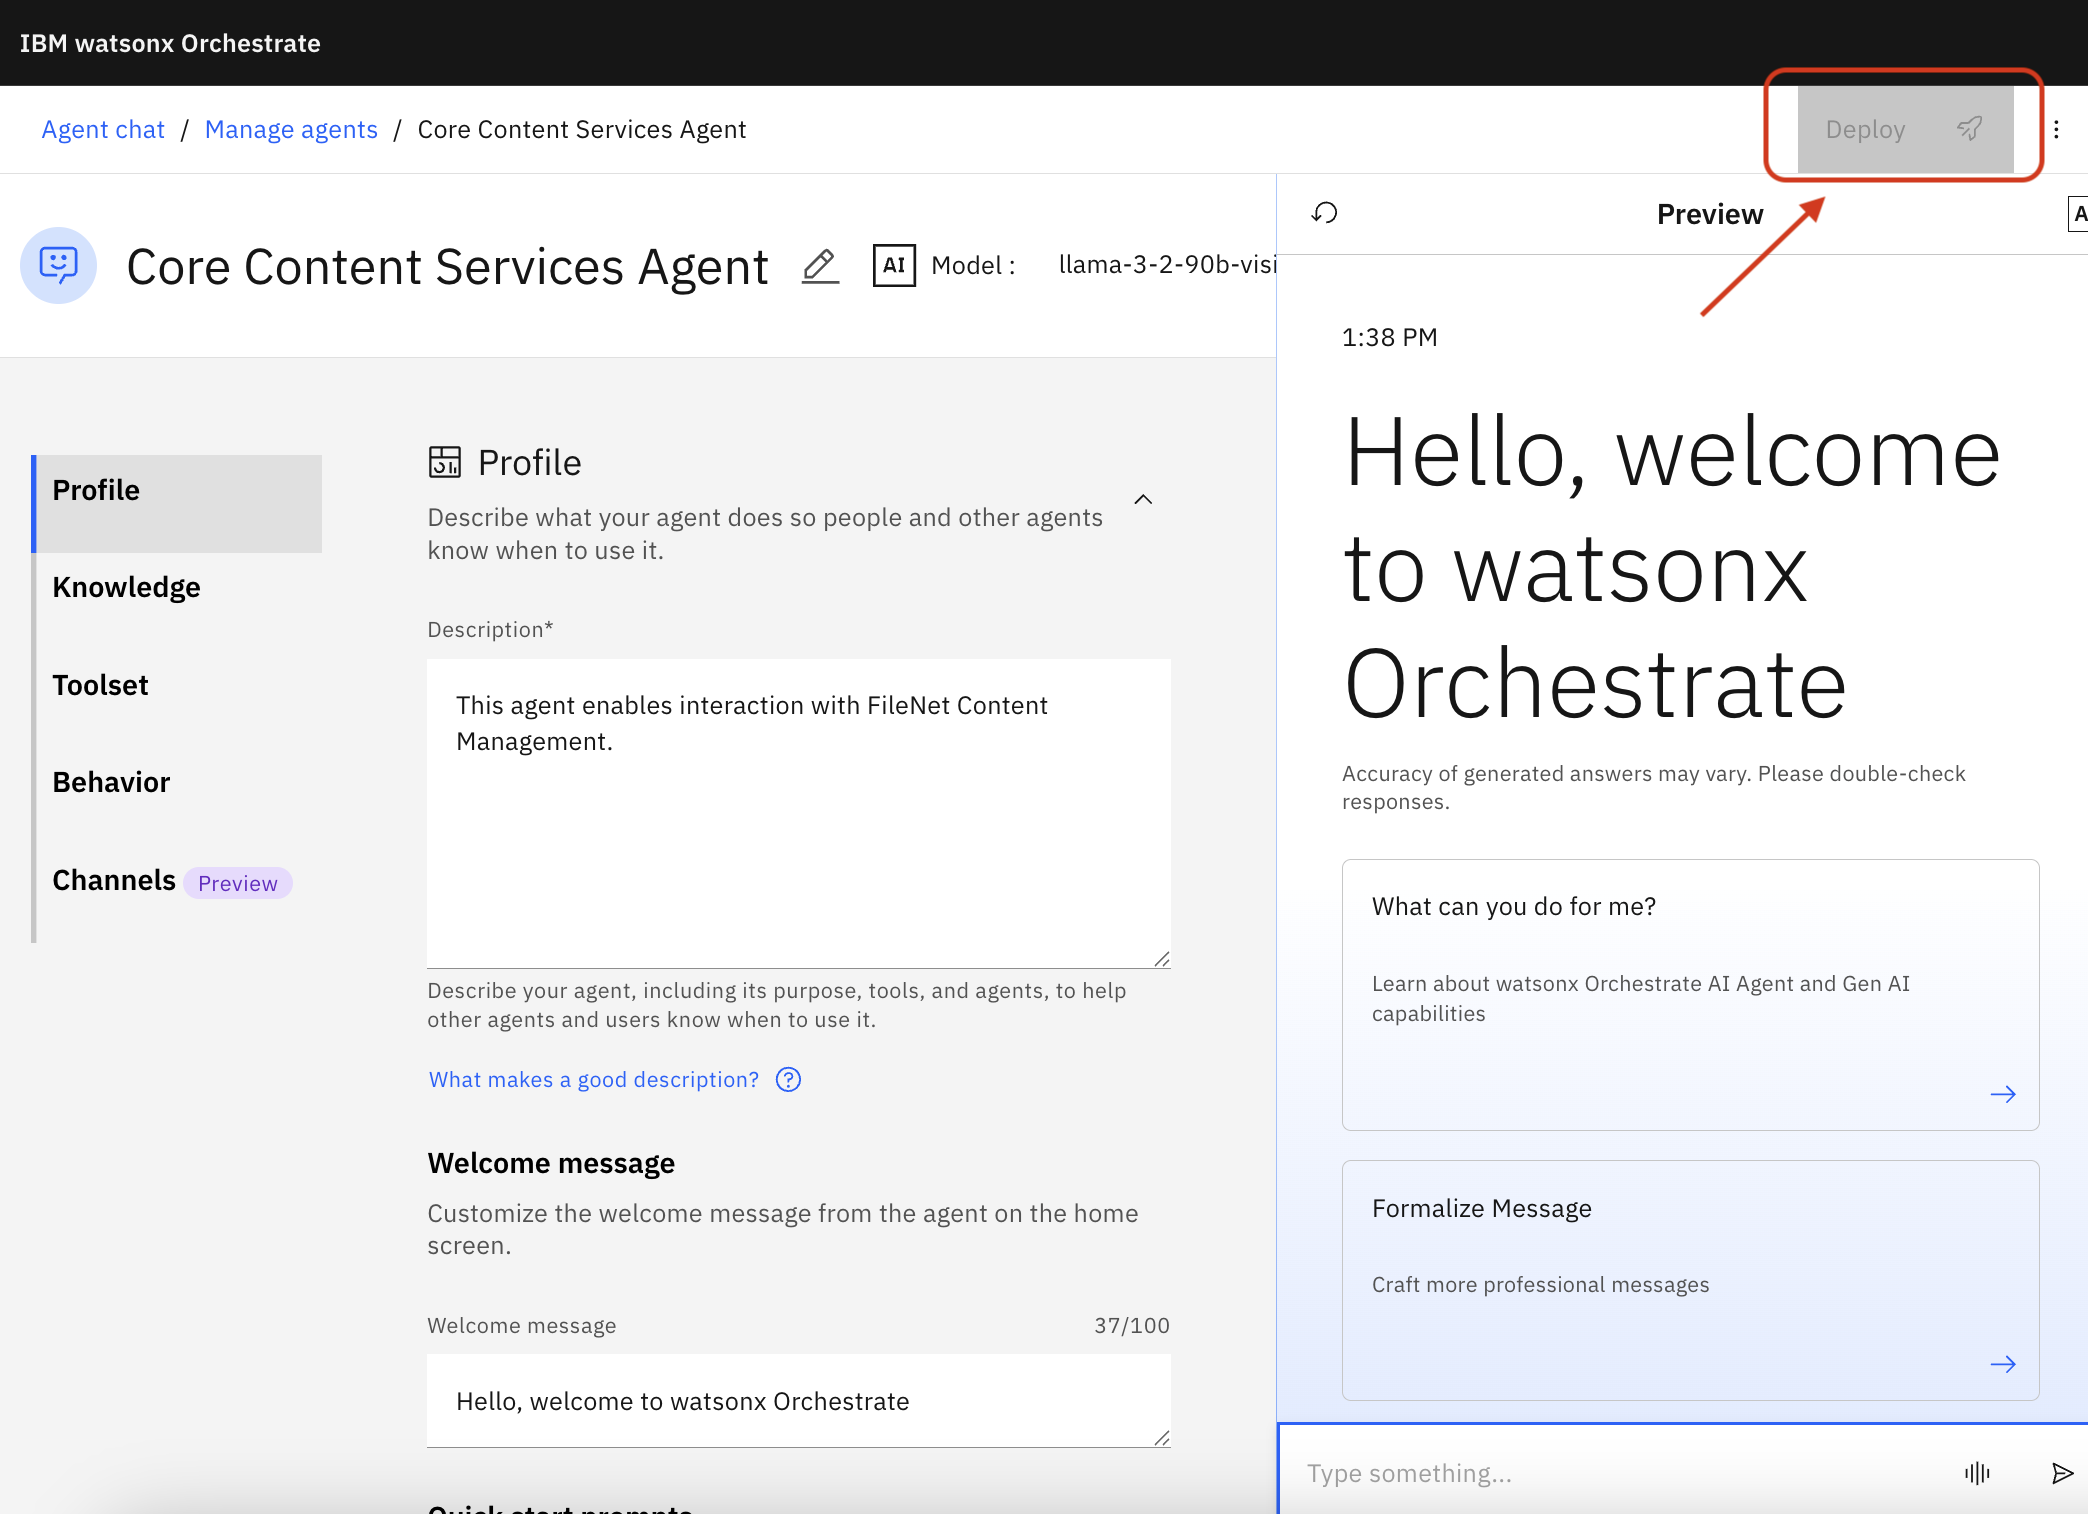
In the popup, Click Deploy again
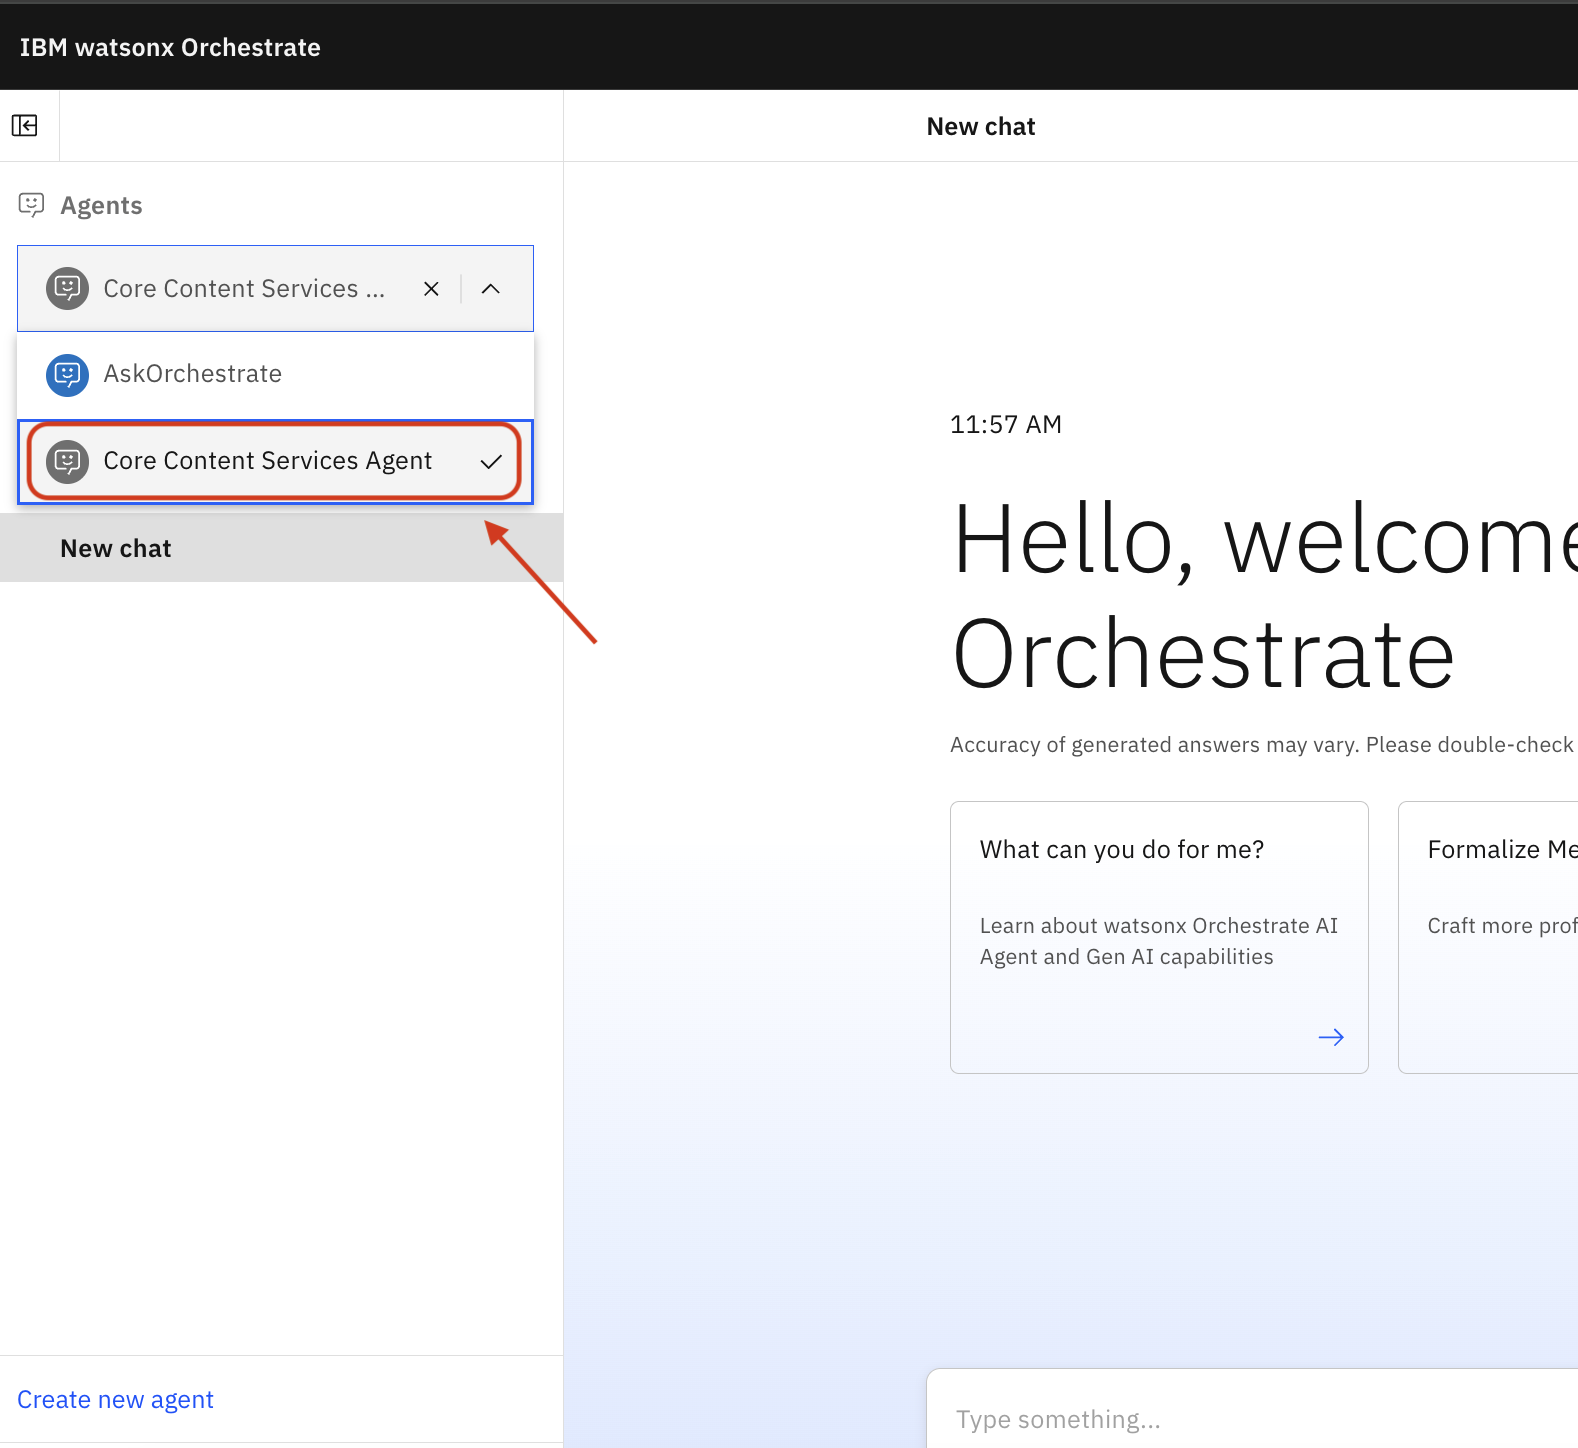
5. Let the agent be used in chats
Click the main menu icon
Navigate to Chat
Click the newly created agent
Example Workflow
Once configured, you can interact with your FileNet repository through natural language in watsonx Orchestrate chats, depending on which tool you've enabled. For example:
"Find all documents containing the pdf in its document title"
"Create a new folder called Project Z"
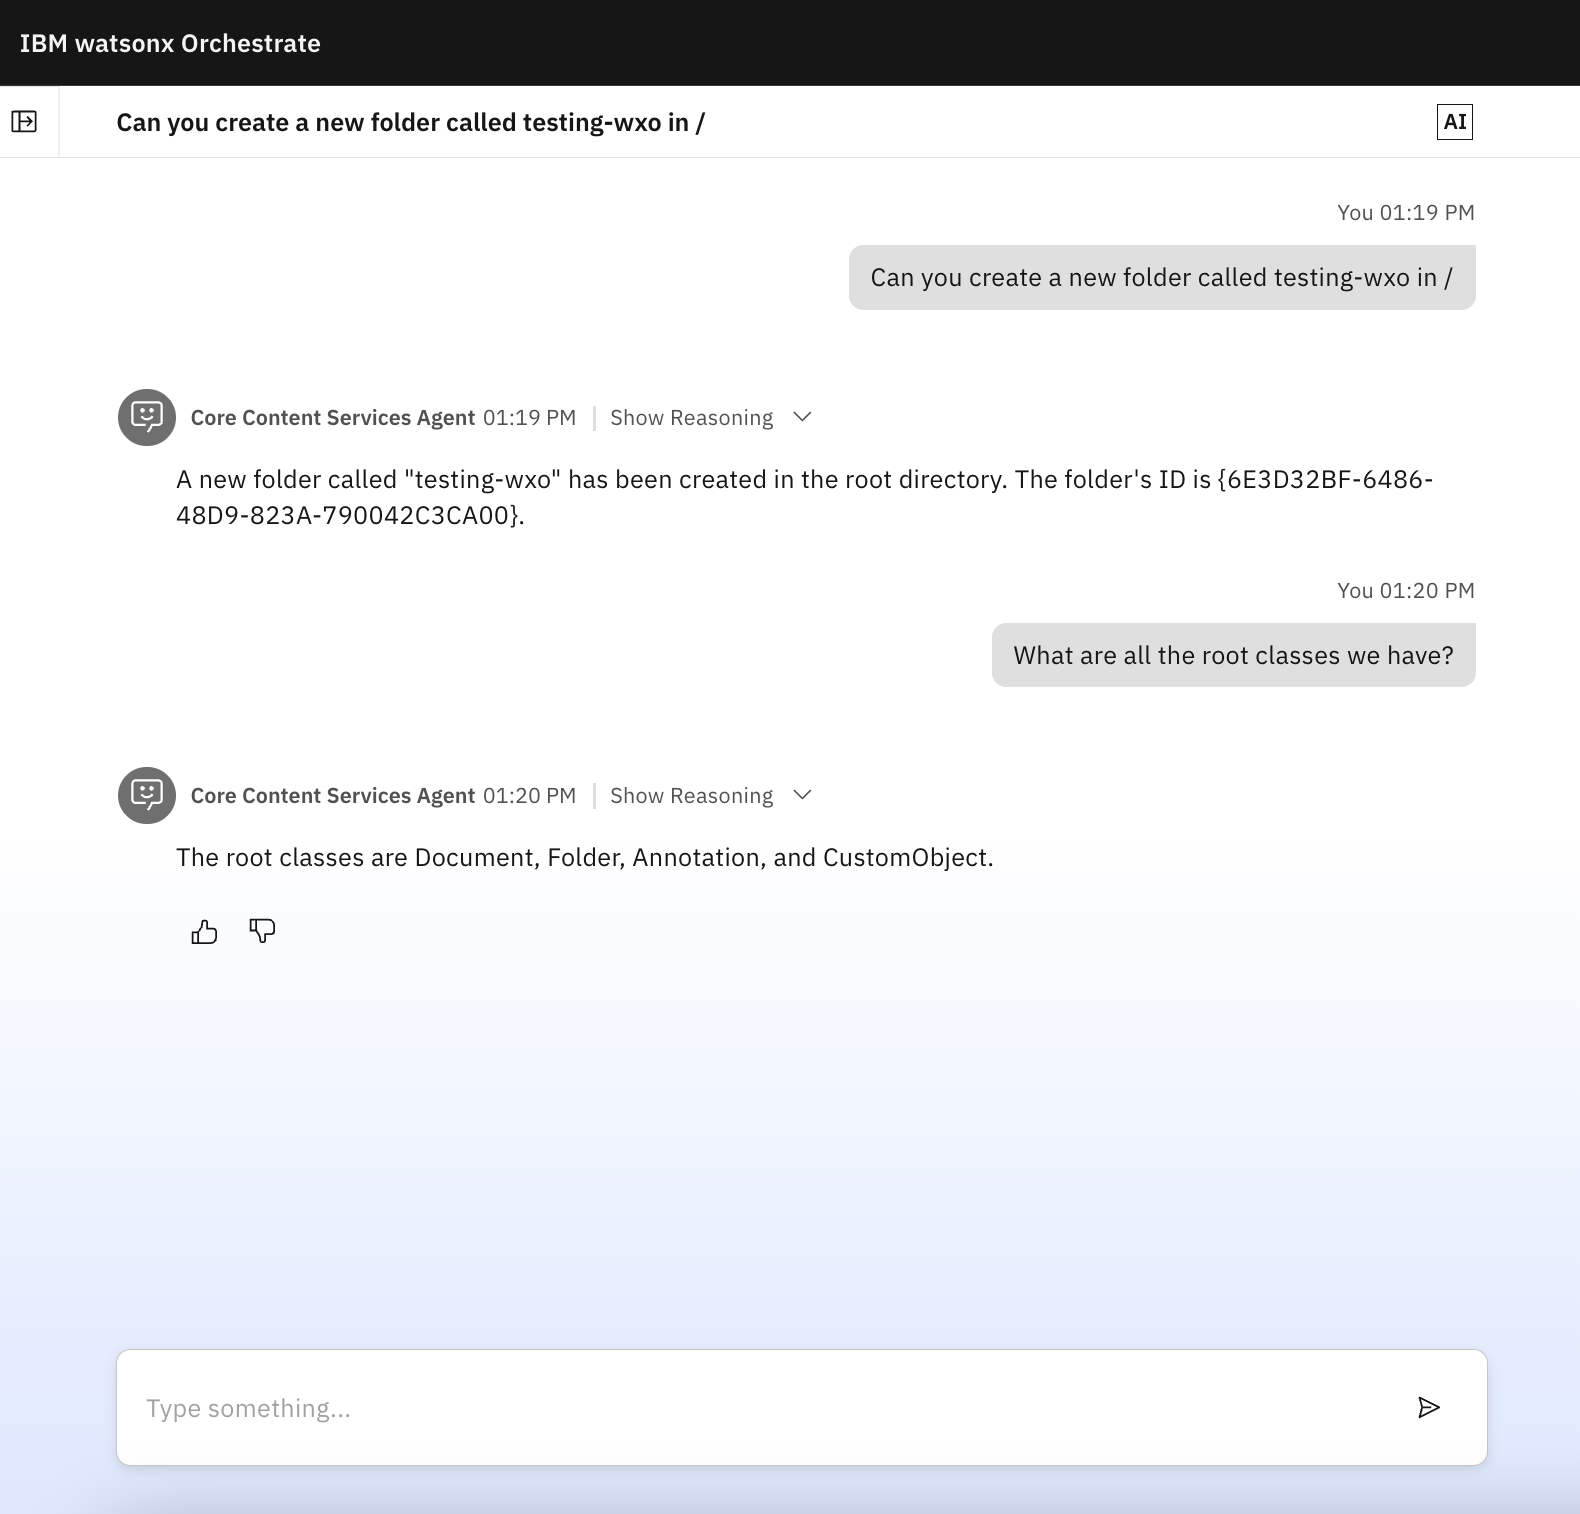
Click Show Reasoning in any response to see the details of the operations performed.

Usage
Running Servers Directly
If you have a local copy of the repository, you can run any server directly with environment variables:
Core Server:
Property Extraction and Classification Server:
Legal Hold Server:
Integration with AI Agents
The Content Services MCP Servers can be integrated with AI Agents that support the MCP protocol. Depending on which server(s) you deploy, the AI Agent can:
Core Server capabilities:
Access and retrieve document properties
Extract text from documents
Create, update, check-in, and check-out documents
Manage folders and document classifications
Execute searches
Get document annotations
Access resources for LLM context
Property Extraction and Classification Server capabilities:
Extract property values from document content using AI
List and match document classes for reclassification
Legal Hold Server capabilities:
Create and manage legal holds
Place objects under hold
Track and query held objects
Example Workflows
Core Server Workflow: Search and Document Management
Search and Discovery:
Users typically start with descriptive information (name, content, keywords) rather than IDs
The AI Agent first uses search tools to locate relevant objects:
get_searchable_property_descriptionsto discover valid search propertiesrepository_object_searchfor property-based searches
Search results include object IDs needed for subsequent operations
Document Retrieval:
Once an object ID is obtained through search, the AI Agent can retrieve:
Document properties using the ID
Version history
Text content (requires Persistent Text Extract Add-on to be installed)
Annotations
Document Creation: Users can ask the AI Agent to create new documents with specific properties and content.
Document Update:
After identifying a document through search, the AI Agent can:
Check out the document using its ID
Update properties or content
Check the document back in
Folder Operations:
Folders can be identified by path or by ID from search results
Documents can be filed/unfiled using both document and folder IDs
Property Extraction and Classification Workflow
Requires: Core Server (for document updates)
Property Extraction:
Use
property_extractiontool with a document IDThe tool returns:
Document class information
All available properties for that class (excluding system/hidden properties)
Document text content
AI analyzes the text and extracts appropriate property values
Use Core Server's
update_document_propertiesto save the extracted values
Document Classification:
Use
list_all_classesto get all available document classesAI analyzes document content and matches it to the most appropriate class
Use Core Server's
update_document_classto reclassify the document
Legal Hold Workflow
Creating a Hold:
Use
create_holdwith a descriptive name (e.g., "Litigation ABC vs XYZ")Returns the hold object with its ID
Placing Objects Under Hold:
Identify documents using Core Server search tools (if needed)
Use
add_object_to_holdwith the hold ID and object IDRepeat for all relevant documents/objects
Managing Holds:
Use
get_holds_by_nameto find holds by nameUse
get_held_objects_for_holdto see all objects under a specific holdUse
delete_object_from_holdto release specific objectsUse
delete_holdto remove the hold entirely (releases all objects)
Note: Most operations that modify or access specific objects require an object ID, which is typically obtained through a search operation first. This workflow pattern ensures users can work with objects by their meaningful attributes rather than requiring them to know technical identifiers upfront.
License
See the LICENSE file for details.